


Newborn Photography Editing: How to Retouch Baby Photos
July 13, 2026
Best AI Upscaler 2026: 10 Photo Enhancers Compared
July 14, 2026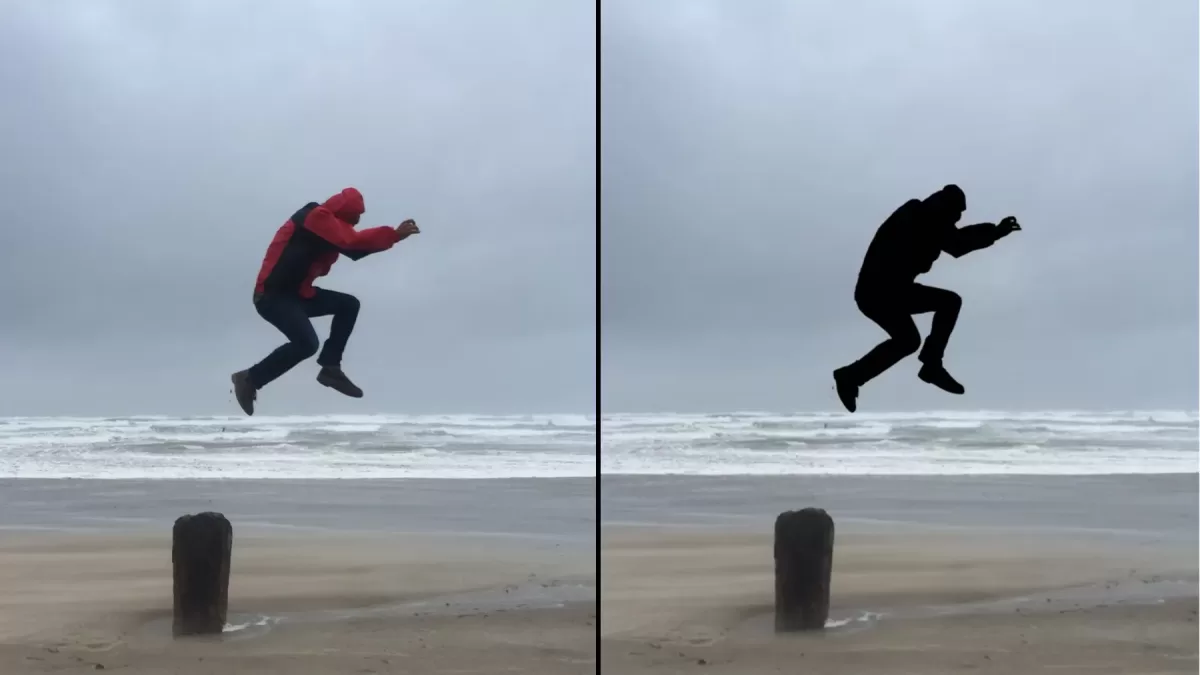
Turning a regular photograph into a striking, jet-black silhouette is one of the most satisfying photo projects you can finish in an afternoon. Maybe you want a nursery keepsake of your toddler’s profile, a moody sunset print for your living room, or clean silhouette graphics for a logo. Whatever the goal, the process comes down to three ideas: strong shape, high contrast, and a clean cutout. This guide walks you through every practical route — smartphone apps, Canva, Photoshop, Lightroom, and free web tools — along with lighting tricks the pros lean on when they want a gallery-grade look.
Silhouettes carry a surprisingly rich history. The art form takes its name from Étienne de Silhouette, an 18th-century French finance minister famous for cost-cutting, which is exactly why paper-cut profile portraits — cheap, quick, and accurate — inherited his name. According to the Smithsonian American Art Museum, silhouettes flourished in America across the 18th and 19th centuries because they were accurate, inexpensive, quick to make, and easy to mail as heirlooms and gifts. Today, the same silhouettes get made in seconds on a phone.
Ready to skip the software wrestling? Let our editors turn your photo into a crisp, print-ready silhouette overnight — try our image masking service and see the difference clean edges make.
- What Exactly Is a Silhouette Photo?
- Take the Right Photo First (This Matters More Than the Software)
- Method 1: Turn a Photo Into a Silhouette on Your Phone (Free, Beginner-Friendly)
- Method 2: How to Make a Silhouette in Canva (The Fastest Desktop Method)
- Method 3: Convert a Photo to Silhouette in Photoshop (The Professional Way)
- Method 4: Turn a Photo Into a Silhouette in Lightroom (Great for Landscape Photographers)
- Method 5: Free Online Silhouette Tools (No Software Install)
- Method 6: The Old-School Craft Method (Paper, Scissors, Glue)
- Silhouette Photography Tips the Pros Actually Use
- Printing and Framing Your Finished Silhouette
- Advanced Silhouette Styles Worth Trying
- Common Silhouette Mistakes to Avoid
- Silhouette Ideas Beyond Portraits
- A Quick Note on the Word “Silhouette”
- Frequently Asked Questions
- Final Thoughts
What Exactly Is a Silhouette Photo?
A silhouette is a solid-shape rendering of a subject — usually pure black — set against a lighter background. It removes color, texture, and inner detail, leaving only the outline. Two very different techniques create the same effect:
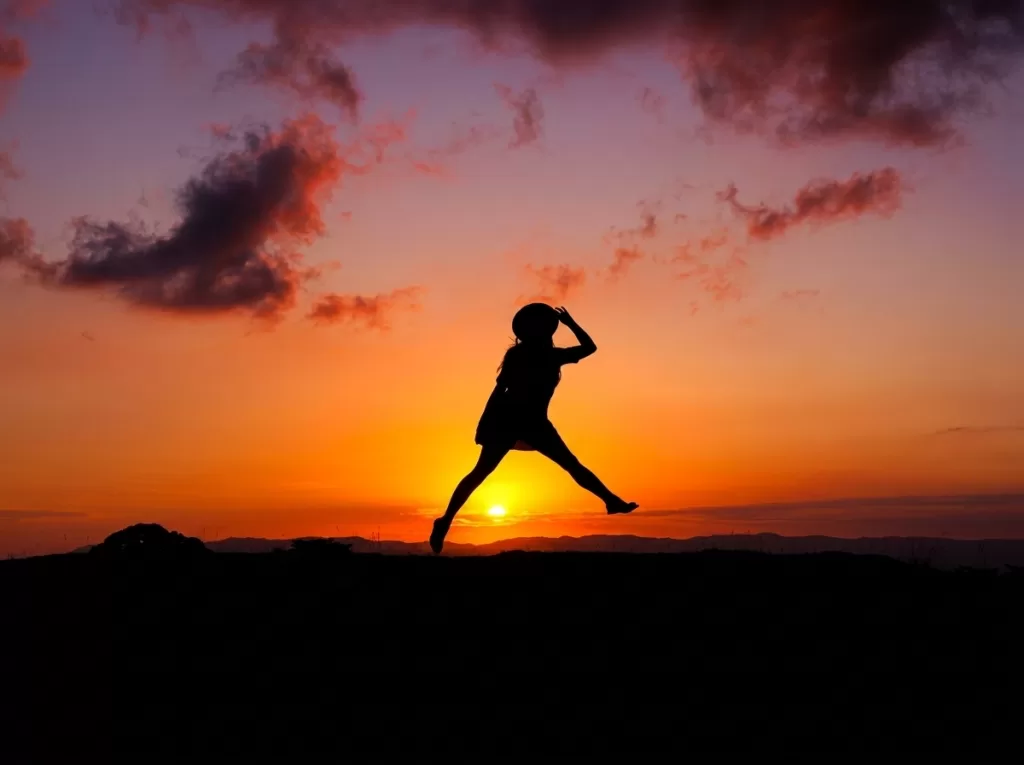
- In-camera silhouettes — you photograph a subject against a bright light source (sky, window, sunset) and expose for the background so the subject goes dark.
- Edited silhouettes — you start with an ordinary photo and use software to remove the background, then fill the subject with a single flat color.
Both approaches share the same visual DNA: a sharp shape, no interior detail, and enough negative space around the subject to let the outline breathe. Silhouettes work because they distill a portrait to its most recognizable feature — the outline of the face, the curve of a shoulder, or the tilt of a hat.
Why Silhouettes Still Work in 2026
Even in an AI-image era, silhouettes stay in demand because they:
- Look timeless in nursery decor, wedding invites, and family galleries.
- Translate cleanly to vinyl decals, laser cutting, and Cricut or Silhouette Cameo projects.
- Compress beautifully as SVG or PNG for web graphics and logos.
- Solve a common photo problem — messy backgrounds, harsh lighting, or distracting clothing.
- Read equally well at business-card size or wall-mural size.
Take the Right Photo First (This Matters More Than the Software)
The single biggest predictor of a beautiful silhouette is the source photo. Fix the input, and every method below becomes easier. Follow these shooting rules, and you’ll save hours of edge cleanup later.
The Perfect Profile Shot for a Classic Silhouette Portrait
For traditional keepsake silhouettes — the kind that end up framed above a fireplace — you want a clean side profile from the shoulders up. Clothing and makeup barely matter, since only the outline will survive editing. Focus instead on posture, lighting, and background clarity.
Practical setup tips:
- Face the light. Ask your subject to stand near a large window so soft natural light hits the cheek and eyelashes.
- Use a plain wall. A white or light-gray wall behind the subject helps every background-removal tool find the edges.
- Keep the head neutral. Position the chin parallel to the floor, relax the mouth, and pull hair back for cleaner edges (or leave it loose for personality).
- Shoot at eye level. Kneel down for kids so the profile doesn’t distort from a high angle.
- Fill the frame. Get close enough that the head and shoulders take up most of the frame, leaving small margins.
If you’re photographing children, place them in the same spot each time, facing the same direction, on a bright wall near a window. That consistency produces sharper eyelash and hairline details — the same fine details that give a silhouette its character.
Shooting an In-Camera Silhouette Outdoors
For dramatic, cinematic silhouettes — sunsets, doorways, mountain ridges — you’re using light, not software, to darken the subject. Digital Photography School explains that golden hour offers an easy backlight window because the low sun sits directly behind your subject.
- Shoot during golden hour. The 30-minute window before sunset gives you a warm, blown-out sky and easy backlight.
- Position the sun behind the subject. Your subject should block the light source completely or partially.
- Expose for the sky. On a phone, tap the brightest part of the sky and drag the exposure slider down. On a camera, use spot metering on the background.
- Turn off the flash. Any front light will kill the silhouette effect instantly.
- Look for clean gaps. Space between arms, legs, and props reads far better than a solid blob.
- Shoot in RAW when possible. RAW preserves the sky’s color gradient during editing.
Not sure your gear is up to it? A modern mirrorless camera — or even a current smartphone — handles backlight beautifully. Technique matters far more than megapixels.
Method 1: Turn a Photo Into a Silhouette on Your Phone (Free, Beginner-Friendly)
Smartphones handle silhouettes surprisingly well in 2026 thanks to on-device AI cutouts. The two easiest phone routes involve the built-in Photos apps plus free apps like YouCam Perfect or Photoshop Express.
iPhone Method (Photos App + Markup)
- Open the profile photo in the Photos app.
- Tap Edit, push Exposure down, and increase Contrast.
- Long-press the subject to use Apple’s lift subject from background feature (iOS 16 and later).
- Paste the isolated subject onto a white background in Notes, Keynote, or Pages.
- Screenshot the result, open it in Markup, and fill the shape with black using the marker tool.
Android Method
Samsung Gallery, Google Photos, and Xiaomi Gallery all include one-tap background removal. After erasing the background:
- Open the cutout in a free editor like Snapseed.
- Apply Curves → Ultra High Contrast, then push shadows to full black.
- Save as PNG to preserve the transparent edge.
Best Silhouette-Maker Apps for Mobile
- YouCam Perfect — one-tap “Silhouette” filter with fine-tuning brushes.
- Photo Silhouette Maker — creates silhouettes of people, pets, trees, and everyday objects with adjustable thresholds.
- Adobe Photoshop Express — free background removal plus solid-color fill.
- PicsArt — layered effects and text overlays for social posts.
- Canva mobile — a full duotone workflow that runs on iOS and Android.
If you’re comparing editing apps in general, our roundup of the best photo editing apps covers strengths well beyond silhouettes alone.
Want frame-worthy edges without doing them yourself? Our team offers precise, hand-done background removal so your silhouette prints cleanly at any size — even wall-scale.
Method 2: How to Make a Silhouette in Canva (The Fastest Desktop Method)
Canva has quietly become the go-to tool for DIY silhouette portraits, largely because its Background Remover and Duotone filter turn a two-hour Photoshop job into a five-minute click session. The Background Remover currently requires Canva Pro, but a free trial covers most one-off projects.
Step-by-Step Canva Workflow
- Create a new design. Choose a custom size that matches your print — 8×10 in, 11×14 in, or the ratio that fits your 8×10 photo frame.
- Upload your profile photo. Drag it onto the canvas and stretch it to fill the frame.
- Remove the background. Select the photo, then click Edit image → BG Remover. Canva isolates the subject in a few seconds.
- Refine the edges. Use the Erase and Restore brushes to clean up stray hair or missed edge pixels.
- Apply the Duotone effect. Under Edit image, open Duotone → Custom. Set both Highlights and Shadows to pure black (#000000).
- Add a background. Click a blank spot on the canvas and choose white (#FFFFFF) or a soft cream for a vintage feel.
- Download as PNG. Pick the highest quality setting — this matters enormously for printing.
Optional Canva Touches That Look Premium
- Add the child’s name and birthdate in a serif font like Playfair or Cormorant.
- Duplicate the design for siblings so they read as a matched set.
- Export as SVG (Canva Pro) if you plan to cut vinyl on a Cricut or Silhouette Cameo.
- Overlay a subtle paper-texture rectangle behind the silhouette to mimic vintage cardstock.
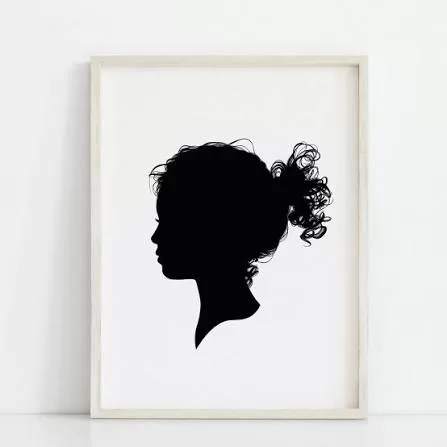
Method 3: Convert a Photo to Silhouette in Photoshop (The Professional Way)
Adobe Photoshop still offers the most control over edges, hair, and complex subjects like pets or lace details. Here’s the reliable workflow used by product retouchers and professional printmakers.
The Photoshop Silhouette Workflow
- Open the photo and duplicate the background layer (Cmd/Ctrl + J).
- Select the subject using Select → Subject (AI-powered) or the Object Selection Tool for tricky edges.
- Refine the selection in Select and Mask. Use the Refine Edge Brush along the hairline and boost Smart Radius to roughly 2–4 px.
- Add a layer mask to isolate the subject on transparency.
- Create a Solid Color fill layer above the masked subject. Set it to black (#000000).
- Clip the fill layer to the masked subject (Alt + click between layers). The subject becomes a jet-black silhouette.
- Add a white background layer below.
- Flatten and export as PNG for web or TIFF for print.
For truly gallery-quality edges, learn how to resize an image in Photoshop after masking — resizing before masking can soften hairlines. If you want to add a natural cast shadow underneath your silhouette for depth, our step-by-step guide to realistic shadows shows exactly how.
Handling Difficult Subjects
- Fluffy hair or fur: Use Select and Mask → Refine Hair after the initial selection.
- Glasses, jewelry, or hats: Rebuild these areas manually with a smaller brush after the main mask.
- Multiple people: Mask each subject separately, then combine layers so gaps between them stay visible.
- Pets: Zoom to 200% for whiskers, ear tufts, and tail edges — those tiny details define animal silhouettes.
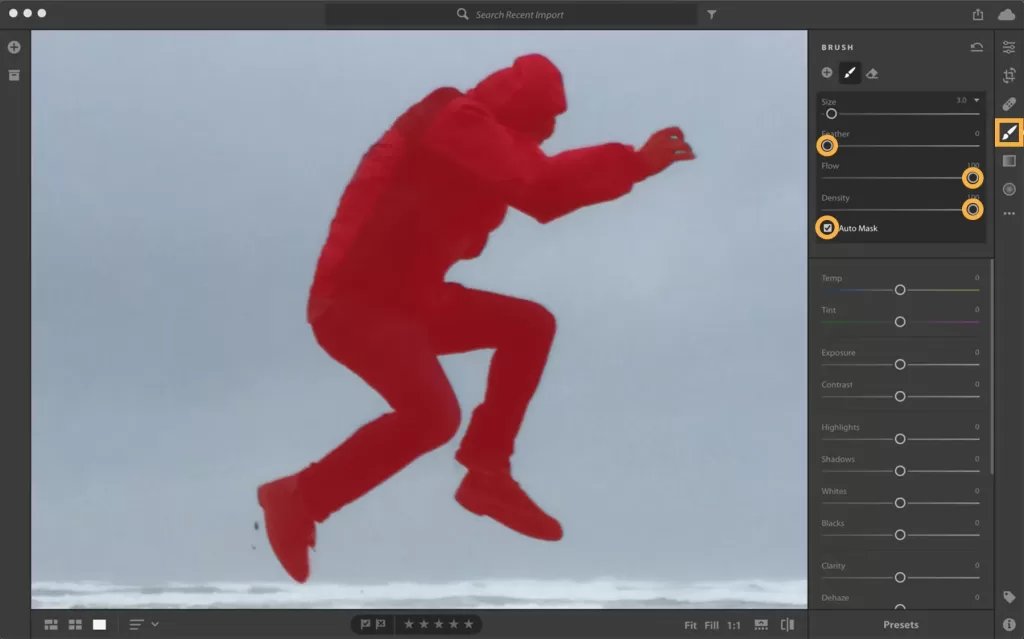
Method 4: Turn a Photo Into a Silhouette in Lightroom (Great for Landscape Photographers)
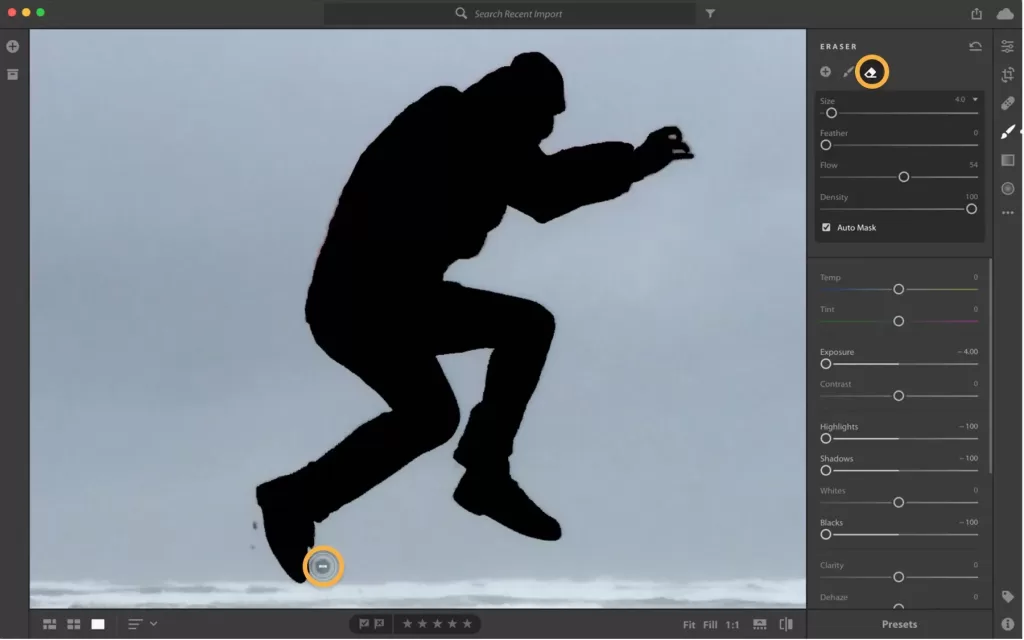
Adobe Lightroom won’t do a full background swap, but its Brush and Auto Mask tools produce beautiful editorial-style silhouettes — perfect when the sky and setting matter as much as the subject. Adobe’s own Photoshop overview hub links to the same ecosystem, and Lightroom pairs perfectly with it for shoot-to-print workflows.
Follow this workflow:
- Select the Brush tool in Lightroom.
- Enable Auto Mask so the brush respects subject edges. Set Feather to 0 for crisp edges.
- Brush over the subject to build a mask, then press O to toggle the red overlay.
- Darken with the sliders: Exposure -4.00, Highlights -100, Shadows -100, Blacks -100.
- Refine leftover areas with the Eraser tool at Auto Mask off, then re-enable it for the next region.
- Toggle Before/After with the backslash key to double-check your shape.
This method preserves the sky, water, or sunset while collapsing the subject into a pure silhouette shape — a look most in-camera silhouettes can’t quite match if the light was uneven.
Photographing a full jewelry collection or product lineup? Clean outlines mean nothing if the reflections aren’t perfect — our jewelry photo editing and retouching team polishes every gemstone and clasp before you ever consider silhouetting.
Method 5: Free Online Silhouette Tools (No Software Install)
Not every reader wants to install anything. These free web tools handle a full silhouette conversion right in the browser.
- BeFunky Photo Editor — offers a five-step silhouette workflow with an AI Background Remover, background color fill, and tint controls.
- Remove.bg — one-click background removal; then paint the cutout black in any editor.
- Photopea — a free Photoshop clone that runs in the browser.
- Fotor — includes a dedicated silhouette effect under its “Effects” tab.
- Pixlr E — layer-based editing with AI mask suggestions.
Quick Comparison Table
| Tool | Best For | Skill Level | Cost |
|---|---|---|---|
| Canva | Portrait keepsakes | Beginner | Free / Pro |
| Photoshop | Complex subjects, print | Intermediate+ | Paid |
| Lightroom | Landscape silhouettes | Intermediate | Paid |
| BeFunky | Fast web-based portraits | Beginner | Free / Plus |
| Remove.bg + Paint | Bulk basic silhouettes | Beginner | Free |
| YouCam Perfect | On-the-go phone edits | Beginner | Free |
Method 6: The Old-School Craft Method (Paper, Scissors, Glue)
If you want the most authentic keepsake, do it the way the Victorians did — with scissors. This method also makes a wonderful kids’ project. The Royal Collection Trust still publishes a full paper-silhouette tutorial for exactly this reason.
Follow these steps:
- Photograph the profile against a bright wall.
- Print the photo at your desired size (usually 8×10 in).
- Have the child cut around the head shape.
- Trace the outline onto black construction paper with a pencil.
- Cut the shape a second time from the black paper.
- Glue the black silhouette onto white cardstock and frame in a simple oval or rectangular mat.
Crafters often scale kids’ silhouettes to match 16×20 frames for statement walls or smaller 4×6 mats for gift sets. Matching sibling silhouettes across identical frame sizes creates the most cohesive look.
Silhouette Photography Tips the Pros Actually Use
Whether you edit or shoot, small choices separate an “okay” silhouette from a striking one.
Composition Rules
- Isolate limbs. Arms tucked into the torso disappear into the shape. Extend them slightly.
- Give the subject air. Leave breathing room around the silhouette so the shape reads as art rather than clipart.
- Vary the head angle. A slight three-quarter turn adds life; a strict side profile reads classical.
- Watch for merging shapes. In outdoor silhouettes, a tree behind the subject’s head can merge into the skull — move a few feet.
- Match sibling poses. For family sets, photograph everyone at the same angle and distance.
Editing Rules
- Push contrast until the subject is pure black, but keep edges crisp — soft edges look muddy.
- Never leave the background pure white if you plan to print on white paper. Use #F7F5F0 or a warm cream instead.
- Save a working PSD or Canva template so you can update siblings or pets later.
- Export at 300 DPI for print and 72 DPI for web.
- Always check the mask at 100% zoom before exporting.
Printing and Framing Your Finished Silhouette
The output stage is where DIY silhouettes either shine or look like a school project. A few small choices dramatically upgrade the finished piece.
- Choose matte paper. Glossy paper reflects light and hides the pure-black shape. Matte lends a museum feel.
- Print at photo-quality settings. Most local labs offer archival matte prints for under $10.
- Mount on a slightly larger mat. A two-inch white or ivory mat elevates the silhouette instantly.
- Frame in wood or black metal. Modern black frames read graphic; wood frames read heirloom.
- Group as sets. Three matching silhouettes of siblings look intentional; one lonely portrait can look accidental.
For gifts, print two versions — one at 5×7 dimensions for a desk and a larger 8×10 or 11×14 for a shelf. Comparing 4×6 vs 5×7 also helps you decide which fits the frames you already own.
Selling prints, cards, or Etsy listings? Consistent product images make the sale — let our editors handle your full lineup with expert photo retouching, so every silhouette in your shop feels like the same brand.
Advanced Silhouette Styles Worth Trying
Once you’ve mastered the classic black-on-white portrait, experiment with these variations:
- Reverse silhouettes: A white shape on a black or navy background — very modern nursery style.
- Duotone silhouettes: Two colors instead of pure black, great for brand graphics and packaging.
- Textured silhouettes: Fill the shape with a photo of the sky, marble, or florals for wedding stationery.
- Multi-layer silhouettes: Overlap parent and child profiles for a family-portrait version.
- Silhouette stickers: Export as SVG and cut on a Silhouette Cameo or Cricut for laptops and water bottles.
Silhouettes for E-Commerce and Branding
If you run an online store, silhouette-style product shots are having a real moment — especially for jewelry, apparel, and shoes. They isolate shape, remove distraction, and unify a scattered catalog. For that use case, the workflow leans professional: clean cutouts, invisible ghost mannequin effects, and consistent lighting. Our step-by-step ghost mannequin photography guide is a natural next read if you’re heading that direction.
Running an online shop? Turn every product photo into a scroll-stopping silhouette or clean cutout with our expert clipping path service — no more messy edges on transparent PNGs.
Common Silhouette Mistakes to Avoid
- Shooting on a busy background. Every busy pixel makes the mask harder later.
- Front-lighting the subject in golden hour. You’ll get a portrait, not a silhouette.
- Over-smoothing edges. Feathering above 2–3 px looks like poor screen printing.
- Filling with dark gray instead of true black. The result feels flat and printer-ink-cheap.
- Forgetting to check the mask at 100% zoom. Tiny stray pixels ruin the shape at print scale.
- Ignoring composition. A great silhouette is 70% shot, 30% software.
- Skipping the print test. Colors, especially warm cream backgrounds, always look different on paper.
Silhouette Ideas Beyond Portraits
Silhouette work isn’t limited to family portraits. Once you know the workflow, whole new project categories open up:
- Family pet profiles — dogs, cats, horses.
- Wedding first-dance silhouettes for save-the-dates.
- Travel silhouettes — kids running on the beach, hikers at ridgelines.
- Business logos — clean, single-color, endlessly scalable.
- Baby milestone series — one silhouette per birthday, framed as a growing timeline.
- Book covers and podcast art — silhouettes read at any thumbnail size.
A Quick Note on the Word “Silhouette”
The name still surprises people. As Britannica records, Étienne de Silhouette served briefly as Louis XV’s controller-general of finances in 1759 and became notorious for his miserly reforms. His hobby of cutting shadow portraits from paper — cheap, quick, and stripped to essentials — merged with his reputation for austerity, and the word “silhouette” stuck to any thrifty likeness ever after. Two-and-a-half centuries later, the same shape still hangs in millions of living rooms.
Frequently Asked Questions
How do I turn a picture into a silhouette for free?
The easiest free route is Canva’s Background Remover (Pro trial) plus its Duotone filter set to black-on-black. On mobile, use your phone’s built-in “lift subject” feature, paste the cutout onto a white background, and fill it with black. Photopea, Pixlr, and BeFunky also offer free web-based silhouette creation workflows.
Which app is best for making silhouettes from photos?
For beginners, Canva and YouCam Perfect are excellent choices. For professional print-quality results, Adobe Photoshop is the best option. If you’re creating landscape silhouettes, Adobe Lightroom’s Brush tool with Auto Mask works well. Photo Silhouette Maker and Photoshop Express are also solid free mobile alternatives.
What kind of photo works best for a silhouette portrait?
A well-lit side-profile photo taken from just below the shoulders up works best. Use a plain white or light-colored background with soft natural window light. Keep the chin parallel to the floor, pull hair back for cleaner edges, and fill the frame with the subject.
How do I get sharp edges on a silhouette?
Start with a high-resolution image, use AI background removal, and then manually refine the mask at 100% zoom. Keep feathering below 2 px and export at 300 DPI if you plan to print the silhouette.
Can I make a silhouette in Photoshop without removing the background?
Yes. Select the subject, add a Curves adjustment layer clipped to that selection, and drag the curve downward until the subject becomes solid black. This method is especially effective for in-camera silhouettes that only need additional darkening.
How big should I print a silhouette portrait?
For a single portrait, standard print sizes are 8 × 10 inches or 11 × 14 inches. Family silhouette sets look best at matching sizes such as 5 × 7 inches or 8 × 10 inches. For nursery accent walls, a 16 × 20-inch print creates a striking focal point.
Are silhouettes still popular in 2026?
Yes. Silhouette portraits remain popular for home décor, wedding stationery, minimalist logos, and Cricut or Cameo craft projects. AI-powered cutout tools have further increased their popularity by making the creation process faster and more accessible.
Can I sell silhouettes I make from client photos?
Yes, provided the client has given permission or hired you to create the artwork. If you use stock photos, always review the licensing terms first. Most royalty-free stock licenses allow silhouette derivatives, but not all do.
Final Thoughts
Turning a photo into a silhouette is equal parts art project, keepsake craft, and modern branding tool. The workflow is refreshingly simple: shoot a strong profile, remove the background, fill the shape with black, and mount it on a clean background. Whether you use Canva in five minutes, Photoshop for gallery prints, or a pair of scissors for a family memory, the same principles apply — clean shape, high contrast, and thoughtful framing. Start with one profile this weekend, and you’ll likely find yourself building a whole wall of them by next month.
Wrap-up: Once your silhouette is perfect, don’t stop there — colored backgrounds, brand palettes, and bold accents make it truly yours. Try our color changing service for tasteful, print-safe hues in hours, not days.