

AI Photo Retouching: Professional Photography Tips | Pros & Cons
January 24, 2026
High-Precision Image Masking for Fashion Photography: Techniques to Handle Intricate Details
January 26, 2026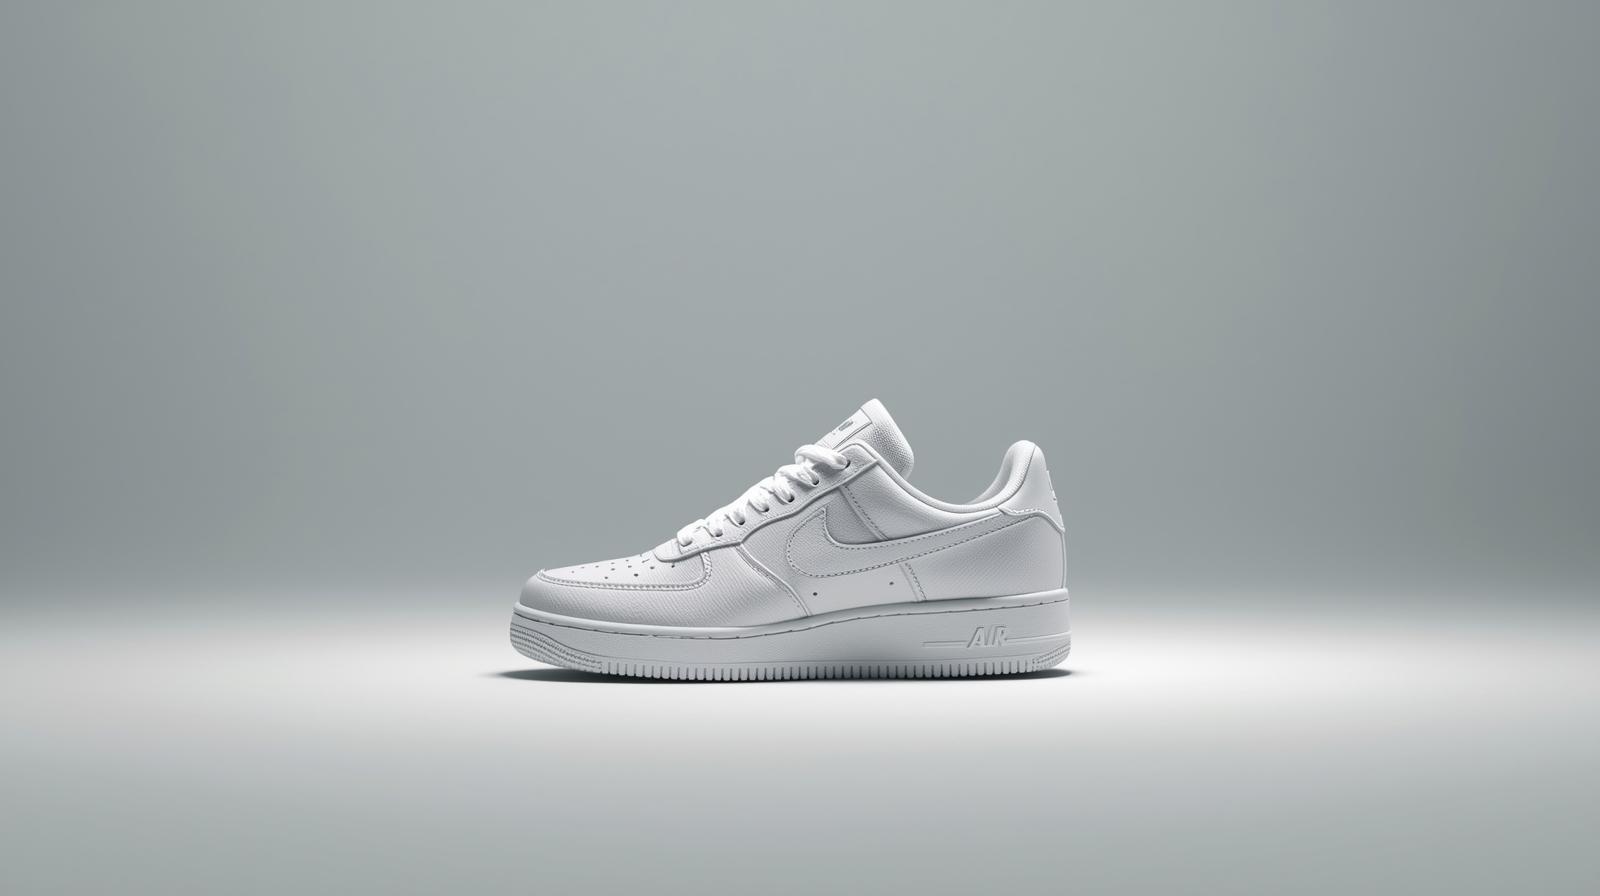
- Why Realistic Shadows Matter More Than Most Editors Realize
- Understand the Main Types of Shadows in Photoshop
- Prepare the Image Before You Create the Shadow
- Method 1: Create a Quick Drop Shadow with Layer Styles
- Method 2: Build a Realistic Cast Shadow Manually
- Method 3: Use a Gradient-Based Cast Shadow for Smoother Falloff
- Method 4: Use Generative Fill for AI-Powered Shadows
- Method 5: Add a Contact Shadow for Extra Depth and Realism
- Refine and Blend the Shadow Like a Professional Retoucher
- Common Mistakes That Make Photoshop Shadows Look Fake
- Advanced Tips for Hyper-Realistic Shadow Effects
- When It Makes Sense to Outsource Shadow Creation
- Multi-Object Shots Need Individual Shadow Logic
- Final Checklist Before You Export
- Frequently Asked Questions (FAQ)
- Conclusion: Realistic Shadows Are a Skill You Can Build
Why Realistic Shadows Matter More Than Most Editors Realize
A clean cut-out alone does not make an image believable. If the subject has no convincing shadow, it often looks pasted, flat, or disconnected from the background. That problem shows up everywhere, from product photography and catalog design to portrait composites and social media creatives.
Realistic shadows do more than darken an area. They tell the eye where the light comes from, how far the subject sits from the surface, and whether the object truly belongs inside the frame. In practical terms, shadows create depth, weight, realism, and visual trust. That matters even more in e-commerce, where customers make split-second judgments based on how polished a product photo looks.
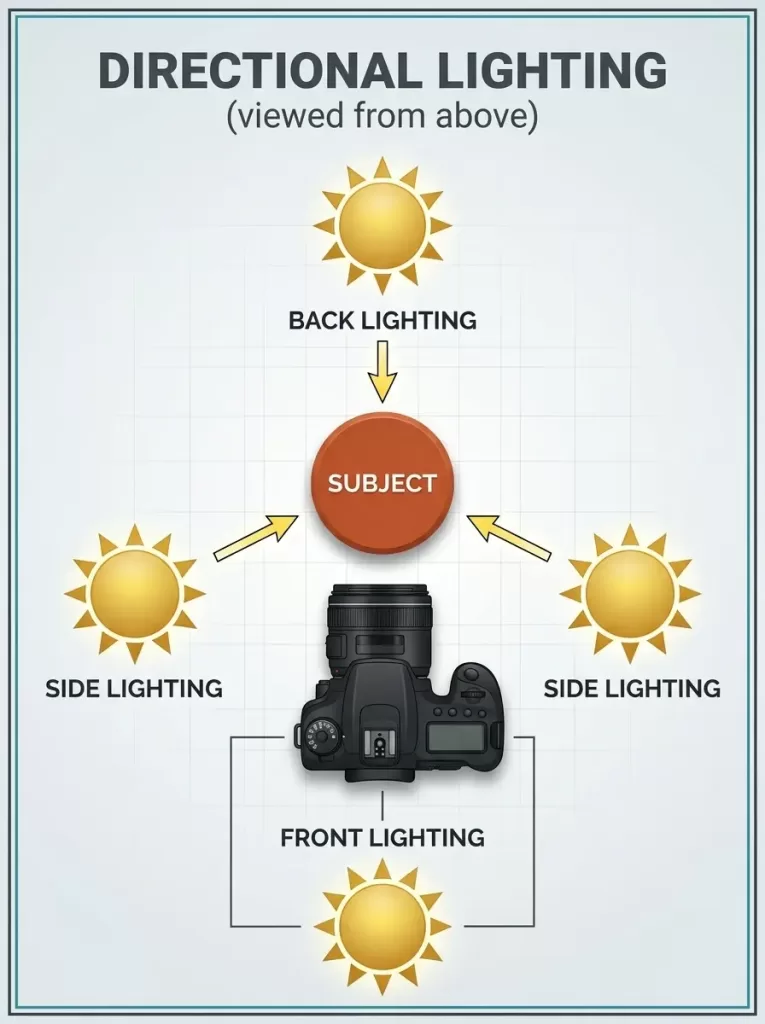
If you study professional shadow tutorials, a consistent pattern appears: the best results depend on direction, softness, density, and falloff. Those four elements decide whether your edit looks natural or obviously manipulated. A useful technical reference on this principle comes from Adobe’s documentation on layer opacity and blending modes, because blend behavior directly affects how realistic your shadows feel.
In this guide, you will learn:
- The four main shadow types every Photoshop user should know
- How to prepare an image correctly before shadow work begins
- Five effective ways to create realistic shadows in Photoshop
- How to refine shadows so they match the scene naturally
- Common mistakes that make composites look fake
- When professional help can save time and improve consistency
Want your cut-outs to look naturally grounded instead of flat and artificial? Explore our professional shadow creation service for realistic, production-ready image editing.
Understand the Main Types of Shadows in Photoshop
Before you start adding blur, masks, or blend modes, identify the kind of shadow your image actually needs. Many weak edits fail because the editor uses the wrong shadow style for the scene.
The four most useful shadow types are:
- Drop shadow — A simple offset shadow that works well for web graphics, isolated products, banners, and lightweight marketing visuals.
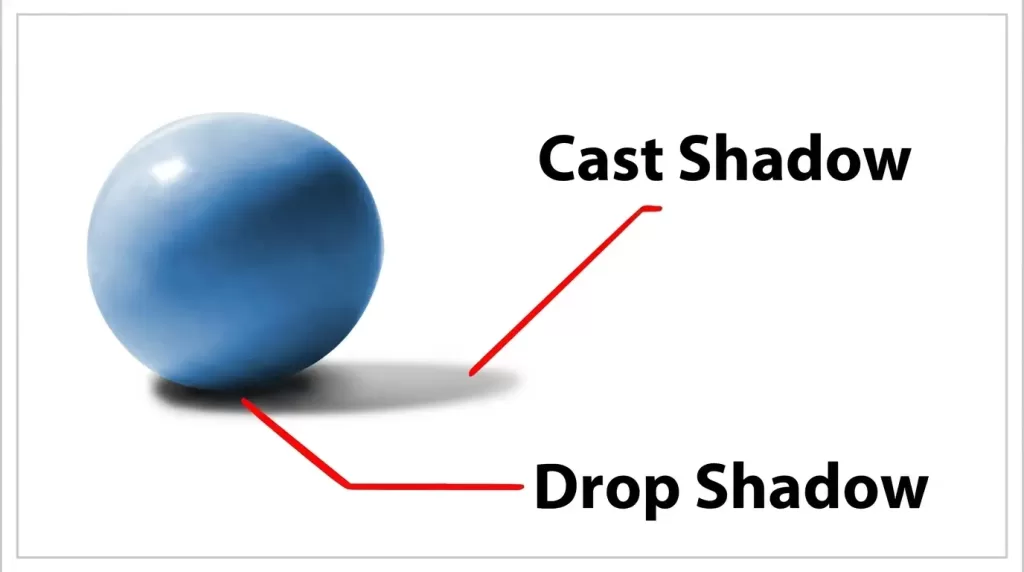
- Cast shadow — A directional shadow that stretches away from the subject based on the light source. This style works best for composites, portraits, footwear, and grounded product images.
- Natural or floor shadow — A soft shadow that sits under or around the subject and mimics studio lighting, especially on white backgrounds.
- Contact shadow — A short, dark shadow where the object touches the ground. This tiny detail often makes the biggest difference in realism.
If you want the object to feel anchored to the surface, do not rely only on a generic drop shadow. That shortcut often works for graphics, but it rarely works for high-quality composites or product photography.
Prepare the Image Before You Create the Shadow
Most shadow problems start before the shadow layer exists. If the subject has rough edges, white halos, clipped details, or poor separation from the background, the final shadow will amplify those flaws.
Here is a simple prep workflow that saves time:
- Create a clean cut-out. Use the Pen Tool for hard edges and Select and Mask for hair, fur, or textured edges.
- Place the subject on its own layer. This gives you full control over blur, masking, and opacity.
- Expand the canvas if needed. A longer cast shadow needs room to extend naturally.
- Study the light source. Look for highlights, reflections, and bright edges on the subject.
- Check the background tone. Shadows interact with color, so the surface beneath the subject matters.
- Work non-destructively. Use duplicate layers, Smart Objects, and masks wherever possible.
For high-volume product work, clean extraction matters just as much as the shadow itself. If you handle complex product edges at scale, a dedicated clipping path service can help maintain consistency across entire catalogs.
A few careful setup steps can save you from fixing distortion, halos, and misaligned shadow edges later.
Method 1: Create a Quick Drop Shadow with Layer Styles
The Layer Style method is one of the fastest ways to add a simple shadow in Photoshop. It works well for product photos, isolated objects, banners, and website visuals where you want a polished but not overly dramatic effect.
Follow these steps:
- Select the subject layer in the Layers panel.
- Click the fx icon at the bottom.
- Choose Drop Shadow.
- Start with these settings:
- Blend Mode: Multiply
- Color: A dark sampled tone from the image, not pure black
- Opacity: 35–55%
- Angle: Match the light source
- Distance: 8–20 px
- Spread: 0%
- Size: 15–35 px
- Click OK and review the shadow.
- If you want more control, right-click the effect and choose Create Layer.
- Add a mask and fade the shadow manually where needed.
Pro Tip for Better Results
Avoid using solid black shadows. Real shadows usually pick up a little color from the environment. Sample a darker neutral tone from the image, then lower saturation slightly if needed. That one change often makes a quick shadow look far more natural.
This method is fast, but it works best when the image needs a controlled commercial look rather than a dramatic environmental composite.
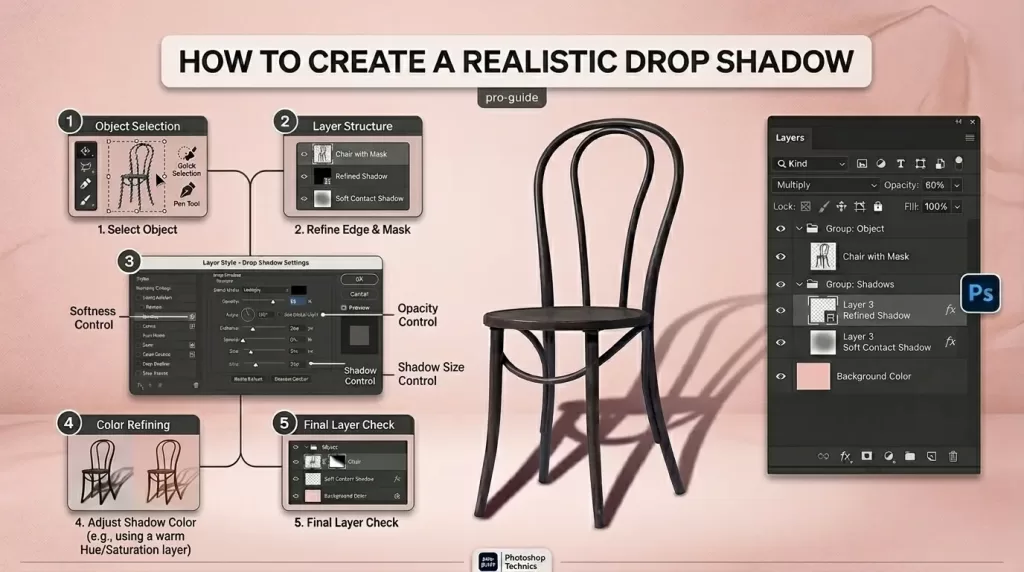
Method 2: Build a Realistic Cast Shadow Manually
If you want the subject to feel truly grounded in a new scene, manual cast shadows give you far more control than the default Drop Shadow effect. This approach works especially well for people, standing products, shoes, mannequins, and outdoor composites.
A strong visual walkthrough of this process appears in PhotoshopCAFE’s tutorial on making very realistic shadows in Photoshop, but the workflow below is rewritten and streamlined for practical use.
Step-by-Step Manual Cast Shadow Workflow
- Duplicate your subject layer and rename it Shadow.
- Lock the transparent pixels on the new layer.
- Fill the subject shape with black.
- Drag the Shadow layer below the original subject.
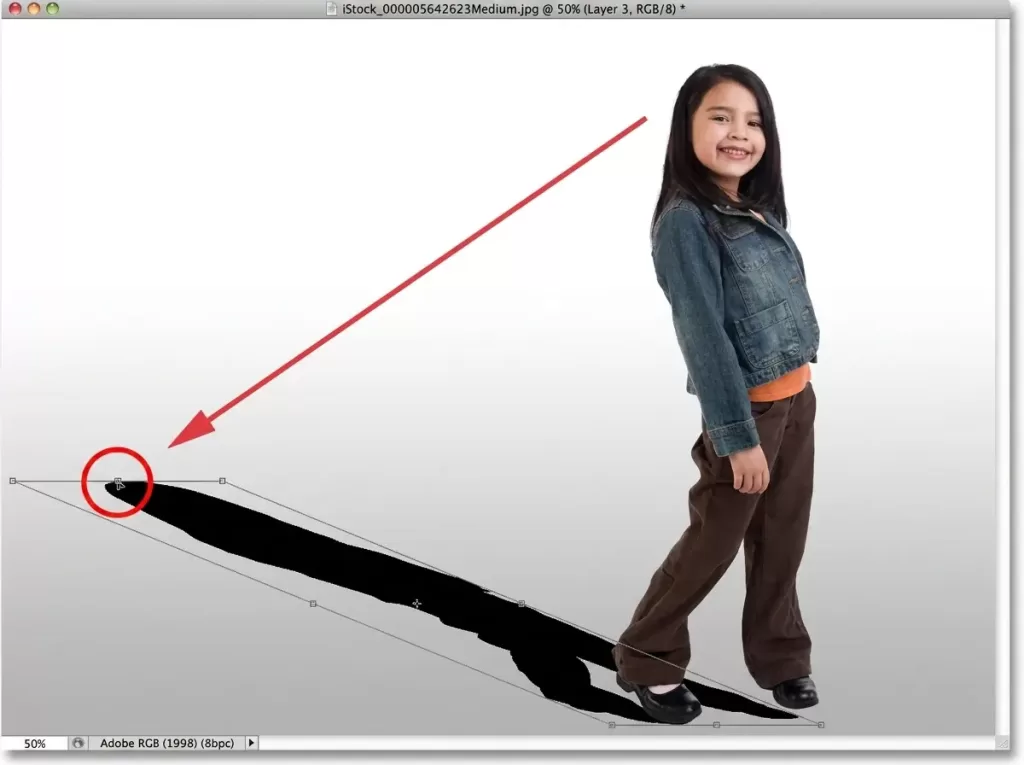
- Press Ctrl/Cmd + T for Free Transform.
- Right-click and choose Flip Vertical.
- Move the flipped silhouette down so it touches the ground contact point.
- Right-click again and choose Distort or Skew.
- Stretch the shadow in the direction opposite the light source.
- Adjust the shape until it matches the perspective of the surface.
- Set the layer blend mode to Multiply.
- Reduce opacity to around 55–75%.
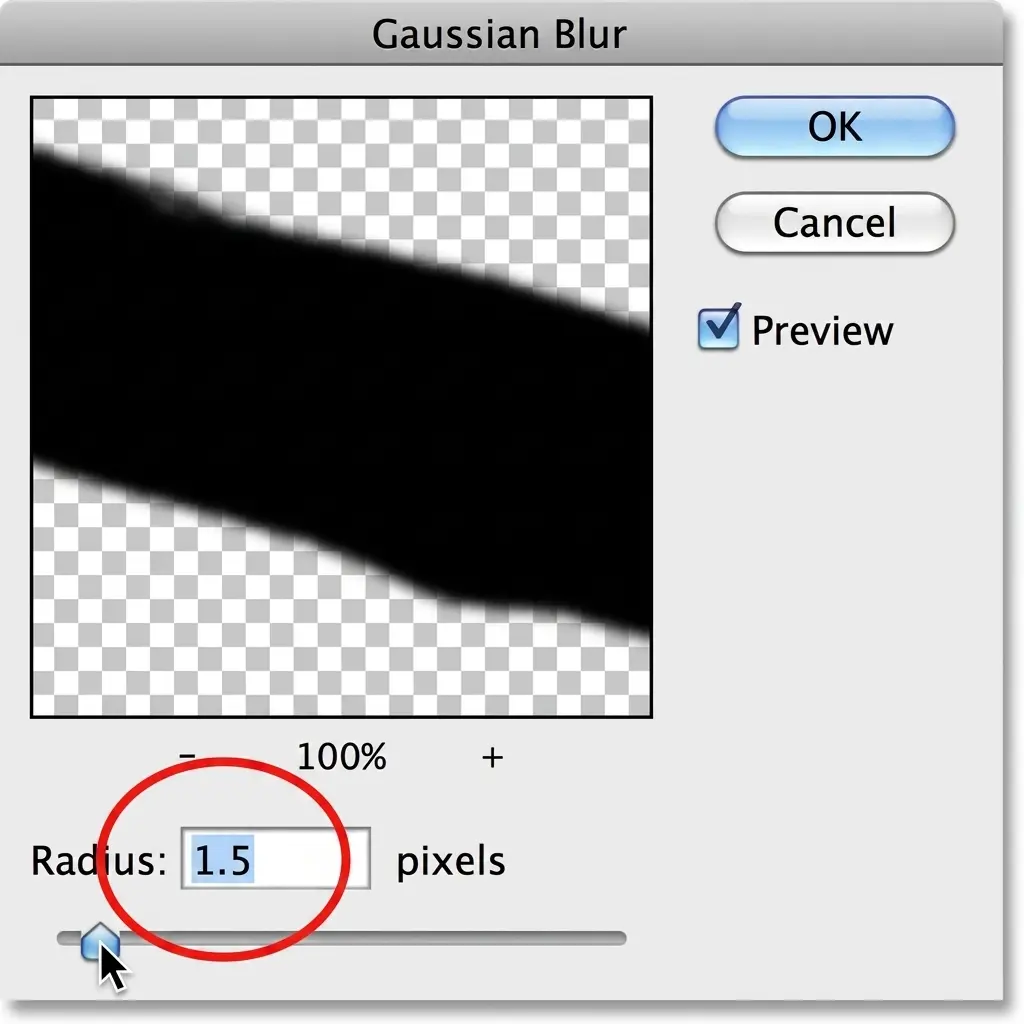
- Apply a light Gaussian Blur to soften the edges.
Make the Shadow Falloff Look Real
A shadow should not stay equally sharp from start to finish. In real scenes, the part closest to the subject usually looks darker and sharper, while the far end gets softer and lighter.
To create that effect:
- Convert the shadow into a Smart Object
- Open Filter > Blur Gallery > Field Blur
- Add one blur pin close to the object with low blur
- Add another blur pin farther away with higher blur
- Fine-tune opacity after the blur is in place
That gradual transition gives the shadow believable depth and distance.
Need precise extractions before you build realistic shadows? Our image masking service helps preserve fine edges, hair, fur, and semi-transparent details.
Method 3: Use a Gradient-Based Cast Shadow for Smoother Falloff
A gradient-based shadow gives you more natural fade than a standard fixed-opacity shadow. This method works beautifully for editorial composites, portraits, and high-end product visuals.
The concept appears in Photoshop Essentials’ guide to realistic cast shadow effects, but here is the cleaner practical version:
- Build the shadow silhouette as in Method 2.
- Position and distort it correctly.
- Add a Layer Mask to the shadow layer.
- Select the Gradient Tool.
- Use a black-to-white linear gradient on the mask.
- Drag the gradient so the far end of the shadow fades out smoothly.
- Apply a second blur pass if the shadow still looks too rigid.
Why This Method Works So Well
The human eye expects shadows to lose strength gradually. A mask-based gradient recreates that behavior better than a simple opacity slider. When you combine a distortion adjustment, layered blur, and gradient fade, the final result looks much closer to a real photographed shadow.
Method 4: Use Generative Fill for AI-Powered Shadows
Photoshop’s Generative Fill can create surprisingly useful shadows in seconds. It is not always the best option for pixel-perfect commercial work, but it can speed up ideation and batch editing when used carefully.
How to Do It
- Create a loose selection where the shadow should appear.
- Click Generative Fill from the contextual taskbar.
- Enter a clear prompt, such as:
“Soft realistic ground shadow under the product, light from upper left, natural blur.” - Generate several variations.
- Choose the one that best fits the image.
- Lower opacity or mask portions of the shadow if needed.
What to Watch Out For
- AI can misread the light angle
- It may create a shadow with the wrong shape
- It often needs manual cleanup around the contact area
- It works better for quick layouts than for hero images
If you want Adobe’s official explanation of how the tool behaves, their Generative Fill documentation is the best reference to include in a blog post, as it provides an authoritative source for the feature.
Method 5: Add a Contact Shadow for Extra Depth and Realism
Even if the main shadow looks good, the object can still appear to float if there is no contact shadow. Contact shadows sit directly under the subject where it touches the surface. They are usually shorter, darker, and tighter than the main cast shadow.
To add one:
- Create a new layer between the subject and background
- Set the blend mode to Multiply
- Choose a soft round brush
- Lower brush flow to 15–30%
- Sample a dark tone from the existing image
- Paint a narrow shadow at the base of the subject
- Apply a small Gaussian Blur if the edge looks too harsh
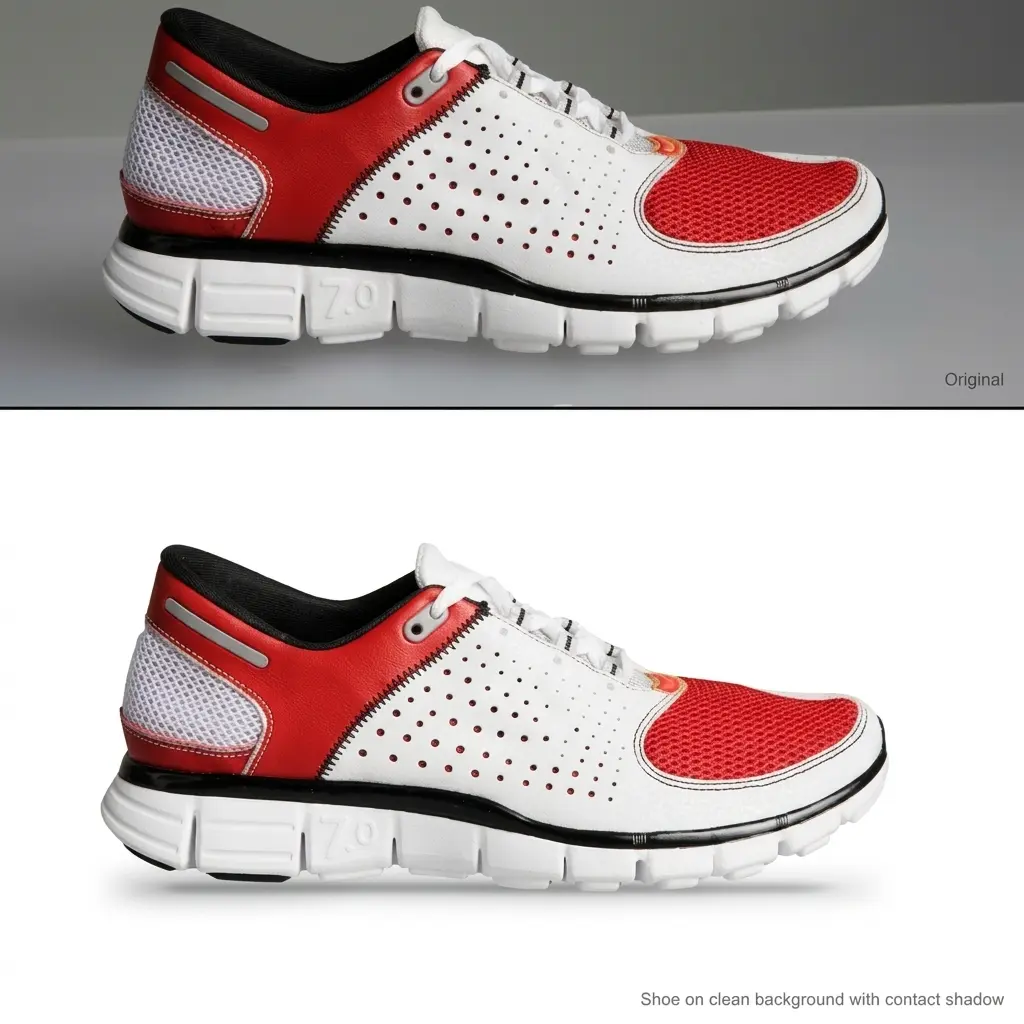
This step takes only a few seconds but instantly adds grounding, weight, and realism.
Selling clothing online? Our ghost mannequin service helps create clean apparel visuals with realistic inner depth and natural product presentation.
Refine and Blend the Shadow Like a Professional Retoucher
Once the shadow sits in roughly the right place, refine it carefully. This stage matters because viewers usually notice small inconsistencies, even if they cannot explain why the image feels wrong.
Use this refinement checklist:
- Match the shadow color to the environment instead of leaving it neutral black
- Adjust opacity based on scene brightness
- Blur selectively rather than evenly
- Mask away hard ends so the shadow fades out naturally
- Check edge sharpness close to the subject
- Compare the new shadow to existing shadows already present in the image
- Add slight noise if the image has visible grain
- Use Curves or Levels to fine-tune density
For readers who want a deeper artistic explanation of why shadows change in tone and softness, Muddy Colors’ article on the anatomy of shadows adds useful conceptual depth without interrupting the tutorial flow.
Common Mistakes That Make Photoshop Shadows Look Fake
Even skilled editors can weaken a good image by making one of these avoidable mistakes:
- Using pure black shadows
- Ignoring the actual light direction
- Leaving the whole shadow equally sharp
- Making the shadow too dark
- Forgetting the contact shadow
- Stretching the shadow without matching perspective
- Creating a shadow that ends too abruptly
- Ignoring ambient bounce light in bright scenes
A fast quality check helps. Zoom out, look at the image from a distance, and ask yourself one question: Does the shadow support the subject, or does it call attention to itself? If it draws too much attention, reduce it or refine it.
Advanced Tips for Hyper-Realistic Shadow Effects
Once you understand the basics, you can push the realism further with a few advanced habits:
- Turn key shadow layers into Smart Objects
- Sample shadow color from the real image
- Match shadow softness to the actual light source size
- Use Field Blur instead of one flat Gaussian Blur when possible
- Add subtle grain so the shadow texture matches the image
- Build separate shadows for multi-object scenes
- Paint soft reflections for glossy surfaces when needed
- Keep contact shadows darker than extended cast shadows
If you edit high-resolution camera files, it also helps to study how real light behaves in detailed reference photography. For example, the Nikon D4S review on Photofixal can serve as a useful visual reference for natural light falloff and tonal depth in DSLR-grade images.
Need polished product images that already look consistent, grounded, and sales-ready? Our photo retouching service helps streamline high-volume image production.
When It Makes Sense to Outsource Shadow Creation
You can absolutely build realistic shadows yourself, especially for occasional edits. But when volume grows, consistency becomes the bigger challenge.
Outsourcing often makes sense when:
- You need shadows for 50 or more product images per week
- You sell on platforms that require a consistent look across all listings
- Your products include glass, jewelry, chrome, or transparent packaging
- You need turnaround speed more than experimentation
- Your in-house team spends too much time on repetitive edits
Studios such as Clipping Expert Asia and platforms like Photofixal are useful reference points when discussing outsourced editing ecosystems for e-commerce imagery.
If your main issue starts before the shadow stage, a strong background removal can also improve the final result by giving the shadow cleaner edges to work with.
Multi-Object Shots Need Individual Shadow Logic
Grouped product photography needs more careful planning because each object reacts to light differently. A single shadow effect across every item often looks mechanical and inaccurate.
Keep these principles in mind:
- Taller objects often cast longer shadows
- Shorter products usually need tighter floor shadows
- Reflective surfaces may create softer or lighter-looking shadows
- Overlapping objects create stronger occlusion where they meet
- Items closer to the light source often have harder shadow edges
A practical workflow is to separate each object into its own layer group and build the shadow independently. For complex grouped product images, a multi-clipping path service makes that process more manageable and accurate.
Final Checklist Before You Export
Use this quick review to catch issues before the image goes live.
- The shadow angle matches the light source
- The contact shadow is visible where the object touches the surface
- The shadow gets softer with distance
- Opacity feels realistic, not heavy or muddy
- The shadow color fits the environment
- The edge quality matches the scene
- The shadow does not end abruptly
- Grain or texture matches the original image
- The layer structure remains editable
If your edit still feels artificial, do not start over immediately. Check the contact point, soften the far edge, and reduce opacity first. Those three fixes solve most realism issues.
Frequently Asked Questions (FAQ)
Q1. What is the most realistic way to add a shadow in Photoshop?
The most realistic method usually combines a duplicated subject silhouette, perspective distortion, selective blur, and a gradient mask. That workflow gives you control over direction, softness, and fade.
Q2. Why do my shadows look fake?
Most fake-looking shadows come from the same issues: pure black color, wrong angle, missing contact shadow, too much opacity, or equal blur from end to end.
Q3. What blend mode works best for shadows in Photoshop?
Multiply is the most common choice because it darkens the layer beneath while preserving surface detail. In some cases, Soft Light can work for softer ambient shadows.
Q4. What opacity should a realistic shadow have?
Most realistic shadows fall somewhere between 40% and 80% opacity. The right number depends on how strong the light source is and how bright the background appears.
Q5. Can I use Generative Fill to create realistic shadows?
Yes, but use it carefully. It works well for concept drafts, quick edits, and basic layouts. For high-end results, refine the AI output manually.
Q6. How do I create shadows for transparent products like glass or perfume bottles?
Use a softer painted base shadow, keep the opacity lower, and consider subtle highlights or reflected light inside the shadow zone to mimic transparency.
Q7. Should I add noise to the shadow?
Yes, if the image itself contains visible grain. A tiny amount of noise helps the shadow blend into the texture of the original photo.
Q8. When should I outsource shadow creation?
Outsource when you need consistent high-volume work, faster delivery, or more precision for reflective, transparent, or highly detailed products.
Conclusion: Realistic Shadows Are a Skill You Can Build
Shadows are not guesswork. They follow visual logic. Once you understand direction, density, softness, and falloff, you can create far more convincing edits in Photoshop.
The strongest results come from using the right shadow type for the scene, preparing the subject properly, and refining the final effect instead of settling for a default layer style. Sometimes a quick drop shadow is enough. Sometimes a detailed cast shadow with masks, blur transitions, and contact grounding is the better choice.
If you apply the techniques in this guide consistently, your edits will stop looking pasted and start feeling naturally photographed.
Want realistic, consistent shadows without spending hours in Photoshop? Our expert shadow creation team delivers clean, natural-looking results for product and e-commerce images.