


How Much Does Photo Editing Cost? Pricing Guide
August 27, 2026
How to Remove Blemishes in Photoshop: Complete Skin Retouching Guide
August 31, 2026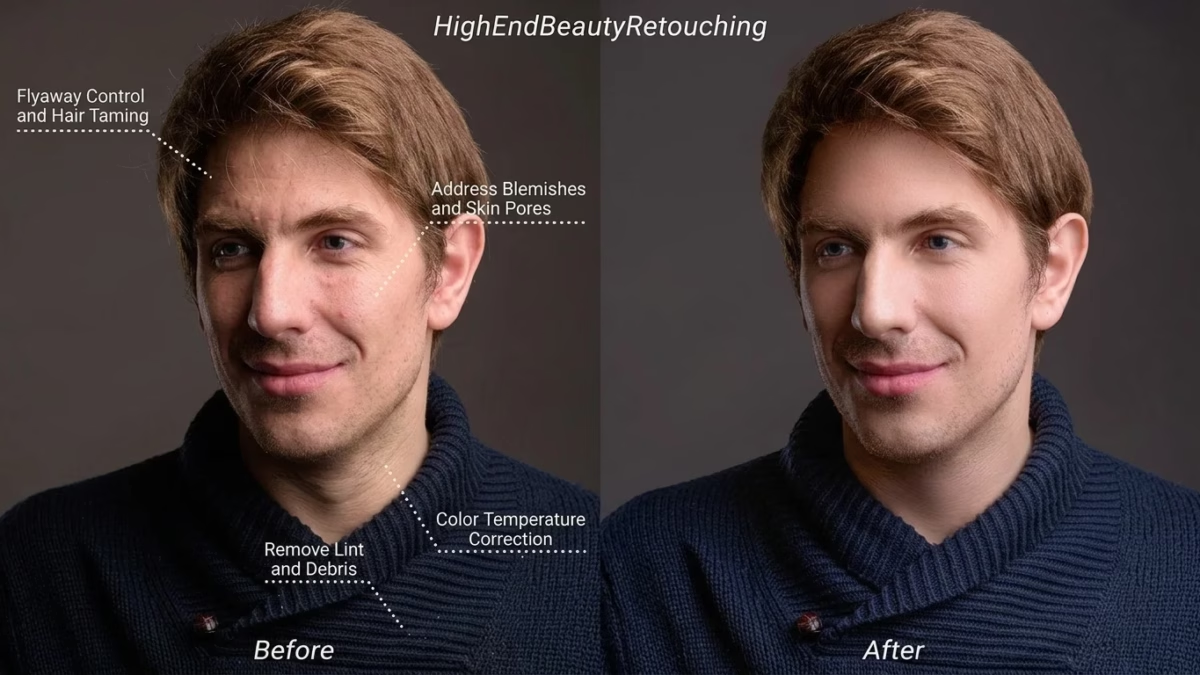
TL;DR — Key Takeaways
- Portrait retouching in 2026 is a hybrid craft: AI handles the boring 80%, you finish the memorable 20% by hand.
- The 13 techniques below cover the full pipeline — from RAW culling to final output sharpening.
- Frequency separation and dodge & burn still define natural, editorial-grade skin work.
- Keeping real texture, freckles, and personality marks is the defining aesthetic of the year.
- The global photo retouching market is projected to hit roughly $4.1 billion in 2026, growing at a 12.4% CAGR through 2033.
- A well-retouched portrait can lift ecommerce conversions by up to 40%, which is why professional retouching is not optional for brand work.
Portrait retouching in 2026 sits at a strange, exciting crossroads. AI now processes thousands of frames while you sip coffee, yet clients still spot the difference between a machine’s polish and a human retoucher’s touch in under a second. This guide walks you through the exact 13 techniques professional studios use today — the same steps behind $2,000 editorial covers — but written in plain English, tuned to current tools, and stripped of the fluff most tutorials pile on.
- What Is Portrait Retouching in 2026?
- Why Portrait Retouching Still Matters in the AI Era
- The 2026 Portrait Retouching Workflow at a Glance
- Technique 1: Shoot RAW and Cull Ruthlessly
- Technique 2: Nail Global Exposure and White Balance First
- Technique 3: Healing — Blemish and Distraction Removal
- Technique 4: Frequency Separation Done Right
- Technique 5: Dodge and Burn to Sculpt Light
- Technique 6: Eye Enhancement Without the “Cartoon” Look
- Technique 7: Teeth Whitening That Doesn’t Glow
- Technique 8: Hair Cleanup — The Detail Clients Notice Silently
- Technique 9: Body Contouring With Ethics in Mind
- Technique 10: Wrinkles, Clothing, and Glare — The “Small Wins” Stage
- Technique 11: Micro-Contrast and Selective Sharpening
- Technique 12: Color Grading With LUTs and Split Toning
- Technique 13: Output Sharpening and Export
- Retouching Different Skin Tones the Right Way
- Retouching by Genre: Headshots vs. Beauty vs. Wedding
- Retouching Men’s Portraits: A Different Set of Rules
- AI vs. Manual Retouching in 2026: Which Should You Choose?
- The 7 Retouching Mistakes That Instantly Kill a Portrait
- Tools the Pros Actually Use in 2026
- Portrait Retouching Pricing 2026: What to Charge (or Pay)
- When to DIY vs. Outsource Portrait Retouching
- The Portrait Retouching Ethics Checklist for 2026
- Quick Portrait Retouching Checklist (Save This)
- Frequently Asked Questions
- Final Thoughts
What Is Portrait Retouching in 2026?
Portrait retouching is the process of refining a photograph of a person — skin, eyes, hair, tone, color, and light — so the final image looks polished without looking fake. In 2026, the definition has widened. It now spans traditional Photoshop craft and AI-assisted batch corrections that handle culling, color, and exposure in seconds.
The goal, though, has not changed. You are still trying to bring out the true character of a face while removing temporary distractions — a stray hair, a red spot, a shadow that flattens the cheekbone. The best retouchers in the world make viewers feel they are looking at the subject on their best day, not a synthetic version of them.
Why Portrait Retouching Still Matters in the AI Era
Clients scroll past thousands of images a day. A polished portrait stops the scroll, communicates authority, and — for commercial shooters — directly boosts conversions. Global market forecasts put the specialised photo retouching segment near $4.1 billion in 2026, according to industry reports on the future of photo retouching, because brands cannot afford inconsistent visuals anymore.
Retouching also protects your reputation. Inconsistent editing is one of the fastest ways to lose returning clients. Viewers instantly feel the mismatch, even when they cannot name it.
Want your images to look professionally edited, not over-processed?
Achieve natural, high-end perfection with our skilled Photo Retouching Service
The 2026 Portrait Retouching Workflow at a Glance
Before we hit the 13 techniques, here is the six-stage pipeline every professional runs.
| Stage | What Happens | Typical Tools |
|---|---|---|
| 1. Capture & culling | Shoot RAW, pick the keepers | Lightroom, Aftershoot, Photo Mechanic |
| 2. Global adjustments | White balance, exposure, contrast | Lightroom, Capture One, Imagen |
| 3. Skin & blemish work | Heal spots, even tone | Photoshop, Retouch4me |
| 4. Detail refinement | Hair, teeth, eyes, clothing | Photoshop |
| 5. Advanced enhancements | Dodge & burn, Liquify, sculpting | Photoshop |
| 6. Color grade & output | LUTs, sharpening, export | Photoshop, Lightroom |
Now let’s break down the 13 techniques that live inside this pipeline.
Technique 1: Shoot RAW and Cull Ruthlessly
Every strong retouch starts before Photoshop opens. Always shoot RAW so you keep the full dynamic range and 14-bit color depth you need for skin transitions, shadow recovery, and clean color grading later.
What to do in 2026:
- Import into Lightroom Classic or Capture One and back up immediately.
- Use AI culling (Aftershoot Cull, Imagen Cull) to filter for sharp focus, open eyes, and lighting consistency.
- Flag your “hero” frames — usually 3–5% of the shoot — for advanced manual work.
- Keep a working folder of only the winners.
Culling is not glamorous, but it saves hours. If you learn only one habit from this guide, let this one stick. For more on efficient studio pipelines, check our ecommerce editing breakdown — the batch logic translates almost 1-to-1.
Technique 2: Nail Global Exposure and White Balance First
Never touch skin until the global tone is right. Fix these in your RAW converter before you ever open Photoshop.
- White balance: neutralize skin tones first, mood grading later.
- Exposure: protect highlights on cheekbones and foreheads.
- Contrast: use the Tone Curve, not the Contrast slider — subtler transitions.
- Highlights and shadows: recover blown skin and open up hair shadows.
- Lens correction and crop: clean up distortion and finalize composition.
Skipping this step is the single most common reason a retouch looks muddy later. When exposure is off by a stop, no amount of frequency separation will save you.
Technique 3: Healing — Blemish and Distraction Removal
Once tone is set, jump into Photoshop and create a new blank layer above the background. Name it “Healing,” and check Sample All Layers on the Spot Healing Brush. This non-destructive setup keeps your original pixels untouched forever.
Remove only temporary things:
- Pimples, whiteheads, and active breakouts
- Stray hairs on the forehead or shoulders
- Lint on clothing
- Reflections on eyeglasses
Keep the permanent things:
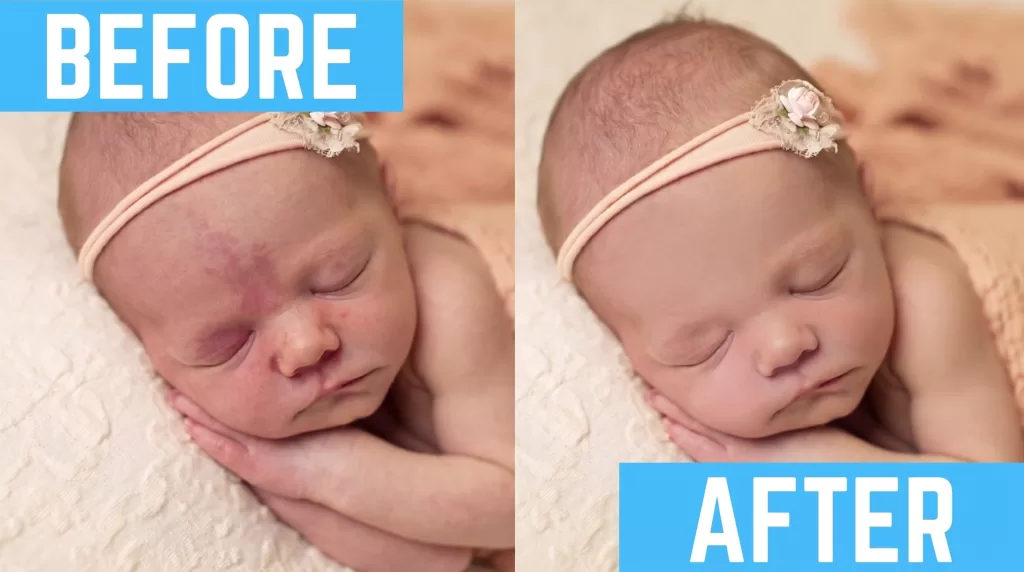
- Freckles, moles, scars, dimples
- Laugh lines and character wrinkles
- Beauty marks the subject is known for
The Clone Stamp handles areas where the Healing Brush blends poorly — usually the hairline and jaw. Toggle between the two, and always sample fresh texture from the same lighting direction.
Technique 4: Frequency Separation Done Right
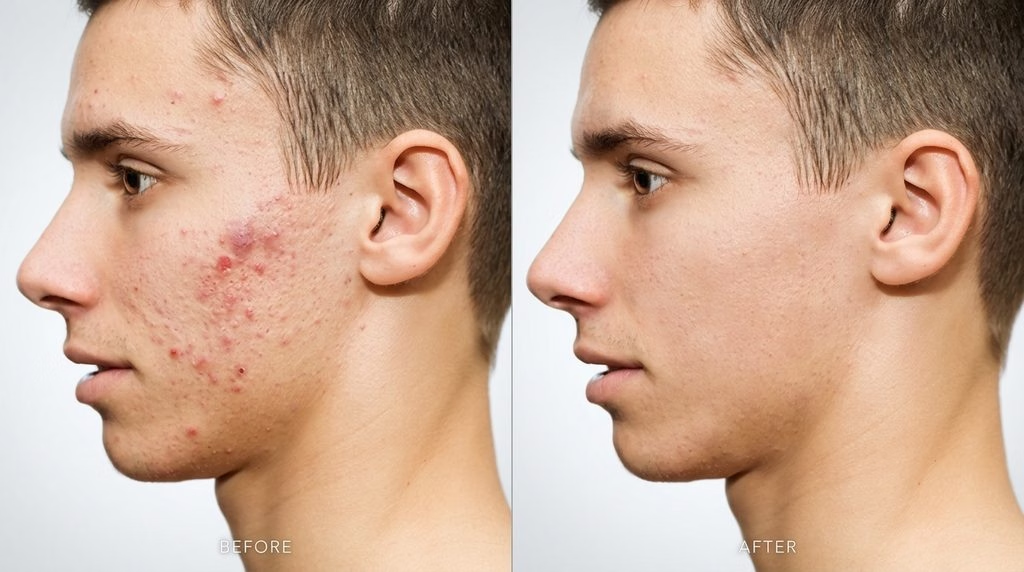
Frequency separation is the classic move that splits color and tone (low frequency) from texture and pores (high frequency) onto two layers. You smooth blotches on the low-frequency layer without ever touching pore detail on the high-frequency layer.
Quick setup in Photoshop:
- Duplicate your background layer twice.
- Name the bottom copy “Low Frequency” and blur it with Gaussian Blur until skin transitions smooth out — usually 4–8 px for portraits shot on 24–50MP cameras.
- Name the top copy “High Frequency.” Go to Image → Apply Image, subtract the low layer, and set the blend mode to Linear Light.
- Use the Mixer Brush or Clone Stamp on the Low layer to even out blotchy color.
- Never blur the High Frequency layer — that is the #1 cause of plastic skin.
Manually, this step takes 20–35 minutes on a portrait. AI plugins like Retouch4me Skin cut that to under a minute, but always audit the result. Machines still soften what should stay sharp. For a deeper dive into non-destructive layering, our Photoshop tools guide covers the underlying panels.
Technique 5: Dodge and Burn to Sculpt Light
Dodge and burn is where a portrait turns into a painting. You brighten highlights (dodge) and deepen shadows (burn) to give the face three-dimensional structure — the same trick classical painters used with light and shadow.
Two clean methods for 2026:
- Gray layer method: Fill a new layer with 50% gray, set it to Soft Light blend mode, and paint white or black at 5–10% opacity.
- Curves method: Create two Curves adjustment layers — one pulled up (Dodge), one pulled down (Burn). Invert their masks to black and paint white on the mask only where you want the effect.
Where to add light: forehead, cheekbones, nose bridge, chin, cupid’s bow.
Where to add shadow: sides of the nose, under the cheekbones, jawline, the crease of the eyelid.
Zoom out often. If you can see your dodging, it’s too strong. The best D&B work reads emotionally before it reads technically.
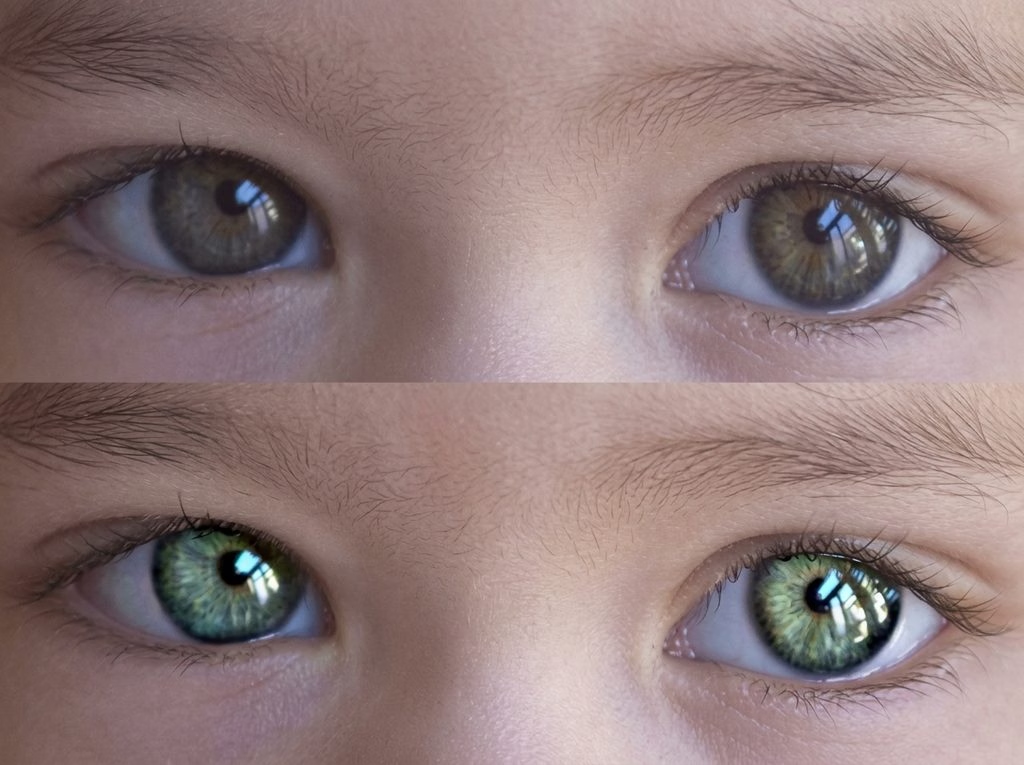
Technique 6: Eye Enhancement Without the “Cartoon” Look
Eyes carry the emotion of a portrait, but overworked eyes are the fastest way to make a face look uncanny. The trick is small, cumulative adjustments — not one big move.
The professional eye workflow:
- Whiten the sclera: desaturate the whites 10–20% and lift brightness slightly. Never go pure white.
- Brighten the iris: dodge the iris pattern at low opacity to reveal color texture.
- Sharpen selectively: apply a High Pass filter masked only over the iris and lashes.
- Darken the limbal ring: a soft burn on the ring around the iris adds instant depth.
- Kill red veins: use the Sponge tool in Desaturate mode at low opacity.
Avoid making eyes bigger with Liquify. Editors spot that trick instantly, and it universally reads as amateur. For advanced eye work, Retouching Academy’s eye tutorial has one of the best free breakdowns online.
Want to enhance colors and contrast without losing realism?
Trust our experts to perfect your images with our Photo Retouching Service
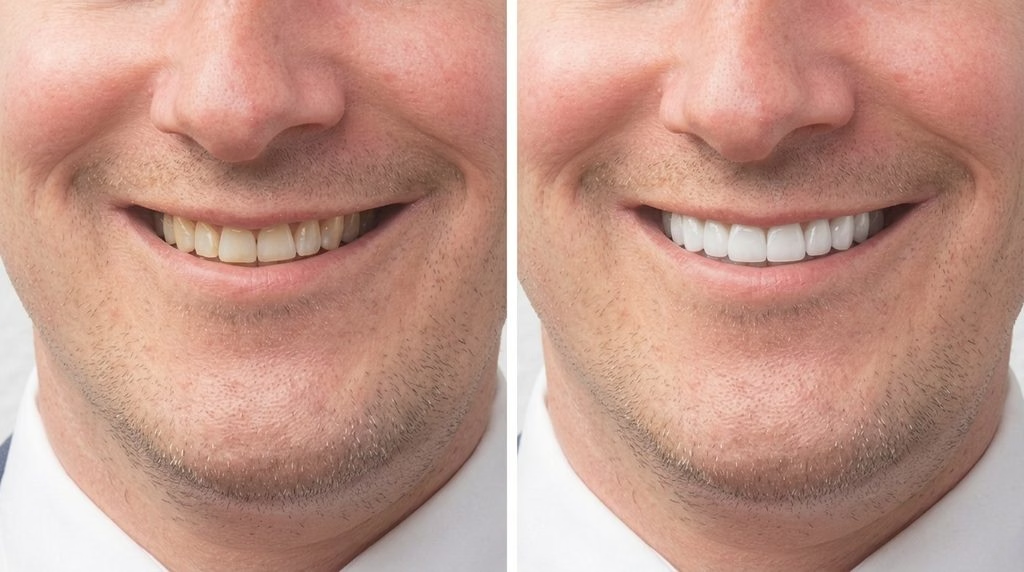
Technique 7: Teeth Whitening That Doesn’t Glow
Yellow teeth read as “unretouched.” Neon-white teeth read as fake. The correct move sits between the two.
Safe teeth-whitening steps:
- Select the teeth with a soft brush or Camera Raw brush.
- Reduce yellow saturation by 15–25%.
- Add +5 to +10 exposure or brightness — never more.
- Feather the selection so the gum edges blend naturally.
- Never touch the outer edges of the teeth. You will lose dimensional shadow and the smile will flatten.
AI tools like Retouch4me White Teeth and Aftershoot Retouch handle this well for volume headshots. For bridal and editorial jobs, keep human hands on the wheel.
Technique 8: Hair Cleanup — The Detail Clients Notice Silently
Clients rarely say “your hair retouching is amazing,” but they always feel it when it’s missing. Flyaways and stray hairs pull the eye off the face and make an image look unfinished.
How to clean hair like a pro:
- Zoom to 100% and use the Spot Healing Brush for individual flyaways against clean backgrounds.
- Use the Clone Stamp with a small brush along complex hairlines.
- For thicker groups of stray hairs, sample nearby hair texture and paint on a Sample-All-Layers layer.
- Use the Pen tool for hard edges when the hair meets a busy background — this is essentially a mini clipping path.
- Never over-clean. A portrait with zero flyaways looks CGI.
Volume shoots — weddings, corporate rosters — often outsource hair cleanup because it can eat entire days.
Technique 9: Body Contouring With Ethics in Mind
Liquify is powerful. That power is also easy to abuse. In 2026, ethical body work is the industry standard — subtle refinement, never transformation.
Acceptable uses of Liquify:
- Fixing clothing folds that pull unnaturally.
- Straightening posture where the pose distorted the frame.
- Smoothing background bulges caused by tight garments.
- Correcting lens distortion on faces near the edges of wide shots.
What to avoid:
- Reshaping a subject’s real body proportions without consent.
- Slimming faces to the point of losing bone structure.
- Enlarging eyes or lips — the most common giveaway of amateur work.
Retouching ethics matter more than ever. The EU AI Act’s Article 50 transparency rules — active from August 2026 — now require disclosure of AI-generated or heavily manipulated imagery in many commercial contexts. If you contour or use generative AI edits, always ask the client and, where required, label the image.
Technique 10: Wrinkles, Clothing, and Glare — The “Small Wins” Stage
This is where high-end retouching separates itself from the crowd. Every small issue you catch here is a small gift to the client.
Checklist for this stage:
- Soften — do not delete — expression lines and forehead wrinkles.
- Smooth clothing folds with Clone Stamp or Content-Aware Fill.
- Remove glare on glasses with a masked Curves adjustment.
- Repair collar creases and shirt wrinkles.
- Fix stray earring reflections and lipstick smudges.
Never wipe wrinkles completely from someone over 30. It ironically ages the image, because the human eye reads texture-less faces as artificial. The same cleanup logic applies to fashion and ecommerce — our guide on removing clothing wrinkles walks through the fabric-preserving version of these techniques.
Ready to see the difference expert retouching makes on your portraits?
Test our premium Beauty Retouching Services today with a free, no-obligation trial.
Technique 11: Micro-Contrast and Selective Sharpening
Global sharpening is a beginner move. Pros sharpen only where the eye should land — usually the eyes, brows, lips, and hair.
How to sharpen selectively:
- Stamp a merged layer at the top of your stack (Ctrl/Cmd + Shift + Alt + E).
- Apply High Pass filter at 1.5–3 px.
- Change blend mode to Overlay or Soft Light.
- Add a black mask and paint back sharpness only where you want it.
- Zoom to 50%, which is roughly how viewers see your final image.
Add micro-contrast (Clarity in Camera Raw, Structure in Nik Collection) to hair and jewelry, never to skin. Skin clarity above 15 is where “grandma’s skin” begins.
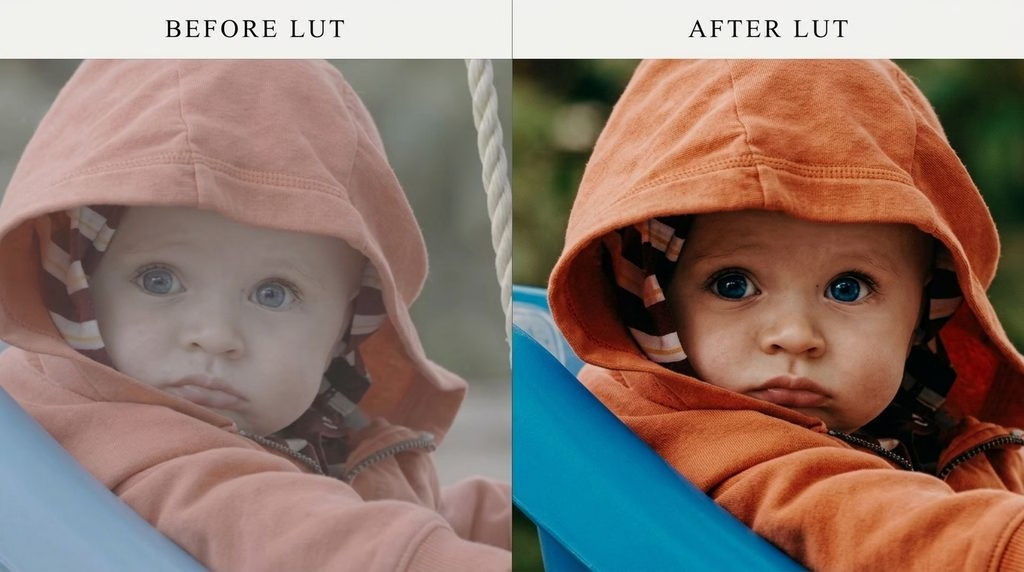
Technique 12: Color Grading With LUTs and Split Toning
Color grading is the mood layer. It is what makes an image feel like your image, not a generic edit. Most professionals split their approach into two stages:
- Balancing — neutralize skin tones first with white balance and HSL sliders.
- Grading — then apply mood using LUTs, Color Grading wheels, or Selective Color.
Popular 2026 portrait grading looks:
- Warm neutral: slight peach in highlights, teal in shadows — the classic “clean editorial.”
- Muted matte: lifted blacks with reduced saturation for a filmic, timeless feel.
- Golden hour boost: amber highlights with cooler blue-green shadows for outdoor sessions.
- High-fashion desaturation: almost-monochrome with skin left slightly saturated as the visual anchor.
Save your grade as a preset or LUT. Consistency across a shoot is what separates a real photographer from a hobbyist. If you’re new to grading, our color grading guide covers the fundamentals in more depth.
Technique 13: Output Sharpening and Export
The last mile matters. A portrait sharpened for print looks soft on Instagram, and one sharpened for the web looks brittle in a magazine.
Practical output settings:
- Web / screen: export sRGB at 2048–2500 px on the long edge, Amount 50–80, Radius 0.5–1.0 px.
- Matte print: more aggressive output sharpening (Amount 100–150) because ink absorbs and softens edges.
- Glossy print: moderate output sharpening (Amount 80–120); the surface already appears sharper.
- Editorial CMYK: convert late, sharpen for the medium, and always soft-proof.
Save a layered PSD master, then export flat JPEG or TIFF variants for each destination. This is also the point to double-check your image format choice for whichever platform will host the final file.
Retouching Different Skin Tones the Right Way
One of the most underrated skills in 2026 retouching is understanding that skin tones are not one-size-fits-all. A workflow tuned for pale European skin will crush shadow detail on deep melanin-rich skin, and vice versa.
Practical tone-specific tips:
- Deep and dark skin tones: protect shadow detail first — slightly overexpose in-camera by ⅓ to ⅔ of a stop, then lift shadows gently in post. Avoid heavy contrast, which can turn skin flat and ashy.
- Medium and olive tones: watch for green casts under mixed lighting. Use a Selective Color adjustment layer on the Yellows and Neutrals to pull greens toward warmer tones.
- Fair and light tones: protect highlights aggressively. Cheekbones and foreheads blow out fast, especially under strobes.
- Multi-subject group shots: use luminosity masks or targeted brushes to correct each tone separately — never apply a single global grade to a group of mixed skin tones.
Adobe’s own skin tone adjustment guide walks through the Selective Color method for uneven skin patches, and it’s a good starting point for anyone new to targeted color work.
Retouching by Genre: Headshots vs. Beauty vs. Wedding
The 13 techniques apply to every portrait, but the dosage changes dramatically by genre. Here is how professionals scale their edits.
| Genre | Retouch Depth | Skin Handling | Typical Time |
|---|---|---|---|
| Corporate headshots | Light | Preserve texture, remove blemishes only | 5–15 min |
| Beauty & editorial | Heavy | Frequency separation + D&B + selective sharpening | 30–90 min |
| Wedding portraits | Medium | Even tone across many subjects, natural finish | 8–20 min |
| Glamour & fashion | Very heavy | Sculpted skin, dramatic color grading | 45–120 min |
| Family & lifestyle | Light–medium | Natural, preserve authenticity | 5–12 min |
Genre-specific pitfalls to avoid:
- Headshots: never over-slim faces — LinkedIn viewers meet the person in real life within weeks.
- Wedding portraits: consistency across the gallery matters more than individual perfection.
- Beauty work: never remove pores; they are the visual proof of realism.
- Fashion: subtle Liquify only, and always match the shoulders to the face.
For studios juggling multiple genres, learning how to outsource photo editing intelligently is often the difference between profitability and burnout.
Retouching Men’s Portraits: A Different Set of Rules
Male portrait retouching is not just “female retouching with less makeup cleanup.” Men’s skin carries texture that reads as character — beard stubble, jawline shadows, pronounced pores.
Rules for retouching men:
- Keep stubble detail sharp. Never blur it into the skin.
- Do not remove five-o’clock shadow unless the client explicitly asks.
- Preserve forehead lines and crow’s feet on subjects over 30. They signal authority.
- Reduce redness with Selective Color on Reds, not by desaturating.
- Sharpen brows and beard edges — this is where masculine portraits gain their punch.
Skip aggressive frequency separation on men. It removes the very texture that makes the portrait feel real.
AI vs. Manual Retouching in 2026: Which Should You Choose?
Both. That’s the honest answer.
| Task | Best Handled By | Why |
|---|---|---|
| Culling 3,000 wedding photos | AI (Aftershoot, Imagen) | Speed and consistency |
| Basic color and exposure | AI batch tools | Uniform look across a gallery |
| Skin cleanup on hero frames | Manual Photoshop | Human judgment on texture |
| Editorial covers | Manual + light AI | Total creative control |
| High-volume ecommerce headshots | AI + human QA | Cost efficiency, natural output |
The photographers thriving in 2026 use AI for the boring 80% and manual craft for the memorable 20%. Adobe’s Photoshop 2026 release now supports Generative Fill with reference images, meaning you can guide AI edits using a specific visual source — a huge leap for retouching consistency across a gallery. For a broader landscape, see our roundup of the best AI photo editing software this year.
Need your images edited faster without sacrificing quality?
Our streamlined process delivers premium results in as little as 6 hours. Explore our fast-turnaround services
The 7 Retouching Mistakes That Instantly Kill a Portrait
Every professional retoucher has a mental blacklist. Here is theirs.
- Plastic skin — over-blurred frequency separation removes all pores.
- Glowing teeth — pure-white teeth kill dimension in the mouth.
- Cartoon eyes — over-sharpened, over-brightened, and enlarged.
- Halos around hair — usually from careless dodging or bad masking.
- Muddy color — combining aggressive HSL with heavy LUTs.
- Uneven skin tones — forehead retouched, neck ignored.
- Over-Liquify — reshaped faces that don’t match the neck or shoulders.
Avoiding these takes discipline, not skill. Zoom out often, take breaks, and compare against the original at every stage.
Tools the Pros Actually Use in 2026
Here is the honest short list — no affiliate fluff.
- Adobe Photoshop 2026 — still the retouching gold standard, now with Generative Upscale and Harmonize.
- Adobe Lightroom Classic / Capture One 2026 — RAW conversion and grading.
- Retouch4me plugins — one-click AI for skin, teeth, eyes, dodge & burn.
- Imagen AI — cloud-based, learns your personal editing style; runs at roughly 20 minutes per 2,500 photos.
- Aftershoot — culling plus AI retouching in one interface.
- Evoto AI — batch beauty retouching aimed at wedding shooters.
Portrait Retouching Pricing 2026: What to Charge (or Pay)
Whether you’re the retoucher or the photographer buying the service, here are honest 2026 benchmarks.
| Retouch Type | Per-Image Range | Hourly Range |
|---|---|---|
| Basic headshot cleanup | $0.50–$5 | $15–$35 |
| Standard portrait retouch | $5–$25 | $30–$65 |
| High-end beauty / editorial | $30–$150+ | $65–$150 |
| Commercial / advertising | $75–$300+ | $75–$300 |
| Wedding gallery (bulk) | $0.50–$3 per image | Volume-based |
Freelance rates from marketplace data show experienced editors commonly bill $30–$150 per hour, with a median of about $65/hour according to industry rate surveys. Studios typically charge less per image at volume but recover on turnaround speed. For a deeper decision framework, our photo editing cost guide walks through pricing tiers.
When to DIY vs. Outsource Portrait Retouching
Outsourcing is not admitting defeat — it is time math. If you spend 45 minutes retouching a headshot and charge $200 per session, you’re earning under $60/hour after culling. Pro services start well below $2 per image at scale, which frees you to shoot and market more.
Outsource when:
- Volume exceeds 100 images per week consistently.
- You’re a wedding shooter with 3-week delivery deadlines.
- You need CMYK-ready commercial images.
- You want a consistent look across a growing team.
DIY when:
- You’re building a signature editing style.
- The project is highly personal or artistic.
- You have fewer than 50 images and time to spare.
The Portrait Retouching Ethics Checklist for 2026
Retouching ethics went from “nice to have” to “legally relevant” this year. A quick self-check before you export:
- ✅ Did I get the subject’s consent for reshaping or heavy manipulation?
- ✅ Did I preserve permanent features (freckles, scars, birthmarks)?
- ✅ Am I disclosing AI-generated elements where required by regional law?
- ✅ Is the final image a version the subject would recognize as themselves?
- ✅ Have I avoided altering ethnic features to match a “beauty standard”?
Meeting all five is not just ethical — it’s increasingly a legal expectation in the EU, California, and other jurisdictions updating their AI transparency rules.
Need your images to be marketplace-ready (Amazon, Shopify, etc.)?
Ensure compliance and quality with our professional Photo Retouching
Quick Portrait Retouching Checklist (Save This)
Print this. Tape it to your monitor. Thank me later.
- Shoot RAW and back up before touching a single slider.
- Cull with AI, then choose your hero frames.
- Set global exposure, white balance, and contrast first.
- Heal only temporary blemishes on a separate layer.
- Run frequency separation on the low frequency only.
- Dodge and burn to sculpt light — sparingly.
- Retouch eyes with layered micro-adjustments.
- Whiten teeth subtly (yellow saturation −20%, brightness +5).
- Clean flyaway hairs at 100% zoom.
- Use Liquify ethically or not at all.
- Sharpen selectively with High Pass.
- Apply your signature color grade as a preset.
- Export with the correct output sharpening for screen or print.
Frequently Asked Questions
1. How long does a professional portrait retouch take?
A high-end beauty retouch typically takes 30–90 minutes per image, including frequency separation, dodge & burn, and color grading. A basic headshot retouch (skin cleanup, eyes, teeth) runs 10–20 minutes. AI-assisted workflows can compress this to 2–5 minutes for standard portraits, though hero frames still deserve manual finishing.
2. What’s the difference between basic and high-end portrait retouching?
Basic retouching removes visible blemishes and balances color. High-end retouching adds frequency separation, dodge & burn sculpting, selective sharpening, detailed hair cleanup, and precise color grading — the workflow used for editorial, beauty, and commercial covers.
3. Should I use AI portrait retouching tools in 2026?
Yes, for speed. AI now handles culling, exposure, teeth, and basic skin cleanup extremely well. But you should still review every hero frame by hand, because AI still tends to over-smooth skin and remove personality marks like freckles.
4. What’s the best software for portrait retouching?
Adobe Photoshop remains the industry standard for detailed work. Pair it with Lightroom or Capture One for RAW conversion, and layer AI tools like Retouch4me, Imagen, or Aftershoot for batch efficiency. Beginners can start with our best retouching software shortlist.
5. How do I retouch skin without making it look fake?
Never blur the high-frequency (texture) layer. Work on color unevenness on the low-frequency layer only, keep pores visible, and lower final layer opacity to 60–80%. Zoom to 100% and 50% often — you’ll spot fakeness at one zoom level that hides at the other.
6. Is frequency separation still relevant in 2026?
Yes. It remains the gold standard for high-end beauty and editorial work. AI can imitate it, but human-run frequency separation still delivers the most natural skin because the retoucher decides exactly which areas need color correction and which do not.
7. How much should I charge for portrait retouching?
Freelance rates run roughly $5–$25 for basic headshots, $30–$75 for standard beauty work, and $100–$300+ for editorial or commercial jobs. Studios generally charge less per image at volume. Rates depend on your market, turnaround, and revision policy.
8. Can AI replace professional retouchers?
Not for premium work — and probably not soon. AI is excellent at repetitive corrections, but human retouchers still win on taste, storytelling, and skin realism. The winning approach in 2026 combines both.
Final Thoughts
Portrait retouching in 2026 is less about which button to press and more about which decisions to make. The 13 techniques in this guide give you the technical foundation — RAW discipline, frequency separation, dodge and burn, careful eye and teeth work, hair cleanup, ethical body contouring, tasteful color grading, and correct output sharpening. What separates working professionals from hobbyists is the restraint to know when to stop.
Retouch the temporary things. Keep the permanent things. Make people look like themselves on their best day — not like a stranger. That single principle, applied stage by stage, will keep your work relevant no matter how far AI evolves next year.
Ready to elevate your brand’s visual presence?
Partner with Clipping Expert Asia for fast, secure, and premium image editing starting at just 25¢. Explore all our services