

What Is HDR? HDR vs SDR: Brightness, Color & Formats Explained
October 6, 2026
How to Recover Deleted Photos & Videos from a GoPro SD Card After a Trip
October 8, 2026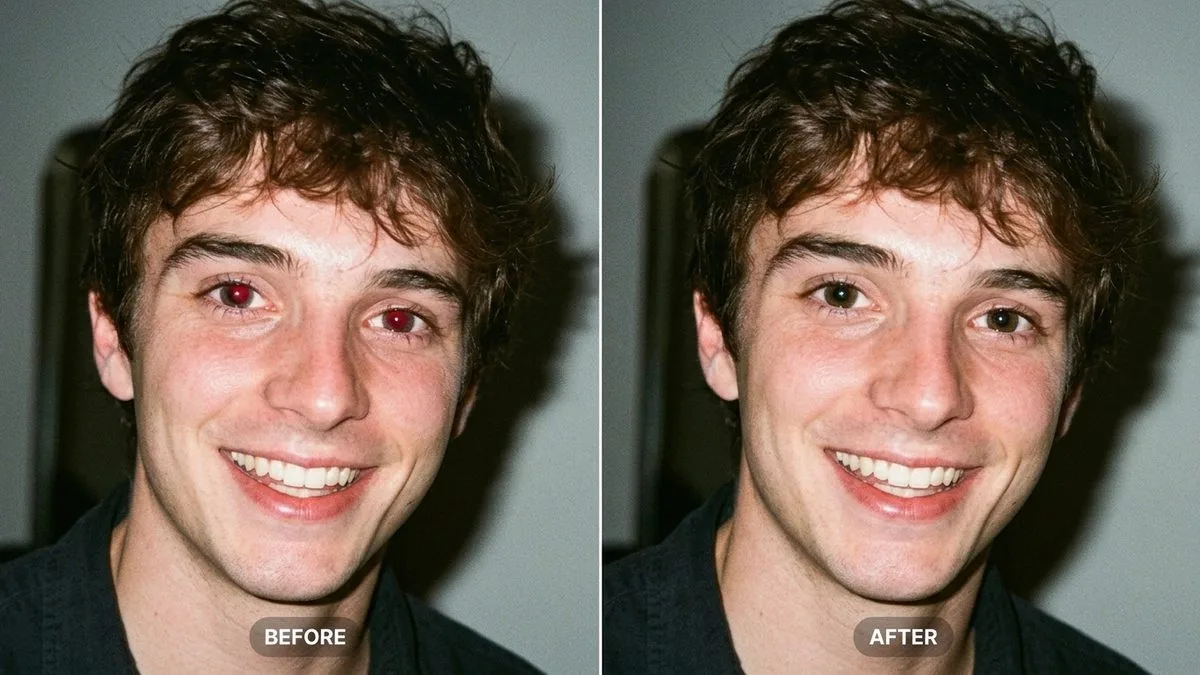
- TL;DR: The Short Answer
- What Causes Red Eye, Exactly?
- Quick Comparison: Every Red Eye Removal Method
- How to Remove Red Eye in Lightroom (Step by Step)
- How to Remove Red Eye in Photoshop (Two Methods)
- Remove Red Eye on iPhone, Android, and Free Online Tools
- Pet Eye: The Green and Yellow Glow (Harder to Fix)
- How to Prevent Red Eye (Better Than Fixing It)
- 6 Pro Tips for Natural-Looking Results
- 5 Common Red Eye Removal Mistakes (and How to Avoid Them)
- Frequently Asked Questions
- Final Verdict
TL;DR: The Short Answer
Red eye happens when your camera’s flash bounces off the blood-rich retina at the back of your subject’s eye and reflects straight back into the lens — almost always with on-camera flash in a dark room. To remove it in Lightroom, go to the Develop module, select the Red Eye Correction tool (press R), click or drag over each red pupil, and adjust the Pupil Size and Darken sliders until the eye looks natural. In Photoshop, use the Red Eye Tool (nested under the Spot Healing Brush, shortcut J) — click each pupil and it fixes it automatically. On your phone, iPhone Photos and Google Photos do it in one tap. The best fix is prevention: bounce the flash, raise the room light, or use red-eye reduction mode. This guide walks through every method in detail, how to preserve catchlights, fix pet eye (green/yellow glow), and avoid the common mistakes that make corrected eyes look fake.
What Causes Red Eye, Exactly?
Red eye is not a camera defect — it is simple optics, and understanding it tells you both how to fix it and how to prevent it. In a dark room, your subject’s pupils are wide open to let in as much light as possible. When the flash fires, a burst of light travels through the dilated pupil, hits the retina at the back of the eye, and reflects straight back. The retina is packed with blood vessels, so the reflected light picks up that distinct red glow. Because the flash sits right next to the lens on most cameras and phones, that reflected light goes straight back into the lens — and the camera captures it.
Red eye is worse when:
- The room is dark (pupils are fully dilated)
- The flash is on-camera or built-in (close to the lens axis)
- The subject looks directly at the camera
- The subject is close to the lens
- The subject has lighter-colored eyes or dilated pupils
The single biggest factor is flash-to-lens distance. Even moving the flash 10–15 cm off the lens axis drastically reduces red eye, because the reflected light no longer bounces straight back into the lens. That is why professional photographers with external flashes almost never get red eye.
Quick Comparison: Every Red Eye Removal Method
| Method | Platform | Cost | Difficulty | Best for |
|---|---|---|---|---|
| Lightroom Red Eye Correction | Desktop | Subscription | Easy (2 clicks) | Photographers editing batches |
| Photoshop Red Eye Tool | Desktop | Subscription | Easy (1 click) | Precise control, manual fallback |
| iPhone Photos | iOS | Free | One tap | Quick phone fixes |
| Google Photos | Android/iOS | Free | One tap | Quick phone fixes |
| Fotor / Picsart / LunaPic | Online | Free tier | Easy | No download needed |
| Snapseed | Mobile | Free | Moderate | Manual on-device editing |
| GIMP | Desktop | Free | Moderate | Free desktop editing |
How to Remove Red Eye in Lightroom (Step by Step)
Lightroom Classic makes red eye removal non-destructive, fast, and easy to batch across hundreds of event photos. Adobe’s official red eye remover guide covers the same workflow.
- Open the photo in the Develop module. Zoom in to 100% on the eyes (press Z or Ctrl/Cmd + plus) so you can see the pupil and iris clearly.
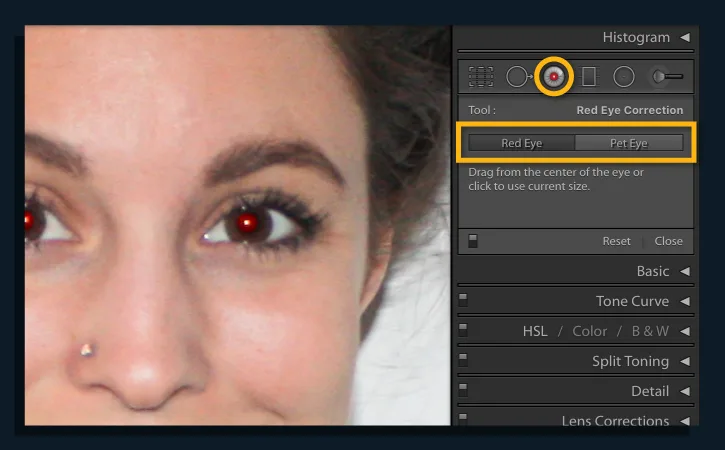
- Select the Red Eye Correction tool. It is the eye icon in the tool strip directly under the Histogram, or press R on your keyboard.
- Choose the right mode. The default is Red Eye for people. Toggle to Pet Eye if you are fixing green or yellow animal eye glow.
- Apply the correction. You have two options: click once in the center of the pupil and Lightroom auto-sizes the correction, or click and drag a circle from the center outward to cover the pupil and iris without touching the surrounding skin.
- Fine-tune the two sliders:
- Pupil Size — controls how much of the eye gets corrected. If red remains at the edges, increase it; if it darkens the colored iris, decrease it.
- Darken — controls how dark the corrected pupil becomes. Too low and the eye looks grey and unnatural; too high and you get a flat black hole with no depth. Start at 50 and nudge in small increments.
- Repeat on the other eye. Match the Pupil Size and Darken values so both eyes look identical.
- Try Auto Correct (newer versions). Lightroom’s June 2022 update added an Auto Correct button that detects both eyes and fixes them in one click. Use it as a starting point, then fine-tune the sliders.
The correction is fully non-destructive. You can select the circle and move or resize it at any time, or click Reset to remove it entirely. For wedding and event photographers dealing with hundreds of flash photos, building a wedding editing workflow that includes a dedicated red-eye pass will save you hours of rework.
How to Remove Red Eye in Photoshop (Two Methods)
Photoshop gives you an automatic one-click tool plus a manual method for the tricky cases where the automatic tool leaves grey or unnatural-looking eyes. Adobe’s guide on removing red eye covers both approaches.
Method 1 — Red Eye Tool (fast, works 90% of the time):
- Zoom in to 100% on the eyes.
- Click and hold the Spot Healing Brush in the toolbar to reveal the nested tools, and select the Red Eye Tool (or press J, then Shift+J to cycle through the group until you reach it).
- In the options bar at the top, set Pupil Size and Darken Amount — start at 50% for both.
- Click directly on the center of each red pupil, or drag a small rectangle around the eye. Photoshop detects the red and replaces it with a natural dark pupil.
- If the result is too light or too dark, undo (Ctrl/Cmd+Z) and adjust the sliders before clicking again.
Method 2 — Manual Hue/Saturation (for difficult cases):
When the automatic tool leaves a grey ring or an unnatural look, do it by hand:
- Zoom in and select the red pupil carefully with the Lasso or Quick Selection tool. Feather the selection by 1–2 pixels so the edge blends.
- Add a Hue/Saturation adjustment layer. In the Edit dropdown at the top, choose Reds (not Master) — this targets only the red values.
- Drag the Saturation slider down to about -80 to -100. The red disappears. Lower the Lightness slightly (-5 to -10) so the pupil has depth instead of a flat grey.
- Use the layer mask to clean up any spill onto the iris, whites of the eye, or skin.
- For a final natural touch, use the Burn tool set to Midtones with low exposure (10–20%) to darken the pupil slightly. Most importantly, preserve the catchlight — the tiny white reflection of the light source in the eye. That small highlight is what makes an eye look alive; if you darken it away, paint it back with a tiny white brush on a new layer.
If you do a lot of this kind of touch-up, our guide on how to remove blemishes in Photoshop uses the same selection-plus-adjustment-layer workflow, and a solid portrait retouching routine will cover eyes, skin, and teeth in one consistent pass.
Remove Red Eye on iPhone, Android, and Free Online Tools
You do not need desktop software for a quick fix — most phones and browsers handle it in seconds.
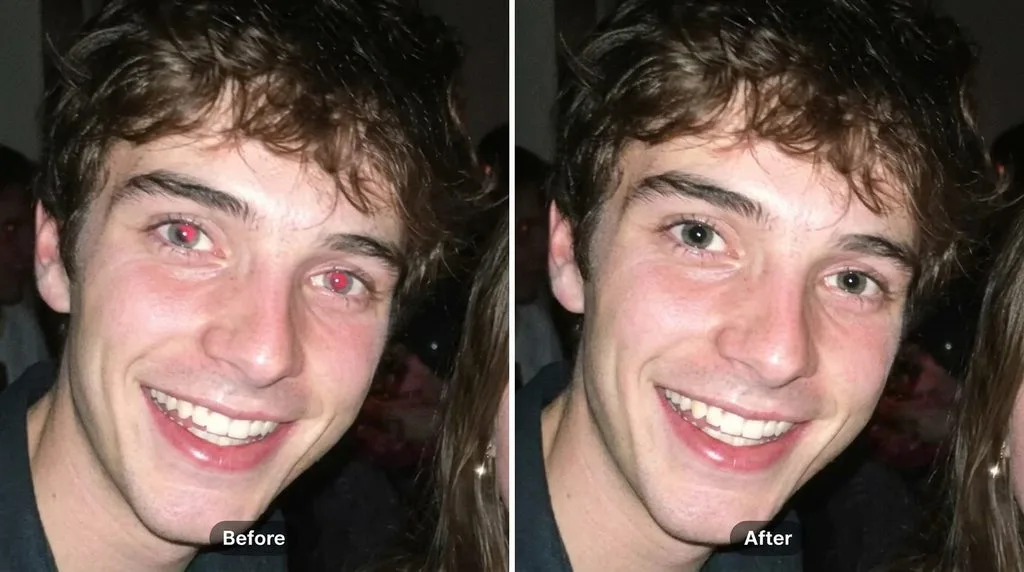
- iPhone (Apple Photos): Open the photo, tap Edit in the top right, then tap the crossed-out-eye icon in the editing toolbar. It only appears if iOS detects a face with red eye, so if you do not see it, zoom in and tap manually. Tap each red pupil to fix it. Apple’s official remove red-eye guide confirms the same one-tap flow on Mac too.
- Android (Google Photos): Open the photo, tap Edit, and look for the red-eye option — it auto-detects and fixes both eyes in one tap.
- Free online: Fotor, Picsart, and LunaPic all offer browser-based red-eye removal with no download or account required. Upload, click the red-eye tool, tap each eye, download.
- Snapseed (free mobile): Google’s professional mobile editor does not have a dedicated red-eye button, but you can use the Healing tool or selective edits to manually correct it when auto-tools fail.
- GIMP (free desktop): The open-source editor has a red-eye removal filter under Filters > Enhance > Red Eye Removal.
For newborn and baby photos — where flash is common and red eye is especially distracting — our newborn photography editing guide covers gentle eye correction that keeps baby photos looking natural.
Pet Eye: The Green and Yellow Glow (Harder to Fix)
Animals get a different problem called pet eye — a green, yellow, or sometimes white glow caused by the tapetum lucidum, a reflective layer behind the retina that helps animals see in low light. It does not respond to the standard red-eye tool because the color is not red.
Lightroom’s Pet Eye mode (in the same Red Eye Correction tool) is designed for this, but results vary because the glow covers the whole eye, not just the pupil. For stubborn cases, you will usually need to work manually:
- Zoom in and select the glowing area carefully.
- On a new layer set to Color blend mode, paint over the glow with a natural dark pupil and iris color sampled from a reference.
- Lower the layer opacity until it blends naturally.
- Add a small catchlight with a white brush — without it, the eye looks dead.
- Use the Burn tool to add natural depth to the pupil.
Patience pays off here. A glowing animal eye looks far more unnatural than a human red eye, and clients notice immediately.
How to Prevent Red Eye (Better Than Fixing It)
Fixing red eye in post is a band-aid. Prevent it at the shoot with these techniques, roughly in order of effectiveness:
- Bounce the flash. Point an external flash at the ceiling or a nearby wall. The light comes from above or the side, not the lens axis, so it cannot reflect straight back. Bounce flash also gives softer, more flattering light and better skin tones.
- Move the flash off-camera. Even 10–15 cm of separation between flash and lens drastically reduces red eye. An external speedlight on a bracket or a cordless trigger solves it completely.
- Raise ambient light. Turn on room lights or open curtains. Brighter ambient light constricts pupils, so less flash reaches the retina. This is the easiest fix at parties and events.
- Use red-eye reduction mode. Most cameras fire one or more pre-flashes that make pupils constrict before the real exposure. It works reasonably well but can make people blink or look away.
- Ask subjects to look slightly away from the lens, or at a point just beside the camera. A direct gaze straight into the lens is the worst case.
- Avoid flash when you can. Use a wider aperture, higher ISO, or slightly slower shutter speed so you do not need the flash at all. Modern cameras handle ISO 3200–6400 cleanly.
If flash is also causing reflections on your subject’s glasses, that is a related problem worth fixing at the same time — our guide on removing glasses glare in Photoshop walks through it.
6 Pro Tips for Natural-Looking Results
- Preserve the catchlight. Never darken away the small white highlight in the eye. It is what makes an eye look alive. If your correction covers it, paint it back with a tiny white brush at low opacity.
- Match both eyes exactly. Fix one eye, note the Pupil Size and Darken values, then apply the same settings to the other. Mismatched eyes are more noticeable than the original red eye.
- Do not over-darken. A natural pupil is dark grey with depth and a hint of the iris around the edge — not a pure black circle. Pure black reads as fake and dead.
- Keep the correction on the pupil only. If it spills onto the colored iris, reduce Pupil Size. A darkened iris looks immediately wrong.
- Check at 100% zoom. Red eye can look fixed on a small screen or thumbnail but leave a faint red ring at full size. Always zoom in to confirm.
- Do it early in the edit. Fix red eye before skin smoothing, whitening, or color grading, so your later adjustments apply to a clean base. A good photo editing guide will put retouching steps like this in the right order.
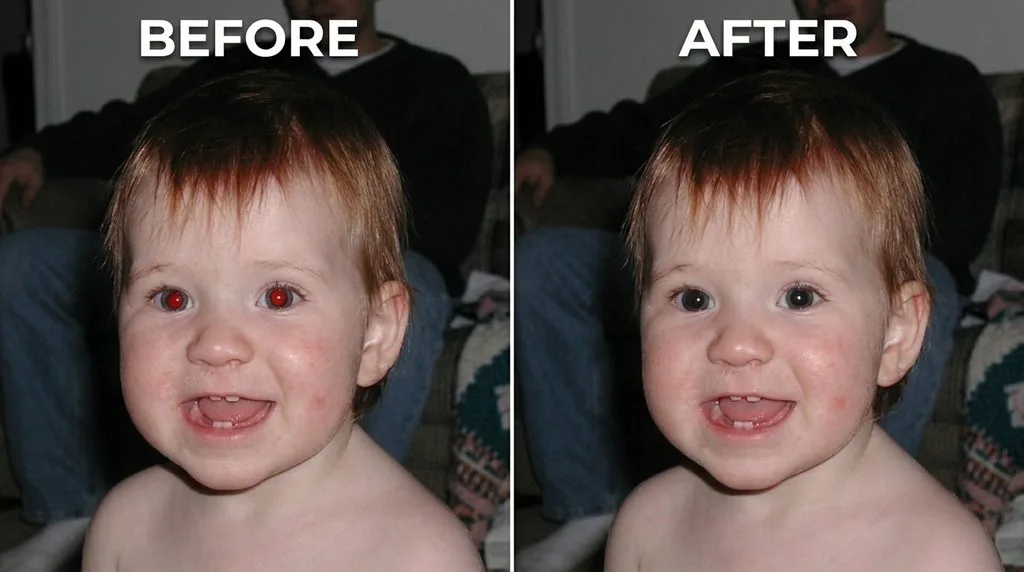
5 Common Red Eye Removal Mistakes (and How to Avoid Them)
- Correcting too large an area — the circle covers the iris and turns the whole eye dark. Fix: reduce Pupil Size and resize the circle to the pupil only.
- Darken set too high — the pupil becomes a flat black hole with no catchlight. Fix: lower Darken and paint the catchlight back in.
- Only fixing one eye — the mismatch is jarring. Fix: always do both, with matching settings.
- Leaving a faint red ring — at 100% zoom you see red around the corrected pupil. Fix: increase Pupil Size slightly or use a Hue/Saturation layer on the Reds channel to clean the edge.
- Sharpening before fixing — sharpening amplifies the red edge and makes it harder to remove cleanly. Fix: remove red eye before any sharpening or detail work.
Frequently Asked Questions
What causes red eye in photos?
Red eye is caused by your camera’s flash reflecting off the blood-rich retina at the back of the eye. It happens most with on-camera flash in dark rooms, where pupils are dilated and the reflected light bounces straight back into the lens.
How do I remove red eye in Lightroom?
In the Develop module, select the Red Eye Correction tool (press R), click or drag a circle over each red pupil, then adjust the Pupil Size and Darken sliders until the eye looks natural. Newer Lightroom versions have an Auto Correct button. The edit is non-destructive and reversible.
How do I remove red eye in Photoshop?
Use the Red Eye Tool (under the Spot Healing Brush, shortcut J cycle) — set Pupil Size and Darken Amount to 50%, then click each pupil. For difficult cases, select the pupil, add a Hue/Saturation adjustment layer on the Reds channel, and desaturate to -80 to -100, then add depth with the Burn tool.
Can I remove red eye on my iPhone for free?
Yes. Open the photo in Apple Photos, tap Edit, tap the crossed-out-eye icon (it appears when iOS detects red eye), and tap each pupil. Google Photos on Android has the same one-tap feature. No extra app needed.
How do I prevent red eye when taking photos?
Bounce the flash off a ceiling, move the flash off-camera, raise the room light so pupils constrict, use the camera’s red-eye reduction pre-flash mode, ask subjects to look slightly away from the lens, or avoid flash entirely with higher ISO and wider aperture.
What is pet eye and how do I fix it?
Pet eye is the green/yellow/white glow in animal photos caused by the tapetum lucidum, a reflective layer behind the retina. Use Lightroom’s Pet Eye mode, or manually paint a natural pupil on a Color blend mode layer and add a catchlight by hand.
Why does my corrected eye look grey or fake?
Usually the Darken slider is too low, or the correction covers too much of the iris. Increase Darken slightly, reduce Pupil Size so it only covers the pupil, and make sure the catchlight (white highlight) is still visible. A pure black pupil always looks fake.
Can I remove red eye in bulk for many photos?
Yes — in Lightroom, you can copy the red-eye correction from one photo and paste it to others with similar eye position, or use the Auto Correct button on each in a few seconds. For very large batches, some AI-powered online tools auto-detect and fix red eye across an entire album.
Final Verdict
Red eye is one of the easiest portrait problems to fix — and one of the easiest to prevent. In Lightroom or Photoshop, it is a two-click job; on your phone, it is one tap. The trick to natural results is restraint: match both eyes, keep the catchlight, do not over-darken, and never let the correction spill onto the iris. But the real pro move is to never have it in the first place — bounce that flash, brighten the room, move the flash off the lens, and your subjects will look like people, not demons.