

How to Colorize Black and White Photos: 2026 Step-by-Step Guide
October 2, 2026
What Is HDR? HDR vs SDR: Brightness, Color & Formats Explained
October 6, 2026
- TL;DR: The Short Answer
- What Does Sharpening an Image Do, Exactly?
- 5 Signs You Oversharpened (and How to Fix It)
- Method 1: Photoshop Unsharp Mask (The Classic)
- Method 2: Smart Sharpen (The Pro's Choice)
- Method 3: High Pass Filter (Best for Local Sharpening)
- Method 4: Lightroom Detail Panel (Fastest Workflow)
- Sharpening vs Clarity vs Texture vs Dehaze (Stop Confusing Them)
- Method 5: AI Sharpeners and Deblur (For Genuinely Blurry Shots)
- The Three-Level Sharpening Workflow (Pros Use This)
- Get It Right in Camera (The Best Sharpening Is No Sharpening)
- 7 Pro Rules for Sharper Results Without the Damage
- When NOT to Sharpen (and What to Do Instead)
- Frequently Asked Questions
- Final Verdict
TL;DR: The Short Answer
Sharpening an image boosts contrast along edges — darkening the dark side of an edge and brightening the light side — so your eye perceives more detail. It does not recover detail that was never captured. To sharpen well: reduce noise first, work at 100% zoom, use Smart Sharpen or Unsharp Mask in Photoshop (Amount 80–120%, Radius 0.5–1.5px, Threshold 2–5) or the Detail panel + Masking in Lightroom, apply it on a masked layer so you can protect skin and skies, and sharpen last — after resizing, before output. If a photo is genuinely blurry, an AI deblur tool (Topaz, Remini, Adobe Firefly) will do more than any sharpening slider. And the best sharpening happens in camera: shoot at f/5.6–f/8, use a fast shutter speed, and focus on the eye. This guide explains exactly what sharpening does, every method, and how to avoid the halos and noise that ruin oversharpened photos.
What Does Sharpening an Image Do, Exactly?
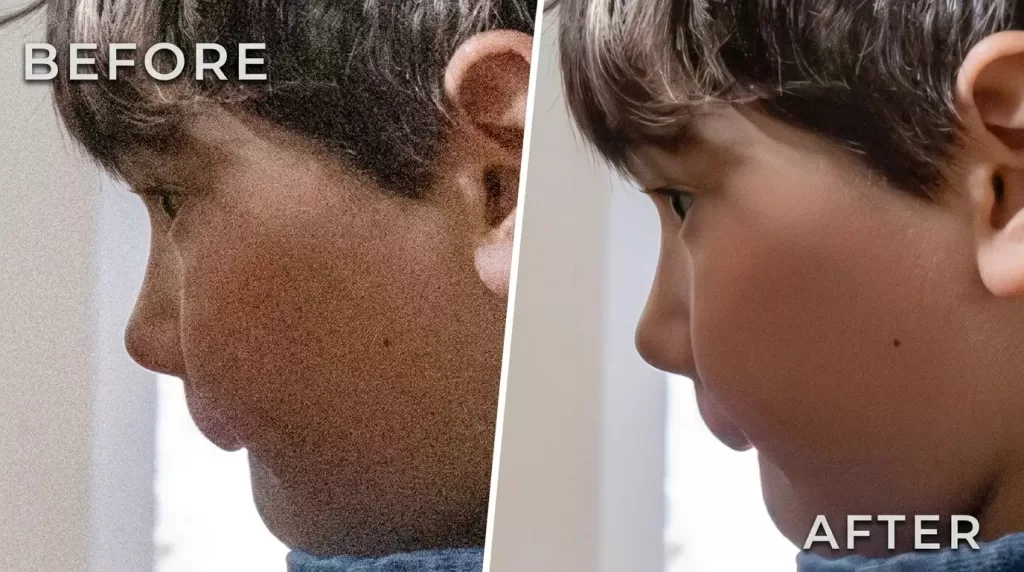
Sharpening does not add detail. It increases local contrast along the edges in your photo. Where a dark object meets a light background, the algorithm darkens the dark pixels a touch and brightens the light pixels a touch. Your eye reads that stronger edge as “sharper” — a property called acutance. The actual pixel count never changes. Adobe’s official guide to unsharp masking confirms this: the contrast creates the illusion of greater detail.
This matters because it tells you the limits. A photo that is out of focus, motion-blurred, or low-resolution is missing real information. Sharpening can make it look crisper, but it cannot invent the missing detail. For that, you need AI deblur or upscaling, which actually reconstructs pixels — a different tool entirely.
5 Signs You Oversharpened (and How to Fix It)
Push the sliders too far and the damage is obvious once you know what to look for:
- Halos — bright or dark fringes around high-contrast edges (the #1 tell). Lower the Radius or Amount.
- Noise in smooth areas — skies, walls, and skin turn grainy because sharpening amplifies every tiny variation. Raise the Threshold or use a mask to protect those areas.
- Crunchy texture — skin, fur, and fabric look unnatural and over-processed. Reduce Amount.
- Jagged edges — diagonal lines and curves look stair-stepped. Lower Radius.
- Glowing highlights — bright edges develop a neon rim. Reduce Amount or use the Fade control in Smart Sharpen.
If you already oversharpened, step back: lower the layer opacity, run a gentle Gaussian blur on a masked layer over the worst halos, or reduce the sharpening amount in your history. Prevention is easier — always start low and increase gradually.
Method 1: Photoshop Unsharp Mask (The Classic)
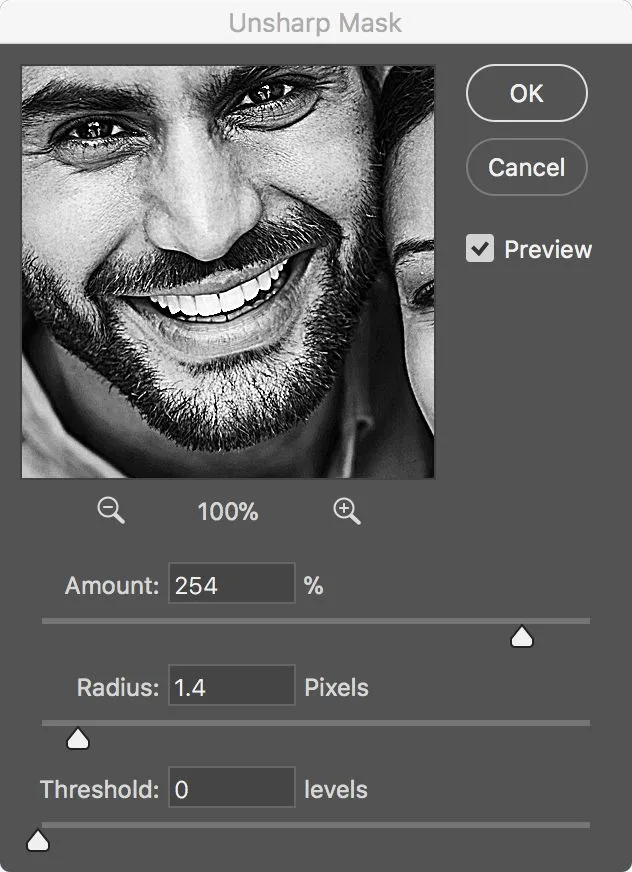
Unsharp Mask (USM) is the standard sharpening filter. It has three sliders, and once you understand them, you will never guess again.
| Slider | What it does | Starting value | Watch out for |
|---|---|---|---|
| Amount | How much contrast is added to edges | 80–120% (web), up to 150% for print | Too high = halos and crunchy texture |
| Radius | How many pixels around each edge get sharpened | 0.5–1.5px (web), 1–2px (print) | Too high = wide halos |
| Threshold | How different two pixels must be to count as an edge | 2–5 | 0 sharpens everything (including noise); high values skip real detail |
A note worth knowing: Photoshop’s default USM settings — Amount 50%, Radius 1.0, Threshold 0 — were designed for old 72ppi monitors. Modern high-resolution sensors and Retina displays usually need a smaller Radius (0.3–0.8px on 45MP+ cameras) and more Amount.
Steps: Duplicate your layer (Ctrl/Cmd+J) so you never sharpen the original. Go to Filter > Sharpen > Unsharp Mask. Check Preview, zoom to 100%, and start with Amount 100%, Radius 1.0, Threshold 3. Increase Amount until you just start to see a halo, then back off 10–20%. Add a black layer mask and paint white only where you want sharpening — eyes, product edges, text. If you edit product photos for ecommerce, that masked sharpening on labels and edges is where you’ll see the biggest payoff in ecommerce product photo editing.
Method 2: Smart Sharpen (The Pro’s Choice)
Smart Sharpen is Photoshop’s more intelligent filter, and most pros prefer it for final output. It adds three things Unsharp Mask lacks:
- Remove dropdown — choose Gaussian Blur (behaves like USM), Lens Blur (finer sharpening, fewer halos — use this most often), or Motion Blur (compensates for camera shake).
- Reduce Noise — smooths the sharpening effect so you do not amplify grain.
- Shadow/Highlight controls — Fade Amount, Tonal Width, and Radius let you reduce halos separately in dark and bright areas.
How to use it: Convert your layer to a Smart Object for non-destructive editing, go to Filter > Sharpen > Smart Sharpen, set Remove to Lens Blur, Amount 100–150%, Radius 0.5–1.0px, and raise Reduce Noise until grain disappears. Use the Shadow/Highlight Fade Amount (around 10–20%) to kill halos while keeping edge sharpness. For noisy or slightly soft files, Smart Sharpen beats Unsharp Mask every time.
Method 3: High Pass Filter (Best for Local Sharpening)
The High Pass method gives you sharpening on its own layer, which means full opacity and mask control. It is the best method for sharpening only the eyes in a portrait or the edges of a product.
- Duplicate your background layer.
- Go to Filter > Other > High Pass. Set Radius to 1–3px (lower = finer, higher = broader). The image should turn mostly gray with faint edges showing.
- Set that layer’s blend mode to Overlay (or Soft Light for subtler, Hard Light for stronger).
- Lower the layer opacity to taste — 30–70% is typical.
- Add a black layer mask and paint white only where you want sharpness.
For portraits, sharpen the eyes, eyelashes, and lips — never the skin. Smooth skin is the enemy of oversharpening, which is why a solid portrait retouching workflow (and frequency separation for advanced work) always separates skin smoothing from detail sharpening.
Method 4: Lightroom Detail Panel (Fastest Workflow)
In Lightroom Classic or Camera Raw, the Detail panel has four sharpening sliders plus the most useful feature of all: Masking.
- Amount — overall strength (25–50 is a normal starting point for RAW; Lightroom’s default is 40).
- Radius — edge width (1.0 is default; 0.8–1.5).
- Detail — how much high-frequency detail is enhanced (low = just edges, high = texture too).
- Masking — the magic slider. Hold Alt/Option while dragging it: white areas get sharpened, black areas are protected. Push Masking to 60–80 and you sharpen only the real edges, leaving skies and skin completely untouched.
Always balance sharpening with noise reduction. If you see grain in the shadows after sharpening, pull the Luminance noise slider up slightly. For a deeper dive on cleaning up grain before you sharpen, our noise reduction tips walk through the order of operations, and FixPhotoLab’s guide on fixing grainy photos covers the same principle: denoise first, sharpen second.
Sharpening vs Clarity vs Texture vs Dehaze (Stop Confusing Them)
Lightroom has four sliders that all feel like “make it sharper,” but they do very different things. Use the right one.
| Tool | What it affects | Best for | Overuse warning |
|---|---|---|---|
| Sharpening | High-frequency edge contrast | Eyes, edges, fine detail | Halos, noise amplification |
| Texture | Fine surface detail (hair, fabric, bark) | Emphasizing skin texture, foliage | Amplifies noise in shadows |
| Clarity | Midtone contrast, “punch” | Landscapes, architecture, grit | Halos, HDR look, harsh on skin |
| Dehaze | Atmospheric haze, global density | Foggy skies, flat photos | Heavy color shifts, extreme noise |
Rule of thumb: use Sharpening for detail, Texture for surfaces, Clarity sparingly for punch (never on skin), and Dehaze only when there is actual haze. If you want the full editor to manage all of these, our best photo editing software comparison covers both paid and free options.
Method 5: AI Sharpeners and Deblur (For Genuinely Blurry Shots)
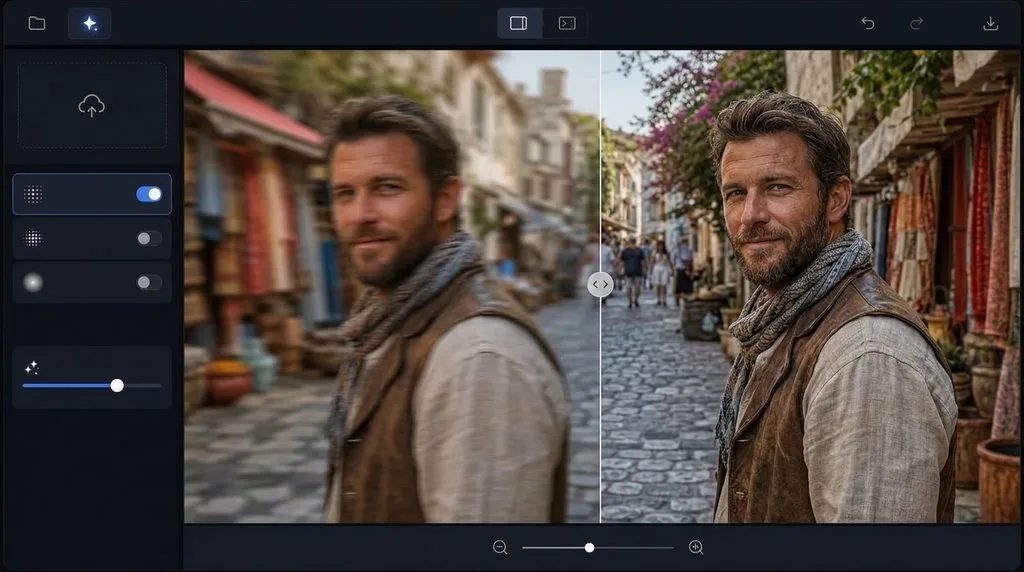
When a photo is truly out of focus or motion-blurred, ordinary sharpening just makes the blur crunchy. AI deblur tools actually reconstruct detail. Here is how the 2026 field compares.
| Tool | Best for | Price | Strength |
|---|---|---|---|
| Topaz Photo AI | Serious blur, wildlife/sports | Subscription | Best detail reconstruction |
| Adobe Firefly / Lightroom Denoise | Photoshop/Lightroom users | Included | Tightest workflow integration |
| Remini | Portraits, faces | Freemium | Best face enhancement on mobile |
| Upscale.media | Quick free online | Free (10/day), Pro $4.99/mo | No login, clean downloads |
| PicWish / VanceAI | Ecommerce product photos | Subscription | Batch processing + background tools |
| Canva / Fotor | Social media, casual | Freemium | One-click, built into editor |
FixThePhoto’s tested roundup of the best AI image sharpener tools ranks Topaz and Firefly at the top for detail recovery. Use AI deblur when the shot matters and ordinary sharpening when you just need a crispness lift.
The Three-Level Sharpening Workflow (Pros Use This)
Professionals do not sharpen once. They sharpen three times, each for a different reason:
- Capture sharpening — at import, in Lightroom’s Detail panel. A small amount (25–50) compensates for the softness inherent in every lens and sensor. Use Masking to protect smooth areas.
- Creative/local sharpening — in Photoshop, on a masked layer. Sharpen only what deserves attention: eyes, product edges, architectural lines. This is artistic, not corrective.
- Output sharpening — after resizing, right before export. In Lightroom’s Export dialog: choose Screen (Amount ~50–100) for web and social, Matte Paper (~60–120) for fine-art prints, or Glossy Paper (~70–150) for albums. Matte ink absorbs more and needs more sharpening; glossy needs less.
Doing it in this order — and never sharpening the original raw file — keeps every step reversible. A good photo editing guide will put sharpening near the very end of the pipeline, after color and exposure.
Get It Right in Camera (The Best Sharpening Is No Sharpening)
No amount of post-processing fixes a soft original. Nail these in camera and you will barely need to sharpen:
- Aperture sweet spot — most lenses are sharpest 2–3 stops down from wide open, usually f/5.6–f/8. Wide open (f/1.4–f/2.8) is soft at the edges; f/16+ causes diffraction softness.
- Shutter speed rule — shoot at least 1/focal length (1/200s at 200mm). For people or sports, use 1/250s or faster.
- Focus precisely — use a single AF point on the nearest eye. For landscapes, zoom to 100% in Live View to confirm.
- Stabilize — tripod + remote shutter (or 2-second timer) eliminates camera shake. Handheld? Tuck your elbows in and brace.
- ISO — keep it low, but raise it before letting shutter speed drop. A sharp, slightly noisy photo beats a clean, blurry one.
- Shoot RAW — RAW files tolerate sharpening far better than JPEGs, which already have in-camera sharpening baked in.
7 Pro Rules for Sharper Results Without the Damage
- Zoom to 100%. You cannot judge sharpening at fit-to-screen.
- Reduce noise first. Sharpening amplifies noise — always denoise before you sharpen.
- Sharpen last. Do it after exposure, color, retouching, and resizing, right before output.
- Use a mask. Never sharpen skin, skies, or smooth walls — paint sharpness only onto edges and detail.
- Start low, go slow. Begin at 50% Amount and increase until you just see a halo, then back off.
- Match radius to resolution. High-megapixel files need smaller radii (0.3–0.8px); low-res web files can take 1–2px.
- Output matters. Sharpen for the medium. A print file and a web file from the same master need different amounts.
When NOT to Sharpen (and What to Do Instead)
- The photo is genuinely blurry. Use AI deblur (Topaz, Firefly, Remini), not sharpening.
- It is low-resolution and you need it bigger. Upscale first (AI upscaler), then sharpen the upscaled result.
- It is a soft-focus artistic shot. Some portraits and fine-art images are meant to be soft. Sharpening fights the intent.
- It is heavily compressed (JPEG artifacts). Sharpening makes blocky compression artifacts worse. Use a noise/artifact reduction pass first.
Frequently Asked Questions
What does sharpening an image do?
It increases contrast along edges — darkening the dark side and brightening the light side — so your eye perceives more detail. It creates the illusion of sharpness (acutance) but does not recover detail that was never captured.
How do I sharpen an image in Photoshop?
Duplicate the layer, go to Filter > Sharpen > Unsharp Mask or Smart Sharpen, start with Amount 100%, Radius 1.0px, Threshold 3, view at 100%, and adjust. For local control, use the High Pass filter with an Overlay blend mode and a layer mask. Smart Sharpen with Remove set to Lens Blur gives the cleanest results.
What are the best Unsharp Mask settings?
Start with Amount 80–120%, Radius 0.5–1.5px (web) or 1–2px (print), Threshold 2–5. High-megapixel files use smaller radii (0.3–0.8px). Always back off when you see halos.
How do I avoid halos when sharpening?
Lower the Radius first — halos come from too wide an edge band. Then reduce Amount. Use Threshold or a layer mask to protect smooth areas like skin and skies. In Lightroom, push the Masking slider up (Alt/Option-drag to preview). In Smart Sharpen, use the Shadow/Highlight Fade Amount.
Should I reduce noise before or after sharpening?
Always before. Sharpening amplifies noise, so if you sharpen first you will sharpen the grain and it becomes much harder to remove.
What is the difference between sharpening, upscaling, and deblur?
Sharpening boosts edge contrast (no new detail). Upscaling increases pixel count. AI deblur reconstructs detail lost to blur or focus. Use deblur for blurry shots, upscaling for small files, and sharpening for a final crispness lift.
What is the difference between sharpening and clarity?
Sharpening boosts high-frequency edge contrast (fine detail). Clarity boosts midtone contrast for overall punch and can create halos and look harsh on skin. Use sharpening for detail, clarity sparingly for landscape grit.
How much sharpening is too much?
When you see bright or dark halos around edges, grain in smooth areas like sky or skin, or a crunchy, over-processed texture — you have gone too far. Pull back Amount or Radius, or lower the sharpening layer opacity.
Final Verdict
Sharpening is the final 5% of a good edit, and it is where beginners most often overdo it. Remember the core truth: sharpening creates the illusion of detail by boosting edge contrast — it cannot rescue a blurry photo. Get it right in camera first (f/5.6–f/8, fast shutter, eye focus), reduce noise first, work at 100% zoom, use Smart Sharpen or High Pass on a masked layer, protect skin and skies, apply a little capture sharpening, a little creative sharpening where it counts, and output sharpening for the final medium. Do that, and your photos will look crisp and professional — never crunchy or haloed.