

What Is a Telephoto Lens? A Complete Guide for Photographers
October 1, 2026
How to Sharpen an Image: Photoshop, AI & Pro Tips Guide 2026
October 6, 2026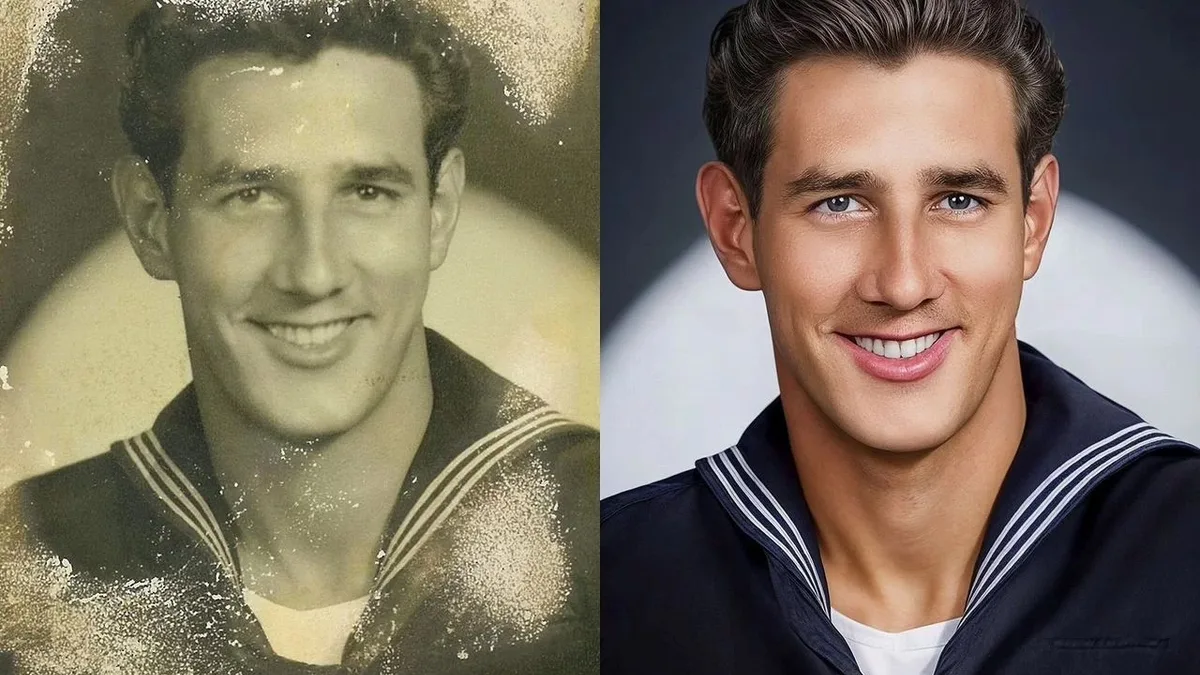
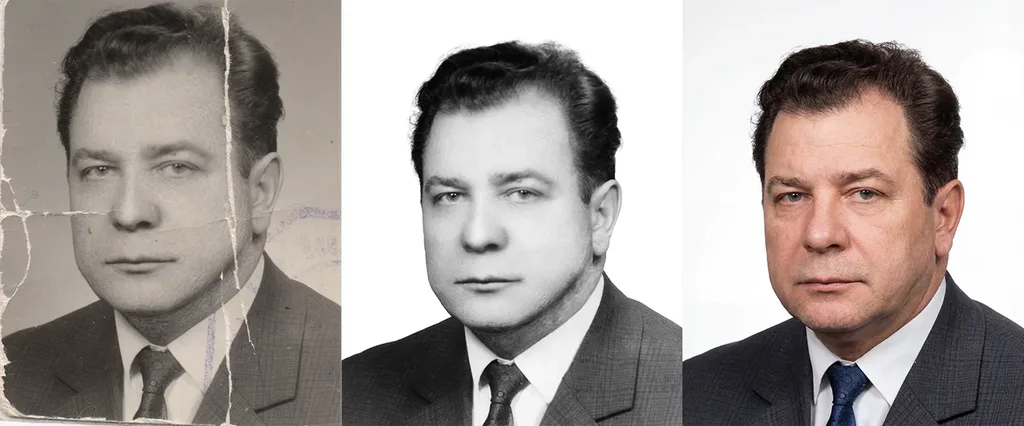
The fastest way to colorize a black and white photo is a one-click AI tool — upload it to Palette.fm, MyHeritage In Color, or Hotpot.ai, and get color in seconds. For full control, open it in Photoshop, run the Colorize Neural Filter, then hand-paint corrections on a layer set to Color blend mode. The secret to realistic results is not the tool — it is the workflow: scan at 600 DPI, repair scratches and dust first, let AI do a first pass, then hand-correct 2–5 regions (especially skin tones), and keep saturation muted. This guide walks through every method, compares the best tools, and shows you how to avoid the fake, neon look that ruins most colorized photos.
- What Is Photo Colorization, and Does AI Get It Right?
- Method 1: One-Click AI Colorizers (Fastest)
- Method 2: Photoshop — AI First Pass, Then Hand Control
- Method 3: Free Options (No Subscription, No Upload)
- The Pro Workflow: Scan → Repair → Colorize → Correct → Archive
- 6 Pro Tips for Realistic (Not Fake) Color
- Common Mistakes to Avoid
- Frequently Asked Questions
- Final Verdict
What Is Photo Colorization, and Does AI Get It Right?
Colorization adds color to a monochrome (black-and-white or sepia) image. Done by hand, it means painting color onto separate layers while preserving the original light and shadow. Done by AI, a neural network trained on millions of photos guesses the most likely colors — grass is green, sky is blue, skin is some shade of brown. The catch: AI does not know the actual colors. A red dress could come out blue. A 1950s car could get a paint color that did not exist until 1970. So treat AI colorization as a fast first draft, not a finished historical document. For family heirlooms, always verify colors with relatives or period references before calling it final.
If you plan to do this often, a solid photo editing guide will cover the layer and mask skills you need for hand corrections.
Method 1: One-Click AI Colorizers (Fastest)
AI colorizers give you a result in 5–30 seconds. They vary in quality, price, and how much control you get. Here is how the top 2026 tools compare.
| Tool | Best for | Price | Standout feature |
|---|---|---|---|
| Palette.fm | Overall quality & control | Free preview; paid HD | 21+ color filters + prompt control (“red sweater”) |
| MyHeritage In Color | Family/genealogy photos | Free with account; photo-only plan | Tuned on historical portraits, preserves identity |
| Hotpot.ai | Quick free results | Free, no login | Color intensity slider (12–25) |
| Photoshop Colorizer | Photoshop users | Included with subscription | Neural Filter, then full editing control |
| VanceAI / ImageColorizer | Batch + repair | Subscription | Scratch repair + face enhancement in one pass |
| GIMP + G’MIC | Free, manual, private | Free, open source | Interactive colorization, no upload required |
Our pick for most people: Palette.fm, because it lets you nudge the AI’s color choices instead of accepting whatever it produces. If you are colorizing family photos, MyHeritage tends to keep faces looking like the actual person. Adobe’s official Photoshop colorize page shows the Neural Filter workflow if you already pay for Creative Cloud.
Method 2: Photoshop — AI First Pass, Then Hand Control
Photoshop gives you the best of both: the speed of AI plus the precision of manual editing.
Step 1 — Prepare the image. Open your photo. Go to Image > Mode > RGB Color (color cannot live in Grayscale mode). Duplicate the background layer (Ctrl/Cmd+J) so you never destroy the original.
Step 2 — Repair first. Use the Spot Healing Brush and Clone Stamp to remove scratches, dust, and creases. Colorization amplifies damage, so a clean scan always colors better. If your old photo is grainy, a light noise reduction pass helps — but keep some film grain, because a perfectly smooth “plastic” look screams fake.
Step 3 — Run the AI colorizer. Go to Filter > Neural Filters > Colorize and toggle it on. Photoshop analyzes the image and applies a first-pass color. This alone may be 80% there.
Step 4 — Hand-correct on Color layers. Create a new layer, set its blend mode to Color, and paint with a soft, low-opacity brush over areas the AI got wrong — skin, lips, clothing, eyes. The Color blend mode preserves the original brightness and shadow while adding hue. Use a separate layer for each region (skin, dress, background) so you can adjust one without touching the others. Add a layer mask to each and clean up spills with a black brush.
Step 5 — Unify the tone. Finish with a Color Balance or Photo Filter adjustment layer over everything to warm or cool the whole image consistently. This is where a little color grading knowledge turns a patchwork paint job into a cohesive, believable photograph.
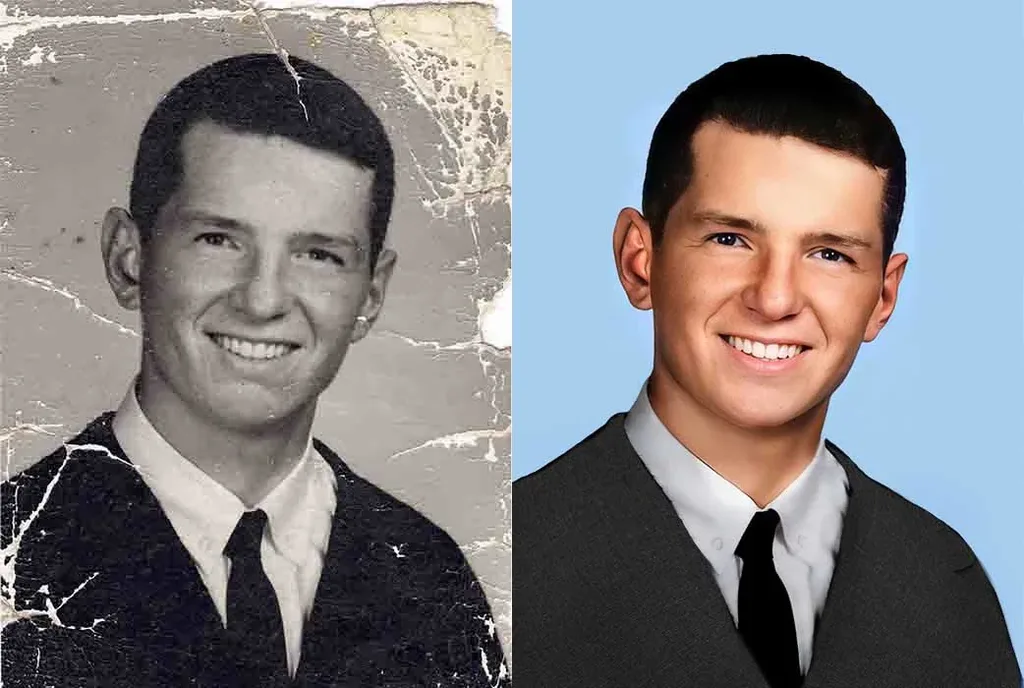
Method 3: Free Options (No Subscription, No Upload)
If you do not want to pay or upload family photos to a server, you still have solid options:
- GIMP (free, desktop): Same manual layer method as Photoshop. Open the image, convert to RGB, create a new layer per color region, set blend mode to Color, paint with a soft brush, and use layer masks. It is slower but 100% free and private.
- G’MIC plugin for GIMP: Adds an interactive “Black & white > Colorize” filter where you place color keypoints and the algorithm fills between them.
- In-browser colorizers (runs locally): Tools like serverless.tools colorize entirely in your browser — nothing is uploaded, which matters for sensitive family photos.
- Canva: If you already use Canva, its colorize black and white feature is a simple one-click option inside the editor, good for social-media-ready results.
For portraits, after colorizing you may want subtle portrait retouching — smoothing skin without erasing texture, brightening eyes — to finish the job.
The Pro Workflow: Scan → Repair → Colorize → Correct → Archive
Follow this order every time, and your results will jump from “obvious AI” to “looks like it was shot on color film.”
- Scan at 600 DPI, save as TIFF. Colorization amplifies any resolution loss. A 300 DPI scan will look soft; a 600 DPI scan gives the AI real detail to work with.
- Repair before you colorize. Remove scratches, dust, and creases first. Every tool’s documentation says the same thing — restore, then colorize.
- Let AI do the first pass. Use Palette.fm, MyHeritage, or Photoshop’s Neural Filter. Expect 70–90% accuracy.
- Hand-correct 2–5 regions. Skin tones and fabric dyes are where AI fails most. Fix the face, the clothing, and anything historically specific.
- Keep saturation muted. Old optics and old dyes never looked neon. If your colorized photo looks candy-colored, pull saturation down. Realism lives in desaturated, slightly faded tones.
- Archive both versions. Save the original scan, the repaired grayscale, and the final color. Never overwrite the original.
6 Pro Tips for Realistic (Not Fake) Color
- Vary tones across large areas. Never paint a wall or a sky one flat color. Light changes across a surface — shift hue slightly and vary brightness, or the result looks like a coloring book.
- Skin needs multiple tones. Add a touch of red to cheeks and lips, warm yellow to the forehead, and cool blue-green in shadow. One flat skin tone is the #1 tell of a bad colorization.
- Anchor to the decade. Tell the AI (or yourself) what era the photo is from — “1950s Kodachrome look” vs “1970s faded print.” Period-correct color is the difference between convincing and cartoonish.
- Check known objects. If you can identify a uniform, a car, a flag, or a famous building, verify its real color and correct it. Those anchor points make the whole image feel true.
- Preserve film grain. Do not run aggressive noise reduction. A little grain sells the vintage feel and hides AI artifacts.
- Use the Color blend mode, never Normal. Painting on Normal mode covers up the original shading. Color mode keeps every highlight and shadow intact.
Common Mistakes to Avoid
- Coloring a damaged photo first. Scratches get colorized too. Repair first.
- Believing AI colors are factual. They are guesses. Verify anything that matters.
- Oversaturating. If the colors pop, they are probably wrong for a vintage photo.
- Painting on Normal blend mode. It destroys the original light and shadow. Always use Color.
- Over-smoothing skin. Plastic skin is the second-biggest fake tell after neon colors.
- Overwriting the original. Always work on a duplicate.
If you are shopping for software to do this regularly, our roundup of the best photo editing software covers both paid and free options side by side.
Frequently Asked Questions
What is the best way to colorize black and white photos?
For most people: scan at 600 DPI, repair scratches, run an AI colorizer like Palette.fm or Photoshop’s Neural Filter for a first pass, then hand-correct skin tones and clothing on a layer set to Color blend mode.
Are AI colorizers accurate?
They are 70–90% accurate on common scenes (grass, sky, skin) but cannot know actual colors. Always treat the result as an artistic interpretation, not a historical record, and verify anything important.
Can I colorize photos for free?
Yes. Hotpot.ai and Palette.fm offer free previews, GIMP with the G’MIC plugin is fully free and manual, and some in-browser tools colorize locally without uploading your photo.
How do I colorize in Photoshop?
Convert to RGB mode, duplicate the layer, go to Filter > Neural Filters > Colorize for an AI first pass, then create new layers set to Color blend mode and hand-paint corrections with a soft brush, using layer masks to clean up.
Why do my colorized photos look fake?
Usually one of three things: saturation too high, skin painted one flat tone, or film grain removed. Mute saturation, paint multiple skin tones, and keep some grain.
Should I repair scratches before or after colorizing?
Always before. Colorization amplifies damage, and a scratch that gets colorized is much harder to fix afterward.
What DPI should I scan old photos at?
600 DPI minimum, saved as TIFF. Higher resolution gives the AI more detail and produces sharper, more believable color.
Final Verdict
Colorizing an old photo is no longer a days-long hand-painting project. AI can get you 80% there in seconds — but the last 20% is what separates a convincing heirloom from a cheap filter. Scan well, repair first, let AI draft, hand-correct the face and clothing, keep the colors muted, and never overwrite the original. Do that, and the grandkids in the photo will look like they could step out of the frame.