

International Shoe Size Conversion Chart – Women & Men
September 14, 2026
35+ Best ChatGPT Photo Editing Prompts for 2026
September 18, 2026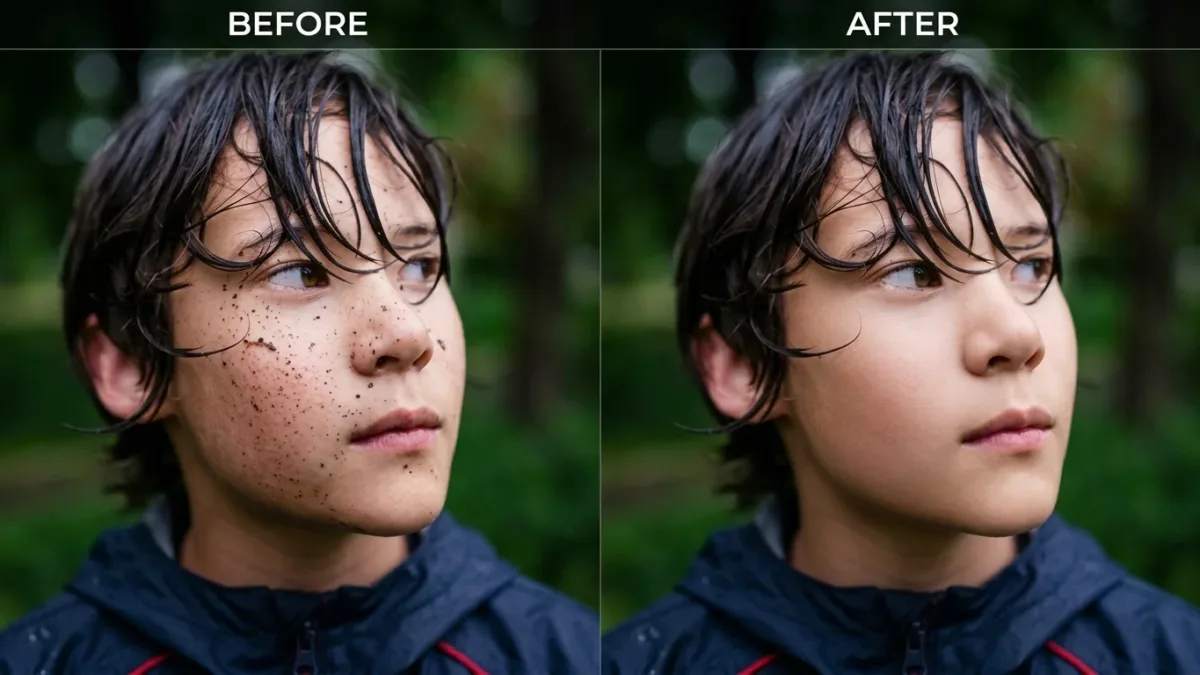
Frequency separation is a Photoshop retouching technique that splits an image into two layers — a high-frequency layer for texture (pores, hairs, grain) and a low-frequency layer for color and tone. You edit each layer independently, which lets you clean blemishes without erasing texture and even out skin without touching the details. The workflow uses Gaussian Blur, Apply Image, and Linear Light blending, then retouching tools tuned to each layer.
Retouching used to force ugly trade-offs. Smooth the skin, lose the pores. Clone a blemish, ruin the color. Blur too aggressively, and your model turns into a mannequin. Frequency separation fixes that problem by giving you two separate “channels” of the same image — one for texture, one for color — so you can attack each issue with the right tool. Once you understand the logic, portraits look cleaner, product shots look sharper, and nothing about the final result whispers “over-edited.”
This guide walks you through everything: what frequency separation actually is, why it still beats one-click AI tools for finishing work, the exact Photoshop settings for 8-bit and 16-bit files, and the mistakes that quietly sabotage most beginners. Whether you shoot portraits, e-commerce products, or jewelry macros, you’ll finish this article with a repeatable workflow you can start using today.
- 🧾 Key Takeaways
- What Is Frequency Separation in Photo Editing?
- Why Do Professional Retouchers Still Use Frequency Separation in 2026?
- The Science Behind Frequency Separation (In Plain English)
- How Do You Set Up Frequency Separation in Photoshop? (Step-by-Step)
- Which Tools Should You Use on Each Layer?
- How Do You Choose the Right Blur Radius?
- Frequency Separation for Portrait and Beauty Retouching
- Frequency Separation for Product and E-Commerce Photography
- Frequency Separation for Jewelry Retouching
- Frequency Separation vs Dodge & Burn: Which One Should You Use?
- Frequency Separation vs High Pass: What’s the Difference?
- The “Modern Method”: Using Photoshop’s Remove Tool With Frequency Separation
- 12 Common Frequency Separation Mistakes (and How to Avoid Them)
- When Should You NOT Use Frequency Separation?
- Advanced Tip: Three-Band Frequency Separation
- Pro Tips That Take Your Retouching to the Next Level
- Frequency Separation vs AI Skin Retouching in 2026
- Frequently Asked Questions
- Final Thoughts
🧾 Key Takeaways
- What it does: Splits an image into texture and color layers so you can edit each without touching the other.
- Where it shines: Skin retouching, product photography, jewelry, food, apparel, and any surface with visible detail.
- Core tools: Gaussian Blur, Apply Image, Linear Light blend mode, Clone Stamp, Healing Brush.
- Blur radius: 4–8 px for portraits, 2–4 px for products, 1–3 px for jewelry.
- 8-bit setting: Apply Image → Subtract, Scale 2, Offset 128.
- 16-bit setting: Apply Image → Add, Scale 2, Offset 0, Invert checked.
- Biggest risk: Over-blurring the color layer or using a soft brush on the texture layer creates the “plastic skin” look.
- Best paired with: Dodge & burn for sculpting light after the cleanup is done.
What Is Frequency Separation in Photo Editing?
Frequency separation is a non-destructive Photoshop technique that splits an image into two layers based on the size of the detail they contain. Fine detail — pores, hairs, fabric weave, grain — lives on the high-frequency layer. Broad information like color, tone, and shadow gradients lives on the low-frequency layer. Retouch each one on its own, and the result stays natural because the two layers mathematically reconstruct the original photo when combined.
The name borrows from signal processing. In audio, an equalizer separates bass and treble so you can boost one without hurting the other. In photography, the same idea applies: slow, sweeping tonal changes are “low frequency,” while tight, repeating detail is “high frequency.” Splitting them gives you an equalizer for your image — and complete control over each band.
Quick breakdown:
- High-frequency layer → texture, pores, fine hair, sharp edges, product surface grain
- Low-frequency layer → smooth tonal gradients, color patches, shadows, uneven lighting
- Combined result → the original image, pixel-for-pixel, until you paint on one of the two layers
Why Do Professional Retouchers Still Use Frequency Separation in 2026?
Even with AI skin-smoothing plugins everywhere, frequency separation stays in every serious retoucher’s toolkit. It’s fast once you build an action, it’s predictable, and it respects the original image instead of guessing what “clean skin” should look like. Beauty studios, e-commerce editors, and jewelry retouchers all lean on it daily because it works on any surface — faces, fabric, leather, ceramic, metal, glass.
Here’s why it still wins in 2026:
- Total control — you decide exactly which frequency to touch and by how much.
- Non-destructive — the original pixels sit safely under a group or Smart Object.
- Natural results — pores, weave, and grain stay untouched while flaws vanish.
- Universal — the same workflow handles a portrait, a leather wallet, or a diamond ring.
- Repeatable — a one-click Photoshop Action sets the layers up in seconds.
- Editorial-safe — magazines and luxury brands still trust it for final finishing.
If your team edits high volumes, pairing frequency separation with a fast photo retouching workflow will cut hours out of every shoot without hurting quality.
Spending too much time on tedious skin cleanup in post-production?
Outsource the detail work to our fast, reliable Beauty Retouching Service and focus on shooting.
The Science Behind Frequency Separation (In Plain English)
Picture a photo of a face from across the room. You see the overall shape, the color of the skin, and the broad shadow under the cheekbone. That’s low-frequency information — big, slow changes across the frame.
Now walk right up to the print. Suddenly you see individual pores, fine hairs, tiny lines, and the small variations that make skin look human. That’s high-frequency information — small, fast-repeating detail.
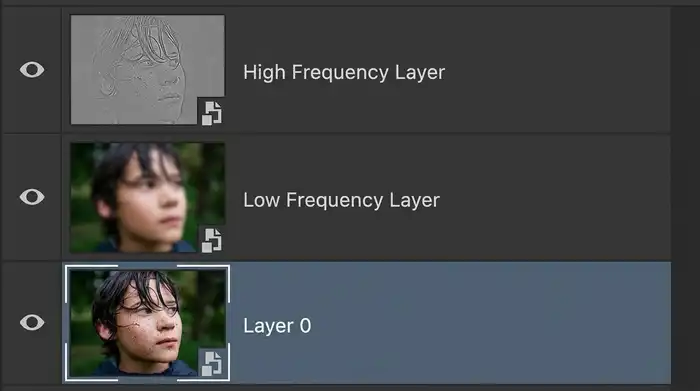
Frequency separation duplicates your image twice. On the bottom copy, you apply Gaussian Blur strong enough to erase the fine detail — that layer now holds only color and tone. On the top copy, you subtract that blurred version from the original — that layer now holds only sharp texture. When the two layers stack together with Linear Light blending, they mathematically rebuild the original photo exactly. But now you can paint on either layer without touching the other.
That’s the whole trick. Everything else is just picking the right blur radius and the right brush.
How Do You Set Up Frequency Separation in Photoshop? (Step-by-Step)
Follow these six steps once by hand. Then record them as a Photoshop Action, and every future setup becomes a single click.
Step 1 — Duplicate the Background Layer Twice
Open your image and press Cmd/Ctrl + J twice. Rename the bottom copy “Low Frequency” (or “Color & Tone”) and the top copy “High Frequency” (or “Texture”). Turn off the top layer’s visibility for the moment.
Step 2 — Blur the Low-Frequency Layer
Select the Low Frequency layer and go to Filter → Blur → Gaussian Blur. Set a radius large enough to erase fine texture but small enough to keep facial features recognizable — usually 4–8 px for portraits and 2–4 px for products. Watch the eyes: when the pores disappear but eyelash patterns are still faintly visible, you’re in the sweet spot.
Some retouchers prefer Surface Blur over Gaussian Blur because it protects hard edges around the eyes, lips, and product boundaries. Surface Blur is slower but produces cleaner edges — a great choice for beauty work.
Step 3 — Build the High-Frequency Layer With Apply Image
Turn the High Frequency layer back on and select it. Go to Image → Apply Image and use the correct recipe for your file’s bit depth:
| Bit Depth | Layer | Blending | Scale | Offset | Invert |
|---|---|---|---|---|---|
| 8-bit | Low Frequency | Subtract | 2 | 128 | Unchecked |
| 16-bit | Low Frequency | Add | 2 | 0 | Checked |
These values are the mathematically correct settings recommended across every serious tutorial, including the deeply technical breakdown by Davide Barranca. Get them wrong, and gray tones bake into your image and cause banding later.
Step 4 — Set the Blend Mode to Linear Light
With the High Frequency layer still selected, change its blend mode from Normal to Linear Light. The image should snap back to looking identical to your original. If it looks off, one of your Apply Image values is wrong — check bit depth first.
Step 5 — Group Both Layers
Select both layers and press Cmd/Ctrl + G to group them. Name the group “Frequency Separation.” You now have a clean, non-destructive stack.
Step 6 — Add an Empty Retouch Layer (Optional but Recommended)
Pros insert a blank layer between the two frequency layers for color/tone work. This keeps your original low-frequency data untouched and gives you an easy mask for later adjustments.
Which Tools Should You Use on Each Layer?
Setting up the layers is only half the job. The tools you use — and the settings on those tools — decide whether the finish looks premium or plastic.
On the Low-Frequency Layer (Color & Tone)
This layer handles uneven skin tone, blotchiness, redness, dark under-eye areas, and broad color casts. Reach for these tools:
- Mixer Brush or soft round Brush at 10–20% opacity, sampling a nearby clean color.
- Lasso Tool with a 15–25 px feather, followed by a small Gaussian Blur inside the selection to blend colors.
- Clone Stamp in Normal, Darken, or Lighten mode to even out patches.
Never touch this layer with a small, hard brush — you’ll create visible blotches. Think of it as makeup, not surgery.
On the High-Frequency Layer (Texture & Detail)
This layer handles blemishes, stray hairs, dust, scratches, and small product flaws — without losing pore-level detail:
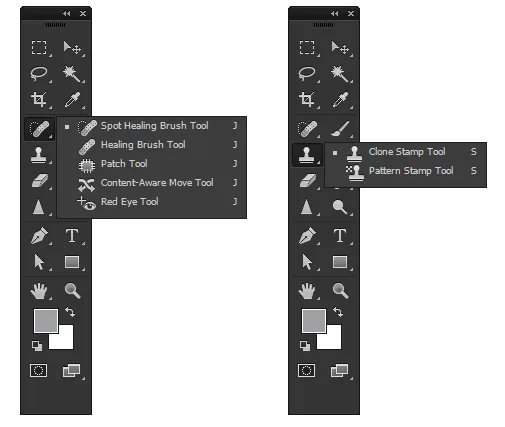
- Clone Stamp — hard-edged brush, 100% opacity and flow, sampling set to Current Layer.
- Healing Brush — hardness 90–100%, sampling Current Layer, size matched exactly to the flaw.
- Spot Healing Brush for fast blemish removal on well-lit areas.
Match your brush size to the flaw — never bigger. Oversized brushes smudge neighboring texture; undersized brushes leave halos.
Want your images to look professionally edited, not over-processed?
Achieve natural, high-end perfection with our skilled Photo Retouching Service
How Do You Choose the Right Blur Radius?
The Gaussian Blur radius controls which detail sizes end up on which layer. Get it wrong, and texture leaks into the color layer or color leaks into the texture layer. This is the setting beginners get wrong most often.
Working guide by subject:
- 1–3 px → jewelry, small products, macro shots, tight beauty crops
- 4–6 px → standard portraits and headshots at typical resolution
- 7–12 px → full-body fashion shots and larger products
- 15+ px → landscapes, high-resolution files, or heavily zoomed compositions
The eye-test rule: blur until the pores or grain disappear but eyelashes, edges, and product boundaries stay faintly visible. That’s your target zone. If you can still count pores, increase the radius. If features start dissolving, dial it back.
Frequency Separation for Portrait and Beauty Retouching
Portraits are where frequency separation shines brightest. Skin holds two very different problem types — texture flaws (pores, stubble, small bumps, active blemishes) and tonal flaws (redness, patchiness, shadows, uneven color). Trying to fix both with one brush is exactly why so many portraits end up looking waxy.
Here’s a clean beauty workflow:
- Low-frequency layer → even out cheek redness, lighten under-eye shadows, blend patchy foundation, calm forehead shine.
- High-frequency layer → remove active blemishes, stray hairs, flakes, small scars, dust particles.
- Dodge & burn on top → sculpt light, restore volume, and refine the transitions the frequency layers softened.
Frequency work pairs perfectly with strong portrait retouching techniques that sculpt light after your cleanup is done. If you’re chasing specific issues like acne or scars, the workflow for removing blemishes drops naturally into the same session.
Frequency Separation for Product and E-Commerce Photography
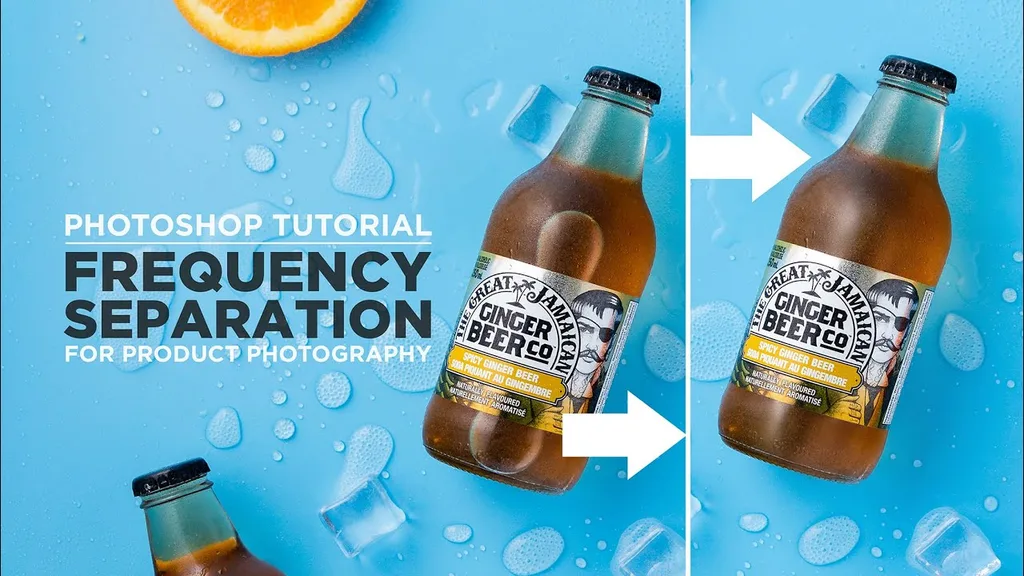
Frequency separation isn’t just a beauty tool. It performs just as well on products, packaging, leather goods, footwear, cosmetics, and food. Any product surface carries both large tonal information (highlights, shadows, gradients) and fine surface detail (grain, weave, print, texture). Editing them independently keeps the product looking real instead of airbrushed.
Common product uses:
- Leather bags and shoes → clean scuffs and glue marks on the texture layer; even lighting on the color layer.
- Cosmetics packaging → remove dust, fingerprints, and label wrinkles without softening matte or gloss finishes.
- Food photography → wipe crumbs, drips, and small stains without flattening the natural texture of sauces or bread.
- Fabric and apparel → remove lint and pet hair while keeping weave sharp for ghost-mannequin shots.
- Metal and ceramic → tame reflections and fingerprints without softening the material’s finish.
For sellers pushing hundreds of SKUs, combining frequency separation with a strong product photo editing pipeline is the difference between an amateur listing and a conversion-ready one.
Frequency Separation for Jewelry Retouching
Jewelry is unforgiving. Every fingerprint, dust speck, and micro-scratch shows up against polished metal or faceted stones. Frequency separation lets you clean the metal while keeping the natural micro-texture that makes gold look like gold and silver look like silver — instead of like flat, printed plastic.
Jewelry-specific tweaks:
- Use a smaller blur radius (1.5–3 px) because critical detail sits in tighter frequencies than skin.
- Zoom to 200–300% and work with a small, hard-edged Clone Stamp on the texture layer.
- Correct broad reflections and lighting hotspots on the color layer with a soft brush at 10–15% opacity.
- Preserve the tiny catch-lights inside stones — those are what make gems look expensive.
For a full walkthrough of jewelry-specific techniques, our dedicated guide to jewelry photo editing covers gemstone enhancement, prong cleanup, and color correction using the same non-destructive spirit.
Do your product images fail to show off intricate details?
Highlight every facet and texture with our precise Jewelry Photo Editing Service
Frequency Separation vs Dodge & Burn: Which One Should You Use?
These two techniques often get compared, but they solve different problems. Confusing them is why some editors chase “smooth” instead of “beautiful.”
| Feature | Frequency Separation | Dodge & Burn |
|---|---|---|
| Primary job | Clean flaws and even tone | Shape light and add volume |
| Works on | Texture + color independently | Highlights and shadows |
| Best for | Blemishes, patches, dust, scratches | Sculpting features, contouring, depth |
| Speed | Fast — one action, minutes per image | Slower — precision brush work |
| Risk if overused | Plastic-looking skin | Muddy, flat image |
| Reversibility | Fully non-destructive | Non-destructive on gray layers |
The professional answer isn’t “either/or” — it’s both, in the right order. Use frequency separation to clean first, then use dodge & burn on top to add sculpted light back into the face or product. Frequency separation plays the surgeon; dodge & burn plays the sculptor.
Frequency Separation vs High Pass: What’s the Difference?
Both techniques separate an image by detail size, but they behave differently. High Pass produces a single detail layer that you overlay on the original — it’s fast for sharpening but limited for retouching. Frequency separation produces two complete layers that mathematically reconstruct the original — so you can paint destructively on either one and still have complete control.
Rule of thumb:
- Use High Pass when you want to sharpen or add micro-contrast.
- Use Frequency Separation when you want to retouch skin, products, or fabric with surgical precision.
The PhotoshopCAFE tutorial also covers this distinction with a working example — worth a bookmark if you want a second technical perspective.
The “Modern Method”: Using Photoshop’s Remove Tool With Frequency Separation
Newer versions of Photoshop introduced the Remove Tool (AI-powered content removal). Modern retouchers now combine it with frequency separation for lightning-fast cleanup — the Remove Tool handles obvious flaws in seconds, then frequency separation polishes the finishing details that AI still can’t nail.
A modern hybrid workflow looks like this:
- Use the Remove Tool for one-pass cleanup of stray hairs, dust, and obvious blemishes.
- Set up frequency separation for the finishing pass.
- Use the Healing Brush on the texture layer for anything the Remove Tool left behind.
- Even out color and tone on the low-frequency (or middle) layer.
- Add dodge & burn to shape final light and volume.
This combo is now the fastest way to hit editorial-quality retouching without spending hours per frame.
12 Common Frequency Separation Mistakes (and How to Avoid Them)
Most botched frequency separation edits come from the same short list of mistakes. Avoid these, and your work already beats 80% of what’s floating around online.
- Blur radius too high — tonal information bleeds into the texture layer and creates halos.
- Blur radius too low — texture leaks into the color layer and makes skin patchy.
- Soft healing brush on the texture layer — smudges texture into mush.
- Working at 100% flow on the low-frequency layer — stay at 1–20% for gradual tone blending.
- Painting perpendicular to light — always paint along the direction of the light gradation.
- Fixing everything in one pass — build up small corrections instead of one heavy stroke.
- Skipping the middle empty layer — you lose flexibility and easy masking.
- Blindly trusting an action — you can’t fix issues you don’t understand.
- Never toggling layer visibility — you can’t judge over-retouching without comparing.
- Wrong sampling mode — use “Current Layer” for texture; “Current & Below” for the middle layer.
- Skipping dodge & burn afterward — flat retouching feels lifeless.
- Global effect with no mask — apply frequency work only where it’s needed.
If images still look grainy after your work, the fix isn’t more blur — it’s cleaner noise reduction before frequency separation starts.
When Should You NOT Use Frequency Separation?
Frequency separation is powerful, but it’s not always the right tool. Skip it in these situations:
- Small social crops where AI skin-smoothing gets you 90% there in one click.
- Documentary or journalistic images where any invisible retouching is ethically off-limits.
- Landscape and architectural photos where dodge & burn plus local adjustments do better.
- Very low-resolution files where the two frequencies don’t cleanly separate.
- Speed-first turnarounds where an all-in-one AI tool is “good enough” for the platform.
Use the right tool for the job. Frequency separation is a scalpel — don’t reach for it when you just need a broom.
Advanced Tip: Three-Band Frequency Separation
The classic setup uses two frequencies. Advanced retouchers sometimes use three — low, mid, and high — so they can target skin unevenness at a specific size (like small dents or uneven patches) without touching either fine pores or broad shadows.
The three-band setup:
- Low frequency → color and broad tone (blur radius 12–20 px).
- Mid frequency → medium tonal variations, small dents, minor unevenness (radius 4–6 px).
- High frequency → pores and micro-texture (untouched).
Three-band separation gives you far more precision, but it takes longer and demands more control. Save it for hero portraits and campaign work where every pixel matters.
Pro Tips That Take Your Retouching to the Next Level
Small habits separate hobbyist retouching from professional finishing. Add these to your routine and your images will improve fast.
- Record a Photoshop Action. Set the layers up once, record it, and reuse it forever.
- Convert the low-frequency layer to a Smart Object before blurring — you can tweak the radius later without redoing setup.
- Zoom out often. Retouching at 200% looks great — until you zoom to 100% and see the mess.
- Use multiple FS groups for different blur radii on the same image (one for skin, one for hair, one for the background).
- Mask the effect. Add a black mask to the group and paint white only where retouching is needed.
- Compare against the original. Every few minutes, toggle the group off — if the difference is too obvious, back off.
- Keep pores visible. A viewer should be able to spot pores in any high-end beauty portrait.
- Stop before it’s “perfect.” The best retouching leaves the subject looking like themselves — just on their best day.
Frequency Separation vs AI Skin Retouching in 2026
AI skin retouching tools are fast and improving quickly. They’re great for volume work, social content, and rough passes. But they still guess — they don’t know which pore is character and which is a flaw, and they often soften eyelash roots, eyebrow hair, and lip edges by accident.
Frequency separation is the opposite: it edits nothing until you tell it to. You keep every pore worth keeping. That’s why editorial retouchers, luxury e-commerce brands, and beauty publications still rely on it for finishing — even when AI handles the first pass.
The winning 2026 workflow is a hybrid:
- AI for volume cleanup (Neural Filters, Remove Tool, third-party plugins).
- Frequency separation for precision finishing (skin tone evening, blemish removal, texture control).
- Dodge & burn for sculpting (highlights, shadows, dimensionality).
For teams comparing tools before committing, our roundup of the best editing software breaks down which apps handle each stage best.
Need your images edited faster without sacrificing quality?
Our streamlined process delivers premium results in as little as 6 hours. Explore our fast-turnaround services
Frequently Asked Questions
What is frequency separation in Photoshop, in one sentence?
Frequency separation is a non-destructive Photoshop technique that splits an image into a texture layer and a color/tone layer so you can retouch each independently without affecting the other.
What Gaussian Blur radius should I use for frequency separation?
Use 4–8 px for standard portraits, 2–4 px for products, and 1–3 px for jewelry. Blur until pores and grain disappear but eyelashes, edges, and boundaries stay faintly visible.
What are the correct Apply Image settings for 8-bit and 16-bit files?
For 8-bit files: Blending = Subtract, Scale = 2, Offset = 128, Invert unchecked. For 16-bit files: Blending = Add, Scale = 2, Offset = 0, Invert checked. Use the wrong bit-depth settings and gray tones will bake into your image.
Which tools should I use on each frequency layer?
On the high-frequency (texture) layer, use the Clone Stamp or Healing Brush with a hard edge, sampling set to “Current Layer.” On the low-frequency (color) layer, use a soft brush at low opacity or a feathered lasso plus a small Gaussian Blur.
Why does my skin look plastic after frequency separation?
Plastic-looking skin usually comes from over-blurring the color layer, using a soft brush on the texture layer, or applying the effect globally instead of masking specific areas. Done properly, frequency separation preserves natural pores and stays completely invisible.
Is frequency separation only for portraits?
No. It works beautifully for product photography, jewelry, leather goods, food, fabric, ceramics, and any surface with both broad tonal variation and fine texture.
Frequency separation vs dodge & burn — which one should I learn first?
Learn frequency separation first — it fixes flaws quickly. Then learn dodge & burn to sculpt light and volume on top. Real professionals use both in the same session.
Can I automate frequency separation with a Photoshop Action?
Yes. Record the setup steps as an Action and every future file becomes one click away from ready. Just make sure you understand the technique before you rely on the action — otherwise you can’t fix issues when things go wrong.
Does frequency separation still matter with AI retouching tools?
Absolutely. AI handles volume; frequency separation handles precision. The best 2026 workflow uses AI for the first pass and frequency separation for editorial-quality finishing.
Final Thoughts
Frequency separation isn’t a filter, a trick, or a shortcut. It’s a way of thinking about an image — separating what a photo shows from how it feels — and it’s why professional retouchers can polish faces and products without ever making them look edited. Once you internalize the two layers, you’ll stop fighting your images and start guiding them.
Start simple. Pick one portrait, one product, and one jewelry piece. Set up the layers by hand, work in small strokes, and compare against the original every few minutes. Within a week you’ll wonder how you ever retouched without it. Within a month, your work will look measurably more professional to clients, followers, and marketplaces.
If you’d rather focus on shooting and let a specialist team handle the retouching side of your business, that’s exactly what we do every day — at scale, with fast turnaround, and with real humans (never bots) behind every image.