

How to Remove a Person From a Photo in Photoshop: 5 Easy Methods
September 1, 2026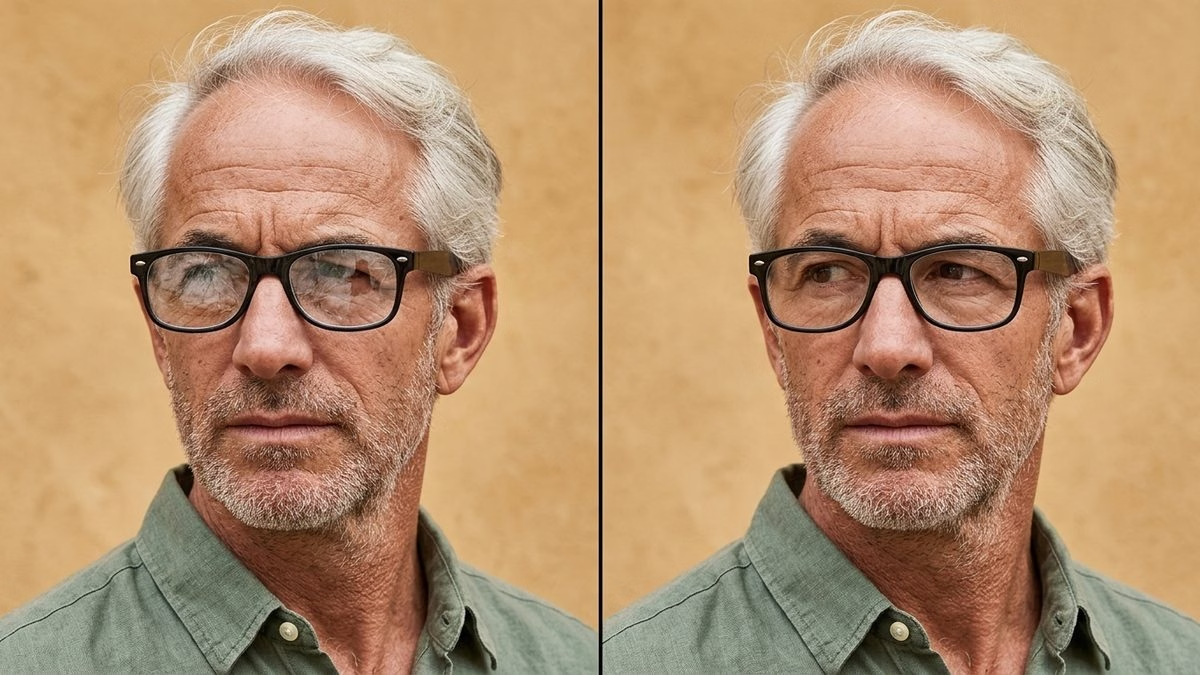
You nailed the shot. The smile is genuine, the light is soft, the composition is clean — and then two chalky white blotches appear right where your subject’s eyes should be. Anyone who photographs people wearing glasses knows the feeling. Industry data from 36Pix suggests around 65% of glasses-wearing students show noticeable glare in traditional school photos, and that same pattern haunts weddings, corporate headshots, and even eCommerce sunglasses shoots.
The good news? Photoshop in 2026 finally makes reflection removal easy. This guide breaks down seven proven methods — from Adobe’s new AI-powered Reflection Removal tool to the classic clone-stamp trick every retoucher still keeps in their pocket. Pick the one that fits your image, follow the steps, and get your subject’s eyes back where they belong.
- TL;DR: Fastest Way to Remove Glasses Glare in Photoshop
- Why Glasses Glare Happens (The 30-Second Physics Lesson)
- Quick Decision Guide: Match the Method to Your Image
- Method 1: Adobe Camera Raw’s AI Reflection Removal Tool
- Method 2: Generative Fill with Firefly Image Model 5
- Method 3: The Classic Clone Stamp Technique
- Method 4: Spot Healing Brush + Patch Tool Combo
- Method 5: The Copy-and-Flip Lens Technique
- Method 6: Dehaze + Adjustment Layers for Hazy Glare
- Method 7: The Layered Composite Workflow (The Pro Move)
- Bonus Method: The Two-Shot Merge (Prevention Meets Post-Production)
- Prevention Beats Retouching: How to Avoid Glare in Camera
- Photoshop vs Lightroom: Where Should You Do This Work?
- Common Mistakes That Ruin Your Glare Removal
- Real-World Comparison: Which Method Wins?
- Handy Keyboard Shortcuts Cheat Sheet
- When Should You Hire a Professional Retoucher?
- Bonus: What About Sunglasses and Reflective Product Shots?
- Frequently Asked Questions
- Final Thoughts
TL;DR: Fastest Way to Remove Glasses Glare in Photoshop
- For huge glass reflections → Use Camera Raw’s AI Reflection Removal (Filter → Camera Raw Filter → Remove → Distraction Removal → Reflections).
- For portraits with detailed features → Use Generative Fill with Firefly Image Model 5 in Photoshop Beta.
- For small, precise hotspots → Use the Clone Stamp Tool (S) on a new layer.
- For asymmetric glare (one lens clean) → Copy the good lens, flip horizontally, mask edges.
- For hazy overall glare → Use Camera Raw Dehaze with a masked brush.
Each method is covered step-by-step below.
Why Glasses Glare Happens (The 30-Second Physics Lesson)
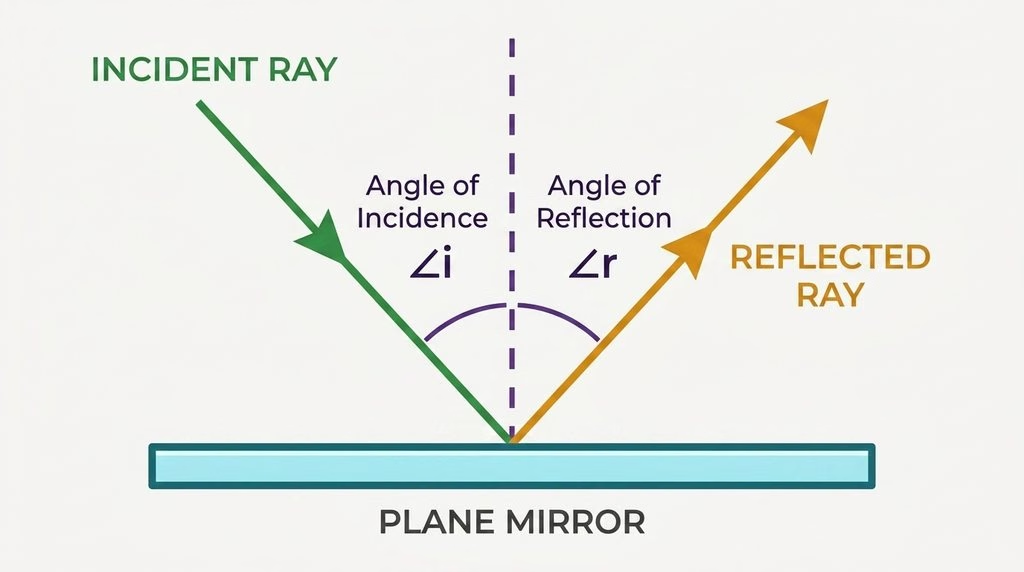
Glare is a physics problem before it’s a Photoshop problem. According to the Law of Reflection, light bounces off a surface at the same angle it arrived — Westcott University’s portrait lighting tutorial explains that this is why an off-camera flash aimed straight at your subject creates a huge reflection: the angle of incidence mirrors the angle of reflection.
Here’s why fixing glare matters:
- Eyes drive engagement. Viewers look at eyes first, then everything else. Bright reflections destroy that connection instantly.
- Clients notice. A single unretouched frame can cost a wedding photographer repeat referrals.
- eCommerce suffers too. Sunglasses, watch faces, and glossy packaging all fight the same reflection problem — most techniques in this guide translate directly.
- Anti-reflective coatings help, but they never fully solve it. Even premium AR-coated lenses reflect roughly 1–2% of incoming light, which is still enough to blow out an eye on camera.
If you shoot portraits regularly, treat this article as a workflow you can reach for over and over rather than a one-off tutorial.
Quick Decision Guide: Match the Method to Your Image
Before you touch a single pixel, match the situation to the right tool:
| Your Image | Best Method | Time |
|---|---|---|
| Big window reflection | Camera Raw Reflection Removal | 30 sec |
| Detailed portrait with facial features | Firefly Model 5 Generative Fill | 1–2 min |
| Small speedlight hotspot | Spot Healing Brush | 30 sec |
| Bright glare on one lens only | Copy-and-flip lens | 2–3 min |
| Milky haze across both lenses | Dehaze + Adjustment Layer | 1 min |
| Tinted color-cast reflection | Layered composite workflow | 5–10 min |
| Multi-image consistency | Copy-paste ACR settings | Batch-friendly |
Now let’s dig into each one.
Method 1: Adobe Camera Raw’s AI Reflection Removal Tool
Adobe rolled out the AI-powered Reflection Removal tool in Camera Raw in December 2024, then expanded it to non-raw files in April 2025 with ACR v17.3, and refined it again in August 2025. Adobe’s own help documentation confirms the tool is trained specifically on glass reflections — so it works best on large reflections rather than tiny lens hotspots.
Interestingly, PetaPixel’s coverage clarifies an important detail: the tool is not generative AI, which means it never invents objects that weren’t in the original photo. That’s a big deal for photojournalism, real estate, and any work where authenticity matters.
Step-by-Step Workflow
- Open your image in Photoshop and go to Filter → Camera Raw Filter (or open raw files directly in Camera Raw).
- Click the Remove panel on the right sidebar.
- Select Distraction Removal → Reflections → Apply.
- Choose a quality level:
- Preview — Fastest, lowest resolution, good for social sharing.
- Standard — Balanced, good for on-screen viewing.
- Best — Full resolution, slowest, use for print or large output.
- Wait a few seconds while the AI processes the image.
- Use the slider: +100 shows the cleaned image, 0 shows the original, -100 shows only the reflection layer.
Bonus: Batch Processing
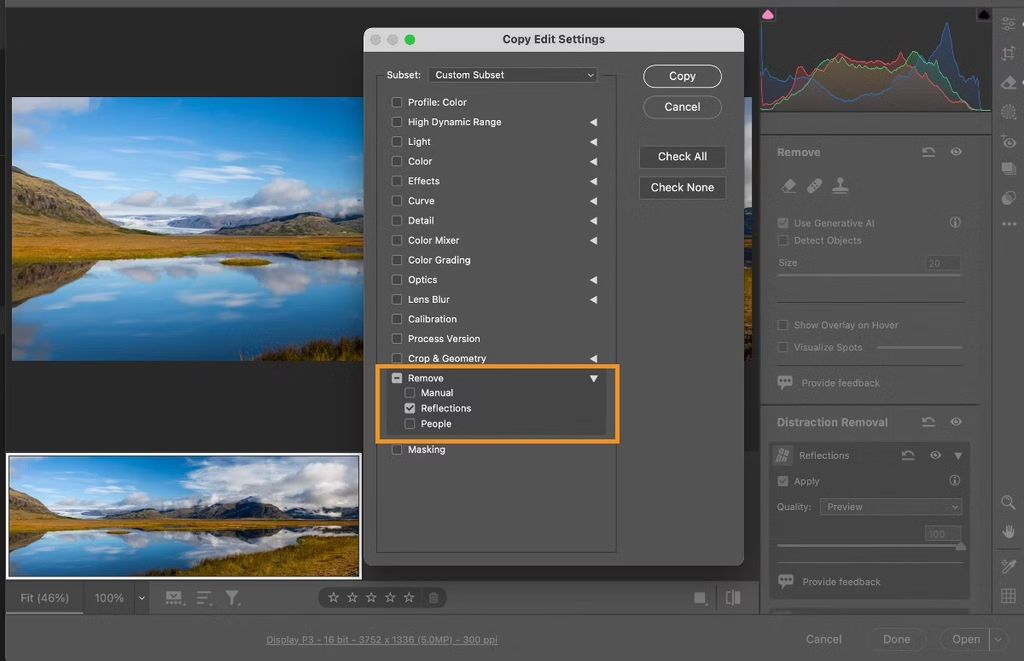
Camera Raw lets you copy the Reflection Removal setting across multiple images:
- Click More Image Settings (three dots).
- Choose Copy Selected Edit Settings, tick Reflections.
- Select multiple photos and Paste Edit Settings.
That single trick saves hours on wedding galleries or school portrait sessions.
Where This Tool Shines — and Where It Doesn’t
- ✅ Excellent for shooting-through-glass scenarios (museums, cars, storefronts).
- ✅ Preserves color and texture beautifully on large reflections.
- ✅ Doesn’t consume generative credits.
- ⚠️ Less reliable on tiny, sharp specular highlights on eyeglass lenses.
- ⚠️ Not available on WinARM machines.
- ⚠️ Occasionally inverts the effect — if +100 still shows glare, drag to -100.
Want your images to look professionally edited, not over-processed?
Achieve natural, high-end perfection with our skilled Photo Retouching Service
Method 2: Generative Fill with Firefly Image Model 5
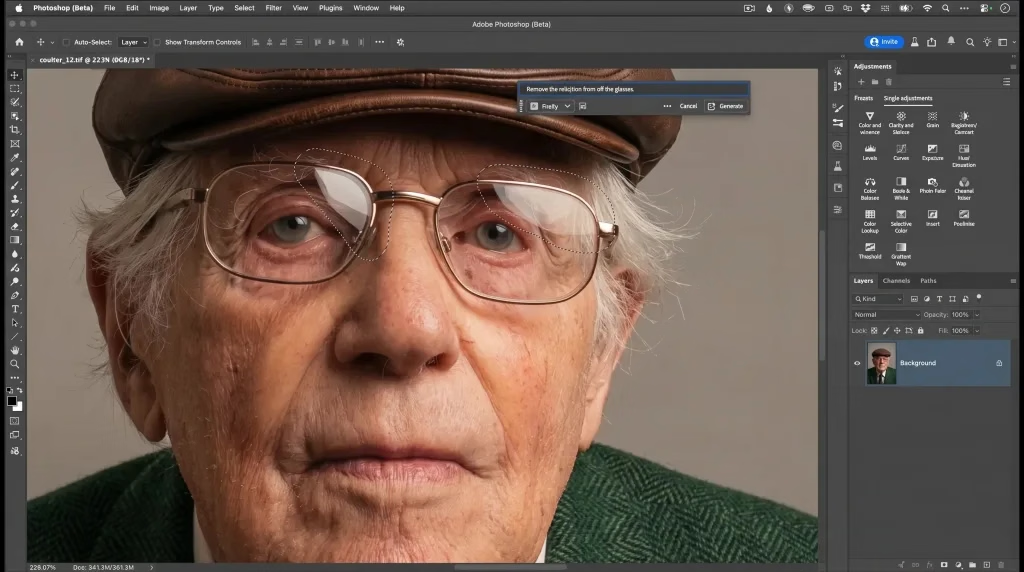
This is where things get magical. In late 2025, Adobe released Firefly Image Model 5 in the Photoshop Beta — and it changed the game for portrait retouching. Photographer Glyn Dewis, working on his 39-45 Portraits Project, tested it thoroughly on his reflection removal tutorial and confirmed the model removes reflections while keeping eyebrow hairs, skin texture, and frame shape virtually identical to the original file.
How to Use It
- Open your portrait in Photoshop Beta (Firefly 5 is currently premium-preview only).
- Grab the Selection Brush Tool (Shift+B).
- Paint over the reflected areas on both lenses. Precision isn’t critical — slightly overlapping the frame is fine.
- Open the Contextual Task Bar (Window → Contextual Task Bar if hidden).
- Click Generative Fill.
- Under Adobe Models, select Firefly Image Model 5 (Preview).
- Type a short prompt:
remove the reflection from the glasses - Click Generate and wait 10–12 seconds.
Why This Works So Well
- Detail preservation is prioritized. Firefly 5 changes only what you selected.
- Handles tinted reflections beautifully. Blue window casts, warm indoor lights — no problem.
- Frame integrity stays intact. Older models often bent frame shapes; Firefly 5 rarely does.
Credit Cost Reality Check
Each Firefly Model 5 generation costs 10 generative credits because it’s the premium model — Adobe’s Firefly plans page shows Creative Cloud plans include monthly allotments starting around 500 credits, with Firefly Standard offering 2,000/month for $9.99. Heavy retouchers processing 50+ portraits weekly may want to budget for a credit top-up.
For a broader look at AI-assisted editing, our roundup of the best AI photo editing software covers alternatives worth knowing.
Method 3: The Classic Clone Stamp Technique
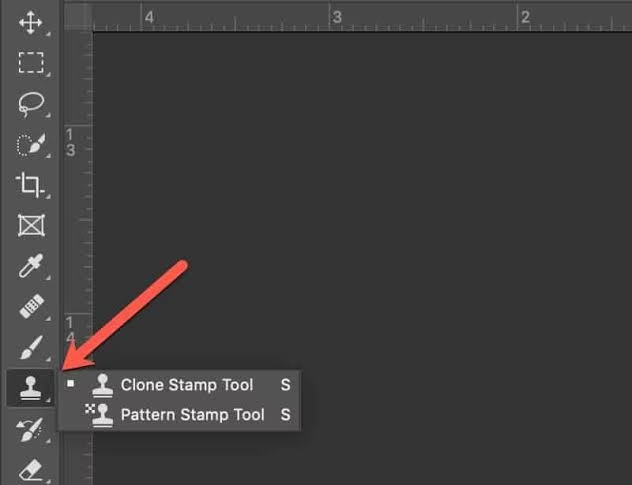
The Clone Stamp Tool (S) has been rescuing glasses shots since Photoshop 3.0. Even with AI everywhere, professional retouchers still reach for it when precision matters. Adobe’s own glasses glare guide recommends it for localized cleanup — and for good reason: no AI matches the control of a well-sampled clone.
Step-by-Step
- Create a new blank layer above your background (keeps everything non-destructive).
- Select the Clone Stamp Tool and set Sample: Current & Below in the top options bar.
- Zoom in to 300–400% on the glare.
- Hold Alt (Option on Mac) and click a glare-free area near the reflection.
- Release Alt and paint over the glare with a soft brush (Hardness 0–30%).
- Re-sample from different clean areas every few strokes to avoid repeating patterns.
- Lower flow to 30–50% and build up the correction gradually.
Pro Tips That Make a Real Difference
- Rotate your clone source. Open Window → Clone Source and rotate 5–15 degrees so lines and curves match naturally.
- Match the eye anatomy. When cloning across an eye, sample from the same eye area on the opposite lens (mirrored).
- Watch for color shifts. Tinted glare has color — clip a Hue/Saturation adjustment to your clone layer to correct it.
- Preserve catchlights. Never clone over both catchlights entirely. Eyes look dead without them.
For a deeper look at Photoshop’s toolset, see our Photoshop tools guide.
Method 4: Spot Healing Brush + Patch Tool Combo
For small, contained hotspots like a single speedlight reflection, the Spot Healing Brush works faster than the Clone Stamp because Photoshop samples surrounding pixels automatically.
Workflow
- Press J to cycle through healing tools; select the Spot Healing Brush.
- Choose Content-Aware mode in the top bar.
- Set brush size slightly larger than the glare spot.
- Click once on each highlight (don’t drag).
- For larger patches, switch to the Patch Tool, draw around the glare, and drag the selection to a clean donor area.
The Spot Healing Brush is your friend for stray edge reflections and pinpoint catchlight overspill. It struggles with anything bigger than a coin-sized patch — that’s when Methods 3 or 5 take over.
Skin cleanup follows the same principles. Our tutorial on how to remove blemishes in Photoshop walks through the same healing tools in more depth.
Spending too much time on tedious skin cleanup in post-production?
Outsource the detail work to our fast, reliable Beauty Retouching Service and focus on shooting.
Method 5: The Copy-and-Flip Lens Technique
This is Adobe’s recommended trick for when one lens is clean and the other is ruined. It’s fast, it preserves the eye perfectly, and clients love the natural result.
Step-by-Step
- Use the Lasso Tool (L) to select the clean lens area — include the eye.
- Copy to a new layer with Ctrl+J (Cmd+J on Mac).
- Press Ctrl+T for Free Transform.
- Right-click inside the transform box and choose Flip Horizontal.
- Drag the flipped lens over the glare-covered lens.
- Lower opacity to 50% temporarily so you can align the eye precisely.
- Bring opacity back to 100%.
- Add a layer mask and use a soft black brush to blend the edges into frame and skin.
Watch Out For
- Asymmetry. Human faces aren’t perfectly symmetrical. Use the Warp transform if the flip looks “off.”
- Direction of gaze. If your subject was looking sharply left or right, the copied eye will point the wrong way — skip this method.
- Catchlight mismatch. Slightly clone or move any catchlights so both eyes look consistent.
Think of this as borrowing symmetry. The human brain accepts small mirror adjustments as long as the face reads naturally.
Method 6: Dehaze + Adjustment Layers for Hazy Glare
Not every reflection is a bright hotspot. Some show up as a milky haze across the whole lens — common with outdoor light or diffused overcast conditions. The Dehaze slider in Camera Raw handles these beautifully.
Workflow
- Duplicate your background layer (Ctrl+J).
- Go to Filter → Camera Raw Filter.
- Select Masking → Brush (K).
- Paint over just the lens area.
- In the masking panel:
- Push Dehaze to +40 to +70.
- Drop Highlights to -30 to -50.
- Drop Whites to -20.
- Reduce Exposure by -0.3 if needed.
- Click OK to return to Photoshop.
For stubborn areas, add a Levels adjustment layer, invert the mask to black with Ctrl+I, then paint white only where glare sits. Push the midtone slider left to darken the glare zone.
Related color-grading fundamentals go a lot deeper in our color grading guide if you want to master this level of control.
Method 7: The Layered Composite Workflow (The Pro Move)
When every other method leaves telltale artifacts, the layered composite approach gives you full manual control. This is your “the glare is really bad and the shot absolutely has to work” method.
Complete Workflow
Stage 1: Reduce with Camera Raw
- Open Filter → Camera Raw Filter → Adjustment Brush.
- Push Dehaze, Whites, and Highlights down aggressively on just the lens area.
Stage 2: Clean up edges
- Use the Spot Healing Brush on any hard glare edges along the frame.
Stage 3: Clone on a new layer
- Create a new empty layer.
- Use the Clone Stamp Tool with Sample: Current & Below to fix eyebrow, hairline, or skin detail.
Stage 4: Merge to a stamped layer
- Press Alt+Ctrl+Shift+E (Option+Cmd+Shift+E on Mac) to stamp all visible layers into a new merged layer.
Stage 5: Lens-over-lens composite
- Use the Quick Selection Tool to select the entire lens area.
- Press Ctrl+J to copy it to a new layer.
- Press Ctrl+T, drag corners outward slightly to enlarge fractionally.
- Hold Alt/Option and click the Layer Mask icon to add a black (hidden) mask.
- With a soft white brush, paint back the corrected areas over the glare.
The result: a completely non-destructive, expert-level fix that keeps every strand of eyebrow hair and every skin freckle intact. This is exactly the level of care that separates amateur retouching from truly professional photo retouching.
Want to enhance colors and contrast without losing realism?
Trust our experts to perfect your images with our Photo Retouching Service
Bonus Method: The Two-Shot Merge (Prevention Meets Post-Production)
Here’s a favorite trick from portrait pros: take two shots. First, ask your subject to remove their glasses for one frame. Then take the “real” shot with glasses on. In Photoshop, mask the clean eyes from the first shot onto the glasses shot — essentially a head-swap for just the eye region.
- Works best when both frames are shot from the exact same position and lighting.
- Align using Edit → Auto-Align Layers.
- Mask carefully around lens edges to hide the transition.
This method takes about 2 minutes and produces flawless results — no AI required.
Prevention Beats Retouching: How to Avoid Glare in Camera
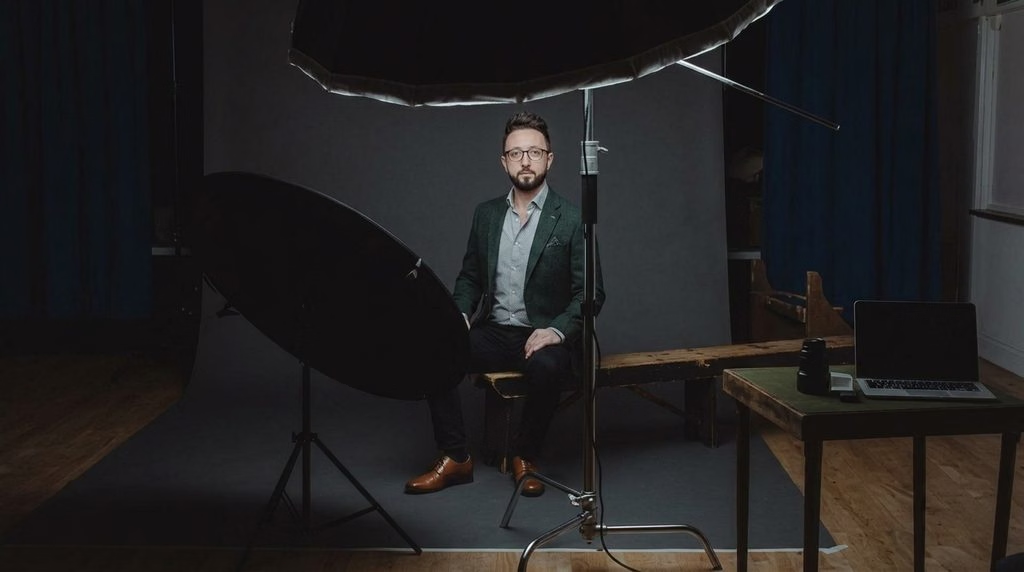
The fastest fix is not needing one. Photographer Melissa Stottmann’s portrait tips at Click Community and educators at Westcott University both recommend the same small on-set adjustments — most of which eliminate 90% of glare before it hits your card.
On-Set Tricks That Work
- Raise your key light to 45° above eye level. The reflection bounces downward, away from your lens.
- Tilt the glasses slightly down — push the earpieces above the ears so the lens tilts by 5–10°.
- Use broad lighting rather than narrow (short) lighting — reduces reflection angle significantly.
- Move the subject, not the light. A tiny 15° body turn often eliminates a stubborn reflection.
- Tuck the chin. Micro head-tilts change the entire angle of reflection.
- Try backlighting. Light coming from behind rarely bounces back into the lens.
- Butterfly light position. Place the key light in front of and above the subject, angled down.
- Consider a polarizing filter. It only works at roughly a 56° Brewster angle, but helps outdoors.
- Zoom in during playback. Always check the eyes before your subject leaves.
For photographers who repeatedly shoot people in glasses, spending 10 minutes on a lighting rehearsal saves hours in Photoshop. Our beginner photography tips cover more foundational advice for setting up shoots that don’t need heavy post-production.
Photoshop vs Lightroom: Where Should You Do This Work?
Both applications now include AI Reflection Removal, but they differ in one crucial way:
- Lightroom Classic offers a single-slider Reflection Removal that applies globally — fast but limited.
- Photoshop 2026 generates separate layers for the reflection removal, which means you can mask the effect in or out with a brush.
Fstoppers reviewer Aaron Nace demonstrated this brilliantly — Photoshop’s layer-based approach lets you fix the AI’s mistakes (like when it accidentally identifies an arm as a reflection) with a black mask painted back where you want the original preserved. That level of control is why professional retouchers still route reflection work through Photoshop even when Lightroom is faster.
Common Mistakes That Ruin Your Glare Removal
Even skilled editors stumble here. Avoid these traps:
- ❌ Cloning in the same direction repeatedly — creates obvious repeating patterns.
- ❌ Working at 100% flow — hard edges betray your edit.
- ❌ Ignoring color temperature shifts — glare has color; your fix should account for it.
- ❌ Removing catchlights entirely — eyes look dead without them.
- ❌ Editing directly on the background layer — always work non-destructively.
- ❌ Skipping the zoom-out check — what looks perfect at 400% may look wrong at fit-to-screen.
- ❌ Trusting AI blindly — always inspect eyebrows, eye shape, and frame edges after generative fills.
- ❌ Forgetting to save a working PSD — flattening too early kills your ability to revise.
Our roundup of common photo editing mistakes covers more pitfalls worth avoiding.
Real-World Comparison: Which Method Wins?
Here’s how each method compares on the metrics that matter:
| Method | Speed | Accuracy | Best For | Skill Level |
|---|---|---|---|---|
| Camera Raw Reflection Removal | ⚡ Very Fast | Good | Large glass reflections | Beginner |
| Firefly Model 5 Generative Fill | Fast | Excellent | Detailed portraits | Beginner |
| Clone Stamp | Moderate | Very High | Small, precise areas | Intermediate |
| Spot Healing Brush | Very Fast | Moderate | Tiny hotspots | Beginner |
| Copy-and-Flip Lens | Moderate | Excellent | Asymmetric glare | Intermediate |
| Dehaze + Adjustments | Fast | Good | Milky/hazy glare | Beginner |
| Layered Composite | Slow | Highest | Difficult cases | Advanced |
| Two-Shot Merge | Very Fast | Perfect | Pre-planned shoots | Intermediate |
For most photographers, a combined workflow wins: start with Camera Raw or Generative Fill for the heavy lifting, then finish with Clone Stamp for the last 10%. That’s how working retouchers get consistent results at scale.
Handy Keyboard Shortcuts Cheat Sheet
Speed up your reflection removal workflow with these shortcuts:
- S — Clone Stamp Tool
- J — Cycle through Healing tools (Spot Healing Brush, Healing Brush, Patch)
- B — Brush Tool
- L — Lasso Tool
- Ctrl/Cmd + J — Duplicate layer
- Ctrl/Cmd + T — Free Transform
- Ctrl/Cmd + I — Invert mask
- Alt/Option + Ctrl/Cmd + Shift + E — Stamp visible layers
- [ and ] — Decrease/increase brush size
- Shift + [ and Shift + ] — Decrease/increase brush hardness
Print this out or memorize it — the fastest retouchers rarely reach for the mouse when they don’t have to.
When Should You Hire a Professional Retoucher?
DIY works for occasional portraits. But if you’re a wedding photographer with 800 images to deliver, or an eCommerce brand shooting glasses on models weekly, the math shifts fast. Professional editors handle glare removal in under 5 minutes per image, use non-destructive workflows, and deliver consistent results across full sets.
Outsourcing pays off when:
- You’re processing 50+ images with glare per shoot.
- Clients demand magazine-quality eye retouching.
- You need 24-hour turnaround during peak season.
- Your time is worth more spent shooting than retouching.
Industry pricing typically runs $1–$5 per image for basic glare removal and up to $14.95 per pose for complex portrait work — details worth comparing before committing. Our photo editing cost breakdown covers pricing tiers in depth, and our outsourcing guide explains what to expect from a vendor relationship.
Bonus: What About Sunglasses and Reflective Product Shots?
The methods above transfer directly to sunglasses in eCommerce photography, reflective watch faces, and glass-front picture frames. The one difference: with mirrored sunglasses or glossy products, you often want a subtle reflection to sell realism — you’re just removing the unwanted studio-light bounce.
For product-specific challenges — jewelry, glossy packaging, watch crystals — the workflow shifts toward frequency separation and dodge-and-burn rather than clone stamping. Our white background product photography guide covers the retouching side in detail.
Ready to transform your raw photos into professional assets?
Get a custom, no-obligation quote tailored to your specific volume and needs. Explore Clipping Expert Asia
Frequently Asked Questions
Can Photoshop remove glasses glare completely?
Yes, in most cases. Camera Raw’s AI Reflection Removal and Firefly Image Model 5 handle even complex reflections. Extreme cases where the entire eye is obscured may still need the copy-and-flip technique or manual cloning.
Which Photoshop version do I need for AI reflection removal?
You’ll need Photoshop 2025 (v26) or newer with Camera Raw 17.1+ for the built-in Reflection Removal tool. For Firefly Image Model 5, you’ll need Photoshop Beta and an active Creative Cloud subscription.
Is Generative Fill free to use for glare removal?
Adobe includes monthly generative credits with Creative Cloud plans. Standard models use 1 credit per generation; Firefly Image Model 5 uses 10 credits because it’s the premium model. Heavy users may need a credit top-up.
Will the reflection removal tool work on non-raw files like JPEGs?
Yes. Since Camera Raw v17.3 (April 2025), Reflection Removal supports JPEG, PNG, TIFF, and other non-raw formats. Open them via Filter → Camera Raw Filter.
How do I remove glare without ruining the eyes underneath?
Use the copy-and-flip lens technique or Generative Fill with Firefly Model 5. Both preserve or reconstruct the eye naturally. Avoid heavy Clone Stamp work directly on eye pixels — it flattens depth and kills catchlights.
Can I batch-process glare removal on multiple photos?
Camera Raw lets you copy Reflection Removal settings and paste them across multiple images. Select the source photo, choose More Image Settings → Copy Selected Edit Settings, tick Reflections, then paste onto other images. Works best on shots taken in similar lighting.
Do polarizing filters really prevent glasses glare?
Sometimes. Polarizers cut reflected light at specific angles (around 56° from the surface). They help outdoors in strong sun but do little against studio strobes hitting glasses head-on. Combine with lighting angle changes for best results.
What if the glare is tinted (blue or warm)?
Tinted glare needs color correction after removal. Add a Hue/Saturation adjustment layer clipped to your fix, then reduce saturation in the affected channel. Firefly Model 5 handles this automatically most of the time.
How long does it take a professional to remove glasses glare?
Professional retouchers typically remove glasses glare in 3–5 minutes per image for standard cases, and 10–15 minutes for severe reflections. A full beauty portrait retouch can run 1–4 hours, but glare alone is much faster.
Final Thoughts
Glasses glare used to be one of those problems that made photographers dread every portrait involving eyewear. In 2026, it’s a solved problem — provided you match the right technique to the right image. Start with prevention on set, reach for Adobe’s AI tools first, then keep the Clone Stamp in your back pocket for the details.
If you’re managing high volumes of portraits or eCommerce shots where consistency matters more than experimentation, delegating retouching to specialists frees you to focus on the creative work only you can do. Either way, no more shots ruined by two bright blobs where the eyes should be.