

How to Remove Glare from Glasses in Photoshop: 7 Proven Methods That Actually Work
September 1, 2026
Best Background Remover Tools: 12 Free & Paid Options Compared
September 4, 2026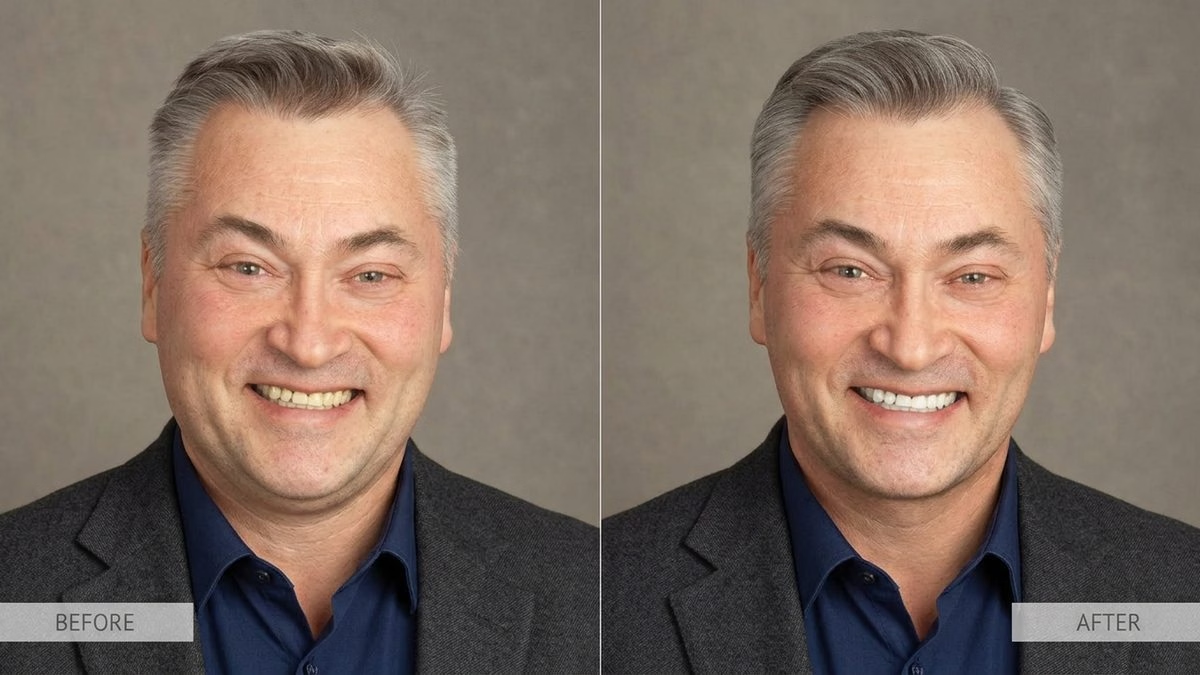
Quick answer: To remove a double chin in Photoshop, convert your photo layer to a Smart Object, open Filter → Liquify, choose the Face Tool (A), and inside Face-Aware Liquify move Chin Height to about +8, Jawline to about −5, and Face Width to −3. For finer control, switch to the Forward Warp Tool (W) with a large brush (200–500 px) and low pressure (20–40), then rebuild the natural jaw shadow with a soft dodge and burn layer. Keep every move small, respect the subject’s real features, and never sculpt someone into a stranger.
Now let’s slow down and do this properly.
Almost every polished portrait you’ve admired online has had a quiet nudge in post. A softened neck shadow here. A refined jaw curve there. The double chin—that little pocket of shadow that shows up when a subject tilts their head, laughs, or sits under overhead light—is one of the most common things photographers fix in Adobe Photoshop.
But there’s a huge difference between a natural, respectful edit and a heavy-handed one that reshapes someone into a stranger. This guide covers both sides—the craft and the ethics—of reshaping a face in Photoshop’s Liquify filter, so your portraits look better without ever looking “photoshopped.”
Grab your Wacom pen (or trackpad), pour a coffee, and let’s dig in.
- Why “Ethical Liquify” Is the First Thing You Should Learn
- Common Reasons a Double Chin Appears in Photos (Blame the Camera First)
- Tools You’ll Need (and a Setup Tip That Saves Hours Later)
- Method 1: Face-Aware Liquify — Fastest, Cleanest for Most Portraits
- Method 2: The Forward Warp Method — Full Manual Control
- Method 3: The Pro Combo — Liquify + Dodge & Burn + Clone Stamp
- Method 4: Pen Tool + Warp Transform — When Backgrounds Get Busy
- Method 5: Generative Fill in Photoshop 2025 / 2026 — When You Need Speed
- The 7 Golden Rules of a Believable Face Reshape
- Speed Comparison: Which Method Should You Use?
- Photoshop Keyboard Shortcuts Worth Memorizing
- Common Mistakes That Instantly Give Away Retouching
- Myths vs. Facts About Retouching a Double Chin
- When to Skip Photoshop Entirely (And Hire It Out)
- AI Tools vs. Photoshop for Double Chin Removal
- Real-World Applications for Face Reshaping (Beyond Vanity)
- Advanced Tip: Batch Retouching for High-Volume Photographers
- Ethics Checkpoint: 4 Questions to Ask Before You Export
- Prevention Beats Post: 6 In-Camera Fixes That Reduce Chin Retouching Time
- Final Thoughts: Craft, Not Cosmetics
- Frequently Asked Questions
Why “Ethical Liquify” Is the First Thing You Should Learn
Liquify is powerful. Maybe too powerful. It lets you push, pull, pucker, and bloat pixels like clay—which means it can quietly redraw a person’s identity if you’re not careful. That’s exactly why governments are starting to regulate retouched imagery.
- Norway amended its 2009 Marketing Act (passing 72–15 in Parliament) to require influencers and advertisers to label any promotional image where a body’s shape, size, or skin has been retouched. Serious violations carry fines and, in extreme cases, possible imprisonment, as reported by It’s Nice That.
- France has required disclaimer labels on commercial photos of models with digitally altered bodies since October 2017, NPR confirmed.
- Israel passed the “Photoshop Law” back in 2012, championed by fashion photographer Adi Barkan. It requires all retouched model images to be labeled and bans models with a BMI below 18.5.
- The UK is heading the same way. Dr. Luke Evans’s proposed bill would force influencers and advertisers to disclose body edits, and the BBC has covered the rising pressure on the industry.
The takeaway isn’t “don’t retouch.” It’s this:
- Fix distortions, don’t manufacture beauty. A wide-angle lens or awkward head tilt can create a chin shadow that isn’t really there in person. Correcting that is fair.
- Respect the subject’s identity. Sharpening a jaw until it looks CGI is disrespectful and instantly obvious.
- Get consent. Especially for headshots, dating profiles, and personal branding, ask what the subject actually wants tweaked.
- Disclose heavy edits. For commercial, editorial, or ad work, be transparent about the scope of your retouching.
Great retouching treats the photo like a portrait, not a sculpture. That single mindset shift changes every technical choice that follows.
Common Reasons a Double Chin Appears in Photos (Blame the Camera First)
Before you open Photoshop, know your enemy. A “double chin” in a portrait is often just geometry and lighting—not fat. Understanding the cause helps you fix it with the lightest possible touch.
- Head tilt. A slight downward tilt compresses the skin under the jaw.
- Wrong focal length. Anything shorter than 50mm can distort facial proportions. The classic portrait sweet spot sits between 85mm and 135mm, and many pros consider 135mm the flattering gold standard because it slims the face and separates the subject from the background.
- Overhead or flat lighting. Light from directly above deepens neck shadows; flat frontal light kills jaw definition.
- Low camera angle. Shooting from below dramatically enlarges the lower face and neck.
- Compressed posture. Sitting slouched or retracting the chin creates skin folds even on very lean subjects.
Whenever you can, solve this in camera first. A pro’s classic direction—“forehead forward, chin down slightly, tongue pressed to the roof of the mouth”—eliminates 80% of chin issues before Photoshop even opens. When post is the only option, the workflow below delivers clean, believable results.
Want your images to look professionally edited, not over-processed?
Achieve natural, high-end perfection with our skilled Photo Retouching Service
Tools You’ll Need (and a Setup Tip That Saves Hours Later)
- Adobe Photoshop 2023 or newer (Face-Aware Liquify has improved significantly in modern versions).
- A pressure-sensitive tablet. Not required, but a Wacom Intuos or Huion Kamvas transforms your Liquify precision.
- A calibrated monitor. Skin-tone edits look wildly different on uncalibrated screens.
- A high-resolution source file. RAW or high-quality JPEG only. Low-res files fall apart under Liquify.
- Adobe Firefly credits (optional, only if you plan to use Generative Fill for the trickiest cases in Photoshop 2025/2026).
Setup tip that changes everything: Before you touch a slider, duplicate your background layer (Ctrl/Cmd + J), right-click that duplicate, and choose Convert to Smart Object. This makes Liquify a Smart Filter—so you can reopen it hours or days later and tweak your sliders without any pixel loss. This is real, professional non-destructive editing, and it’s the workflow habit that separates pros from beginners.
Method 1: Face-Aware Liquify — Fastest, Cleanest for Most Portraits
Face-Aware Liquify debuted in Photoshop CC 2015 and has quietly become the retoucher’s best friend. It detects a face automatically and gives you slider-based control—no manual pixel-pushing required. This is my go-to for LinkedIn headshots, wedding candids, and anytime I’m batch-processing more than a handful of images. It pairs beautifully with the broader techniques in our portrait retouching walkthrough.
Step 1 — Open the Liquify Filter
Head to Filter → Liquify (shortcut: Shift + Ctrl + X on Windows, Shift + Cmd + X on Mac). Photoshop opens the Liquify workspace with your image loaded and centered.
Step 2 — Grab the Face Tool
In the toolbar on the left, click the Face Tool (shortcut: A). Photoshop scans the image, detects the face, and reveals on-canvas handles around key features. On the right panel, expand the Face-Aware Liquify section.
Step 3 — Ignore Everything Except “Face Shape”
Skip the eyes, nose, and mouth categories. Scroll straight to Face Shape. Four sliders live there:
- Forehead — raises or lowers the forehead line
- Chin Height — dragging right raises the chin (tucks it up), dragging left lowers it
- Jawline — dragging right widens the jaw, dragging left narrows it
- Face Width — dragging right widens the overall face, dragging left slims it
Getting the direction of each slider right matters. Positive Chin Height raises the chin upward, which is exactly what you want when reducing a double chin. This is confirmed by Photoshop Essentials, the go-to Adobe tutorial resource for the last decade.
Step 4 — The Sacred Trio for a Natural Chin Fix
Here’s the exact combination that works 90% of the time on a standard portrait:
- Chin Height: +5 to +15 — lifts the chin up, tightening the skin beneath the jaw.
- Jawline: −3 to −8 — gently pulls the jaw inward. Never push past −10, or the face turns cartoonish.
- Face Width: −2 to −5 — a tiny reduction adds subtle slimming without altering identity.
Three sliders. Tiny values. Toggle the Preview checkbox on and off to compare. If your subject still looks like themselves, you’re doing it right.
Step 5 — Hit OK and Re-Edit Anytime
Because you’re working on a Smart Object, the filter now sits under your Smart Object as Smart Filters → Liquify in the Layers panel. Double-click it any time to reopen those sliders and adjust. That’s professional workflow in one click.
A quick reality check: Every human face is slightly asymmetrical. Face-Aware Liquify applies its adjustments symmetrically, which can flatten that natural asymmetry. If your subject has a defining feature—a strong left jaw, a soft right side—switch to the manual Forward Warp method instead. That freedom matters for wedding, editorial, and portrait work.
Method 2: The Forward Warp Method — Full Manual Control
When Face-Aware Liquify doesn’t quite nail it—maybe the subject is looking away, wearing a scarf, or has a hand near the chin—you’ll want manual control. This is also the method most professional beauty retouchers still prefer for magazine work.
Step 1 — Re-Enter Liquify
Filter → Liquify. Same workspace, same shortcut.
Step 2 — Select the Forward Warp Tool
It’s the very first tool in the toolbar (shortcut: W). Forward Warp pushes pixels in the direction you drag them—like combing wet clay.
Step 3 — Dial In Brush Settings That Actually Work
Photoshop’s default brush is too small and too aggressive for chin work. Change these on the right panel before doing anything:
- Size: 200–500 px (larger than the chin area itself, so you shape smoothly)
- Pressure: 20–40 (lower is gentler; higher is more aggressive)
- Density: 50–75 (softer edges blend better)
- Rate: 30–50
Big brush, low pressure. That’s the mantra. A tiny hard brush creates the “warped” look everyone spots instantly.
Step 4 — Push Gently, Never Yank
Place the brush just below the extra chin skin and lightly nudge upward and inward, following the natural jaw curve. Work in short strokes. Release, evaluate, stroke again.
- Never fight the jaw’s natural line — follow it.
- Zoom out constantly. What looks subtle at 200% often looks extreme at 100%.
- If you overshoot, hit Reconstruct Tool ® to gradually restore, or Ctrl/Cmd + Z.
Step 5 — Use the Freeze Mask for Precision
If the chin sits near a shirt collar or jewelry, Forward Warp will smear the fabric. Prevent this by clicking the Freeze Mask Tool (F) and painting a red mask over anything you want protected—shirt, hair, earrings. Frozen pixels don’t move while you liquify around them. Use the Thaw Mask Tool (D) to erase the freeze when you’re done.
Spending too much time on tedious skin cleanup in post-production?
Outsource the detail work to our fast, reliable Beauty Retouching Service and focus on shooting.
Method 3: The Pro Combo — Liquify + Dodge & Burn + Clone Stamp
Professional beauty retouchers rarely rely on one tool alone. This three-stage workflow produces the most natural results, and the reason is simple: a double chin isn’t just a shape—it’s also a shadow. Fix the shape without fixing the shadow, and the edit collapses under any decent monitor.
Stage 1 — Reshape with Liquify
Do a light pass using Method 1 or 2 above. Keep the change gentle. You’ll refine the illusion in the next two stages.
Stage 2 — Rebuild the Jawline Shadow with Dodge & Burn
Here’s the secret sauce: a defined jawline is really just a well-placed shadow. Rebuild it manually:
- Create a new blank layer above your image and rename it “Burn.”
- Set the layer’s blend mode to Soft Light.
- Grab the Brush tool (B), set foreground color to black, opacity 5–8%, flow 20%, hardness 0%.
- Paint a soft, thin line following the natural jaw curve. Each stroke should be barely visible—that’s the point. Build up shadow with 3–5 gentle passes.
- Create a second layer named “Dodge,” same Soft Light mode, but paint with white along the top of the jawbone to create a highlight.
Together, these two layers recreate the light-and-shadow language your brain reads as a “sharp jaw.” It’s far more convincing than pushing pixels alone. If dodge and burn is new to you, our step-by-step portrait retouching guide walks through the exact setup.
Stage 3 — Repair Texture with the Clone Stamp
Every time you push pixels with Liquify, you distort the skin’s natural pore texture. Repair it like this:
- Select the Clone Stamp Tool (S).
- Set the Sample dropdown to All Layers.
- Alt-click a clean patch of skin near the neck.
- Paint over any smeared area with opacity 20–30% to restore texture gently.
For heavily smeared spots, the Spot Healing Brush (J) blends better than Clone Stamp because it samples surrounding pixels automatically. If you regularly clean up skin, our field-tested tutorial on how to remove blemishes in Photoshop will save you real time.
Method 4: Pen Tool + Warp Transform — When Backgrounds Get Busy
Sometimes a chin sits against a difficult background—floral wallpaper, a busy street, patterned clothing. Liquify smears everything it touches. In that case, isolate the chin first.
Step 1 — Trace with the Pen Tool
Select the Pen Tool (P) and set mode to Path. Trace along the desired new jawline—not the current one—adding anchor points every centimeter or so.
Step 2 — Close and Convert
Loop the path back around the excess chin. In the Paths panel, right-click your path and choose Make Selection. Feather 1–2 px for smooth edges.
Step 3 — Copy to a New Layer
Press Ctrl/Cmd + J. The chin area now lives on its own layer.
Step 4 — Warp It Into Position
Edit → Transform → Warp. Drag the mesh handles to reshape the isolated chin exactly where you want it. Because it’s isolated, the background stays untouched.
Step 5 — Blend the Edges
Add a layer mask and use a soft black brush at 30% opacity to feather the transition. This method takes about five times longer than Liquify, but it produces zero smearing on complex backgrounds. It shares a lot of DNA with the same Pen Tool precision covered in our overview of what a clipping path is.
Want to enhance colors and contrast without losing realism?
Trust our experts to perfect your images with our Photo Retouching Service
Method 5: Generative Fill in Photoshop 2025 / 2026 — When You Need Speed
Photoshop 2025 introduced generative AI inside the Remove Tool, and Photoshop 2026 (released October 2025) added Harmonize, an upgraded Generative Fill, and improved AI Select. These tools can genuinely handle a subtle chin refinement in seconds—though they still need supervision.
When Generative Fill actually helps:
- The neck-chin transition is complex (jewelry, tattoos, patterned collar).
- You want a first pass in under 30 seconds and don’t mind cleaning up afterward.
- The subject’s chin sits against soft, non-detailed background.
When it fails:
- Fine skin texture matters (Generative Fill often smooths or hallucinates pores).
- The subject wears glasses or has a beard—AI can distort both.
- Skin tone consistency matters across multiple images.
Quick workflow: Loosely lasso the double chin area, click Generative Fill in the contextual taskbar, and leave the prompt empty (or type “clean jawline, natural skin”). Choose the best variation. Then run a 10–15% opacity Clone Stamp pass to restore texture. Treat it as a starting point, never a final answer—the manual craft always finishes stronger.
The 7 Golden Rules of a Believable Face Reshape
After thousands of edits, these are the principles that separate amateur retouching from professional work:
- Small incremental moves beat one big move. Ten tiny nudges look natural; one big drag never does.
- Zoom out every 30 seconds. Close-up work fools your eye. Full-image view is the truth-teller.
- Preserve asymmetry. Perfectly symmetric faces look uncanny. Keep natural imbalances.
- Follow existing anatomy. Enhance the subject’s actual bone structure—don’t invent a new one.
- Watch the ears, hair, and collar. These are the “tells” that reveal Liquify smears. Freeze them.
- Toggle before/after constantly. In Liquify, use the Preview checkbox. On the canvas, click the eye icon on your Smart Filter.
- Take a break, then review. Come back after 10 minutes with fresh eyes. If anything screams “edited,” dial it back.
Speed Comparison: Which Method Should You Use?
Different jobs call for different methods. Here’s a decision matrix from real production experience:
| Scenario | Recommended Method | Time Per Image |
|---|---|---|
| LinkedIn / corporate headshot | Face-Aware Liquify only | 1–2 minutes |
| Wedding candid | Face-Aware + light Dodge & Burn | 3–5 minutes |
| Editorial magazine cover | Forward Warp + Dodge & Burn + Clone Stamp | 15–30 minutes |
| E-commerce fashion catalog | Face-Aware batch action + shadow rebuild | 2–4 minutes |
| Portrait with busy background | Pen Tool + Warp Transform | 10–15 minutes |
| Rush turnaround | Generative Fill + manual cleanup | 1–3 minutes |
If you handle heavy volume—say 200+ headshots a month—Face-Aware Liquify combined with Photoshop’s Actions panel can process a queue in a single afternoon. And if you’re weighing in-house vs. outsourced retouching, our breakdown of photo editing cost shows exactly where the numbers tip. Industry data from Path Edits shows professional retouching prices ranging from about $0.69 to $150+ per image depending on complexity.
Photoshop Keyboard Shortcuts Worth Memorizing
If you plan to do any real volume of face retouching, muscle memory beats menus every time:
- Filter → Liquify: Shift + Ctrl/Cmd + X
- Face Tool inside Liquify: A
- Forward Warp Tool: W
- Reconstruct Tool: R
- Freeze Mask / Thaw Mask: F / D
- Clone Stamp: S
- Spot Healing Brush: J
- Brush Tool: B
- Brush Size (up/down): ] and [
- Undo: Ctrl/Cmd + Z (repeatable)
- Toggle layer visibility: Alt-click the eye icon
Common Mistakes That Instantly Give Away Retouching
Even experienced editors fall into these traps. Watch out for:
- The “melted collar” effect. You forgot to freeze the shirt, and now the collar bends like Play-Doh.
- The “ghost jaw.” The Liquify push left a lighter smudge where the chin used to be; add a subtle burn layer to hide it.
- The alien neck. Slimming the chin without adjusting the neck creates a floating-head look. Match neck width proportionally.
- Over-sharpened chin edge. Never sharpen the freshly liquified area—it exaggerates the pixel push.
- Chopped earlobes. The jaw edge sometimes gets pushed into an earlobe, slicing it in half. Zoom in and check.
- Wrong shadow direction. If the original light came from camera-left, don’t paint your new jaw shadow on the wrong side. Lighting must stay consistent.
- Skin blur from AI over-processing. Neural Filters and Generative Fill often smooth pores too much—always follow with a texture pass.
I once handed a bride her engagement portrait with a chin sharpened too far and a neck I forgot to match. She looked six years older. Lesson learned: subtlety and consistency always beat aggressive editing.
Myths vs. Facts About Retouching a Double Chin
Search results are full of half-truths on this topic. Let’s clear them up:
- Myth: “Retouching a chin means you’re being dishonest.”
Fact: Correcting distortion caused by a lens or head tilt just restores what your subject actually looks like in person. Sculpting a new face is different—and that’s where ethics matter. - Myth: “Face-Aware Liquify replaces every other technique.”
Fact: It’s excellent for 80% of portraits, but complex backgrounds, profile shots, and heavy asymmetry still demand manual Forward Warp or Pen Tool work. - Myth: “AI does it better.”
Fact: AI is fast but generic. It often smooths skin texture, hallucinates detail, and applies one-size-fits-all beauty standards. Manual editing wins on any project where quality is scored. - Myth: “You need to disclose every edit.”
Fact: Disclosure laws in Norway, France, and Israel apply to commercial and promotional posts—not to personal portraits. Ethical practice still means being transparent with clients. - Myth: “The best retouchers use the biggest edits.”
Fact: The best retouchers make edits so subtle that no one notices anything was done. Restraint is the whole skill.
When to Skip Photoshop Entirely (And Hire It Out)
Let’s be real. If you shoot 40 weddings a year or launch 500 SKUs a quarter, hand-retouching every image just isn’t scalable. That’s where professional retouching studios come in.
Signs it’s time to outsource:
- You’re spending more than 10 minutes per image on face reshaping alone.
- Your business is bottlenecked by editing turnaround.
- Clients keep asking for consistency across large batches.
- You want to focus on shooting, not squinting at pixels at midnight.
A specialized retouching team can turn around hundreds of hand-edited portraits within 24 hours, often at rates below your billable shooting hour. If you’ve never done it, our guide on how to outsource photo editing walks through vetting, pricing structures, and quality-control checks in detail.
Need your images edited faster without sacrificing quality?
Our streamlined process delivers premium results in as little as 6 hours. Explore our fast-turnaround services
AI Tools vs. Photoshop for Double Chin Removal
You’ve probably seen one-tap “slim face” filters in FaceTune, YouCam, and Instagram. They’re fast, but the trade-offs are real. A quick comparison:
- Consumer AI apps (FaceTune, Facetune 2, Fotor, YouCam). Fast and free, but they apply generic beauty templates, blur skin, and often distort ears, glasses, and backgrounds. Fine for casual selfies. Poor for professional portraits.
- Photoshop Generative Fill (2024–2026). Adobe’s Firefly-powered engine can rebuild a jaw or remove a chin fold, but it sometimes hallucinates unnatural detail. Excellent as a starting point; still needs manual cleanup.
- Photoshop Smart Portrait Neural Filter. Powerful but currently unreliable for chin work—user reports have flagged unexpected mask behavior in Photoshop 2025.
- Traditional Photoshop Liquify + Dodge/Burn. Slower, but produces the most controlled, defensible, professional-grade results. This is what magazine retouchers still use in 2026.
We benchmarked this exact tradeoff across background removal in our recent write-up on Remove.bg vs. Photoshop vs. Canva manual editing. The same pattern applies to face reshaping: AI is convenient, but hand-editing wins whenever quality is actually being judged.
Real-World Applications for Face Reshaping (Beyond Vanity)
Not every application is about personal appearance. Subtle, ethical face reshaping has legitimate business uses:
- LinkedIn and executive headshots. Confident, polished portraits build trust.
- Actor and model comp cards. Casting agents want the subject at their most flattering.
- Real estate agent portraits. Consistency across a brokerage’s team page matters for brand image.
- Author photos and press kits. A book jacket lives for decades—a natural refined portrait ages well.
- Wedding albums. Nobody wants a lifetime keepsake ruined by an unlucky camera angle.
- Fashion catalogs and e-commerce lookbooks. Face and body reshaping is industry-standard for editorial and fashion e-commerce.
If you shoot apparel with live models, our deep dive into ghost mannequin photography shows how face retouching fits into a full production pipeline alongside body slimming, background swaps, and color correction.
Advanced Tip: Batch Retouching for High-Volume Photographers
If you shoot corporate events, headshot marathons, or e-commerce, hand-editing every face isn’t sustainable. Here’s the fastest legitimate batch workflow:
- Record a Photoshop Action with your standard Face-Aware Liquify defaults (Chin Height +10, Jawline −5, Face Width −3).
- Use File → Automate → Batch to apply that Action to an entire folder.
- Manually review each result—Face-Aware Liquify occasionally misdetects on profile shots or extreme angles.
- Pair with Lightroom presets for color and exposure, then export from Photoshop for final touches.
Done right, this compresses a 100-image job from a full day to under two hours, without sacrificing the human review step that catches errors.
Ethics Checkpoint: 4 Questions to Ask Before You Export
Before you hit save, pause. Run through this short checklist:
- Would the subject recognize themselves in this image? If not, you’ve gone too far.
- Am I fixing a distortion or manufacturing a new face? There’s a moral difference.
- Am I meeting or setting an unrealistic beauty standard? Especially critical for young audiences and social media.
- If used commercially, would a disclaimer be legally required in Norway, France, or Israel? Increasingly, the answer is yes.
If any answer feels uncomfortable, dial your edits back. The best retouching is the kind nobody notices—your subject just looks like themselves on a really good day.
Prevention Beats Post: 6 In-Camera Fixes That Reduce Chin Retouching Time
Every minute you save at the shoot is ten minutes you save in Photoshop. Bake these into your posing playbook:
- Raise the camera to eye level or slightly above. This alone removes most double chin appearances.
- Ask the subject to push their forehead gently toward the lens. Sounds weird; works instantly.
- Use a longer lens. Anything between 85mm and 135mm on full-frame flatters faces.
- Light from a 45° angle. Front-flat lighting kills jaw definition; side or Rembrandt light rebuilds it.
- Watch for compressed posture. Have subjects sit tall and roll shoulders back.
- Ask for a subtle jaw press. Tongue behind top teeth, mild forward lean. This is the industry-standard “power pose.”
Photographers who master these basics need Liquify half as often—which means faster delivery and happier clients.
Ready to see the difference expert retouching makes on your portraits?
Test our premium Beauty Retouching Services today with a free, no-obligation trial.
Final Thoughts: Craft, Not Cosmetics
Removing a double chin in Photoshop is a technical skill you can learn in an afternoon. Doing it well—so the result feels human, respectful, and invisible—takes years. The difference isn’t the tool. It’s the mindset.
Approach every portrait as if the subject is sitting in the room, watching over your shoulder. Because in a very real sense, they always are. Their identity, their confidence, sometimes their livelihood, rides on the image you’re shaping. Fix distortions. Refine shadows. Respect the person.
That’s the whole game.
Frequently Asked Questions
Is it ethical to remove a double chin in Photoshop?
It depends on context. Correcting a chin shadow caused by camera angle or lens distortion is widely accepted. Reshaping a face to meet an unrealistic beauty standard—especially for commercial or influencer content in countries like Norway, France, or Israel—may legally require a disclosure label. When in doubt, ask the subject and disclose the edit.
What’s the difference between Liquify and Face-Aware Liquify?
Standard Liquify uses brush-based tools (Forward Warp, Pucker, Bloat, Twirl) to push pixels manually. Face-Aware Liquify uses AI to detect the face automatically and gives you slider controls for eyes, nose, mouth, and face shape. Both live inside Filter → Liquify.
Can I remove a double chin without Photoshop?
Yes. Alternatives include Affinity Photo (its Liquify Persona), GIMP with the iWarp filter, and mobile apps like FaceTune, Facetune 2, YouCam, and Fotor. AI-first tools like Magic Eraser and Adobe Firefly also handle basic double-chin removal, though results vary widely in quality.
Why does my Liquify edit look fake?
Three most common reasons: you pushed pixels too aggressively (lower your brush pressure), you didn’t rebuild the jawline shadow with dodge and burn, or you accidentally warped the collar, ear, or hair. Zoom out and toggle before/after to spot every tell.
How do I make Liquify edits non-destructive?
Convert your image layer to a Smart Object before applying Liquify (right-click the layer → Convert to Smart Object). The filter will appear as an editable Smart Filter in the Layers panel, letting you double-click and adjust the sliders anytime. This is best practice in every professional workflow.
What brush size should I use for Forward Warp on a chin?
Use a brush larger than the chin area itself—typically 200–500 pixels for a 4000-pixel-wide portrait. Set pressure to 20–40 and density to 50–75. Big and soft always beats small and aggressive.
How long does professional double chin removal take?
For a straightforward LinkedIn headshot, 1–3 minutes using Face-Aware Liquify. For editorial or magazine-grade work using Liquify + dodge/burn + Clone Stamp, expect 15–30 minutes per image. Batch workflows can drop corporate headshot averages to under two minutes.
Can I outsource face retouching for bulk projects?
Absolutely, and it’s often more cost-effective than doing it yourself. Professional retouching services offer per-image pricing (often between $0.69 and $4 per portrait for high volume based on 2026 industry benchmarks), 24-hour turnaround, and consistent quality across large batches—ideal for wedding photographers, corporate clients, and e-commerce brands.
Does Photoshop 2026 have a built-in “double chin remover”?
Not with that specific name, but Photoshop 2026 pairs the traditional Face-Aware Liquify with an upgraded Generative Fill, an improved Remove Tool, and the new Harmonize feature. For most chin work, Face-Aware Liquify still delivers the most controlled result.