

How to Remove Blemishes in Photoshop: Complete Skin Retouching Guide
August 31, 2026
How to Remove Glare from Glasses in Photoshop: 7 Proven Methods That Actually Work
September 1, 2026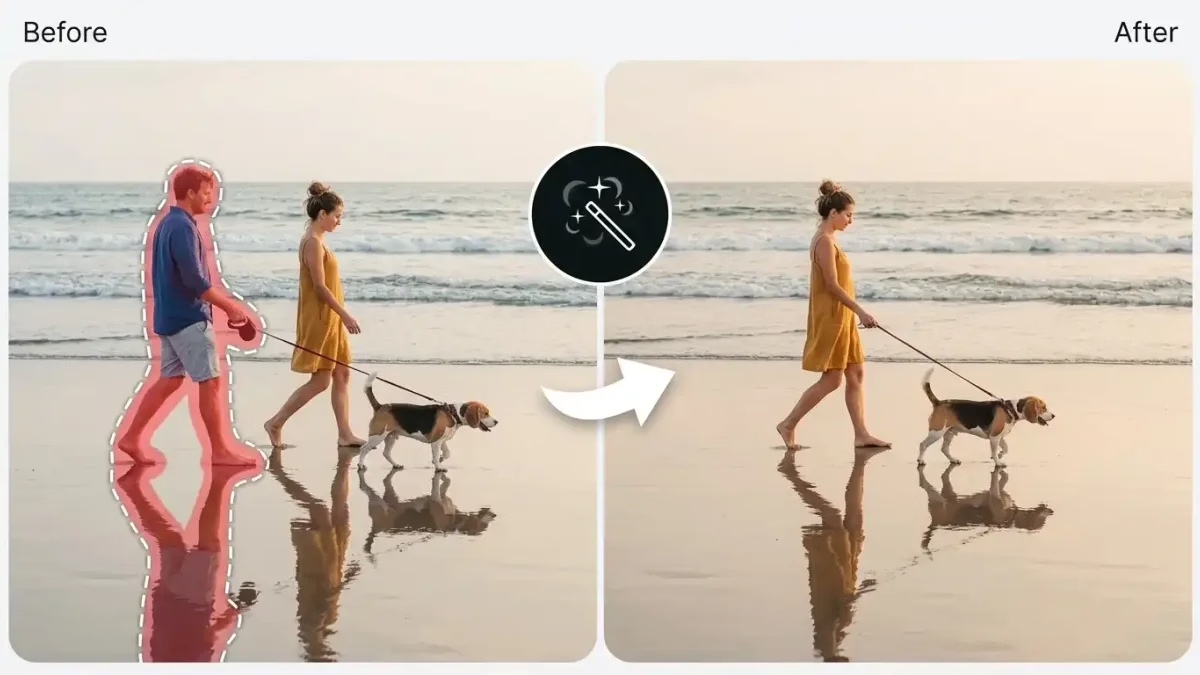
You lined up the perfect shot. The light was gold, the composition was clean — and then a random tourist wandered straight into your frame. Or maybe you’re staring at a favorite family photo, wishing one particular person wasn’t standing there anymore. Either way, you’ve come to the right place.
Photoshop in 2026 gives you more tools than ever to erase a person cleanly, and the differences between them are bigger than most tutorials admit. This guide compares five proven methods side by side, shows you exactly when each one shines, and reveals the layered workflow professional retouchers use to make the fix invisible. No fluff. No filler. Just the real playbook.
- Key Takeaways (TL;DR)
- Quick Answer: The Fastest Way to Remove a Person in Photoshop
- When You Actually Need to Remove a Person From a Photo
- What to Check Before You Start Editing
- Method 1: Photoshop’s AI Remove Tool (Best for 90% of Everyday Photos)
- Method 2: Generative Fill with Firefly, Nano Banana & Flux (Best for Complex Scenes)
- Method 3: Content-Aware Fill (Fast, Free, Full-Resolution Classic)
- Method 4: Clone Stamp, Healing Brush & Patch Tool (Pro-Level Precision)
- Method 5: Median Stack Mode (Best for Crowded Landmarks)
- Head-to-Head Comparison: All 5 Methods
- The Pro Workflow: Stacking Methods for Invisible Results
- The Cost Side: Credits, Hardware & Time
- Removing a Person on Photoshop for iPad
- Common Problems (and How to Fix Them Fast)
- Not Ready for Photoshop? Fast Alternatives
- Ethics, Legality & Content Credentials in 2026
- When to Hand It Off to a Professional Retoucher
- Frequently Asked Questions
- Final Thoughts: Which Method Should You Choose?
Key Takeaways (TL;DR)
- Best default: Photoshop’s Remove Tool handles about 90% of everyday person-removal jobs in a few clicks.
- Best for complex scenes: Generative Fill with Nano Banana Pro, Nano Banana, or FLUX.1 Kontext [pro] beats every other method on messy backgrounds.
- Best for repeating patterns: Classic Content-Aware Fill still produces sharper, credit-free results on sky, grass, or brick.
- Best for precision work: The Clone Stamp + Healing Brush + Patch Tool trio remains the gold standard for high-end retouching.
- Best for crowded landmarks: Median Stack Mode wipes out entire crowds when you have multiple frames of the same scene.
- New in 2026: The Remove Tool now runs its generative AI model on your device (Photoshop 27.7, released May 19, 2026), so you can edit offline and keep sensitive images off the cloud.
Quick Answer: The Fastest Way to Remove a Person in Photoshop
For a single person in most photos, open the image in Photoshop 2026 (version 24.5 or newer), grab the Remove Tool from the toolbar (it sits with the Spot Healing Brush), paint over the person, and release. The AI fills the gap in seconds. If the background is messy or the subject is huge, upgrade to Generative Fill and leave the prompt blank — the built-in Firefly, Nano Banana, or Flux model will reconstruct what should be behind them.
Everything below expands on that answer with the full workflow, the caveats, and every pro trick worth knowing.
When You Actually Need to Remove a Person From a Photo
Before you jump into a tool, understand why you’re editing. Your use case shapes the method you pick:
- Travel and landscape photography — tourists, hikers, or a photobomber ruining your view.
- Wedding and event albums — removing an ex, an uninvited guest, or a distracting bystander from group shots.
- Real estate and interior photos — erasing agents, homeowners, or accidental mirror reflections.
- Product and e-commerce photography — cleaning hands, models, or brand reps out of lifestyle shots. If this is your workflow, our detailed ecommerce editing guide pairs beautifully with this tutorial.
- Sports and action photography — decluttering crowded backgrounds behind the athlete.
- Family and heritage restoration — respectfully removing someone from an old scanned photo.
Each situation demands a slightly different approach. A tourist in a landscape is easy; a bride’s cousin standing right in front of the couple is not.
What to Check Before You Start Editing
A quick five-second checklist saves hours of rework:
- Duplicate the background layer (Ctrl/Cmd + J) so you always have a safety net.
- Zoom to 100% to see how detailed the surroundings really are.
- Study the background complexity — plain wall = easy, patterned tile = hard.
- Trace all shadows and reflections — miss one and the edit screams “fake.”
- Confirm you have the right to edit the image — copyright and likeness rules still apply.
- Check your Photoshop version — the Remove Tool needs 24.5+, and on-device AI needs 27.7+.
Method 1: Photoshop’s AI Remove Tool (Best for 90% of Everyday Photos)

The Remove Tool is the workhorse of modern Photoshop. Adobe kept polishing it through 2025 and 2026, and the May 2026 release (Photoshop 27.7) added a game-changing option — the same generative AI model can now run fully on your local device instead of the cloud. That means faster fills, offline editing, and total privacy for sensitive client work.
Under the hood, the Remove Tool blends smart pixel sampling with generative AI to paint believable pixels wherever you brush. You don’t need selections. You don’t need prompts. You just paint.
When to Reach for It
- Single person against a moderately detailed background
- Tourists in the mid-ground of a travel photo
- Small groups you want gone entirely
- Any time you’d rather not type a prompt
Step-by-Step: Erasing a Person With the Remove Tool
- Open your image and press Ctrl/Cmd + J to duplicate the background layer.
- Grab the Remove Tool — press J and cycle until you see the little brush-with-a-slash icon.
- Resize the brush with the
[and]keys until it comfortably covers the person’s width. - Choose your AI mode from the Options bar: Auto, Generative AI On (Cloud), Generative AI On (Device), or Off.
- Enable “Create new layer” from the Contextual Task Bar for non-destructive edits.
- Paint over the person. You can scribble across them or draw a loose loop around them — both work.
- Release the mouse. The AI fills the area in seconds.
- Refine by holding Alt/Option to subtract, or paint again on any rough patches.
Insider Tips
- Turn on “Remove after each stroke” to blast through many small distractions at once.
- The “Find distractions” button auto-detects people, wires, and 26 other distraction categories in one click.
- Pick Device mode for embargoed campaigns, NDA-covered shoots, or spotty Wi-Fi. Your image never leaves your machine.
- The on-device model download is roughly 5 GB, and Adobe’s hardware bar is high — most mid-range GPUs work, but very low-VRAM cards may not.
Remove Tool: Pros and Cons
- ✅ One-click workflow, minimal skill needed
- ✅ Full-resolution output (no 1024-px cap)
- ✅ Works offline in Device mode
- ✅ Free — no generative credits burned
- ❌ Struggles with very large subjects
- ❌ On-device mode demands strong hardware
- ❌ Sometimes needs a second pass on complex overlaps
Want your images to look professionally edited, not over-processed?
Achieve natural, high-end perfection with our skilled Photo Retouching Service
Once you’ve cleaned up faces, you may also want to sharpen skin details — our companion piece on blemish removal covers the perfect follow-up steps.
Method 2: Generative Fill with Firefly, Nano Banana & Flux (Best for Complex Scenes)
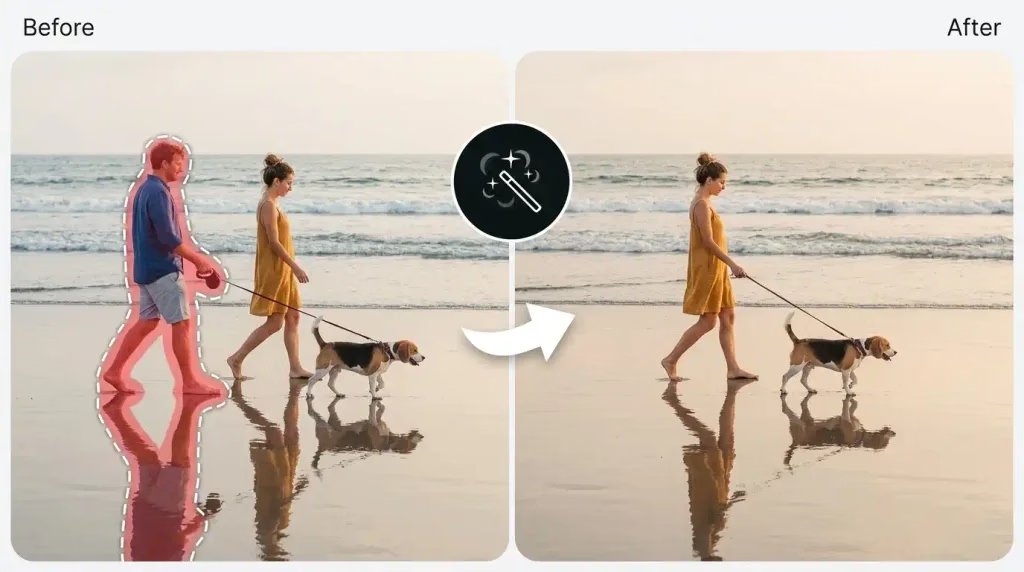
When the Remove Tool falters, Generative Fill steps in. This is Photoshop’s marquee AI feature, and in 2026 it became dramatically more powerful thanks to a lineup of partner models. Alongside Adobe’s own Firefly Image Model 5, you can now switch to Google’s Nano Banana (Gemini 2.5 Flash Image), Nano Banana Pro (Gemini 3), or Black Forest Labs’ FLUX.1 Kontext [pro] — each with a distinct personality. Nano Banana Pro, added in late 2025, is especially strong at photoreal edits and integrates cleanly into Photoshop’s Generative Fill workflow via Adobe’s Firefly and Photoshop partner models rollout.
Because these models imagine content rather than just clone nearby pixels, they can rebuild scenes the Remove Tool cannot.
When to Reach for It
- Person standing in front of intricate detail (foliage, architecture, signage)
- Very large subject filling most of the frame
- Backgrounds that need to be invented, not just copied
- You want multiple variations to compare before choosing
Step-by-Step: Generative Fill Removal
- Select the person using the Object Selection Tool (W). In Photoshop 2026, this tool has a smart “Select People” mode that auto-detects individuals and even body parts.
- Expand the selection by 8–15 pixels via Select > Modify > Expand — this gives the AI headroom to blend edges.
- Click “Generative Fill” in the Contextual Task Bar.
- Pick your model — Firefly Image 5, Nano Banana, Nano Banana Pro, or FLUX.1 Kontext [pro].
- Leave the prompt empty and hit Generate. An empty prompt tells the model to remove and reconstruct.
- Review three variations in the Properties panel. Not happy? Click Generate again for three more.
- Blend seams with the Remove Tool, a soft mask, or the Healing Brush.
Which Model Should You Choose?
- Firefly Image 5 — safest for commercial work; trained only on licensed content.
- Nano Banana — excellent at photoreal edits with fine detail preservation.
- Nano Banana Pro — the newest, sharpest option; handles complex removals and shifts lighting or angles.
- FLUX.1 Kontext [pro] — best for surgical text and structural edits inside images.
Generative Fill: Pros and Cons
- ✅ Handles impossibly complex backgrounds
- ✅ Three fresh variations per generation
- ✅ Can also add, replace, or restyle content
- ✅ Multiple partner models to compare
- ❌ Consumes generative credits
- ❌ Cloud-only for most models (needs internet)
- ❌ Some models cap resolution around 1024 px per pass
- ❌ Content Credentials automatically attached
Struggling with complex hair or fur edges?
Let our experts deliver flawless, natural cutouts with our advanced Image Masking Service
If your edit involves detailed cutouts for compositing later, our companion piece on transparent backgrounds explains how to preserve edges cleanly.
Method 3: Content-Aware Fill (Fast, Free, Full-Resolution Classic)
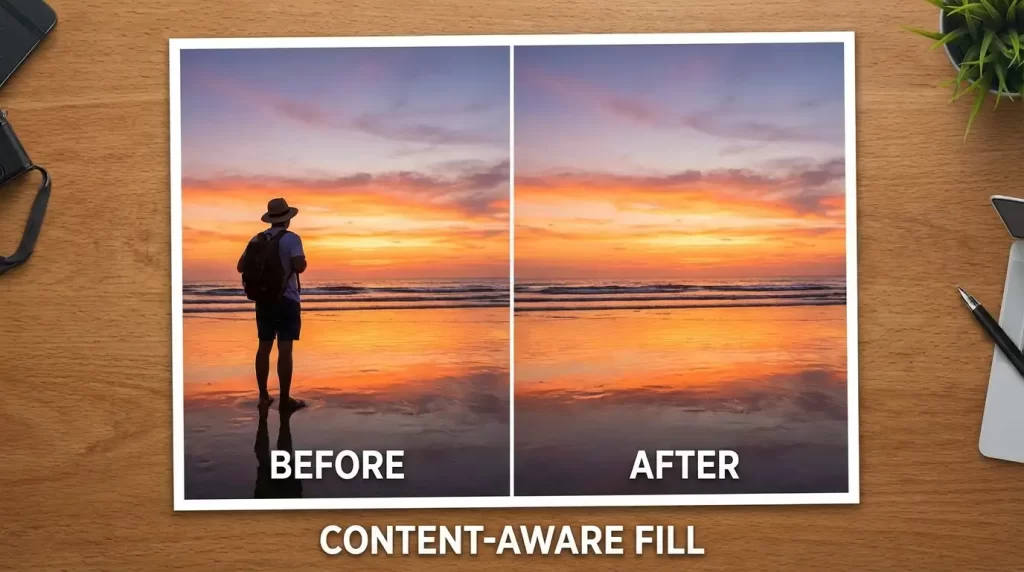
Long before generative AI arrived, Content-Aware Fill was Photoshop’s magic wand — and it’s still one of the sharpest tools in the box. Because it samples real pixels from your image, results stay at native resolution and often look cleaner than AI on repeating textures like sand, sky, water, grass, or brick.
Content-Aware Fill also uses zero generative credits, needs no internet, and produces no AI provenance metadata. For agencies with strict AI-content policies, it’s often the only allowed option.
When to Reach for It
- Simple, uniform backgrounds (sky, wall, water, grass)
- Repeating patterns where AI hallucinates
- Client contracts that forbid generative AI
- Fast batch retouching without credit costs
Step-by-Step: Content-Aware Fill Method
- Select the person with the Lasso Tool (L). A loose selection is fine — Content-Aware handles rough edges.
- Expand the selection by 5–10 pixels via Select > Modify > Expand.
- Go to Edit > Content-Aware Fill… to open the dedicated workspace.
- Refine the sampling area with the Sampling Brush. Green overlay = pixels Photoshop pulls from. Paint out any zones you don’t want sampled (like other people).
- Tune the settings:
- Color Adaptation: Medium or High for gradients (sky, sunset).
- Rotation Adaptation: High for curved lines (arches, horizons).
- Scale: On, if the pattern varies in size.
- Mirror: On, for symmetrical scenes.
- Set Output to New Layer so you can mask fixes non-destructively.
- Click OK and inspect at 100%.
Insider Tips
- Struggling edges? Grab the Patch Tool (J) — a lightweight, drag-based cousin of Content-Aware Fill.
- Break large selections into two or three smaller passes for cleaner sampling.
- If the fill starts repeating obviously, exclude the repeating patch from the sampling area.
Content-Aware Fill: Pros and Cons
- ✅ Full resolution, no cloud
- ✅ Zero generative credits
- ✅ Excellent on repeating patterns
- ✅ No AI metadata attached
- ❌ Weaker on complex, unique scenes
- ❌ Manual sampling tweak often needed
- ❌ Can produce visible repetition without care
For a deep dive into the workspace itself, our full tutorial on Content-Aware Fill walks through every panel setting.
Method 4: Clone Stamp, Healing Brush & Patch Tool (Pro-Level Precision)
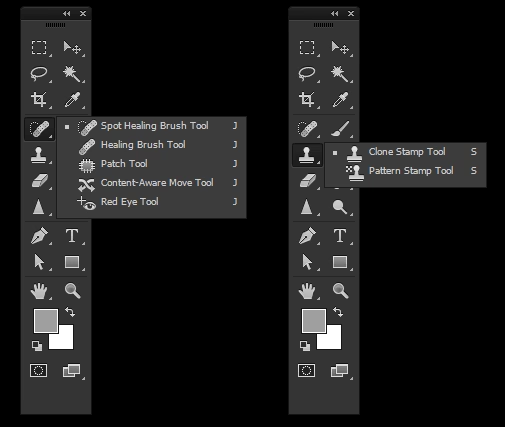
For the most demanding jobs — museum-grade restoration, luxury retouching, magazine covers, or images where every algorithm has failed — professionals still rely on the trio that built modern retouching: the Clone Stamp, Healing Brush, and Patch Tool. These give you pixel-level control that no AI can match, and they cost nothing in credits, hardware, or bandwidth.
When to Reach for It
- Very high-end or heritage retouching
- AI has failed and you need a deterministic fix
- Selective removals inside faces, hair, or fine textures
- Learning fundamentals that transfer everywhere else
Step-by-Step: The Manual Pro Workflow
Stage 1 — Big fills with the Patch Tool:
- Press J to grab the Patch Tool.
- Set the mode to Content-Aware in the Options bar.
- Draw around the person, then drag the selection to a clean patch of background.
- Release — Photoshop blends the sampled area into the selection.
Stage 2 — Rebuild details with the Clone Stamp:
- Press S. Set opacity to 100% and hardness to about 50%.
- Alt/Option-click a source area with matching texture and lighting.
- Paint over remaining traces of the person. Re-sample often to break up repetition.
- Toggle Aligned on, and set Sample: Current & Below for cleaner separate-layer work.
Stage 3 — Blend with the Healing Brush:
- Press J twice to reach the Healing Brush.
- Alt/Option-click a clean source area.
- Paint over any seams. Unlike Clone Stamp, Healing Brush matches surrounding color and texture automatically.
- Finish with the Spot Healing Brush for tiny residual specks.
Insider Tips
- Work on separate empty layers for each tool — if you mess up, delete just that layer.
- Rotate and flip your clone source occasionally to hide repetition.
- A pressure-sensitive tablet makes brush transitions almost invisible.
- Once you master these fundamentals, every other Photoshop tool feels easier. Our Photoshop toolbar breakdown is a great companion read.
Manual Method: Pros and Cons
- ✅ Ultimate pixel-level control
- ✅ Deterministic, predictable output
- ✅ No AI, no credits, no cloud
- ✅ Works on any Photoshop version
- ❌ Slowest of the five methods
- ❌ Requires practice and taste
- ❌ Wrist fatigue on large jobs
- ❌ Steeper learning curve
Spending too much time on tedious skin cleanup in post-production?
Outsource the detail work to our fast, reliable Beauty Retouching Service and focus on shooting.
Method 5: Median Stack Mode (Best for Crowded Landmarks)
This clever technique doesn’t remove people from a single photo — it uses multiple photos of the same scene to statistically erase anything that moves. If you were on a tripod (or shooting fairly steady handheld), stack median can wipe entire crowds off a landmark in minutes. Landscape photographers have used it for years to clean the Louvre, Times Square, or the Grand Canyon on busy days.
When to Reach for It
- You have 8–20+ frames of the same scene
- Tourists, cars, or animals move through the frame
- Long exposures aren’t possible (too bright)
- You want physically accurate lighting and perspective
Step-by-Step: Median Stack Mode Method
- Shoot 10–20 photos of the same scene, 5–10 seconds apart. A tripod helps; Photoshop can auto-align if needed.
- In Photoshop, go to File > Scripts > Load Files into Stack…
- Check “Attempt to Automatically Align Source Images” and click OK.
- Select every layer in the Layers panel.
- Go to Layer > Smart Objects > Convert to Smart Object.
- Choose Layer > Smart Objects > Stack Mode > Median.
- Wait a few seconds. Every moving element vanishes; every static element stays sharp.
- Clean any residual traces with the Remove Tool or Clone Stamp.
Insider Tips
- Include at least one shot with no people if possible — Median leans on the majority pixel value.
- If a person lingered too long in one spot, they’ll show through. Take extra frames to dilute them out.
- Bonus: this method also cures sensor noise and dust spots automatically.
Median Stack: Pros and Cons
- ✅ Physically accurate lighting and perspective
- ✅ No AI hallucinations
- ✅ Wipes entire crowds automatically
- ✅ Bonus noise reduction
- ❌ Requires in-camera planning
- ❌ Useless for single existing images
- ❌ Longer processing on large files
- ❌ Needs enough steady frames
Head-to-Head Comparison: All 5 Methods
| Method | Speed | Difficulty | Best For | AI? | Cost |
|---|---|---|---|---|---|
| Remove Tool | ⚡⚡⚡⚡⚡ | Easy | 90% of everyday shots | Optional | Free |
| Generative Fill | ⚡⚡⚡⚡ | Easy | Complex backgrounds | Yes | Credits |
| Content-Aware Fill | ⚡⚡⚡⚡ | Medium | Repeating patterns | No | Free |
| Clone + Heal + Patch | ⚡⚡ | Hard | Museum-grade precision | No | Free |
| Median Stack Mode | ⚡⚡⚡ | Medium | Crowds (multi-shot) | No | Free |
Choosing the right tool is half the battle. Once you can spot which method fits a photo in five seconds, your edit times drop dramatically — and your results improve at the same time.
Need your images edited faster without sacrificing quality?
Our streamlined process delivers premium results in as little as 6 hours. Explore our fast-turnaround services
The Pro Workflow: Stacking Methods for Invisible Results
Here’s the secret nobody tells beginners: professional retouchers rarely rely on a single method. A high-end person-removal job usually stacks three or four tools on top of each other. A typical workflow looks like this:
- Start big with Generative Fill or the Remove Tool to erase the person as a whole shape.
- Zoom in and inspect — check edges, cast shadows, and repeated patterns.
- Rebuild straight lines (horizons, doorframes, railings) with Content-Aware Fill.
- Refine critical detail — a repeating railing, a face partially visible behind the person — with the Clone Stamp.
- Blend everything with the Healing Brush and Spot Healing Brush.
- Match tones with a subtle Curves or Color Balance adjustment on a masked layer.
This layered approach is exactly how photo retouching studios finish magazine covers and luxury campaigns. AI does the heavy lifting; the human handles the last 5% that separates “good enough” from invisible.
The Cost Side: Credits, Hardware & Time
Removing a person in Photoshop is cheap — but not always free. Here’s what to budget:
- Remove Tool and Content-Aware Fill: free, no credits used.
- Generative Fill: consumes generative credits. Photoshop plans that started before June 17, 2025 include 500 monthly credits. Plans started on or after that date typically include only 25 credits, and the Photoshop mobile-and-web plan includes 100 credits. Credits reset monthly and do not roll over.
- Hardware for on-device AI: Adobe recommends Apple Silicon (M1 Pro and newer) on Mac, plus a modern GPU with adequate VRAM on Windows. Older machines are limited to cloud mode.
- Time: the Remove Tool typically takes seconds per person; Generative Fill 5–15 seconds per generation; manual retouching can run 20–60 minutes for a difficult subject.
Removing a Person on Photoshop for iPad
Editing on the go? Adobe now offers most of these techniques on iPad and mobile too:
- Photoshop for iPad includes the Remove Tool, Generative Fill, and the Tap Select feature for one-tap person detection.
- Adobe Photoshop Express (mobile) offers a lightweight Generative Remove option.
- Adobe Firefly Web offers the full Generative Remove workflow inside any modern browser.
Results are generally close to desktop, though brush precision on a small screen suffers. For serious client work, finish on desktop.
Common Problems (and How to Fix Them Fast)
Even the best tools stumble sometimes. Here are the fixes for the five most common pitfalls:
- Ghost silhouettes remain. Your selection was too tight — expand it by 10–15 pixels and try again.
- Obvious repeating patterns. The Clone Stamp source is looping. Rotate the source or switch to Content-Aware Fill.
- Blurry, low-resolution fill. Some Generative Fill models cap at 1024 px per pass. Break large selections into smaller passes, or finish with the Remove Tool.
- The person’s shadow is still there. Select the shadow separately and re-run your removal method on it. If you want to add a new shadow instead, our step-by-step on realistic shadows walks you through it.
- Weird “face in the bushes” AI artifacts. Regenerate with a larger selection, or paint over the artifact with the Remove Tool in Device mode.
Not Ready for Photoshop? Fast Alternatives
Photoshop is the industry standard, but it isn’t the only option. Photoroom, remove.bg, Canva, Lightroom Mobile, and Snapseed all handle basic person removal in seconds — good enough for social posts or quick shares. Our detailed comparison of the best AI photo editing tools shows which ones actually maintain print-ready quality.
That said, for anything client-facing, hero images, or print work, Photoshop still wins. The resolution ceiling, layer control, and blending flexibility remain unmatched in 2026.
Want to test our quality before committing to a large order?
Try our Image Background Removal Services risk-free with a free trial.
Ethics, Legality & Content Credentials in 2026
Being able to erase someone doesn’t always mean you should. Keep these guardrails in mind:
- Journalism, documentary, and photojournalism — removing people usually violates outlet policies and contest rules.
- Court evidence, insurance claims, and legal documents — never alter these images.
- Family photos of a deceased or estranged person — always ask the family first.
- Copyright and likeness rights — erasing someone doesn’t grant you rights to sell the image.
- Content Credentials (C2PA) — since early 2026, Adobe automatically attaches provenance metadata to any image edited with generative AI. Platforms like LinkedIn, Meta, and TikTok increasingly read these credentials and may label your image as AI-edited.
If you routinely edit portraits, our companion guide on portrait retouching explores the ethical decisions retouchers face every day.
When to Hand It Off to a Professional Retoucher
Some jobs simply aren’t worth doing yourself. Outsource when:
- You have hundreds of images to process (e-commerce, catalog work).
- Backgrounds include hair, fur, or transparent fabrics overlapping the person.
- Deadline pressure makes one bad edit costly.
- You need visual consistency across a full campaign.
- Legal or brand risk rules out generative AI entirely.
A skilled retoucher can knock out a complicated group-photo edit in twenty minutes — a job that might take you three hours to learn and execute yourself. Compare turnaround, cost, and quality carefully; the ROI often makes outsourcing the smarter call.
Want to boost your online sales with better product photography?
High-quality images increase conversions by up to 40%. Let us help you get there. See our editing services
Frequently Asked Questions
1. Can Photoshop remove a person automatically with one click?
Yes. In Photoshop 2026, the Remove Tool’s “Find distractions” feature auto-detects people, wires, and 26 other distraction categories, then removes them in a single click. For manual work, just paint over the person with the Remove Tool and let the AI fill the background instantly.
2. Does Photoshop’s Remove Tool work offline?
Yes — if your hardware qualifies. Photoshop 27.7 (released May 19, 2026) introduced an on-device generative model you can download (roughly 5 GB). Once installed, Remove works fully offline. Cloud mode still requires internet.
3. Do I need paid Firefly credits to remove a person in Photoshop?
Not necessarily. The Remove Tool and Content-Aware Fill are free and use no credits. Generative Fill and Generative Remove consume credits — Photoshop plans that started before June 17, 2025 include 500 monthly credits, while newer plans typically include just 25. Photoshop mobile/web plans include 100. Credits reset monthly and don’t roll over.
4. What’s the difference between Content-Aware Fill and Generative Fill?
Content-Aware Fill samples existing pixels from your image; Generative Fill uses AI to invent new pixels. Content-Aware keeps native resolution but sometimes repeats patterns; Generative Fill can build entirely new backgrounds but often caps at 1024 px per generation and needs the cloud.
5. Can I remove a person and their reflection or shadow at the same time?
Only if your selection covers both. Most tools focus strictly on the selected area, so include the shadow (and any reflection) in your initial mask. If you miss it, simply run the same tool again on the shadow separately.
6. Which method is best for removing tourists from travel photos?
If you have one shot only, use the Remove Tool. If you planned ahead and captured 10+ frames of the same scene, use Median Stack Mode — it produces cleaner, more physically accurate results than any single-image method.
7. Will AI-removed pixels show up as “edited” online?
Since early 2026, Photoshop automatically attaches Content Credentials (C2PA metadata) to generative edits, and Adobe removed the option to disable this. Some platforms display those credentials publicly, while others strip metadata on upload. If disclosure matters, keep the credentials intact.
8. Which Generative Fill model is best for removing people — Firefly, Nano Banana, or Flux?
For photoreal removals with fine detail, Nano Banana Pro currently leads. Nano Banana (Gemini 2.5 Flash Image) is a close second and often cleaner on crowded scenes. FLUX.1 Kontext [pro] shines on structural and text edits. Firefly Image 5 is the safest choice for commercial work because it’s trained only on licensed content.
9. Can I use Photoshop on iPad or a phone to remove someone from a photo?
Yes. Photoshop for iPad includes the Remove Tool, Generative Fill, and a Tap Select feature. Adobe Photoshop Express on mobile also offers Generative Remove. Precision is lower than desktop, but quality is surprisingly close.
10. How long does it take to master person removal in Photoshop?
For AI-based methods, most beginners get usable results within an hour. Mastering the Clone Stamp, Healing Brush, and Patch Tool typically takes a few weeks of daily practice — but that skill pays off for decades of retouching.
Final Thoughts: Which Method Should You Choose?
Photoshop in 2026 gives you more ways than ever to remove a person from a photo — and the right choice depends less on the tool and more on the photo itself. Reach for the Remove Tool first (it wins for most everyday jobs), promote to Generative Fill with Nano Banana Pro or Flux for tricky backgrounds, and lean on Content-Aware Fill, the Clone Stamp, or Stack Median when you need surgical control or physical accuracy.
The best retouchers don’t argue about which method is superior — they use all five, stacking strengths and cleaning up weaknesses. Practice each one on a throwaway image this week, and next time an unwanted human wanders into your frame, you’ll erase them in seconds without a second thought.
Ready to level up? Bookmark this guide, run through the workflow on your own images tonight, and let the results speak for themselves.