


Photo Editing Outsourcing: 12-Point Vendor Checklist 2026
August 20, 2026
Photo Retouching Services 2026: Types, Costs & Outsourcing
August 22, 2026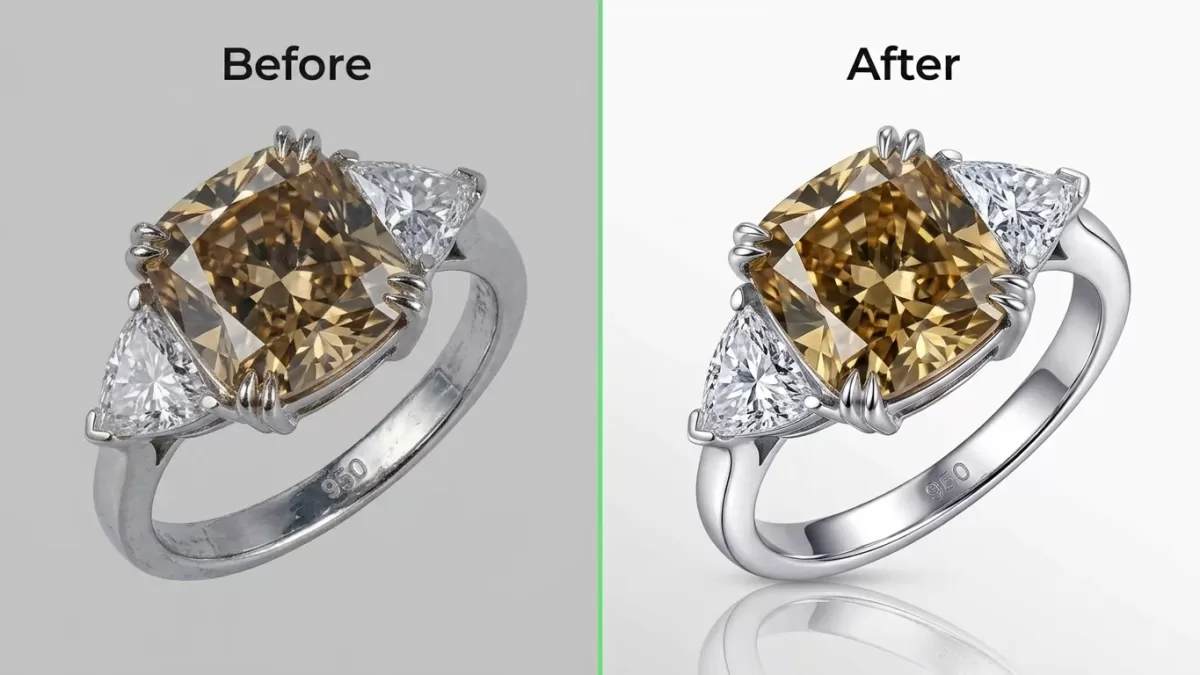
- TL;DR — Key Takeaways
- Who This Guide Is For
- What Is Jewelry Photo Editing and Retouching?
- Why Jewelry Needs Specialized Editing
- How to Shoot Jewelry FOR Retouching (Pre-Production)
- The 11 Core Techniques of Jewelry Photo Editing
- The Professional Photoshop Layer Structure for Jewelry Retouching
- The End-to-End Jewelry Retouching Workflow
- The Ethics of Jewelry Retouching — The Line Professionals Never Cross
- Software and Tools Professional Jewelry Retouchers Use
- File Formats, Colour Profiles, and Export
- Watch Retouching — The Adjacent Specialty
- AI Jewelry Retouching vs Manual Retouching in 2026
- Common Jewelry Retouching Mistakes to Avoid
- Marketplace Rules for Jewelry Photos in 2026
- The Retoucher’s Brief Template — What to Send an Outsourced Editor
- Real ROI Example: A Boutique Jeweler
- Jewelry Retouching Cost Benchmarks (2026)
- FAQ — People Also Ask
- Final Thoughts
TL;DR — Key Takeaways
- Jewelry photo editing is the specialty post-production process that turns raw macro shots of rings, necklaces, earrings, bracelets, and watches into sharp, colour-accurate, marketplace-ready images.
- The eleven core techniques include focus stacking, clipping path, dust and scratch removal, exposure compositing, colour correction, metal polishing, gemstone enhancement, dodge and burn, symmetry cleanup, reflection control, and shadow creation.
- Luxury and jewelry sit at the lowest e-commerce conversion tier — roughly 0.87% to 1.5% in 2026 — so every ounce of visual polish protects margin directly.
- Ethical retouching enhances what a piece already is; it never fakes a diamond’s clarity, a gemstone’s colour grade, or a metal’s karat.
- Outsourced jewelry retouching in 2026 runs $0.59 to $6.99 per image, with hybrid AI + human quality control now the professional standard.
Who This Guide Is For
Jewelry photo editing rewards specialists. This guide serves:
- Jewelry brands and DTC stores selling on Shopify, Amazon, Etsy, or their own storefront.
- Boutique jewelers and independent designers managing small but high-value catalogs.
- Commercial product photographers who shoot jewelry and want a defensible retouching workflow.
- In-house marketing teams deciding between AI tools, freelancers, or a full retouching partner.
- Watchmakers and luxury brands with the same macro and reflective-surface challenges.
By the end you will know which techniques matter, in what order, at what cost, and how to ship images that survive 400% zoom on every device.
What Is Jewelry Photo Editing and Retouching?
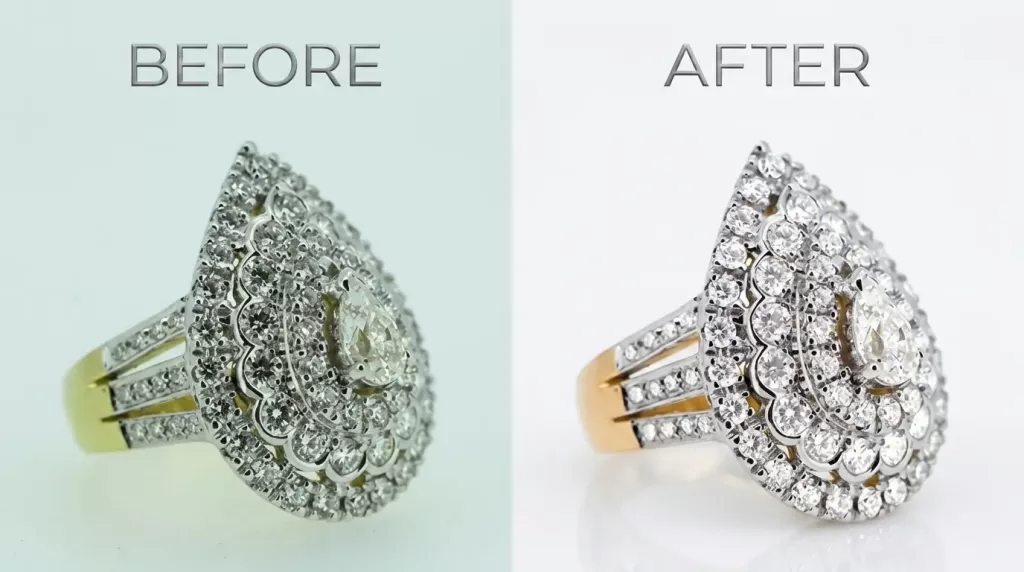
Jewelry photo editing is the post-production process of refining raw macro photographs of jewelry so metals read true, gemstones sparkle honestly, dust and micro-scratches disappear, and every piece looks consistent across the entire catalog. It combines general product retouching with speciality skills — focus stacking, gemstone enhancement, metal polishing, and controlled reflection cleanup — none of which standard e-commerce editing handles well.
Jewelry is unlike any other product category. A single piece packs reflective metal, refractive gemstones, macro depth-of-field issues, and micro-detail into one small subject. Each surface behaves differently under the same light, and each demands a different editing approach. Generic AI tools consistently fail on jewelry, which is why manual craftsmanship still leads the field.
Why Jewelry Needs Specialized Editing
Great editing protects margin in the hardest e-commerce category to convert.
- Jewelry converts at 0.87% to 1.5% in 2026, the lowest range of any major retail vertical. Shoppers research heavily before spending on a $500+ ring, and one unconvincing photo pushes them to a competitor.
- 25% of e-commerce sites still fail on image resolution or zoom quality, according to active Baymard Institute research — jewelry sellers who fix this outperform peers before spending a dollar on ads.
- AI adoption is widespread in jewelry post-production, but the leading studios use it only for bulk background masking; hero images, gemstone work, and reflection cleanup stay manual.
- Return rates climb when metal colour or gemstone hue is inaccurate on-listing — one of the most preventable causes of returns in fine goods.
Better retouching is one of the highest-ROI investments a jewelry brand can make before touching anything else on the store.
How to Shoot Jewelry FOR Retouching (Pre-Production)
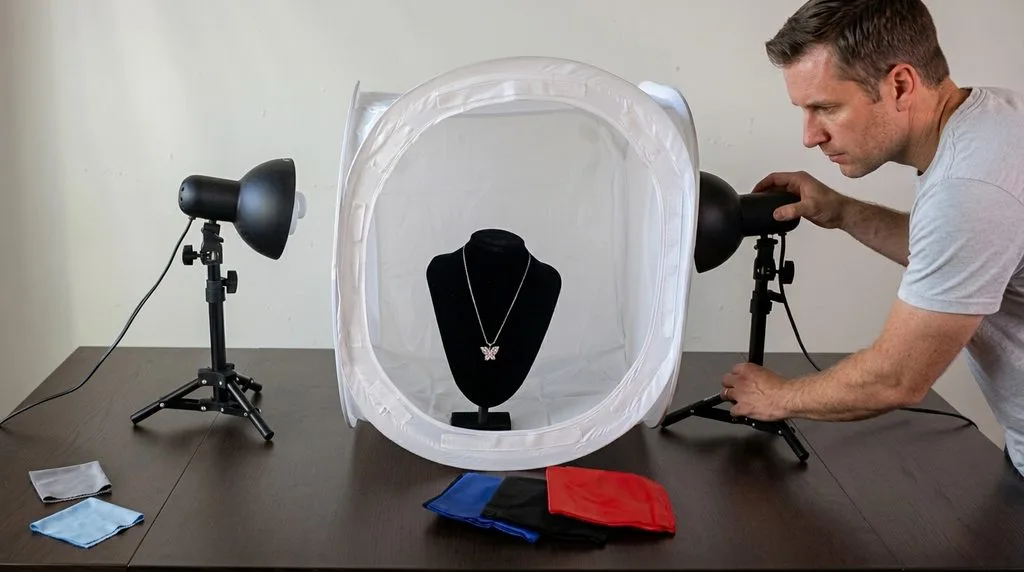
The best retouchers repeat a simple truth: time saved in front of the camera is time recovered in Photoshop. Every hour spent styling a shoot saves five hours of pixel-level cleanup later.
Camera settings for jewelry macro:
- ISO 100 for the cleanest possible sensor output.
- f/8 to f/11 for maximum lens sharpness and workable depth of field.
- Shutter speed locked to your strobe or continuous light (usually 1/125 or slower on tripod).
- RAW capture for full colour data during editing.
- Tripod + tethered shoot for pixel-locked focus stacks.
Studio setup that saves editing time:
- Diffused light through softboxes or a light tent to control metal reflections.
- A colour-checker card in the first frame of every batch — retouchers use it to sync white balance across the whole shoot.
- Museum putty or dental wax to hold pieces at exact angles without visible support.
- A dust-blower and jeweller’s cloth used minutes before each shot, not hours before.
- Foam-core reflectors to fill shadow sides on rings and pendants.
Shoot bracketed exposures if the piece mixes highly polished metal with gemstones. Metal and stones almost never share the same optimal exposure, and shooting one carefully-lit bracket per material lets a retoucher composite the ideal version in post.
The 11 Core Techniques of Jewelry Photo Editing
Every professional jewelry retouching workflow rests on these eleven techniques. Follow them in order and your catalog stays sharp, consistent, and marketplace-safe.
1. Focus Stacking — Sharp Everywhere, Not Just the Centre
Macro shots of jewelry have wafer-thin depth of field. Even at f/11, a ring photographed head-on keeps the crown sharp while the shank blurs. Focus stacking blends multiple frames shot at different focal points into one fully sharp image.
Two tools dominate jewelry workflows:
- Photoshop (File → Scripts → Load Files into Stack + Auto-Blend Layers) — free with Creative Cloud, ideal for stacks of 3–8 frames.
- Helicon Focus — the industry standard for high-volume jewelry work. It offers three rendering methods; the depth-map-based option produces the cleanest results on chain gaps, prong settings, and other complex three-dimensional shapes.
Rings and pendants usually need 8–15 stacked frames. Necklaces and layered chains may need 20+ frames per shot.
2. Clipping Path — The Foundation Cutout
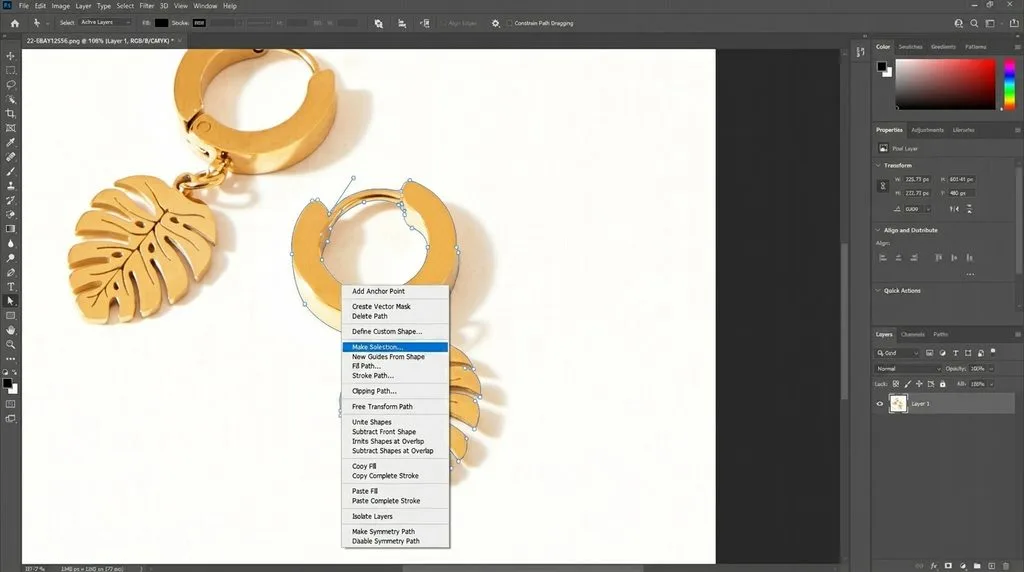
A hand-drawn clipping path using the Photoshop Pen Tool (P) isolates the jewelry from its background with mathematically precise, resolution-independent edges. On a fine chain, the difference between an AI cutout and a manual path is visible at 200% zoom — AI fills the gaps between links, while a manual path preserves every negative space.
Standard settings for jewelry:
- Feather: 0.5 to 1 pixel — sharp enough for zoom, soft enough to avoid jagged aliasing.
- Anchor spacing: every 8–12 pixels on curved edges; wider on straight runs.
- Zoom level: 300–400% during drawing.
- Delivery: save the path inside the PSD so revisions and re-crops stay non-destructive.
Struggling with inconsistent cutouts from automated software?
Switch to 100% manual, expert Clipping Path for guaranteed perfection.
3. Dust, Scratch, and Dirt Removal
Under a macro lens, brand-new jewelry still shows dust, lint, fingerprints, and micro-scratches invisible to the naked eye. Leaving them in makes premium pieces look secondhand.
Professional editors use three tools in sequence:
- Spot Healing Brush (J) — content-aware fixes on flat metal or fabric.
- Clone Stamp (S) — precision cloning on textured, patterned, or curved surfaces.
- Frequency Separation — advanced cleanup that removes dust from complex highlights without softening detail. Adobe’s official frequency separation tutorial uses a 5-pixel Gaussian Blur radius on the low-frequency layer; for smaller macro shots a 2–3 pixel radius protects finer texture.
Work at 200–400% zoom, and inspect the whole image twice — once for dust, once for scratches.
4. Exposure Compositing for Mixed Materials
Metal and gemstones rarely share the same optimal exposure. Highly polished gold reads correctly at one bracket; the diamond it holds needs another. Professional retouchers composite both instead of compromising.
Workflow:
- Shoot the piece at two or three exposures on the same locked tripod.
- Load the frames as layers in Photoshop.
- Add a black layer mask on the top layer.
- Paint white with a soft brush over the areas where the correctly-exposed material should show through.
The result reads as one photograph but shows every material at its ideal luminosity.
5. White Balance and General Colour Correction
Studio lights add warm or cool casts. Sensor characteristics push tones off. Monitors vary. The colour-correction pass fixes all three:
- White balance — click a true-white or grey point in Camera Raw. If the shoot used a colour-checker card, sync the whole batch from one reference frame.
- Curves adjustment layer — a subtle S-curve for contrast; avoid crushing blacks.
- Selective Color — target Whites and Neutrals to remove background tints without shifting the jewelry itself.
- Match against a reference frame taken with a colour-checker every session.
For deeper technique, see our color grading primer.
6. Metal Colour Correction — Gold, Silver, Platinum, Rose Gold
Metal must read true to karat and finish. Retouchers rely on three Photoshop pathways:
- Hue/Saturation targeting Yellows — the fastest route to convert between yellow, white, or rose gold variants without re-shooting.
- Selective Color on Yellows and Neutrals — dial richness for 14K vs 18K yellow gold, and neutralize the greenish cast that budget silver often shows.
- Curves per RGB channel — corrects overall warmth for platinum and white gold so they do not read grey or blue.
Never over-saturate. Real gold does not glow; retouching should suggest warmth, not fluorescence.
Need to change colors on products with multiple parts?
Gain total, layer-by-layer control with our precise Multiple Clipping Path Service
7. Gemstone Enhancement — Colour, Clarity, Brilliance
Gemstone editing is where jewelry retouching becomes an art form. The goal is to bring out what is already in the stone, not to fabricate what is not.
Standard adjustments per stone:
- Saturation — subtle enhancement, never neon.
- Contrast — localised, to deepen shadow zones inside the stone and reveal facet structure.
- Sharpening — masked to gemstone facets only.
- Colour targeting — correct any tint bleed from the surrounding metal into the stone.
Each gemstone family behaves differently under the loupe. Treat each one on its own terms:
| Gemstone | Retouching Priority | Watch Out For |
|---|---|---|
| Diamond (white) | Facet contrast + subtle highlight dodge | Over-brightening dulls the natural fire |
| Sapphire (blue) | Deep, saturated blue with clarity | Turning royal blue into cyan |
| Emerald | Preserve the natural inclusions (jardin) | Cloning out inclusions is deceptive |
| Ruby | Rich red without magenta shift | Blowing highlights that flatten depth |
| Opal | Preserve play-of-colour bands | Sharpening kills the shifting colours |
| Pearl | Luster and creamy tone | Sharpening destroys the natural sheen |
| Coloured lab-grown | Same technique, but colour grading must stay honest | Over-saturating masks the origin |
Do your product images fail to show off intricate details?
Highlight every facet and texture with our precise Jewelry Photo Editing Service
8. Dodge and Burn — Sculpting Metal Shine
Dodge-and-burn sculpts light on polished metal to give it depth. Retouchers create a 50% grey layer set to Soft Light blend mode, then paint white to brighten highlights and black to deepen shadows.
Practical settings:
- Brush hardness: 0% for smooth curves, 40–60% for edges.
- Opacity: 5–15%. Multiple light passes always beat one heavy pass.
- Colour Dodge blend mode: creates bright highlight sparks on facets and polished shanks.
- Luminosity masks: professional retouchers target only the mid-tones or highlights so dodge-and-burn does not blow out already-bright areas.
Restraint separates luxury from plastic. Heavy dodge-and-burn is the single fastest way to destroy the credibility of a fine-jewelry photograph.
9. Symmetry and Shape Refinement
Handmade or hand-set jewelry rarely photographs perfectly symmetrical. Prongs sit fractionally off-centre; chain links twist under gravity; stones tilt inside settings. Retouchers rebuild symmetry using:
- Free Transform (Ctrl/Cmd + T) — align, straighten, and mirror components.
- Warp Tool — subtle curvature corrections without visible distortion.
- Liquify (with restraint) — small refinements on soft edges only.
The rule: refine what physics did to the shot, never alter what the jeweler made.
10. Reflection and Fingerprint Cleanup
Polished metal picks up every light source in the studio. Uncontrolled reflections read as chaos on-listing. Retouchers reduce — never eliminate — reflections, because a totally reflection-free metal looks rendered, not photographed.
Techniques:
- Clone Stamp on a new layer for large reflections.
- Frequency Separation to remove reflections without touching underlying metal texture.
- Masked Curves adjustment to darken hotspots selectively.
For watches, controlled crystal reflections are essential — the goal is a hint of glass, not an invisible dome.
11. Shadow Creation — Grounding the Piece
Cutouts on pure white without shadows float unnaturally. A convincing shadow implies a real surface and lifts perceived value.
The three shadow types that work best for jewelry:
- Reflection shadow — the premium look for rings and pendants shot head-on.
- Contact shadow — a subtle dark line where the piece meets the surface, essential grounding.
- Floating shadow — soft, distant shadow for earrings and lightweight pieces.
Our full shadow creation walkthrough shows each type with product-photography examples.
Want to see how a simple shadow can transform an image?
Request a free sample of our Shadow Creation Service today.
The Professional Photoshop Layer Structure for Jewelry Retouching
This is the section most jewelry tutorials skip and every professional retoucher uses. A well-organised PSD makes revisions painless and keeps the file non-destructive.
Standard layer-group order (bottom to top):
- 01_Base — the original RAW/TIFF file, locked.
- 02_Clipping Path — the vector selection saved as a path.
- 03_Composite — focus-stack and exposure-blend layers.
- 04_Cleanup — spot heal, clone, and frequency-separation layers.
- 05_Colour — Curves, Selective Color, and white-balance adjustments.
- 06_Metal — Hue/Sat and Selective Color layers for gold, silver, platinum.
- 07_Stones — masked adjustments per gemstone.
- 08_D&B — 50% grey layer for dodge-and-burn.
- 09_Reflections — cleanup layers, masked.
- 10_Shadow — natural, drop, or reflection shadow.
- 11_Final — sharpening, output profile, watermark if used.
Every adjustment sits on its own layer with a mask. Nothing lives on the base image. When a client asks for a change, the retoucher edits one layer instead of redoing the whole file.
The End-to-End Jewelry Retouching Workflow
Order matters. Doing techniques in the wrong sequence forces you to redo earlier work. The field-tested sequence:
- Cull and organise — pick the best angle from each set.
- Lens correction — fix chromatic aberration and any distortion.
- RAW pass — exposure, white balance, contrast, shadows in Camera Raw or Lightroom.
- Focus stack — blend the depth range into one sharp file.
- Exposure composite — blend metal and gemstone brackets.
- Clipping path — hand-draw the vector outline.
- Dust and scratch removal at 200–400% zoom.
- Metal colour correction — accurate gold, silver, platinum, rose gold.
- Gemstone enhancement — colour, contrast, targeted sharpening.
- Dodge and burn — sculpt shine.
- Symmetry and reflection cleanup.
- Shadow creation — anchor the piece to the surface.
- Final QC at 100% and 400% zoom.
- Export — sRGB JPEG for web, layered PSD for archive, TIFF for print.
A single hero-image ring takes an expert retoucher 30–90 minutes. Bulk catalog work runs 5–15 minutes per image at production pace.
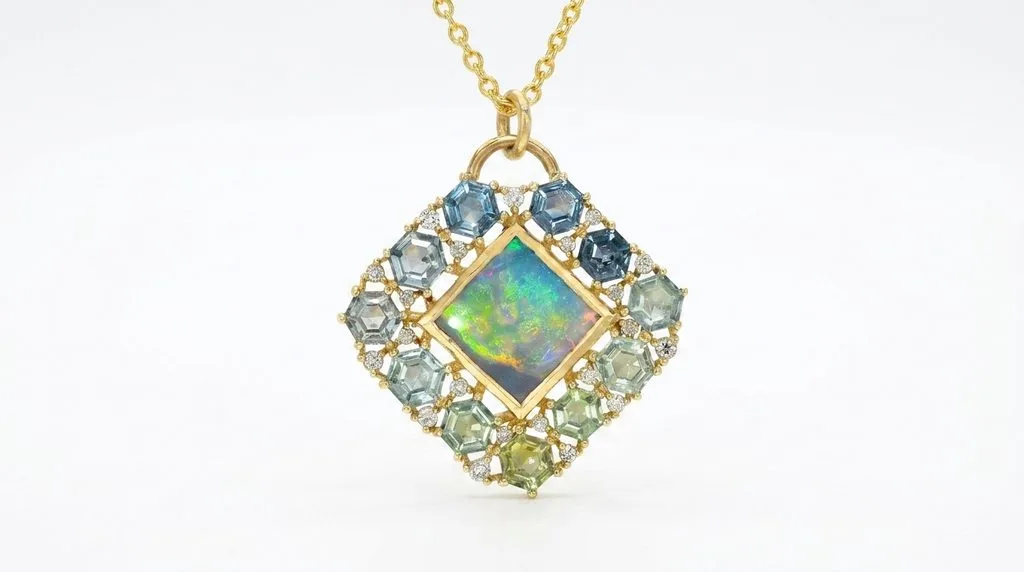
The Ethics of Jewelry Retouching — The Line Professionals Never Cross
Retouching enhances honest presentation; it never misrepresents grade, clarity, weight, or material. This section is the most important one in the entire guide.
Legally protected boundaries:
- Under GIA’s gem treatment disclosure policy, any diamond treatment must be disclosed. GIA laser-inscribes the girdles of laboratory-grown and HPHT-processed diamonds as an added identifier, and GIA discontinues business with clients who submit undisclosed treated stones.
- The FTC’s Jewelry Guides (16 CFR Part 23) require clear-and-conspicuous disclosure of any treatment that is not permanent, requires special care, or significantly affects value. Specifically listed treatments include heating, irradiation, oil or resin impregnation, fracture filling, diffusion, dyeing, bleaching, and laser-drilling.
- Lab-grown diamonds must be labelled with terms such as “laboratory-grown,” “laboratory-created,” or “[Manufacturer]-created,” placed immediately before the product name.
- Pearls must be identified as “cultured” or “imitation” unless they are genuine natural pearls.
- Names like ruby, sapphire, emerald, and topaz may not describe non-mined stones without unambiguous qualification.
Professional retouching rules that follow from this:
- Never alter a stone’s shape, cut proportions, or grade indicators.
- Never fabricate sparkle a stone does not produce.
- Never remove inclusions from a certified diamond — the certificate points to them.
- Enhance saturation subtly; never invent a colour a stone does not have.
The correct standard is authenticity at its most refined, not perfection beyond what the piece actually is. Buyers who receive jewelry that does not match its photo return it, leave reviews, and never come back.
Software and Tools Professional Jewelry Retouchers Use
| Tool | Role | Best For |
|---|---|---|
| Adobe Photoshop | Pixel-level retouching, clipping paths, dodge and burn | Hero images, complex composites |
| Adobe Lightroom / Camera Raw | Batch RAW processing, white-balance sync | Catalog colour consistency |
| Helicon Focus | Automated focus stacking | Macro rings, chains, prong settings |
| Zerene Stacker | Alternative focus stacking with refined output | High-end publication work |
| Capture One | Tethered shooting with colour accuracy | Studio production |
| Affinity Photo | One-time-purchase Photoshop alternative | Small studios avoiding subscriptions |
| Photoroom / Remove.bg | AI first-pass background removal | Bulk simple catalog work |
For the AI-vs-manual clipping vs masking decision, jewelry almost always leans manual because chain gaps, prong details, and stone facets defeat automated selections.
File Formats, Colour Profiles, and Export
- sRGB JPEG (8-bit) — every web destination, every marketplace, every mobile app. Non-negotiable for online.
- 16-bit TIFF (sRGB or Adobe RGB) — high-quality print, catalog production, editorial spreads. Uncompressed and archival.
- PSD (layered) — internal archive, so revisions do not require redoing the pipeline.
- WebP — supported on Shopify and most modern platforms; produces 25–34% smaller files than JPEG at equivalent quality.
- PNG — only when true transparency is required.
Always convert to sRGB before web export (Edit → Convert to Profile → sRGB IEC61966-2.1). Adobe RGB files uploaded to Amazon or Shopify look dull because browsers do not render the wider gamut.
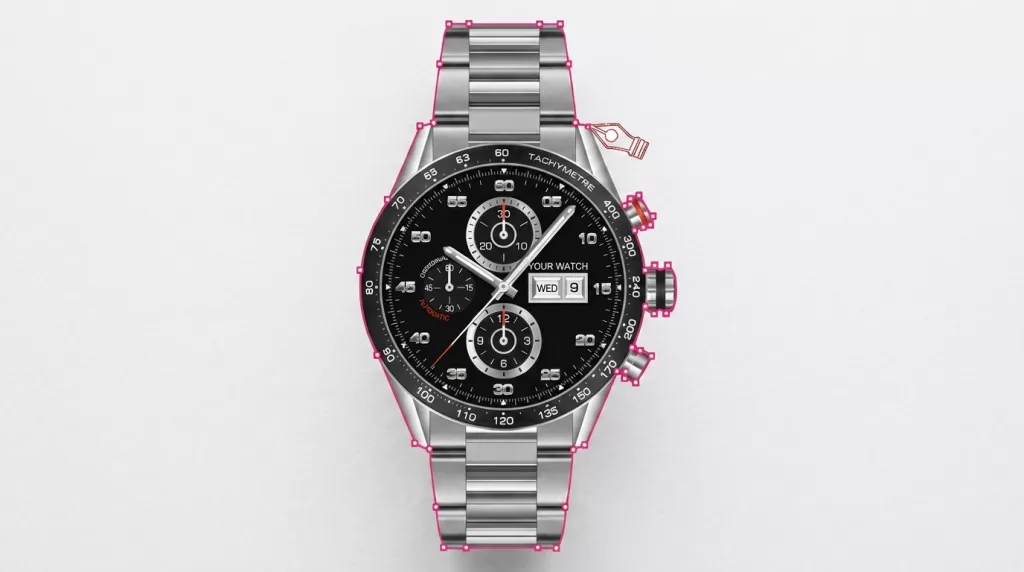
Watch Retouching — The Adjacent Specialty
Watches share almost every macro challenge with fine jewelry and add three of their own:
- Crystal reflections must be controlled, not eliminated. A totally reflection-free crystal looks CGI-rendered; a subtle hint of glass reads as photography.
- Dial cleanup is legally sensitive. Erasing serial numbers, model text, or heritage marks can constitute misrepresentation on luxury pieces.
- Bezel and strap textures need selective sharpening that preserves fine machining and leather grain without introducing halos.
Retouchers who cross from jewelry to watches usually keep the same layer structure and swap only the gemstone group for a dial-and-bezel group.
AI Jewelry Retouching vs Manual Retouching in 2026
| Approach | Strength | Weakness | Best Use |
|---|---|---|---|
| Manual retouching | Precision on chains, prongs, gemstones, reflections; marketplace-safe; ethical | Slower per image; higher per-image cost | Hero shots, high-value pieces, luxury catalogs |
| AI-only tools | Speed, low cost, easy to scale | Fills chain gaps incorrectly, misreads transparency, over-saturates gems | High-volume simple catalogs, secondary images |
| Hybrid AI + human QC | Combines AI speed with manual accuracy on hero details | Requires a review step | The 2026 professional standard |
For revenue-critical listings the human-in-the-loop model wins. AI does the first 70%; a skilled editor does the 30% that decides the sale.
Common Jewelry Retouching Mistakes to Avoid
- Over-saturating gemstones — a natural sapphire glowing like neon signals fakery, not luxury.
- Removing all reflections from metal — jewelry looks rendered, not photographed.
- Whitening white gold or platinum too aggressively — kills the metal’s subtle warmth.
- Uploading Adobe RGB files to Amazon or Shopify — colours flatten in every browser.
- Skipping the dust pass — a $2,000 ring with visible lint reads as $200.
- Uneven catalog editing — one piece warm, the next cool, the third flat, and trust dies.
- Aggressive sharpening — halos on prongs look worse than mild softness.
- AI-only chain cutouts — closed-in gaps between links betray automation instantly.
- Editing on an uncalibrated monitor — you cannot fix colours you cannot see.
- Removing certified inclusions — misrepresents the stone and violates FTC and GIA guidance.
Consistency across a catalog matters more than perfection on one image. Buyers judge trustworthiness by the whole grid, not by a single hero.
Looking for a cost-effective way to perfect your jewelry photos?
Get luxury-level editing at affordable rates with our Jewelry Photo Editing Service
Marketplace Rules for Jewelry Photos in 2026
Every platform enforces image standards. Miss them and listings vanish from search or get suppressed.
Amazon (jewelry category has a critical quirk):
- Pure white background (RGB 255,255,255).
- Product fills at least 85% of the frame.
- Longest side ≥1,000 px to enable zoom in most categories.
- Zoom is disabled for most jewelry categories and for the Handmade store. That means uploading a 4,000 px file does not give shoppers a zoom experience — they see the display resolution and nothing more. Focus your effort on framing, sharpness at display size, and multi-angle coverage rather than mega-pixel counts.
- No text, watermarks, borders, or lifestyle props on the main image.
Etsy:
- Listing photos at least 2,000 px on the shortest side.
- Ten photos plus one video per listing.
- File types: JPG, GIF, PNG, SVG, HEIC.
Shopify:
- 2,048 × 2,048 px square product images.
- WebP where the theme supports it for faster load and better Core Web Vitals.
Google Merchant Center:
- Recommended 800 × 800 px or higher, up to 64 MP.
- Beginning January 31, 2027, the minimum rises to 500 × 500 px enforced.
Instagram / TikTok Shop:
- 1,080 × 1,080 px minimum; vertical 4:5 or 9:16 crops win the mobile fold.
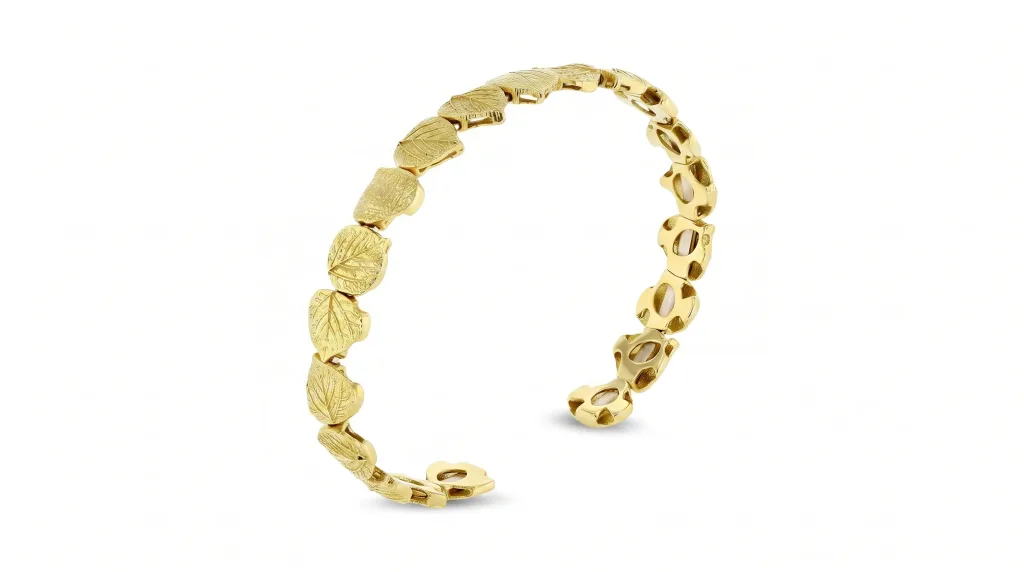
The Retoucher’s Brief Template — What to Send an Outsourced Editor
Most outsourced editing goes wrong because of vague briefs. A tight brief cuts revisions by more than half. Include:
- Reference images — two or three “gold standard” edits that represent your ideal look.
- Style rules — background hex (usually #FFFFFF), shadow style, cropping ratio, and negative-space margin around the piece.
- File naming convention — for example,
SKU12345_R1_MAIN.jpg,SKU12345_R1_ALT1.jpg. - Export specs — dimensions, format, colour profile, and maximum file size per destination.
- Do-not-touch list — labels, hallmarks, certification numbers, gemstone inclusions, or any grade indicator.
- Turnaround SLA — hours from delivery to first draft plus revision policy.
- Colour reference — attach the colour-checker frame from the shoot so the editor can match neutrals.
If you plan to scale, learn how to outsource photo editing as a repeatable process, not a one-off request.
Real ROI Example: A Boutique Jeweler
A boutique launches 200 pieces per season and shoots six photos per piece — that is 1,200 images per season.
- In-house editing at 30 minutes per image: 600 hours per season. At $40/hour that is $24,000 in editor time — before any Photoshop training, monitor calibration, or QC hours.
- Outsourced editing at $1.50 per image with a volume discount: $1,800 per season, delivered in 24–48 hours per batch.
The savings pay for a full replacement of lighting equipment or funding paid ads on the same catalog. Outsourcing is not just cheaper; it also frees the founder’s time to focus on merchandising and marketing.
Jewelry Retouching Cost Benchmarks (2026)
- Basic jewelry retouching (background removal + dust cleanup): $0.59 – $1.99
- Standard retouching (colour correction + dodge and burn + shadow): $1.99 – $3.99
- High-end retouching (focus stacking + gemstone work + reflection cleanup): $3.99 – $6.99
- Metal colour variant (yellow → white → rose gold): $0.99 – $2.99
- Volume discounts kick in at 50 images (10%), 100 (20%), 500 (30%), 1,000+ (40%).
Boutique jewelers with 200 pieces per season spend $500–$1,500 on full retouching — a fraction of the cost of a reshoot and dramatically less than the revenue lost to inconsistent visuals. The same approach applies to broader ecommerce photo editing when jewelry sits inside a mixed catalog.
FAQ — People Also Ask
What is jewelry photo retouching?
Jewelry photo retouching is the specialty post-production process that refines macro jewelry photographs — cleaning dust, correcting metal and gemstone colour, enhancing sparkle, straightening symmetry, and adding realistic shadows so pieces look accurate and premium on-listing.
How long does professional jewelry retouching take per image?
A hero-image ring or pendant takes 30–90 minutes in expert hands, depending on focus stacking, exposure compositing, and gemstone complexity. Bulk catalog work runs 5–15 minutes per image at production pace.
Why do AI background removers fail on jewelry?
AI misreads the fine gaps between chain links, treats transparent gemstones as background, and slices through prong detail. For zoomable e-commerce views, hand-drawn clipping paths remain the reliable method.
What is focus stacking and do I really need it for jewelry?
Focus stacking blends multiple frames shot at different focal points into one fully sharp image. Because macro jewelry has extremely shallow depth of field even at f/11, stacking is often the only way to keep both the diamond crown and the ring shank sharp.
How much does professional jewelry retouching cost in 2026?
Rates run from about $0.59 per image for basic cleanup to $6.99 per image for high-end work with focus stacking, gemstone enhancement, and reflection cleanup. Volume discounts start at 50 images and reach 40% off at 1,000+.
Is it ethical to retouch diamonds and gemstones?
Enhancing what a stone actually is — honest saturation and subtle facet dodge — is standard practice. Fabricating clarity, inventing colour, or hiding treatment indicators violates GIA policy and FTC Jewelry Guides, and can constitute misrepresentation.
Why is Amazon’s zoom disabled for jewelry?
Amazon disables zoom on most jewelry categories and the Handmade store to standardise browsing. Sellers should prioritise sharp display-resolution framing and multiple angles instead of chasing higher pixel counts that shoppers cannot access.
What file format is best for jewelry photos?
Use sRGB JPEG for every web destination and marketplace. Save a layered PSD for archive and re-editing. Export TIFF for print catalog work, and use WebP when your platform supports it for faster page-load speed.
Can I retouch my own jewelry photos or should I outsource?
Under 20 images per month is manageable in-house if you know Photoshop. Above that, outsourcing wins on both cost and consistency — one experienced editor produces a more uniform catalog than three DIY sessions with different moods.
Final Thoughts
Great jewelry photo editing is invisible. Shoppers do not say, “That ring was beautifully retouched.” They say, “That looks real, and I trust this brand,” and click Add to Cart. The eleven-technique framework above — focus stacking, clipping path, dust cleanup, exposure compositing, colour correction, metal polishing, gemstone enhancement, dodge and burn, symmetry, reflection cleanup, shadow creation — plus the layer structure, brief template, and ethics discipline is the difference between a $200 look and a $2,000 look on the same piece.
Build a documented style guide, match every image across the catalog, and treat retouching as revenue infrastructure. Buyers judge jewelry brands by the whole grid on your homepage, and consistency is the compound interest of visual trust.
Ready to transform your raw photos into professional assets?
Get a custom, no-obligation quote tailored to your specific volume and needs. Explore Clipping Expert Asia