

How to Blur a Picture in Photoshop: Background, Edges & Faces
October 9, 2026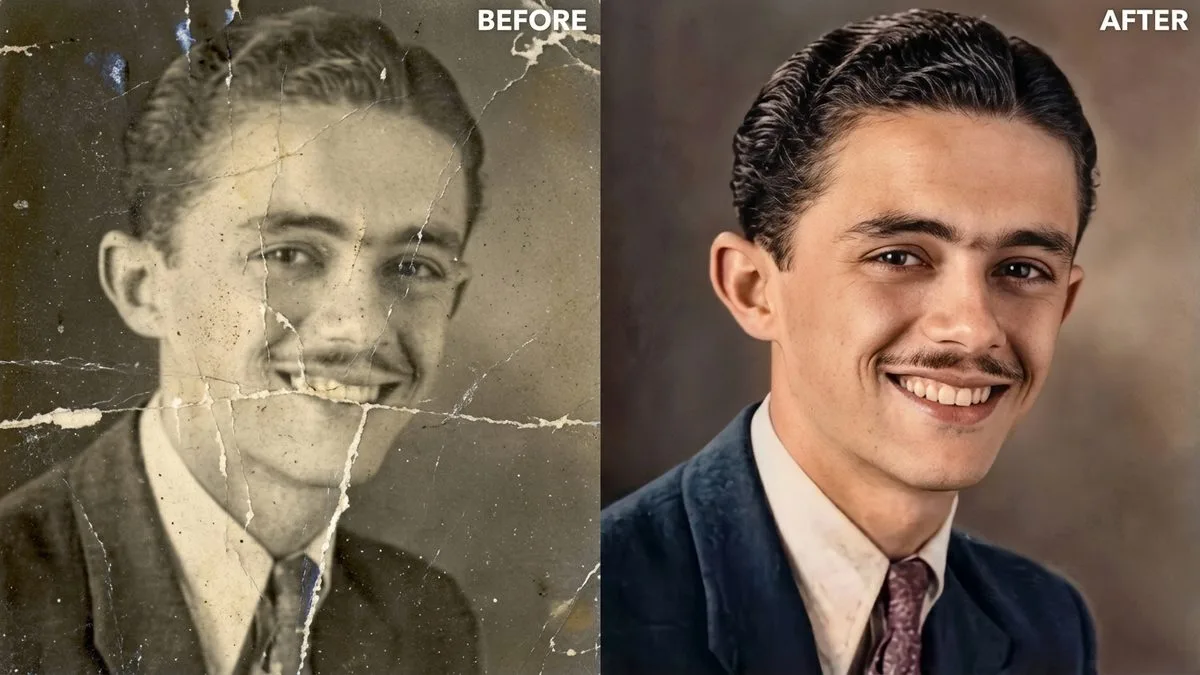
- TL;DR: The Short Answer
- What Can (and Cannot) Be Restored
- Step 1: Scan the Photo Right (This Determines Everything)
- Step 2: Set Up Non-Destructive Layers
- Step 3: Repair Structural Damage (Scratches, Tears, Dust, Stains)
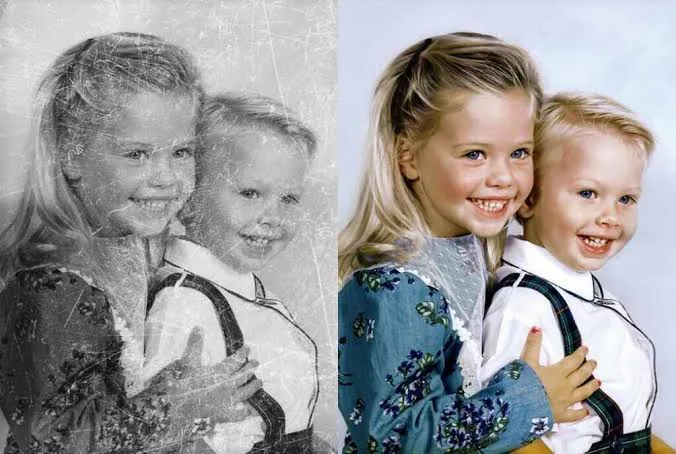
- Step 4: Fix Fading, Yellowing, and Tone
- Step 5: Run the Photo Restoration Neural Filter (AI Assist)
- Step 6: Make It Clear — Denoise, Sharpen, Upscale (In That Order)
- Step 7: Colorize (Optional — and Treat It as Art, Not Fact)
- AI Restoration Tools Compared (Free and Paid)
- 5 Mistakes That Make Restored Photos Look Fake
- When to Hire a Professional Restorer
- Frequently Asked Questions
- Final Verdict
TL;DR: The Short Answer
To restore old photos, start with a high-resolution scan (600 DPI minimum, 1200 DPI for small or badly damaged prints, saved as TIFF). Then work in this order — and this order matters: (1) repair structural damage (scratches, tears, dust, stains) with the Spot Healing Brush, Healing Brush, Clone Stamp, Patch Tool, and Content-Aware Fill; (2) fix fading and tone with Curves and Levels; (3) run Photoshop’s Photo Restoration Neural Filter (Filter > Neural Filters > Photo Restoration) with restrained sliders; (4) denoise, then sharpen lightly, then upscale with Super Resolution if you need a bigger print; (5) colorize only if you want it — it is optional and AI predicts color, it does not recover it. Free AI tools like Remini, MyHeritage, Fotor, and Hotpot do one-click restoration, but for irreplaceable photos, manual Photoshop gives you control and avoids AI-invented faces. The golden rule: preserve the original scan, never over-smooth skin, and stop when the photo looks like a cleaner version of itself — not like a different person.
What Can (and Cannot) Be Restored
Old photos degrade in predictable ways. Some damage is easy to fix; some requires reconstruction. Knowing what you are dealing with tells you which tools to reach for.
| Damage type | What it looks like | Difficulty | Best fix |
|---|---|---|---|
| Dust and spots | Tiny white/black specks | Easy | Spot Healing Brush, Dust & Scratches filter |
| Scratches | Thin white or dark lines | Easy–medium | Healing Brush, Clone Stamp |
| Tears and creases | White lines across the image | Medium | Clone Stamp, Patch Tool, Content-Aware Fill |
| Fading / yellowing | Washed-out, sepia, low contrast | Easy | Curves, Levels, white balance |
| Stains / water damage | Blotchy discoloration | Medium–hard | Clone Stamp, selective color correction |
| Missing pieces | Torn-off corners, large gaps | Hard | Content-Aware Fill + manual reconstruction |
| Blurry / out of focus | Soft faces, no detail | Hard | AI deblur (Topaz, Remini) — results vary |
The one thing no tool can do is invent detail that was never captured. A blurry face can be sharpened and AI can guess at features, but it cannot recover what the camera never recorded. For irreplaceable photos with severe damage, a professional restorer is worth the money.
Step 1: Scan the Photo Right (This Determines Everything)
A great restoration starts with a great scan. If your scan is low-resolution or blurry, no amount of editing will save it.
- Clean the photo first. Use a soft brush or microfiber cloth to gently remove dust. Never use water or cleaning fluids on the print — handle it by the edges.
- Scan at 600 DPI minimum. For small photos (wallet-sized) or anything you want to print larger, scan at 1200 DPI. More pixels give you more to work with when you repair and upscale.
- Save as TIFF, not JPEG. JPEG compression adds artifacts that restoration tools will amplify. TIFF preserves every pixel.
- Scan in color even if the photo is black and white. Color captures the subtle sepia and paper tones, which gives you more data to work with.
- Do not crop the borders yet. You may need the edge detail to reconstruct a torn corner.
If you do not have a scanner, a phone with a scanning app (Google Photoscan, Adobe Scan) works in a pinch — use even, indirect light and avoid glare. A flatbed scanner still beats a phone for fine detail.
Step 2: Set Up Non-Destructive Layers
Open the scan in Photoshop and immediately lock the background layer. Create a new empty layer above it — do all your repair work on that layer. Set the Spot Healing and Healing Brushes to Sample All Layers in the options bar, so they sample from the original but paint onto your repair layer. This way, if you make a mistake, you erase it on the repair layer and the original scan is untouched. For even more safety, convert the scan to a Smart Object before applying any filters.
Step 3: Repair Structural Damage (Scratches, Tears, Dust, Stains)
Work from the smallest damage to the largest. Zoom in to 100% and move methodically across the image.
- Spot Healing Brush (J): For tiny dust spots and small scratches. Brush slightly larger than the spot, click once, and Photoshop blends it away. Use this for 80% of the small damage.
- Healing Brush (J, cycle with Shift+J): For longer scratches and medium damage. Alt/Option-click a clean area to sample, then paint over the scratch. It matches texture and tone from the sample.
- Clone Stamp (S): For repeating textures (wallpaper, fabric, skin) where Healing Brush smudges. Alt/Option-click to sample, then paint. It copies pixels exactly, so use low opacity (30–50%) and feathered edges.
- Patch Tool (J): For larger damaged areas. Draw a loose selection around a tear or stain, drag it to a clean area of similar texture, and Photoshop blends it.
- Content-Aware Fill (Edit > Content-Aware Fill): For missing corners or large gaps. Select the damaged area with a generous margin, run Content-Aware Fill, exclude any parts you do not want sampled, and output to a new layer. Clean up the result with Clone Stamp.
- Dust & Scratches filter (Filter > Noise > Dust & Scratches): A fast way to clear hundreds of tiny specks — but use it on a duplicate layer with low Radius (1–2px) and a mask, because it blurs real detail. Never apply it to the whole image at high Radius.
For water stains and blotchy discoloration, the Clone Stamp on a low-opacity layer is your best friend — build up the repair gradually instead of in one heavy stroke.
Step 4: Fix Fading, Yellowing, and Tone
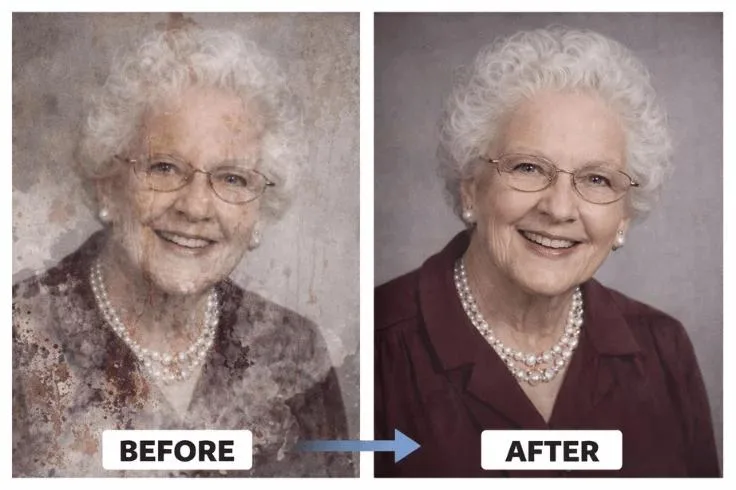
Most old photos fade toward yellow or sepia and lose contrast. Fix this before any sharpening or AI work, because those tools will amplify the wrong colors.
- Add a Curves adjustment layer. Drag the black point slider in to where the histogram starts, and the white point slider to where it ends. This restores contrast instantly.
- Add a Levels adjustment layer if you need more control over midtones.
- For yellowing, add a Color Balance adjustment layer and pull the midtones slightly toward blue and cyan — the opposite of yellow. Go easy; a little goes a long way.
- For black-and-white photos that have yellowed, convert to black and white (Black & White adjustment layer) after repair, or use the Channel Mixer to pull detail from the least-damaged color channel.
The goal at this stage is a clean, neutral, contrasty image. Do not worry about sharpness yet — that comes next.
Step 5: Run the Photo Restoration Neural Filter (AI Assist)
Photoshop’s Photo Restoration Neural Filter (Filter > Neural Filters > Photo Restoration) uses Adobe’s AI to automatically reduce scratches, enhance faces, and improve overall clarity. It is a huge time-saver — but treat it as a first pass, not a final result.
- Create a merged layer on top of everything (Ctrl/Cmd+Alt+Shift+E) and convert it to a Smart Object.
- Go to Filter > Neural Filters > Photo Restoration and toggle it on.
- Adjust the three sliders carefully:
- Photo Enhancement — overall clarity. Start low (20–30%).
- Face Enhancement — sharpens and reconstructs faces. Use sparingly; high values make people look like AI-generated strangers.
- Scratch Reduction — removes remaining scratches. Use on a mask so it does not smooth away real texture.
- Lower the layer opacity to 50–70% and compare with the original. The best result is a blend of AI assist and manual repair.
The biggest risk with AI restoration is hallucination — the AI invents facial features that were never there. Always compare the AI result against the original scan. If Aunt Mabel’s nose changed shape, dial back the Face Enhancement or mask it off.
Step 6: Make It Clear — Denoise, Sharpen, Upscale (In That Order)
This is the step people get wrong. Always denoise before you sharpen. Sharpening amplifies noise, so if you sharpen first, you sharpen the grain and dust into the image.
- Denoise. Use Lightroom’s AI Denoise, Topaz Denoise AI, or Camera Raw’s Detail panel. Keep it light — 20–40% strength. A perfectly smooth “plastic” face screams fake; a little film grain is character. If the photo is grainy, our noise reduction tips walk through the same order of operations.
- Sharpen lightly. Use a High Pass filter (Filter > Other > High Pass, Radius 1–2px, blend mode Overlay, low opacity) or a masked Unsharp Mask. Sharpen only edges — eyes, hair, clothing texture — never skin. Our guide on how to sharpen an image covers the exact settings and how to avoid halos.
- Upscale if needed. If you want a larger print, use Photoshop’s Super Resolution (Camera Raw > Enhance) or Topaz Gigapixel AI. Upscale after restoration, not before — upscaling a damaged photo amplifies the damage.
Step 7: Colorize (Optional — and Treat It as Art, Not Fact)
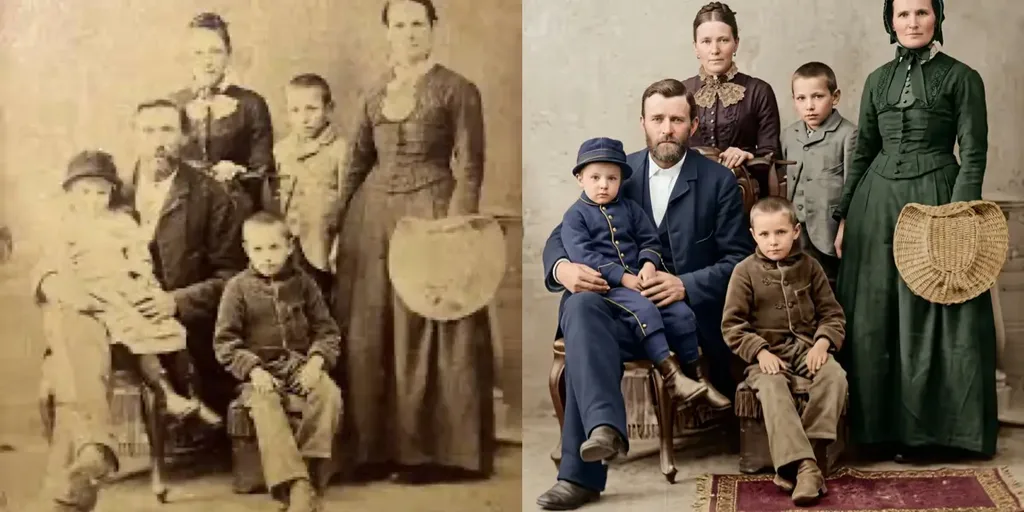
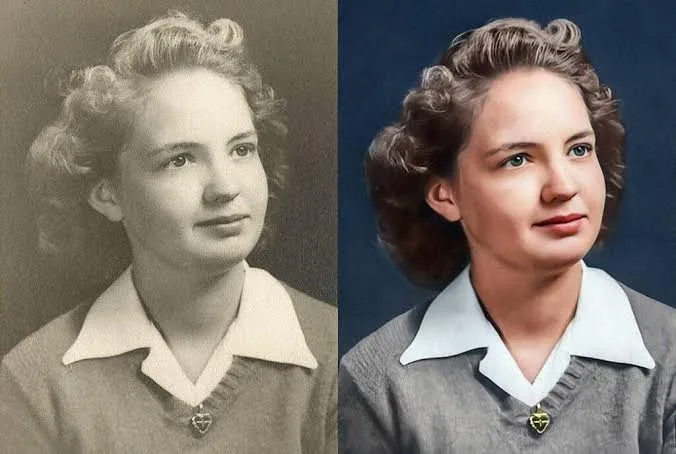
If your photo is black and white, you can add color with Photoshop’s Colorize Neural Filter (Filter > Neural Filters > Colorize), set the layer blend mode to Color, and refine skin, clothing, and sky by hand on masked layers. Important: AI colorization predicts colors — it does not recover them. A 1920s dress did not have a recorded color in a black-and-white photo, so the AI is guessing. Label colorized versions as “colorized” and keep the original black-and-white as the historical record. Our full guide on how to colorize black and white photos walks through the manual Color-blend-mode method that gives you full control.
AI Restoration Tools Compared (Free and Paid)
For one-click restoration or when you do not own Photoshop, these are the leading tools in 2026.
| Tool | Best for | Price | Watch out for |
|---|---|---|---|
| Photoshop + Neural Filters | Full control, pro results | $22.99/mo | Learning curve |
| Remini | Face enhancement on mobile | Free (watermarked), ~$10/yr | Heavy AI face reconstruction |
| MyHeritage | Family archives, genealogy | Photo subscription | Watermarked free tier |
| Topaz Photo AI | Denoise + sharpen + upscale, local | $199/yr or $39/mo | Expensive, but best quality |
| Fotor | Quick online one-click | Free tier | Watermark on free exports |
| Hotpot.ai | Fast online restore + colorize | Pay per photo | Less control |
For a single precious photo, try a free tool first to see what is possible, then do the final pass in Photoshop if the result matters. If you are deciding on software for ongoing work, our best photo editing software 2026 roundup compares the full field.
5 Mistakes That Make Restored Photos Look Fake
- Over-smoothing skin. AI face enhancement at 100% turns real people into plastic dolls. Keep Face Enhancement low and mask it off skin texture.
- AI-invented faces. Always compare the restored face against the original scan. If features changed, dial back or repair manually.
- Sharpening before denoising. You sharpen the grain into the image. Denoise first, sharpen last.
- Over-sharpening halos. Too much Unsharp Mask creates bright outlines around edges. Use a mask and low opacity.
- Colorizing as historical fact. AI guesses colors. Label colorized versions and keep the original monochrome.
A good photo editing guide will reinforce the same principle: restraint beats intensity in restoration.
When to Hire a Professional Restorer
Hire a pro when: the photo is irreplaceable and severely damaged (large missing pieces, water damage that has eaten the emulsion), the faces are the main subject and badly blurred, or you want a museum-quality print. A professional restorer can reconstruct missing features from reference photos of the same person — something AI cannot do reliably. For most family snapshots with scratches and fading, the DIY workflow above will get you 90% of the way there.
Frequently Asked Questions
How do I restore old photos at home?
Scan at 600+ DPI as TIFF, repair scratches and tears with Spot Healing and Clone Stamp on a separate layer, fix fading with Curves, run Photoshop’s Photo Restoration Neural Filter at low strength, denoise then sharpen lightly, and upscale only if you need a bigger print. Always keep the original scan untouched.
How can I make an old photo more clear?
Scan at high resolution first, then denoise (Lightroom AI Denoise or Topaz), then sharpen edges only with a masked High Pass or Unsharp Mask, then upscale with Super Resolution if needed. Sharpening a low-res scan will not create detail that was never captured.
What is the best AI tool to restore old photos?
For control and quality, Photoshop’s Neural Filters plus Topaz Photo AI lead. For quick one-click mobile, Remini is best for faces. For family archives, MyHeritage integrates restoration with genealogy. Fotor and Hotpot are good free online options.
Can AI restore badly damaged photos?
AI can remove scratches, fading, and mild blur, and it can guess at missing or blurry features — but it invents detail rather than recovering it. For large missing pieces or important faces, manual restoration by a professional is more reliable and preserves the person’s actual likeness.
Should I colorize an old black-and-white photo?
Colorization is optional and artistic, not factual — AI predicts colors, it does not recover them. If you colorize, label the version as “colorized” and keep the original black-and-white. Use Photoshop’s Colorize Neural Filter on a Color blend mode layer and refine by hand.
What DPI should I scan old photos at?
Scan at 600 DPI minimum. For wallet-sized photos, severe damage, or anything you want to reprint larger, scan at 1200 DPI. Save as TIFF, not JPEG, to avoid compression artifacts.
How do I fix scratches on old photos in Photoshop?
Use the Spot Healing Brush for tiny spots, the Healing Brush (Alt/Option-click to sample) for longer scratches, and the Clone Stamp for repeating textures like skin or fabric. Work on a separate layer with Sample All Layers enabled so the original stays untouched.
How much does professional photo restoration cost?
Basic scratch and fading repair starts around $20–50 per photo. Severe damage with missing pieces or reconstruction can run $100–300+ per photo. For irreplaceable family photos, it is usually worth it.
Final Verdict
Restoring an old photo is a labor of love, and the modern workflow is faster and more powerful than ever — but the same core rules apply. Scan at high resolution, repair structural damage first, fix tone before sharpness, denoise before sharpen, use AI as an assistant not an author, and always keep the original scan safe. The best restored photo looks like a cleaner, clearer version of the original — not like a different person. Do that, and you can hand your grandchildren photos that look as sharp as the day they were taken.