

Clipping Path, Deep Etch & Silhouette: The Real Difference
August 15, 2026
Remove.bg vs PhotoRoom vs Canva vs Manual Editing: The Honest 2026 Comparison
August 17, 2026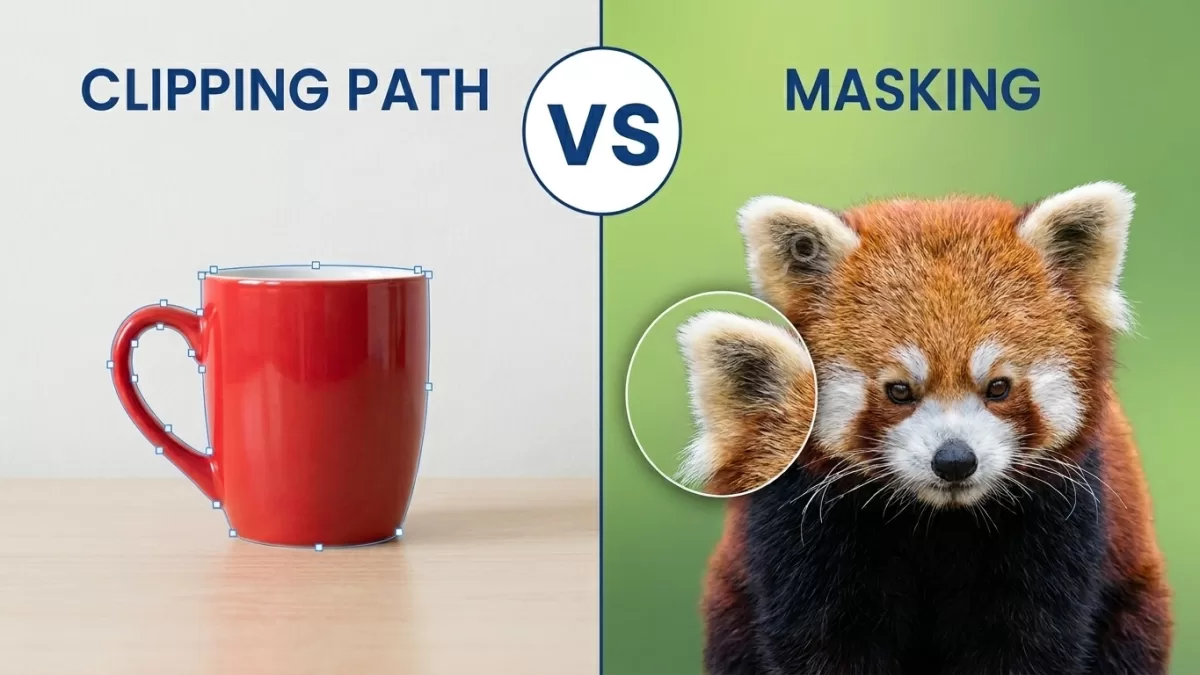
- TL;DR — The 30-Second Answer
- Quick Definitions
- Who This Guide Is For
- What Is a Clipping Path?
- What Is Image Masking?
- The Real Difference — Side by Side
- The 400% Zoom Test
- When Should You Use a Clipping Path?
- When Should You Use Image Masking?
- Products That Need Both Techniques Combined
- AI vs Manual — Where 2026 Tools Actually Fall Short
- Clipping Path Complexity Tiers and Pricing (2026)
- Image Masking Complexity Tiers and Pricing (2026)
- File Formats — What Editors Deliver and Why It Matters
- The 5-Question Decision Tree
- Multi-Clipping Path — A Special Case Worth Knowing
- Related Terms — Deep Etch, Layer Mask, Clipping Mask, Silhouetting
- How to Brief an Editor So You Get the Right Technique
- Common Mistakes to Avoid
- The Rule Every Team Can Remember
- FAQ — People Also Ask
- Final Thoughts
TL;DR — The 30-Second Answer
- Clipping path is a hand-drawn vector outline made with the Pen Tool. It excels on hard, geometric edges — bottles, boxes, shoes, watches, electronics, furniture.
- Image masking is a pixel-level transparency technique. It excels on soft, wispy, or see-through edges — hair, fur, glass, veils, smoke, feathers.
- Use clipping path when edges are crisp and continuous.
- Use image masking when edges are fuzzy, semi-transparent, or complex.
- Many real product shots — models with flying hair, jewelry on silk, perfume bottles with ribbons — need both techniques on the same file.
- Manual editing still beats AI for masking-heavy work in 2026, especially on very fine hair, refractive glass, and low-contrast subjects.
Quick Definitions
- Clipping path: A closed vector path drawn with the Pen Tool that defines what stays visible inside a 2D image; the industry also calls it deep etch or silhouetting.
- Image masking: A raster technique that hides or reveals pixels using an 8-bit grayscale channel with 256 levels of transparency, from 0 (invisible) to 255 (fully visible).
- Alpha channel: A grayscale channel stored inside an image file that carries transparency data.
- Layer mask: A non-destructive mask attached to a Photoshop layer; painting black hides pixels, white reveals them, and grays produce partial transparency.
- Clipping mask: A separate Photoshop feature where one layer’s shape constrains the visibility of the layer above it — related to but distinct from a clipping path.
Who This Guide Is For
If your product images decide whether shoppers click “Buy” or bounce, this article gives you the exact decision framework professional studios use. It serves:
- Amazon, Shopify, Etsy, Walmart, and TikTok Shop sellers who need marketplace-compliant cutouts.
- Product photographers who want to price and scope post-production accurately.
- Fashion, jewelry, and cosmetics brands working with hair, glass, or transparent packaging.
- Marketing and catalog teams briefing outsourced editors and wanting to speak the same technical language.
By the end, you will not just know the difference — you will know which technique fits every product category, when to combine them, and where AI shortcuts genuinely fall short.
What Is a Clipping Path?
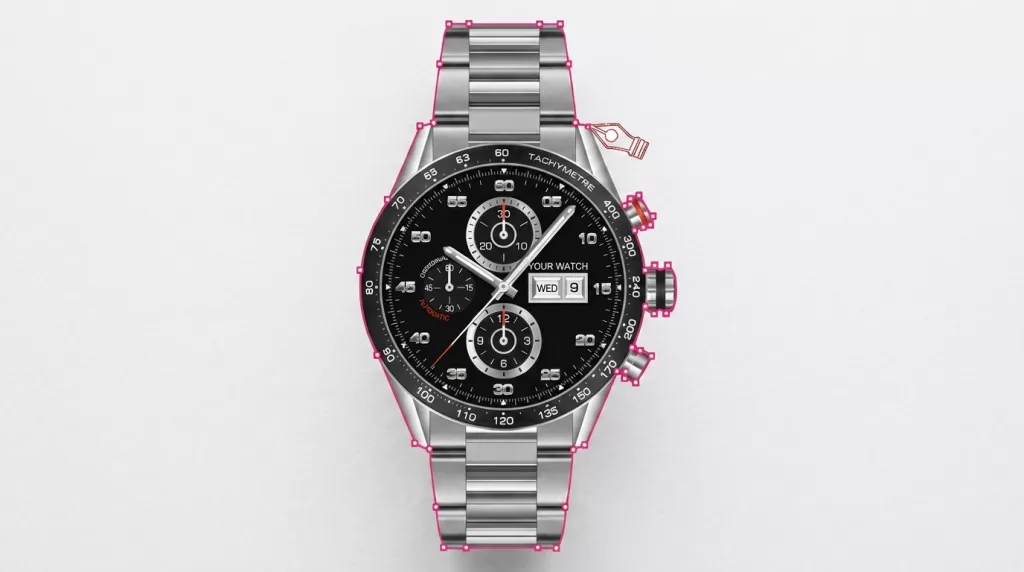
A clipping path is a hand-drawn vector outline created with the Pen Tool in Adobe Photoshop, shortcut P. Anything inside the closed path stays visible; anything outside gets discarded, made transparent, or replaced. Wikipedia describes it as a closed vector path, or shape, used to cut out a 2D image in image-editing software, and the industry also calls it deep etch or silhouetting.
Because the outline is vector — not pixels — the cutout scales cleanly from a small thumbnail to a large billboard without pixelation. Professional editors work at 300–400% zoom, place as few anchor points as possible, and shape curves with the tool’s built-in handles rather than crowding the outline with dozens of straight points. Fewer well-placed anchors produce smoother, more accurate edges than dense point spacing.
Once drawn, the path lives in the Paths panel (Window → Paths). Editors save it, name it, and can export the file as a JPEG or TIFF with the clipping path embedded — a format Adobe InDesign and other layout apps read natively for transparent placement. Our full clipping path guide covers twenty real-world use cases across product categories.
Struggling with inconsistent cutouts from automated software?
Switch to 100% manual, expert Clipping Path for guaranteed perfection.
What Is Image Masking?
Image masking is a raster-based cutout technique that uses pixel-level transparency to isolate a subject. Instead of a hard vector line, masking assigns each pixel a transparency value on an 8-bit scale — 0 for fully hidden, 255 for fully visible, with 254 shades in between. Every partial value produces a semi-transparent pixel, which is precisely what hair strands, glass edges, veil lace, and smoke require to look natural.
Four masking techniques cover almost every scenario product editors face:
- Layer masking — the most common non-destructive method; paint black-to-white on the mask to hide or reveal pixels without deleting them.
- Alpha channel masking — driven by Photoshop’s saved alpha channel masks; best for glass, smoke, and semi-transparent liquids where the channel with the strongest contrast becomes the mask.
- Select and Mask — Adobe’s dedicated hair and fur workspace, opened from any selection tool’s Options bar.
- Channel masking — extracts subjects when the background shares similar tones with the subject.
Skilled editors finish every masking job with color decontamination, which removes fringe pixels that carry residual color from the discarded background. Without it, cutouts placed on white keep a faint halo of the old scene — and shoppers subconsciously register the image as “off” even if they cannot articulate why.
The Real Difference — Side by Side
The core distinction lives in three places: the underlying technology, the type of edge each produces, and the subject each handles best.
| Factor | Clipping Path | Image Masking |
|---|---|---|
| Foundation | Vector-based (mathematically defined path) | Raster-based (pixel-by-pixel transparency) |
| Primary tool | Pen Tool → save in Paths panel | Layer mask, alpha channel, Select and Mask |
| Edge behavior | Binary — 100% visible or 100% hidden | Gradient — 256 levels of transparency |
| Best subjects | Hard, geometric, continuous edges | Soft, wispy, or transparent edges |
| Scalability | Infinite — vector paths never pixelate | Bound to original image resolution |
| Editor time per image | 2–15 minutes for most products | 10–45 minutes for complex hair or fur |
| Skill required | Moderate — clean Pen Tool discipline | High — channel reading, edge refinement, decontamination |
| File delivery | JPEG or TIFF with saved path, or transparent PSD | Layered PSD with mask or transparent PNG-24 |
Think of it this way: a clipping path is surgical scissors; image masking is an airbrush that fades to invisible. Neither wins in the abstract — they solve different problems.
The 400% Zoom Test
Before you decide, run one simple diagnostic. Open the photo in Photoshop and zoom to 400% on the subject’s edge. Then walk the cursor around the outline.
- If every section reads as a crisp, continuous line you could theoretically trace with a ruler, choose clipping path.
- If any section shows wispy strands, translucent gradients, or fuzzy softness, choose image masking for that section.
- If both edge types appear in the same photograph — the classic model-with-hair-in-a-leather-jacket problem — plan to combine both techniques.
This ten-second test replaces guesswork. Do it on ten sample photos from any catalog and you will immediately know which mix of services the shoot needs.
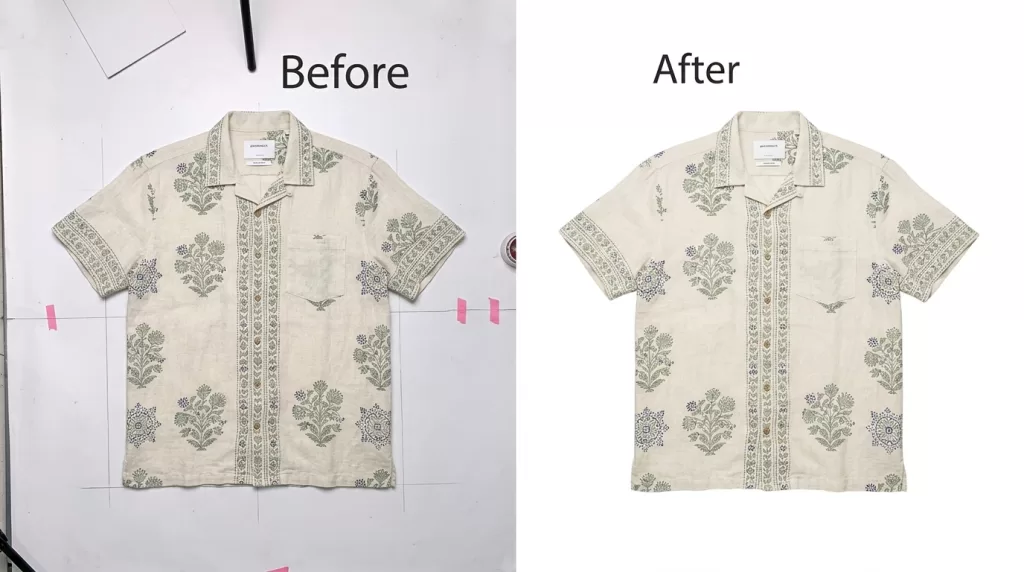
When Should You Use a Clipping Path?
Reach for a clipping path any time the subject has crisp, well-defined edges. It is the fastest, cleanest, and most cost-effective option for hard-edged products.
Ideal clipping-path scenarios:
- E-commerce cutouts — smartphones, laptops, headphones, cameras, kitchen appliances.
- Packaging shots — cardboard boxes, jars, cans, tubes, cosmetic bottles.
- Fashion staples with clean lines — sneakers, belts, wallets, sunglasses, structured handbags.
- Jewelry with solid silhouettes — rings, cuff bracelets, geometric earrings.
- Furniture and homeware — chairs, tables, lamps, vases, appliances.
- Automotive — inventory shots, spare parts, tires, rims.
Clipping paths also become non-negotiable whenever the file needs to be printed at large sizes or embedded into layouts. Because paths remain editable vector data, print production teams love working with clipping-path files delivered as layered PSDs or TIFFs. Sellers who follow the official Amazon rules — laid out clearly in Amazon Seller Central’s image guide — benefit from vector paths that keep edges razor-sharp above the platform’s 1,000-pixel zoom threshold.
When Should You Use Image Masking?
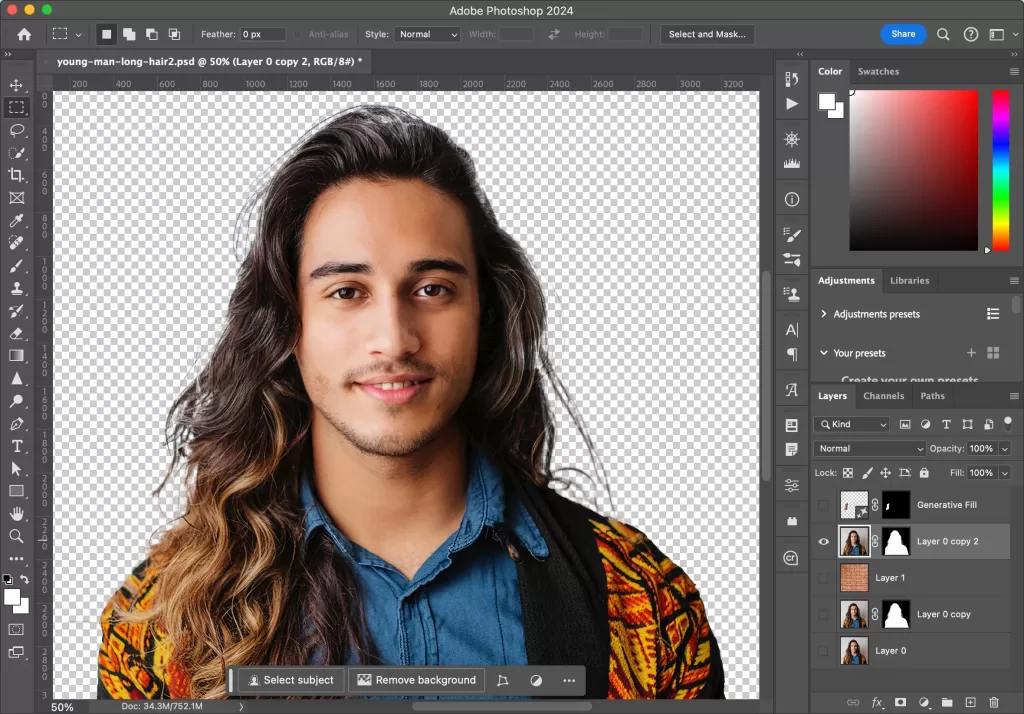
Switch to image masking the moment the edge stops being crisp. Any subject with wispy, translucent, or partially transparent detail needs the graded transparency only masking can produce.
Ideal masking scenarios:
- Model shots — flying hair, natural skin edges, semi-transparent fabric against complex backgrounds.
- Fur and feather products — pet apparel, fur-lined coats, feather boas, faux-fur accessories.
- Transparent and translucent items — perfume bottles, glassware, wine, gin, tinted lenses.
- Wedding and formal wear — bridal veils, tulle, lace, chiffon, sheer fabrics.
- Soft-edged accessories — scrunchies, tassels, fringed bags, knitted textures.
- Smoke, splash, and liquid photography — anything with fading edges or motion trails.
The technical reason clipping paths fail here is simple: vectors deliver a binary edge — 100% visible or 100% hidden. Real hair, glass, and fabric edges live in the middle. A hard clipping path around flying hair looks unnaturally chopped; masking preserves every wispy strand because pixels fade smoothly through 256 shades of transparency.
Struggling with complex hair or fur edges?
Let our experts deliver flawless, natural cutouts with our advanced Image Masking Service
Products That Need Both Techniques Combined
Many real product shots demand both a clipping path and image masking on the same file. Pros layer the two to get sharp edges where the product is solid and graded transparency where the edge fades.
Real hybrid examples:
- A model wearing a leather jacket — clipping path around the crisp leather, masking around the hair.
- A dog holding a chew toy — clipping path on the toy, masking on the fur.
- A perfume bottle with a fabric ribbon — clipping path around the glass shape, masking on the ribbon’s soft weave.
- A bridal dress with lace detail — clipping path around the structured bodice, masking along the lace edges.
- A pet food bag next to a fluffy dog — clipping path on the bag, masking on the coat.
- Jewelry laid on a silk scarf — clipping path on the metal, masking to preserve the scarf’s soft texture.
Hybrid work adds 30–50% to a typical editing job because it involves two paths, two masks, and careful layer discipline. Outsourced hybrid images sit one tier above straight clipping paths in most studios’ price sheets — and the finished result looks natural rather than “cut out.” Sellers who add a subtle shadow creation beneath these hybrid cutouts multiply the perceived quality further.
AI vs Manual — Where 2026 Tools Actually Fall Short
Modern AI tools produce alpha channel PNGs with graded transparency — not the pure binary masks they shipped with in 2020. Photoroom, Remove.bg, and Adobe Firefly all output partial transparency in 2026, and on clean, hard-edged products the results are impressive. Drop in a phone on white, and any of them produces a passable cutout in seconds.
The failure modes are more specific and more subtle than they used to be. AI still struggles with:
- The very finest hair strands — flyaway wisps, baby hair, and semi-transparent frizz frequently vanish or get clipped.
- Low subject-versus-background contrast — dark hair against a dim scene, white products on white surfaces, glass on glass shelves.
- Refractive transparency — glass bottles, tinted lenses, and prisms distort the background behind them in ways AI models cannot reason about correctly.
- Reflective metal on reflective surfaces — mirrored watches, chrome, polished silver photographed on glossy tables.
- Complex composites — layered fabrics, overlapping jewelry chains, and dense foliage backgrounds.
- Color decontamination — most AI pipelines skip the final fringe-cleanup pass entirely.
Our internal breakdown on how AI background remover tools actually work covers the mechanics in depth. The practical takeaway for 2026: AI handles simple clipping-path work at scale, but for hair, jewelry, glass, and reflective surfaces, manual editing still delivers the professional finish shoppers trust.
Want to replace messy backgrounds with pure white or custom colors?
Our expert Background Removal Service makes it quick and effortless.
Clipping Path Complexity Tiers and Pricing (2026)
Not every clipping path costs the same. Studios price by image complexity because a phone box takes three minutes and a bicycle takes forty. The verified 2026 ranges across professional providers:
| Tier | Example Products | Typical Price |
|---|---|---|
| Basic | Phones, boxes, jars, bottles | $0.25 – $0.50 |
| Simple | Shoes, watches, headphones, sunglasses | $0.49 – $0.99 |
| Medium | Jewelry, bicycles, eyewear, small furniture | $0.99 – $1.99 |
| Complex | Intricate chains, dense engraving, flying hair on models | $2.49 – $3.99 |
| Super complex | Group jewelry sets, messy hair, reflective glass compositions | $4.99 – $8.00 |
Volume discounts of 10% to 40% kick in at batches of 50, 100, 500, and 1,000+ images. Sellers pushing thousands of SKUs each quarter save five figures a year by outsourcing bulk clipping-path work.
Image Masking Complexity Tiers and Pricing (2026)
Masking runs slightly higher per image because it takes more skill and time. Verified 2026 ranges:
| Tier | Example Subjects | Typical Price |
|---|---|---|
| Basic | Simple products with soft edges — plastic bottles, basic bags | $0.99 – $1.39 |
| Simple | Handbags with fringe, tassels, feather dusters | $1.39 – $1.99 |
| Medium | Glassware, jewelry with chains, eyewear with tinted lenses | $1.99 – $2.99 |
| Complex | Flying hair, pet fur, wedding veils, dense foliage | $3.99 – $4.99 |
| Super complex | Group model shots, layered chiffon, densely furred animals | $5.99 – $8.00 |
If you are budgeting a full catalog, mix and match tiers realistically. A fashion brand shipping 1,000 apparel photos monthly usually needs 60% simple clipping paths, 25% masking, and 15% hybrid work — and paying by tier keeps the invoice honest.
File Formats — What Editors Deliver and Why It Matters
The delivery format is where clipping path and image masking diverge in the most practical way. Pros deliver each technique differently depending on downstream use.
Clipping path deliverables:
- JPEG with embedded clipping path — the classic layout-app format; InDesign and QuarkXPress read the path and drop the transparent subject onto pages directly.
- TIFF with saved path — the print-industry default; preserves the vector outline plus 16-bit color depth for CMYK output.
- Layered PSD with saved path in the Paths panel — the archival master file; clients keep this to re-export any format on demand.
Image masking deliverables:
- Transparent PNG-24 — the web default with 8-bit alpha; drops cleanly onto any background.
- Layered PSD with saved layer mask — non-destructive; the client can refine the mask later without redoing the whole cutout.
- TIFF with alpha channel — high-bit-depth option for print composites that need transparency.
For anyone building a transparent background file library, insist on PSD masters. A flat JPEG cutout is a dead end — you cannot refine the mask, adjust the edge, or repurpose the file for a new background six months later.
The 5-Question Decision Tree
When you cannot decide which technique the photo needs, walk through these five questions. The answer usually appears within three.
- Are the edges crisp and geometric? If yes → clipping path.
- Does the subject have hair, fur, or feathers? If yes → image masking.
- Is any part of the subject transparent or translucent (glass, veils, smoke)? If yes → image masking (specifically alpha channel).
- Does the file need to be resized to very large print or billboard scale? If yes → clipping path (vector paths scale infinitely).
- Does the product have both hard and soft edges (leather jacket + hair, jewelry + silk)? If yes → combine both techniques.
Studios that use this checklist internally reduce revision cycles and quote more accurately. Sellers who pass the same logic on in a brief get faster, more consistent turnarounds.
Do automated tools fail on your multi-part products?
Rely on 100% hand-drawn precision with our Multiple Clipping Path Service
Multi-Clipping Path — A Special Case Worth Knowing
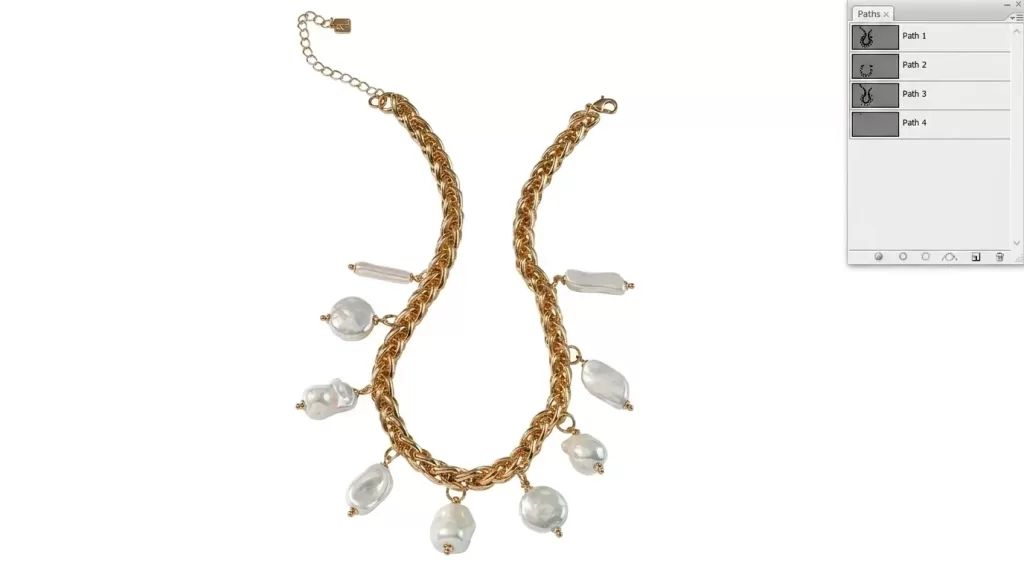
Some products need multiple clipping paths inside the same image. Multi-clipping — also called color path or multi-layer deep etch — draws several separate vector outlines so each part of the product becomes independently editable. Our post on how it relates to a standard deep etch explains the terminology.
Where multi-clipping paths pay for themselves:
- Fashion recoloring — one path per garment section lets you swap sleeve, torso, and hem colors from a single master shot.
- Watch and jewelry editing — separate paths for the case, dial, strap, and stones enable colorway variations without a reshoot.
- Sneaker colorways — each panel gets its own path, generating dozens of SKUs from one photograph.
- Consumer electronics — isolate the screen, buttons, and body for graphic swaps or campaign composites.
This technique is the workhorse behind SKU multiplication. A single high-quality studio shot processed through multi-clipping paths can produce twenty or more sellable variants — with identical lighting, pose, and composition — at a fraction of a full reshoot budget.
Related Terms — Deep Etch, Layer Mask, Clipping Mask, Silhouetting
E-commerce editing has a jargon problem. Here is the plain-English translation of the terms editors and clients use every day:
- Deep etch — an older print-industry name for clipping path, dating to the pre-Photoshop era when photogravure and offset print prep required hand-etching subjects for reproduction. Same technique, same result today.
- Silhouetting — another synonym for clipping path, common in fashion catalog language.
- Layer mask — a Photoshop feature used inside image masking; hides pixels without deleting them.
- Clipping mask — a separate Photoshop function where one layer’s shape or pixels constrain the visibility of the layer above it. Not the same as a clipping path, despite the similar name.
- Alpha channel — an 8-bit grayscale channel stored inside an image file that carries transparency data.
When outsourcing, confirm what your studio means by these terms. A brief that says “please deep etch these” moves faster once both parties speak the same vocabulary.
How to Brief an Editor So You Get the Right Technique
The single fastest way to get consistent cutouts back from an outsourced studio is a documented brief. A complete brief includes:
- Two or three reference images showing your ideal output style.
- Explicit technique preference where you have one — “manual clipping path, not AI,” for example.
- Background hex — usually #FFFFFF for Amazon-compliant work.
- Delivery format — layered PSD, transparent PNG-24, JPEG on white, or all three.
- Turnaround SLA and revision policy.
- A “do not touch” list — product features that must remain 100% unchanged, like certification marks, brand logos, or gemstone facets.
Studios that receive one-line requests deliver one-line-quality output. Studios that receive a documented brief deliver work you can ship without a full manual review. If you need a broader post-production framework beyond cutouts, our product photo editing guide walks through the ten-step professional workflow.
Common Mistakes to Avoid
Even experienced designers get this wrong when the deadline pressure hits. The five most common mistakes:
- Forcing a clipping path around hair or fur. Edges look chopped and unnatural; buyers notice within seconds.
- Using image masking where a clipping path would be faster. Masking a phone or a shoe box triples the effort for no visible quality gain.
- Trusting AI on transparent or refractive products. Glass bottles and jewelry chains routinely lose their transparency or gain fringing when passed through pure AI pipelines.
- Skipping color decontamination after masking. Even a perfectly masked model shot looks “off” if fringe pixels still carry the old background’s color.
- Delivering flat JPEGs instead of layered PSDs. A flat cutout kills the client’s ability to refine the mask, change background color, or repurpose the file later — a small saving today creates rework six months out.
Sellers who avoid these traps ship cleaner catalogs and get fewer “looks fake” complaints from buyers. Anyone maintaining a large image library benefits from proper background removal discipline — flat delivery is a trap that repeats itself across every season.
The Rule Every Team Can Remember
If you take one thing away, take this: hard edges call for clipping paths; soft edges call for masking; real products often need both. Everything else is detail.
Combine that rule with a good editor, a documented brief, and honest expectations about AI’s limits, and your catalog will look cleaner than 90% of competing stores — because most competitors default to whatever their editor felt like doing that day, with no decision framework at all.
FAQ — People Also Ask
Which is better, clipping path or image masking?
Neither. They solve different problems. Clipping path wins on hard, geometric edges — boxes, shoes, jewelry with clean silhouettes. Image masking wins on soft, wispy, or semi-transparent details — hair, fur, glass, veils. The best editors combine both on the same file when the product demands it.
Can AI replace clipping path and image masking in 2026?
For simple clipping-path work on hard-edged products, AI handles bulk jobs well. For image masking, AI still struggles with the finest hair strands, low subject-vs-background contrast, refractive glass, and reflective metal. Manual editing remains the professional standard for masking-heavy catalogs.
How much does clipping path cost per image in 2026?
Basic clipping paths run $0.25 to $0.50. Simple products land at $0.49 to $0.99. Medium complexity sits at $0.99 to $1.99. Complex cutouts reach $2.49 to $3.99, and super-complex work can hit $5 to $8 per image. Volume discounts of 10% to 40% apply at 50, 100, 500, and 1,000+ images.
How much does image masking cost per image?
Basic image masking starts around $0.99. Simple hair or tassel work runs $1.39 to $1.99. Medium complexity — glass, jewelry chains, eyewear — sits at $1.99 to $2.99. Complex hair, fur, and veil masking climbs to $3.99 to $4.99. Super-complex composites can reach $5.99 to $8.
Is a clipping path the same as deep etch?
Yes. Deep etch is the older print-industry name for the same technique. Silhouetting is a third synonym common in fashion catalog language. All three describe a closed vector outline drawn with the Pen Tool to isolate a subject from its background.
Do I still need a clipping path if I use Adobe’s Select and Mask?
Sometimes yes. Adobe’s Select and Mask workspace is excellent for hair and fur, but it produces a pixel-based mask, not a vector path. If you need a scalable, resolution-independent outline for large-format print, a proper Pen Tool clipping path still wins.
Which technique is best for jewelry photos?
Both, depending on the piece. Solid rings and cuff bracelets need a clipping path. Chains, delicate pendants, and gemstones with light refraction benefit from image masking. Complex jewelry sets often require multi-clipping paths combined with masking for the finest details.
How do I know at a glance whether my image needs clipping path or masking?
Zoom to 400% and inspect the edges. If they read as crisp geometric lines all the way around, clipping path is enough. If any section shows wispy strands, transparency, or gradient softness, that section needs masking. If both edge types appear in the same photo, combine the two techniques.
Can a clipping path work in InDesign or print layouts?
Yes. Save the path in Photoshop’s Paths panel, export the file as a JPEG or TIFF with the clipping path embedded, and place it in InDesign or QuarkXPress. The layout app reads the path and displays the subject on a transparent background automatically — the standard workflow print production has used for decades.
Final Thoughts
Clipping path and image masking are not rivals. They are complementary tools in the same toolbox. Skilled e-commerce editors reach for whichever one fits the edge in front of them and switch between the two dozens of times a day without thinking about it.
For your catalog, the decision framework is simple: audit ten random product photos, apply the five-question decision tree, run the 400% zoom test, and see which technique dominates. That single hour tells you exactly what to brief your editor for, what tier to budget, and where AI tools help versus hurt. Do it once per season and your images will stay crisp, marketplace-compliant, and consistent across every SKU you ship.
Ready to transform your raw photos into professional assets?
Get a custom, no-obligation quote tailored to your specific volume and needs. Explore Clipping Expert Asia