

Best 360 Degree Camera 2026 Buying Guide: 8K, VR & Action Picks
June 19, 2026
The 10 Best Memory Card Readers of 2026: SD, CFexpress & USB4 Picks
June 22, 2026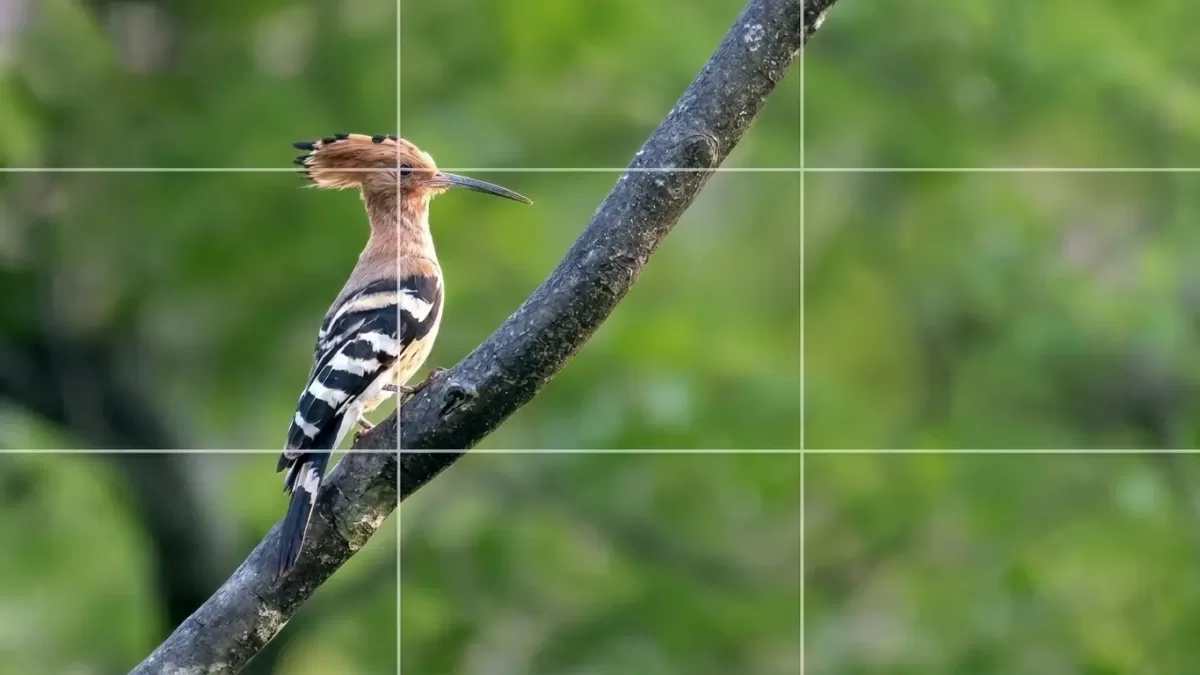
Walk into any camera club, scroll through a beginner’s YouTube tutorial, or flip open a composition book — within minutes, someone mentions the rule of thirds. That popularity is no accident. This single guideline rescues more dull photos than almost any other technique in a photographer’s toolkit, and it does so without expensive gear or complex theory. A slight nudge to the side, a horizon dropped to the lower third, and a flat snapshot suddenly carries weight.
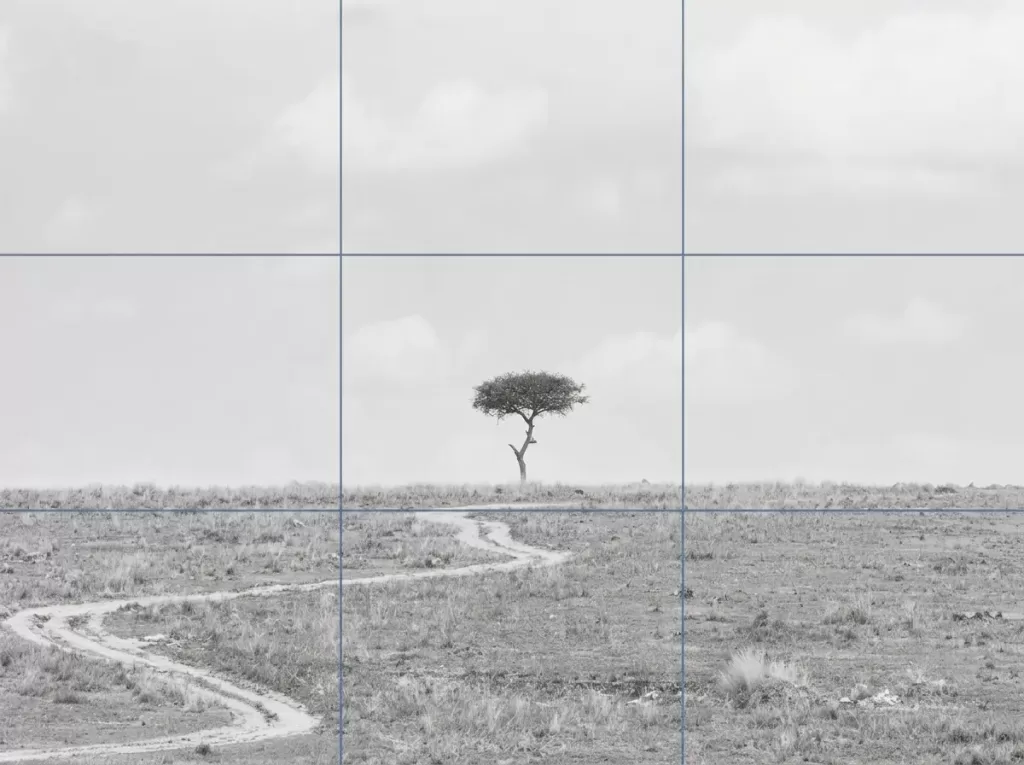
In simple terms, the rule of thirds divides your frame into nine equal rectangles using two horizontal and two vertical lines. You then place your subject, horizon, or focal point along those lines — or, even better, at the four points where the lines cross. The image feels balanced, intentional, and (whether viewers realize it or not) slightly cinematic.
Photographers across every genre lean on this technique because it works fast and forgives mistakes. Landscape shooters use it for horizons. Portrait artists park the eyes on the upper third. Wildlife photographers leave space ahead of a moving animal. Product photographers carve out room for logos and copy. Even smartphone shooters apply it without thinking — once the grid becomes second nature.
In the guide below, you will learn what the rule of thirds really means, where it came from, why our brains respond to it, how to switch on the grid across cameras and phones, and how to apply it across genres. You will also discover when breaking the rule creates an even more powerful image — because the strongest rules in art exist to be questioned, bent, and occasionally shattered.
Shooting products or portraits and want clean, distraction-free results that highlight your composition? Try our professional background removal service — fast turnaround, pixel-perfect edges, and ready-to-publish images.
- Key Takeaways (For Quick Skimmers)
- What Is the Rule of Thirds in Photography?
- Why the Rule of Thirds Works (The Psychology Behind the Grid)
- How to Turn On the Rule of Thirds Grid (Every Device)
- How to Apply the Rule of Thirds, Step by Step
- The Rule of Thirds Across Photography Genres
- Common Mistakes Photographers Make With the Rule of Thirds
- When You Should Break the Rule of Thirds
- Rule of Thirds vs Golden Ratio: What’s the Difference?
- Using the Rule of Thirds in Post-Production (Cropping for Composition)
- Pro Tips to Build the Rule of Thirds Habit
- Real-World Example: One Scene, Three Compositions
- Quick Reference: Rule of Thirds Cheat Sheet
- Frequently Asked Questions
- Final Thoughts: Make the Rule of Thirds Your Quiet Superpower
Key Takeaways (For Quick Skimmers)
- The rule of thirds splits the frame into a 3×3 grid of equal sections.
- Place subjects on the four intersections; align horizons with the top or bottom horizontal line.
- The technique dates back to John Thomas Smith’s 1797 book Remarks on Rural Scenery.
- Almost every camera and phone offers a 3×3 grid overlay — turn it on for faster practice.
- Break the rule on purpose for symmetry, minimalism, or confrontational portraits.
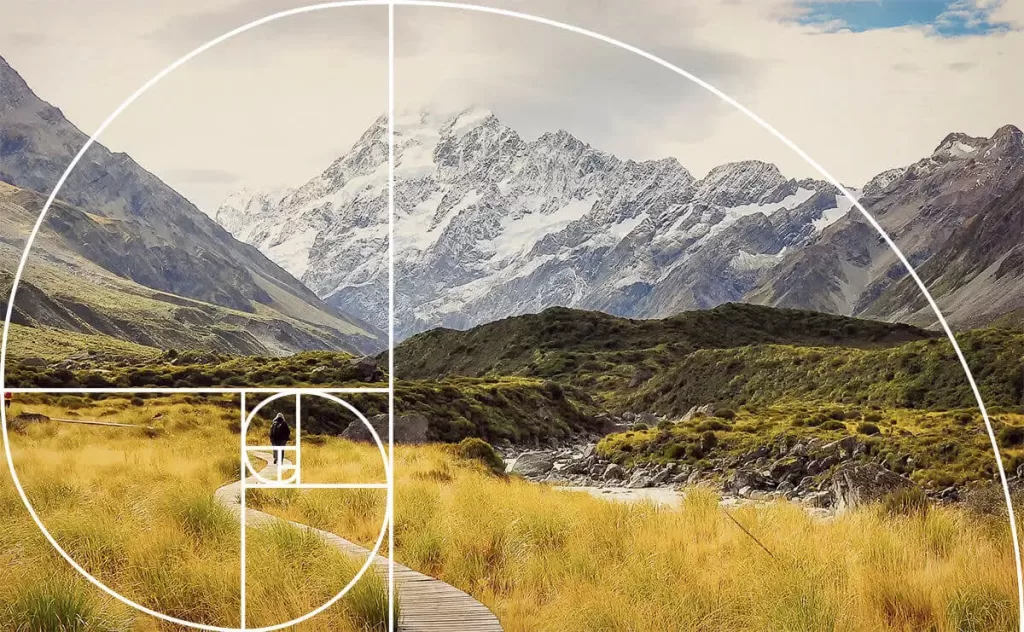
- The golden ratio is a close cousin but uses a 1:1.618 proportion instead of 1:1:1.
What Is the Rule of Thirds in Photography?
The rule of thirds is a compositional guideline that divides your image into a 3×3 grid using two evenly spaced horizontal lines and two evenly spaced vertical lines. The intersections of those lines form four “power points.” Photographers place key subjects either on these points or along the connecting lines to create a more balanced and visually engaging frame than a centered composition usually delivers.
In day-to-day shooting, the rule guides three small decisions:
- Place subjects on intersections — eyes, faces, products, single trees, or wildlife land at one of the four crossing points.
- Align horizons with horizontal lines — sky-heavy scenes use the upper line; ground-heavy scenes use the lower line.
- Align vertical elements with vertical lines — buildings, lampposts, doorways, and standing figures sit along the left or right vertical line.
The grid does not promise a perfect image every time, yet it consistently nudges the composition toward visual balance. As a beginner-friendly breakdown by Photography Life puts it, off-center placement creates tension, movement, and breathing room — qualities a dead-center subject often kills.
A Quick Origin Story
The term itself predates photography by decades. The English painter and engraver John Thomas Smith coined “Rule of Thirds” in his 1797 book Remarks on Rural Scenery. Smith advised dividing landscapes so the ratio of light and dark masses felt natural rather than mechanical. Later painters adopted the idea, and when cameras arrived, photographers borrowed it almost instinctively. A detailed history appears on B&H Photo’s eXplora blog, which traces the concept back through Sir Joshua Reynolds before landing with Smith.
So every time you switch on your camera grid, you tap into a 200-year-old visual habit that your eyes already understand.
Why the Rule of Thirds Works (The Psychology Behind the Grid)
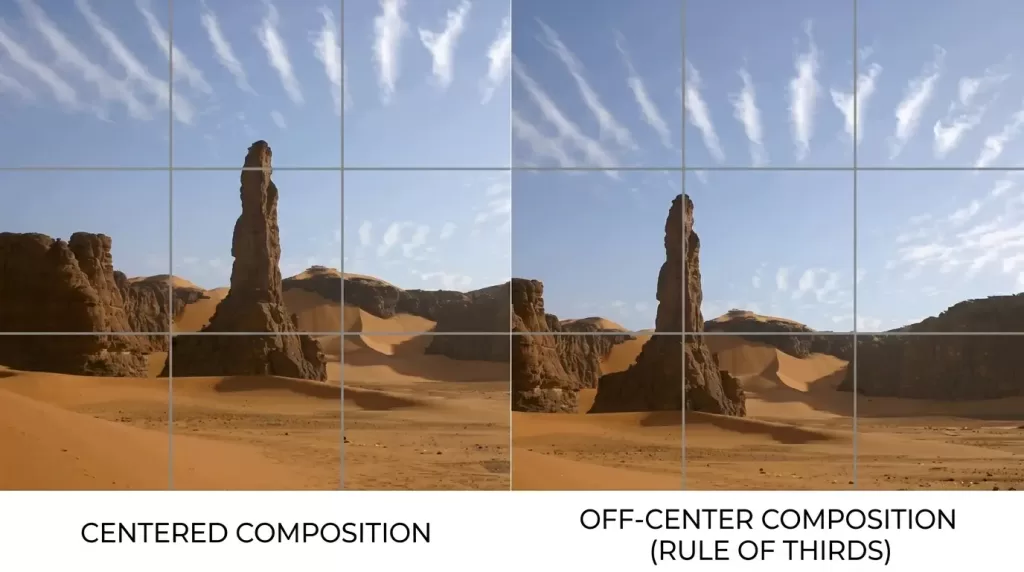
Our brains rarely love perfect symmetry in everyday scenes. A centered subject can feel formal, posed, or even uncomfortable — like an ID photo. Off-center placement, on the other hand, mirrors how we actually look at the world: eyes drift, settle, and follow lines into the distance.
Researchers, painters, and visual designers point to several overlapping reasons why this grid feels right:
- Natural eye movement — Viewers rarely fixate on the dead center. Gaze usually sweeps in from one side, especially the upper-left for left-to-right readers.
- Negative space matters — Off-center subjects leave room for context: a road behind a runner, sky above a mountain, an empty chair beside a portrait.
- Tension creates interest — Slight asymmetry adds a subtle, pleasant friction that holds the eye longer than a perfectly balanced composition.
- Storytelling improves — Composition tells the viewer what to look at first, next, and last. The thirds grid quietly sequences attention.
To put it plainly, the rule of thirds gives a photo room to breathe and gives the eye a path to travel. It also pairs beautifully with core technical fundamentals like exposure and shutter speed — strong composition rescues an imperfect exposure far more often than the other way around.
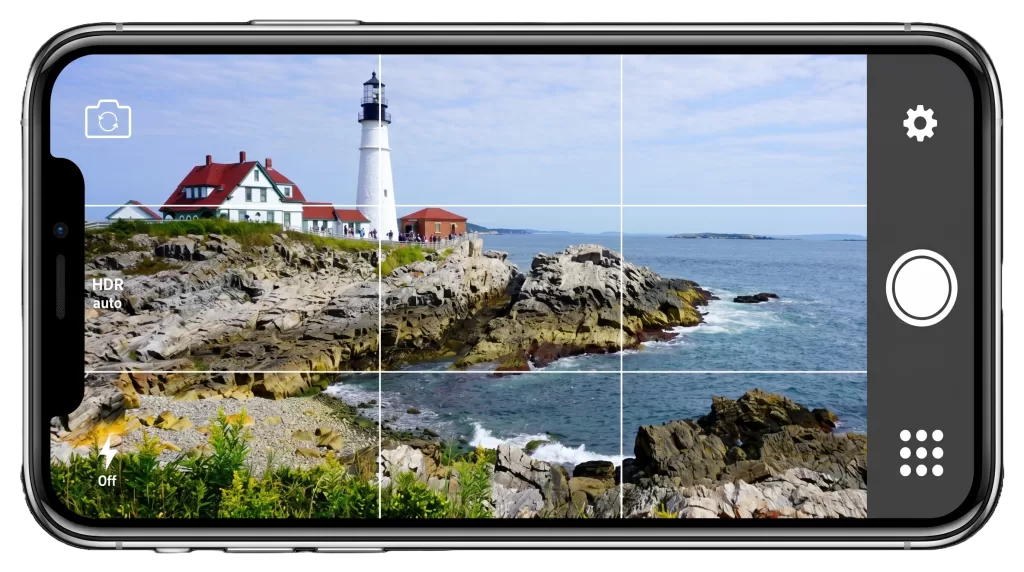
How to Turn On the Rule of Thirds Grid (Every Device)
You can train your eye to see thirds without an overlay, but starting with the grid makes practice much faster. Most cameras and phones include the option — you simply flip a switch.
Quick Setup Table for Popular Devices
| Device | Menu Path |
|---|---|
| iPhone (iOS) | Settings → Camera → Grid → ON |
| Android (Pixel/Samsung) | Camera app → Settings (gear) → Grid lines → 3×3 |
| Canon (EOS/R-series) | Menu → Shooting → Grid Display → 3×3 |
| Nikon DSLR | Custom Setting Menu → d (Shooting/Display) → Viewfinder Grid Display → On |
| Nikon Z (mirrorless) | Setup Menu → Framing Grid Display → On |
| Sony (Alpha) | Menu → Gear icon → Grid Line → Rule of 3rd Grid |
| Fujifilm (X/GFX) | Setup → Screen Setting → DISP. Custom Setting → Framing Guideline → Grid 9 |
Leave the grid switched on for a few weeks. With practice, your eye will start to picture thirds automatically, even when the lines disappear. That habit alone is one reason many photographers researching their next camera body check our roundup of the best mirrorless cameras — modern mirrorless models display crisp, customizable composition grids right inside the electronic viewfinder.
How to Apply the Rule of Thirds, Step by Step
Following the rule is not a math exercise. You build the habit through three small decisions every time you raise the camera.
Step 1: Identify Your Main Subject
Before pressing the shutter, decide what the photo is actually about. A face? A coffee cup? A mountain peak? A single dominant subject anchors the image — without one, even a perfect grid feels empty.
Step 2: Move the Subject Off-Center
Shift the camera until the subject sits on one of the four intersections. Left or right rarely matters at first — the key change is moving off the dead center.
Step 3: Align Lines With the Grid
Horizons, walls, trees, and other linear elements should run along the horizontal or vertical lines.
- Sky is the story? → Place the horizon on the lower third.
- Ground is the story? → Place the horizon on the upper third.
- Building or person? → Align them along a vertical third.
Have a beautifully composed product shot but messy edges or stray background details? Get pixel-perfect clipping paths from our experts and let your rule-of-thirds composition shine.
The Rule of Thirds Across Photography Genres
The grid bends to fit nearly every shooting style. Here is how to apply it in the genres you most likely cover.
1. Landscape Photography
In landscape work, the horizon line is your single biggest decision. Centering it usually looks dull, except in mirror-like reflections.
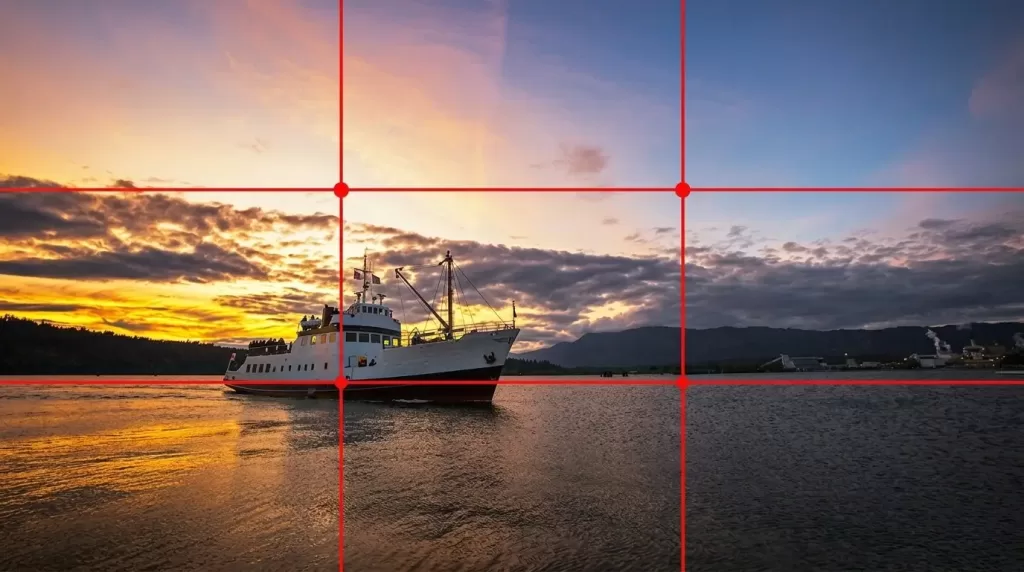
- Dramatic clouds → drop the horizon to the lower third.
- Strong foreground (flowers, rocks, water) → lift the horizon to the upper third.
- A lone tree, lighthouse, or boat → set it on a vertical line rather than the middle.
A practical reminder from working landscape pros: shoot a few extra frames where you intentionally shift the horizon up and then down. Pick the strongest version later. Sorting through dozens of landscape RAW files also becomes easier once you back them up to one of the best cloud storage for photos, so you never lose a frame worth keeping.
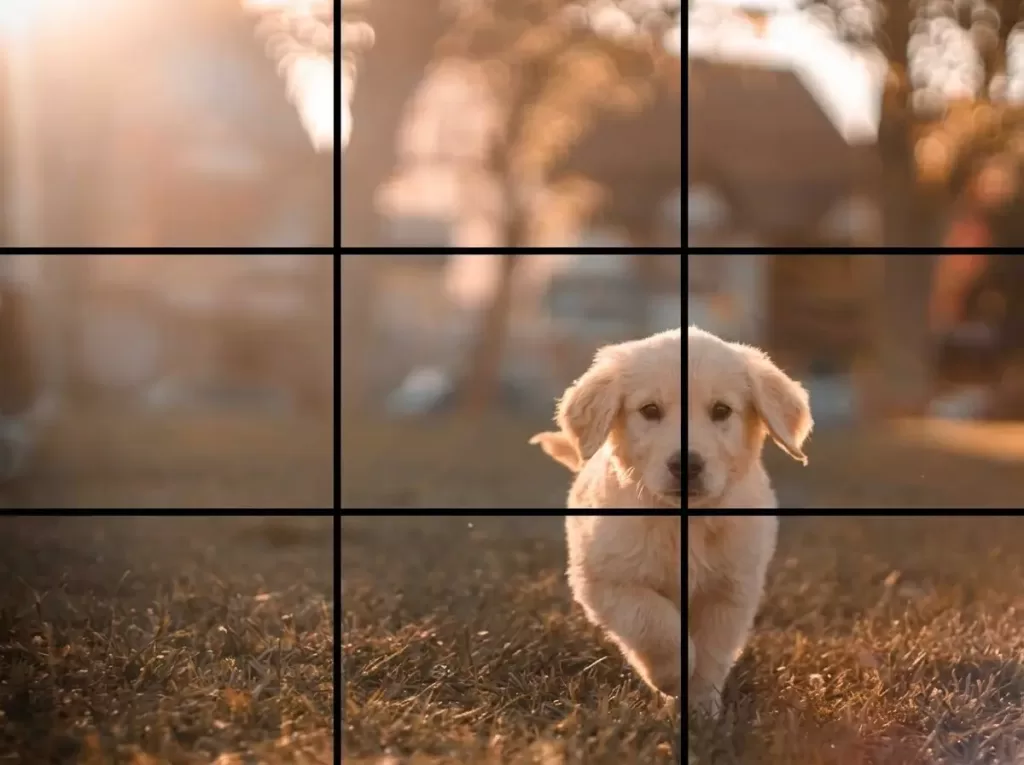
2. Portrait Photography
For portraits, the eyes carry the emotional weight. Place the subject’s eyes — usually the eye closest to the camera — on the upper horizontal third, ideally at an intersection point.
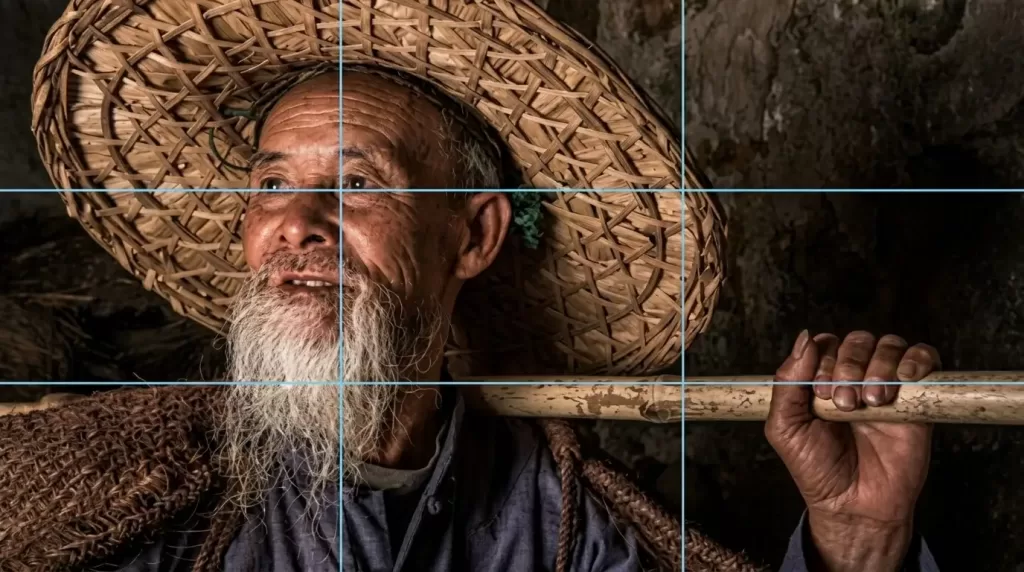
- Leave looking room — empty space in the direction the subject faces.
- For tight headshots, eyes still benefit from upper-third placement.
- For group portraits, position the main person on a vertical third and let the rest fan out.
3. Wildlife and Animal Photography
Animals rarely stand still, so the rule of thirds becomes both a guideline and a survival kit.
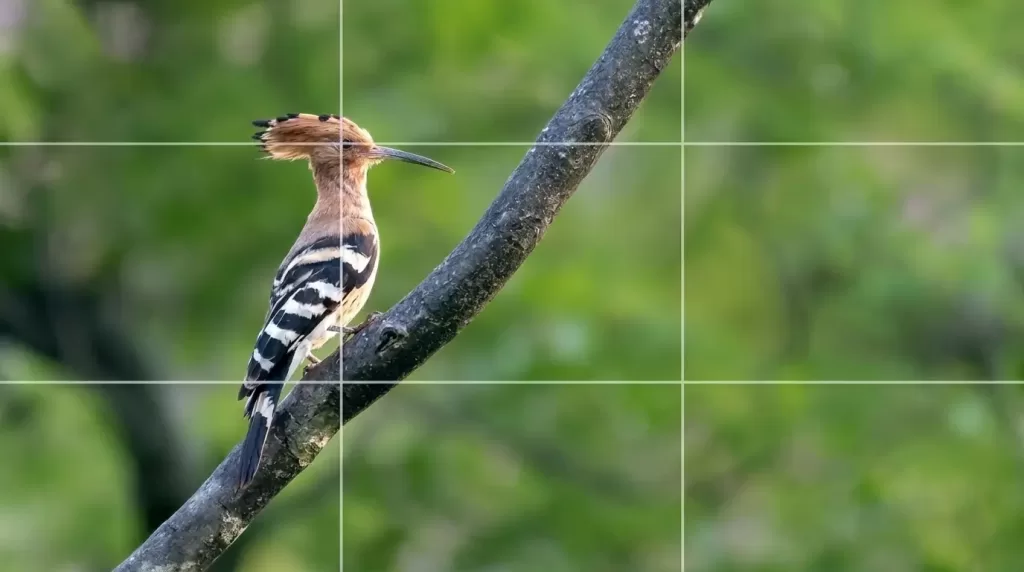
- Place the animal’s eye on an intersection — never the center of its body.
- Leave space in the direction the animal is moving or looking.
- For birds in flight, an intersection on the trailing side gives them room to “fly into.”
4. Product and E-commerce Photography
Online retailers know that strong composition sells faster. The rule of thirds positions the product slightly off-center, leaving room for text overlays, badges, or lifestyle context.
- Place the product on a vertical third.
- Position the brand logo on the opposite third for balance.
- Keep the background tidy — clean lines reinforce the grid.
Selling on Amazon, Shopify, or your own store? Boost conversions with crisp, retouched photos. Try our professional photo retouching service and turn good product shots into great ones.
5. Street and Travel Photography
Street scenes move fast. Pre-visualize the grid and wait for someone to walk into your composition.
- Use doorways, signs, and shadows along the vertical thirds.
- Frame walking subjects entering — not leaving — the frame.
- The “decisive moment” often lands on an intersection point.
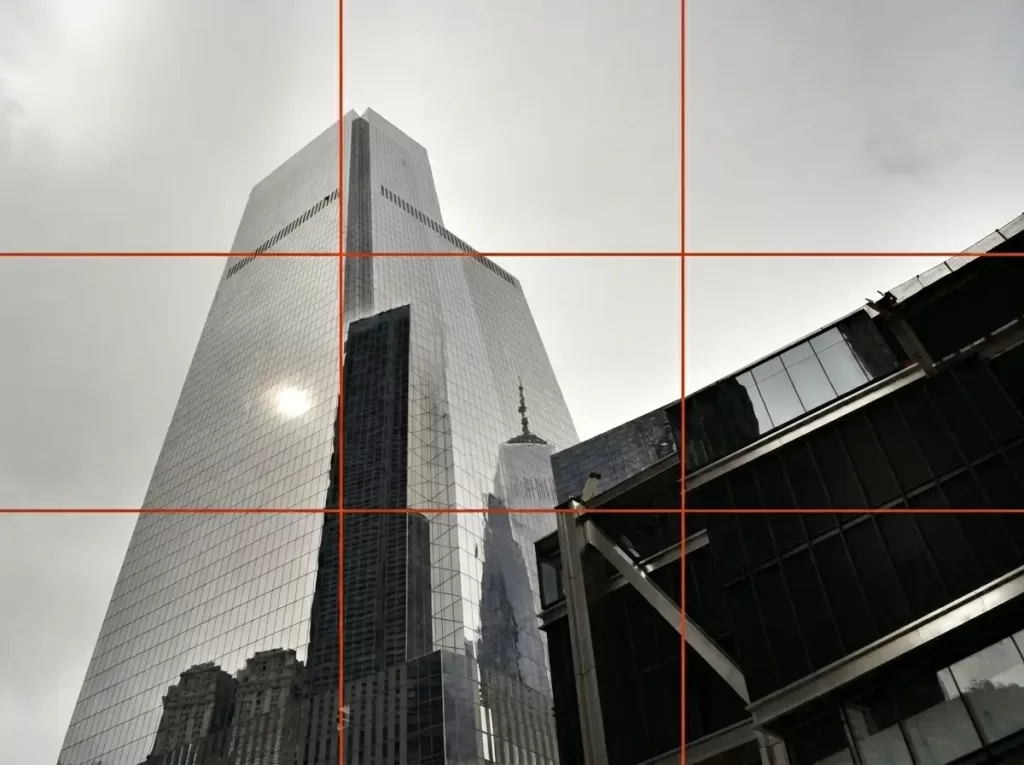
6. Architecture and Interior Photography
Symmetry sometimes overrides the rule, but the grid still helps with off-axis architecture.
- Place dominant edges (a column, doorway, staircase) on a vertical line.
- For wide rooms, use both vertical thirds to anchor furniture or art.
Think about the final crop too. A photo composed for 4×6 print sizes crops slightly differently than one prepared for 5×7, so leave a small safety margin around the edges.
Common Mistakes Photographers Make With the Rule of Thirds
The rule looks simple, yet new photographers often misapply it. Watch for these traps.
- Treating it as a math exercise — Slight deviations are fine. Aim near the intersection, not at the exact pixel.
- Forgetting subject direction — A person looking left needs space on the left. Reverse this and the photo feels claustrophobic.
- Using the grid on every photo — Centered symmetry sometimes wins. Reflections, formal portraits, and minimalist scenes can break the rule beautifully.
- Ignoring the horizon — A tilted horizon, even when positioned on a third, undoes the entire composition. Always check level.
- Cluttered backgrounds — A perfect grid cannot save a busy background. When clutter exists, edit it out with tools like content-aware fill in Photoshop or a masking service.
When You Should Break the Rule of Thirds
Every experienced photographer eventually breaks the rule on purpose, and for good reason. Knowing when to ignore the grid matters as much as knowing when to follow it.
Break the rule when:
- The scene is perfectly symmetrical. Reflections in still water, hallways, doorways, and mandalas demand center placement.
- You want intensity or confrontation. Centered eyes feel direct, even unsettling — perfect for portraits with attitude.
- Minimalism is the goal. A tiny subject lost in negative space sometimes works better dead-center.
- The subject fills the entire frame. Macro work, abstract textures, and patterns rarely need a grid.
A useful exercise comes from the editorial team at PetaPixel, who argue that strict adherence to either the rule of thirds or the golden ratio can make compositions predictable. Shoot the same scene three ways — centered, on a third, and on a golden-ratio point — and study which version feels strongest.
Rule of Thirds vs Golden Ratio: What’s the Difference?
The two are cousins, not twins. Both push subjects away from the center, yet they use different math.
- Rule of thirds divides the frame into three equal columns and rows — a 1:1:1 ratio of widths and heights.
- Golden ratio divides the frame using a ratio of approximately 1 : 1.618, derived from the Fibonacci sequence. The dividing lines sit slightly closer to the center than thirds lines.
The golden ratio is older, more mathematical, and often praised in painting and architecture. The rule of thirds is faster to apply and easier to see at a glance. For everyday shooting, especially with limited time, the rule of thirds wins on practicality. The rule of thirds page on Wikipedia confirms the same conclusion: both systems aim at the same outcome — placing key elements where the human eye naturally lingers.
Composing apparel, jewelry, or accessory shots that need that “floating” mannequin look? Explore our ghost mannequin service for clean, professional fashion images built around perfect composition.
Using the Rule of Thirds in Post-Production (Cropping for Composition)
You will not always nail the grid in-camera, and that’s fine. Cropping in editing software fixes weak compositions in seconds. Almost every editor — Lightroom, Photoshop, Capture One, Affinity Photo, Snapseed, and even free apps — overlays a thirds grid the moment you activate the crop tool.
Here is the workflow:
- Open the image in your editor.
- Select the Crop tool and choose the 3×3 grid overlay.
- Reposition until the subject lands on an intersection.
- Adjust the ratio (3:2, 4:3, 1:1) based on your final use.
- Check the horizon and rotate by a degree if needed.
A subtle crop on the long edge can transform a flat photo into a striking one. If you have not yet picked an editor, our roundup of the best photo editing apps covers mobile and desktop options that display the rule-of-thirds grid by default.
Pro Tips to Build the Rule of Thirds Habit
Once the basics click, layering small habits will sharpen your composition further.
- Pre-visualize before lifting the camera. Imagine the grid first, then frame.
- Combine with leading lines. Roads, fences, rivers, and shadows guide the eye toward an intersection.
- Watch the negative space. Empty areas matter as much as the subject — treat them as part of the composition.
- Shoot wider than needed. Extra space gives you room to crop later.
- Review the grid in playback. Many cameras overlay thirds on review images, creating a fast feedback loop.
- Mix portrait and landscape orientation. Some scenes thrive vertically; others demand horizontal framing. The grid works for both.
- Practice with constraints. Spend a week using only the rule of thirds. Then spend a week breaking it. Compare results.
If you sometimes lose great frames before they make it to your gallery, a quick recovery tutorial on how to find recently deleted photos is worth bookmarking — accidents happen even to careful photographers.
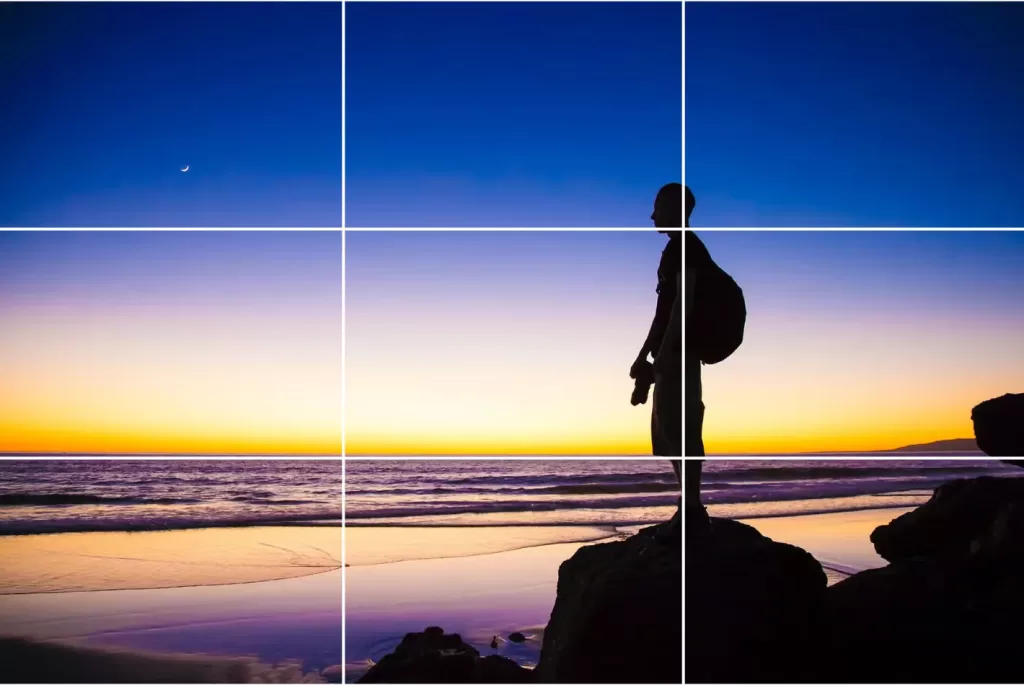
Real-World Example: One Scene, Three Compositions
Imagine standing on a beach during golden hour. A lone surfer walks toward the water on the left side of the frame.
- Centered version — Surfer dead center, horizon dead center. Result: static, postcard-like, unremarkable.
- Rule of thirds version — Surfer on the right vertical third, since he walks left to right and needs room ahead. Horizon on the lower third to highlight a fiery sky. Result: cinematic, balanced, story-rich.
- Broken-rule version — Surfer tiny in the bottom-right corner, sky filling 80% of the frame. Result: minimalist, emotional, focused on scale.
Each version has a place. The rule of thirds simply gives you the most reliable middle option — the one that “works” almost every time.
Quick Reference: Rule of Thirds Cheat Sheet
Keep this list near your camera bag.
- Turn on the grid in camera settings.
- Pick one main subject.
- Place it on an intersection, not the center.
- Align horizons with the upper or lower third — not the middle.
- Give moving or facing subjects looking room in the direction they face.
- Combine with leading lines for stronger results.
- Crop in post to fix what you missed in-camera.
- Break the rule for symmetry, intensity, or minimalism.
Frequently Asked Questions
1. What is the rule of thirds in photography in simple terms?
The rule of thirds divides your frame into a 3×3 grid using two horizontal and two vertical lines. You place key subjects along these lines or at the four points where they intersect, which creates a more balanced and eye-pleasing composition than centering everything.
2. Who invented the rule of thirds?
English painter and engraver John Thomas Smith named the concept in his 1797 book Remarks on Rural Scenery. Painters and later photographers adopted it because it consistently produced compositions that felt natural to the human eye.
3. Should beginners always follow the rule of thirds?
Yes — at first. The rule of thirds gives beginners a reliable framework that almost always improves their photos. After a few months of practice, you can start breaking the rule on purpose for symmetry, drama, or minimalism.
4. How do I enable the rule of thirds grid on my camera or phone?
Turning on the rule-of-thirds grid is usually simple.
On an iPhone, go to Settings → Camera → Grid and switch it on.
On Android, open the Camera app, tap Settings, and look for Grid lines or 3×3.
For most DSLR and mirrorless cameras, the option is usually in the display or viewfinder menu under names like Grid Display, Framing Guide, or Framing Guideline.
5. Is the rule of thirds the same as the golden ratio?
No. Both guide the eye toward off-center subjects, but the math differs. The rule of thirds splits the frame into equal 1:1:1 sections, while the golden ratio uses a tighter 1:1.618 ratio inspired by the Fibonacci sequence. The thirds grid is simpler and faster to apply.
6. Can I apply the rule of thirds while editing instead of shooting?
Absolutely. Every major editor — Lightroom, Photoshop, Capture One, Snapseed, Affinity Photo — overlays a 3×3 grid when you crop. Reposition the crop so the subject lines up with an intersection and your composition instantly improves.
7. When should I break the rule of thirds?
Break it when:
- The scene is perfectly symmetrical (reflections, hallways).
- You want intensity and direct eye contact in portraits.
- The image relies on minimalism and lots of negative space.
- The subject fills the entire frame, such as macro or abstract work.
8. Does the rule of thirds apply to video and cinematography too?
Yes. Filmmakers use the same grid to position actors, props, and horizons. Modern cinematography software, drone interfaces, and gimbals all include a 3×3 overlay because the technique works just as well for moving pictures as it does for stills.
Final Thoughts: Make the Rule of Thirds Your Quiet Superpower
The rule of thirds will not turn an average photographer into a master overnight, yet it will quietly raise the floor of every photo you take. Beginners gain a reliable structure, intermediate shooters refine their storytelling, and professionals use it as a baseline they can knowingly break.
Practice it for one week with the grid switched on. Then practice another week without it. Soon you will feel where the thirds should be even when no lines appear on screen — and that’s when composition stops being a rule and starts becoming instinct. The camera follows the eye, and the eye follows what you have trained it to see.
Composed the perfect shot? Let our specialists handle the rest. Browse all our professional image editing services — clipping path, retouching, masking, shadows, and more — and deliver gallery-ready images your audience will love.