

Camera Lens Filters Explained: The Complete 2026 Guide
May 25, 2026
Outsource Bulk Image Editing Services for E‑Commerce
June 2, 2026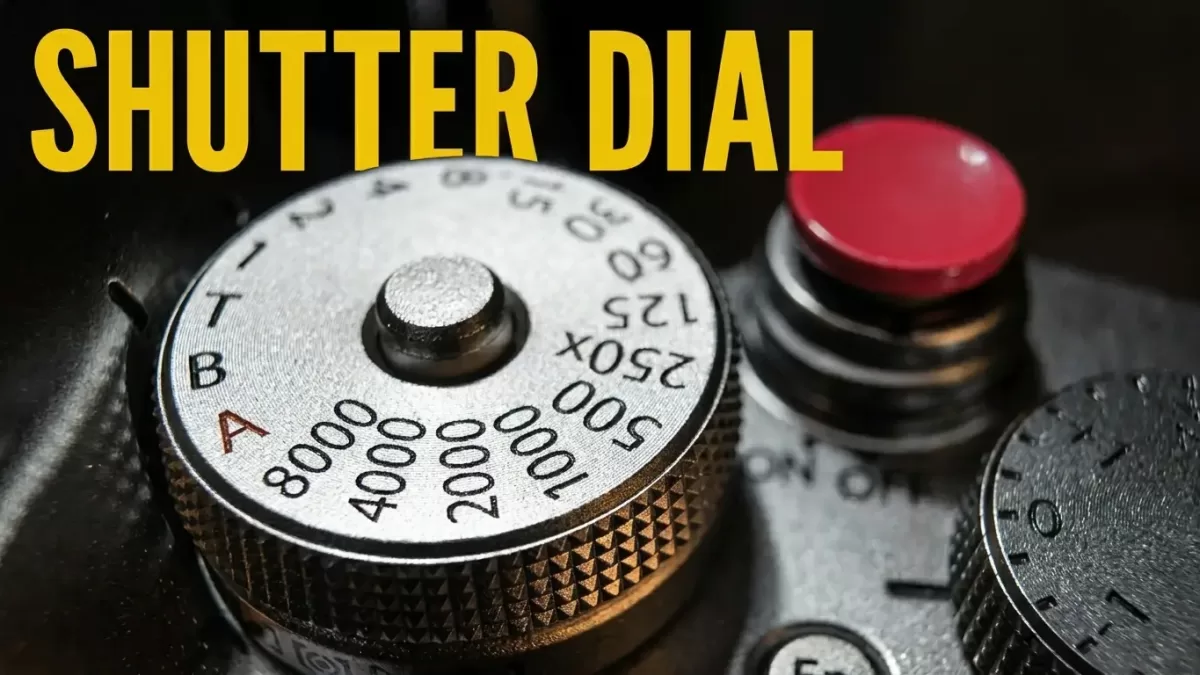
- Why Shutter Speed Sits at the Heart of Every Photograph
- What Is Shutter Speed in Photography?
- How Shutter Speed Affects Your Photos: Two Core Impacts
- The Exposure Triangle: Shutter Speed Isn’t a Solo Act
- Fast Shutter Speeds: Freezing Time in a Single Frame
- Slow Shutter Speeds: Painting With Time
- Shutter Speed Cheat Sheet by Genre
- The Reciprocal Rule: How Slow Can You Handhold?
- Shutter Priority Mode: Letting the Camera Help
- Long Exposure Photography: A Mini Masterclass
- Shutter Speed for Video: The 180-Degree Rule
- Panning: The Sweet Spot Between Sharp and Blurry
- Common Shutter Speed Mistakes (And How to Fix Them)
- Shutter Speed in Different Photography Genres
- Shutter Speed Across Camera Types
- Shutter Speed, Flash, and Image Quality Considerations
- Pro Tips That Separate Beginners From Masters
- Practical Exercises to Master Shutter Speed Fast
- Shutter Speed in the Era of AI and Computational Photography
- Frequently Asked Questions About Shutter Speed
- Conclusion: Shutter Speed Is Your Creative Signature
Why Shutter Speed Sits at the Heart of Every Photograph
Every photograph you’ve ever loved owes part of its magic to one decision — how long the camera’s shutter stayed open. Shutter speed shapes the mood, controls the light, and decides whether motion looks like a frozen sculpture or a flowing river of energy. Beginners often treat it as a technical chore, yet seasoned shooters treat it as the single most expressive tool on the camera dial.
In plain terms, shutter speed measures the length of time your camera’s sensor stays exposed to light. Photographers express it in fractions of a second (like 1/500s) or in full seconds (like 2″ or 30″). A quick blink captures a sliver of time; a long, slow blink soaks in everything that moves during that interval.
This guide unpacks shutter speed in plain language, walks through real-world settings for sports, portraits, landscapes, and astrophotography, and shows you how to combine it with aperture and ISO for cleaner, sharper, more cinematic frames. You’ll also learn the reciprocal rule, the 180-degree rule for video, and the tiny mistakes that quietly ruin otherwise perfect shots.
By the end, you’ll stop guessing and start composing with intention — because once shutter speed clicks for you, everything else in photography starts making sense.
Ready to elevate your shots beyond the shutter? Pair sharp, well-exposed images with flawless post-production through our professional photo retouching service and make every frame portfolio-ready.
What Is Shutter Speed in Photography?
A clear, practical definition every photographer should remember
Shutter speed measures the exact amount of time your camera’s shutter remains open while exposing the sensor (or film) to light. Think of it like a window blind in a dark room — open it for a split second and only a flash of light enters; leave it open for thirty seconds and the room floods with brightness.
Inside every camera lies a small curtain (or a digital equivalent) called the shutter. When you press the shutter button, this barrier opens, allows light to strike the sensor, and then closes. The duration of that open-and-close cycle defines your shutter speed.
- Fast shutter speeds (like 1/2000s) freeze action instantly.
- Slow shutter speeds (like 2 seconds) blur movement into smooth, flowing trails.
- Medium speeds (like 1/125s) balance everyday subjects like portraits and street scenes.
How cameras display shutter speed
Most cameras show shutter speed using three formats:
- Fractions of a second: 1/8000, 1/2000, 1/500, 1/250, 1/125, 1/60, 1/30
- Whole seconds and longer: 1″, 2″, 5″, 15″, 30″ (the quotation mark indicates full seconds)
- Bulb mode (B): Holds the shutter open as long as you press the button — used for exposures beyond 30 seconds
Modern DSLRs and mirrorless cameras typically range from 1/8000s on the fast end to 30 seconds on the slow end, plus a “Bulb” mode for extreme exposures. For a deeper foundational read, Photography Life’s beginner chapter breaks down the math beautifully.
How Shutter Speed Affects Your Photos: Two Core Impacts
Motion and brightness — the dual personality of every exposure
Shutter speed simultaneously controls two visual outcomes, and that dual nature is exactly why photographers obsess over it.
1. Brightness (exposure)
- Doubling the shutter time doubles the light reaching the sensor.
- A 10-second exposure floods the sensor with light; a 1/1000s exposure barely lets any in.
- If your photos look too dark, slowing the shutter often solves the problem. If they look washed out, speeding it up restores balance.
2. Motion capture (sharpness vs. blur)
- A fast shutter freezes a basketball mid-air or a droplet mid-splash.
- A slow shutter renders waterfalls silky, car lights as ribbons, and dancers as ghostly streaks.
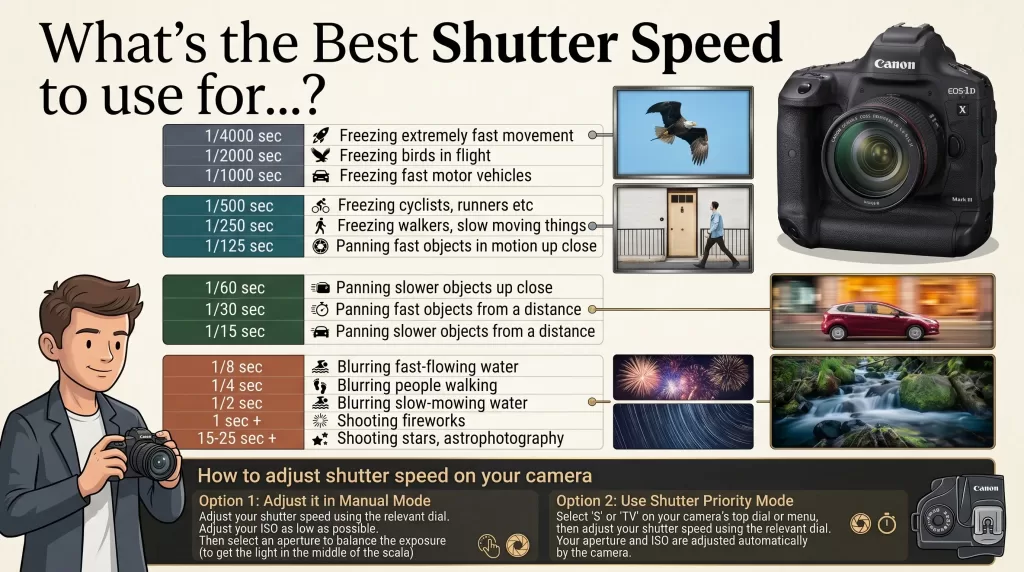
Here’s a quick reference of what different speeds typically capture:
- 1/4000s – 1/2000s: Hummingbird wings, splashing water droplets, racing cars
- 1/1000s – 1/500s: Sports, wildlife in motion, kids running
- 1/250s – 1/125s: Walking subjects, casual portraits, everyday handheld shots
- 1/60s – 1/30s: Still subjects with steady hands, indoor portraits with stabilization
- 1/15s – 1s: Intentional motion blur, panning shots, low-light scenes on a tripod
- 2s – 30s+: Light trails, star photography, silky waterfalls, fireworks
This is why shooting indoors with a fast shutter often produces dark photos — and why blasting a long exposure outdoors at noon usually overexposes the scene. Mastering shutter speed means juggling both effects at the same time without sacrificing either.
The Exposure Triangle: Shutter Speed Isn’t a Solo Act
Aperture, ISO, and shutter speed working together
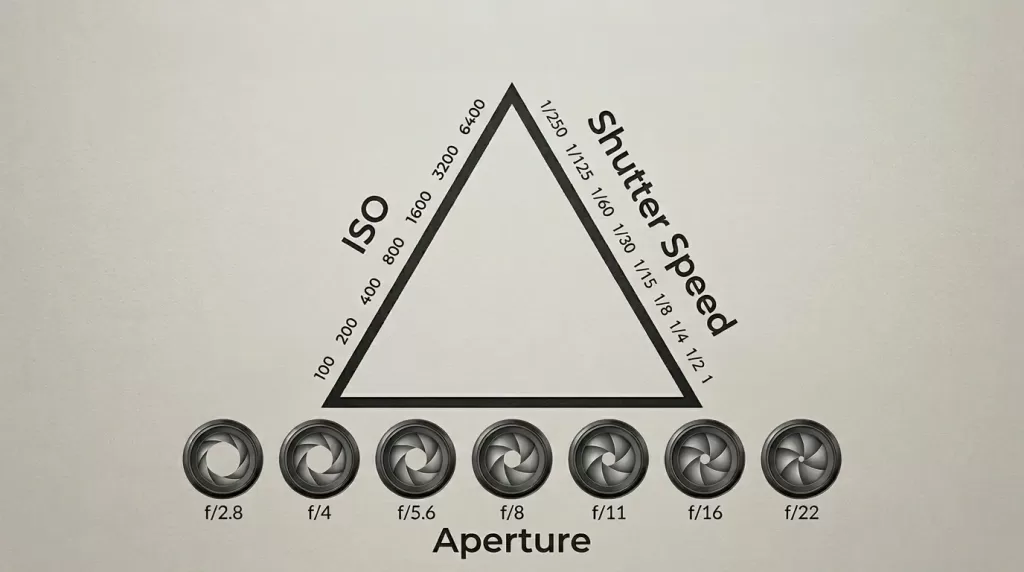
Shutter speed never works alone. It teams up with aperture (how wide the lens opens) and ISO (sensor sensitivity) to form what photographers call the exposure triangle. Change one, and you usually need to adjust another to keep the photo properly exposed.
- Aperture (f-stop): Controls depth of field — wider apertures (f/1.8) blur backgrounds; narrower ones (f/16) keep everything sharp.
- ISO: Boosts sensor sensitivity in low light, but introduces grain at higher values.
- Shutter speed: Controls motion rendering and overall exposure time.
If you halve your shutter speed (say, from 1/250s to 1/500s), you’ll need to either widen the aperture by one stop or double your ISO to keep the same brightness. Conversely, if you drag the shutter open for a long exposure, you typically narrow the aperture and drop ISO to its lowest setting to prevent overexposure.
Adobe’s photography basics hub explains this relationship beautifully through real photographer interviews. Once you internalize this triangle, manual mode stops feeling intimidating and starts feeling intuitive.
Fast Shutter Speeds: Freezing Time in a Single Frame
When fractions of a second matter most
Fast shutter speeds — typically 1/500s and above — stop motion cold. Photographers reach for them when subjects move unpredictably or when crisp detail matters more than mood.
Best use cases for fast shutter speeds:
- Sports photography: 1/1000s or faster catches the exact moment a tennis racket meets the ball.
- Wildlife and birds in flight: 1/2000s freezes wing feathers mid-beat.
- Splash and water droplet shots: 1/4000s isolates individual droplets.
- Kids and pets: 1/500s handles unpredictable movement.
- Hand-held shooting with telephoto lenses: Faster speeds counter camera shake at long focal lengths.
A practical tip from professionals: when shooting moving subjects, always shoot a stop faster than you think you need. You can recover a slightly underexposed image in post-production — but you can never recover sharpness from a blurry one.
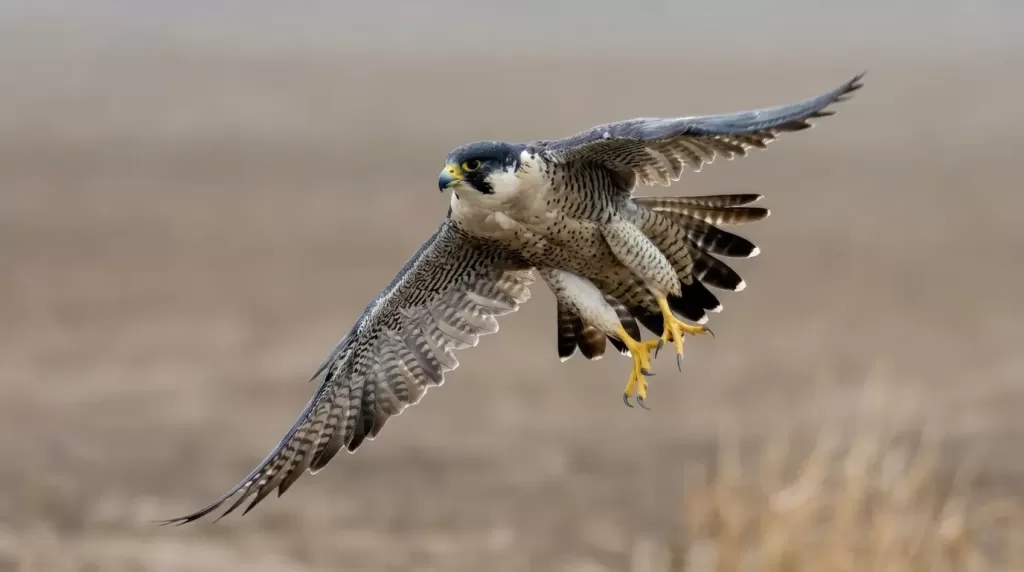
Got sports or pet shots loaded with distracting backgrounds? Let our experts handle precise background removal services so your action shots stand out flawlessly.
Slow Shutter Speeds: Painting With Time
When blur becomes the message, not the mistake
Slow shutter speeds — anything slower than 1/30s — let movement bleed into your frame intentionally. The results feel dreamy, kinetic, and almost painterly. A tripod becomes essential here because even slight camera shake destroys the effect.
Creative use cases for slow shutter speeds:
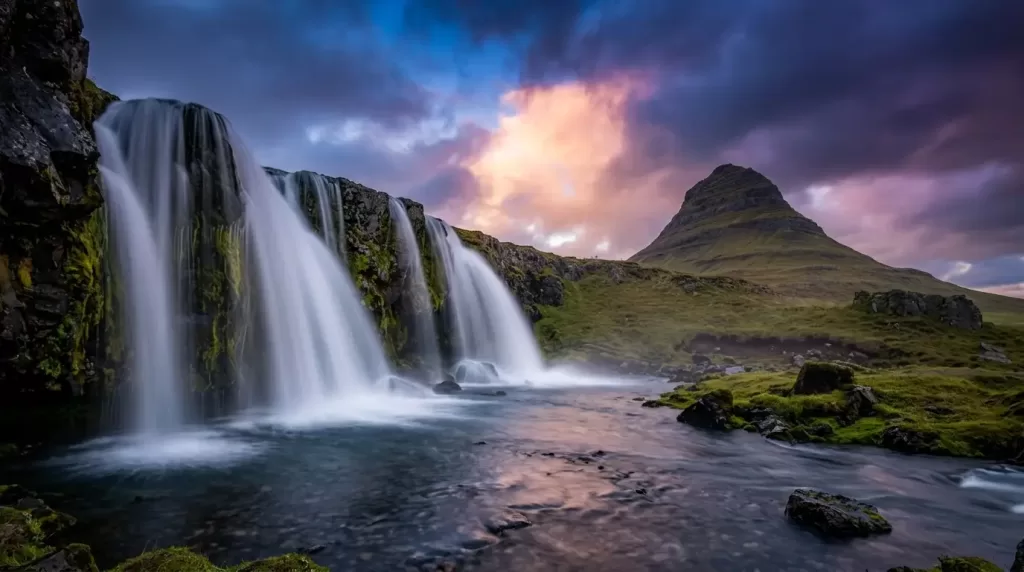
- Silky waterfalls and seascapes: 1 to 10 seconds smooths flowing water.
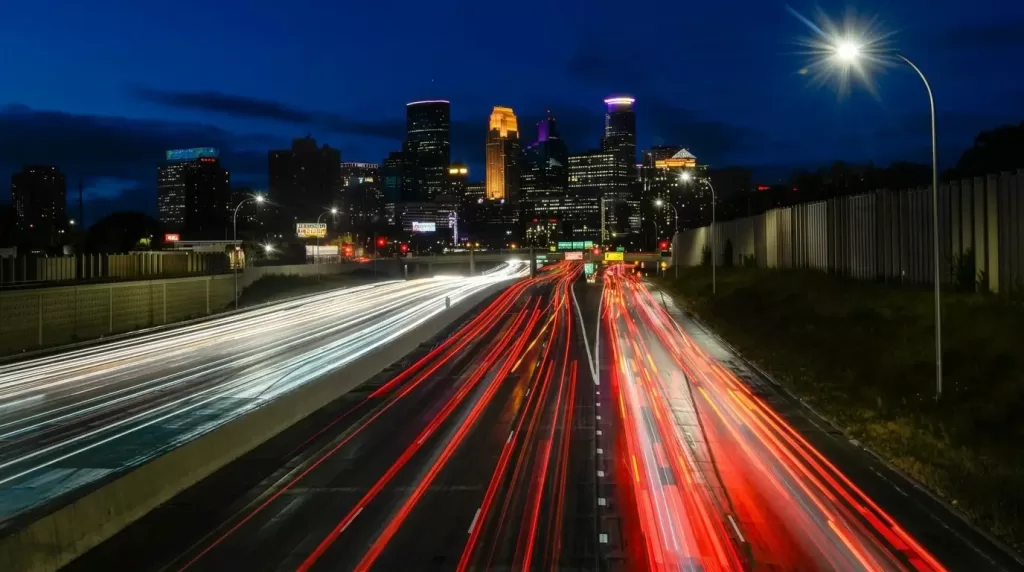
- Light trails from traffic: 10 to 30 seconds turns headlights into glowing rivers.
- Star trails and astrophotography: Several minutes to hours capture Earth’s rotation.
- Fireworks: 2 to 6 seconds traces the full burst of color.
- Panning shots: 1/30s while tracking a moving subject blurs the background but keeps the subject sharp.
Photographer Ben Long, quoted in Adobe’s shutter speed guide, nails it: shooting a Formula 1 car at 1/8000s makes it look parked. Slow it down to 1/60s with a panning motion, and suddenly the car looks like it’s tearing through the frame at 200 miles per hour.
Shutter Speed Cheat Sheet by Genre
A quick-reference table you’ll actually use
Different subjects demand different speeds. Use this as a starting point — then experiment until your eye recognizes the right number instinctively.
- Portraits (posed): 1/125s to 1/250s
- Portraits (candid or kids): 1/250s to 1/500s
- Street photography: 1/250s handheld
- Landscape (handheld): 1/60s or faster
- Landscape (tripod): Any speed — typically 1/30s to several seconds
- Indoor sports (basketball, dance): 1/500s to 1/1000s
- Outdoor sports (soccer, football): 1/1000s to 1/2000s
- Wildlife (stationary): 1/500s
- Birds in flight: 1/2000s to 1/4000s
- Macro (insects, flowers): 1/320s minimum
- Silky water effect (waterfalls, streams): 1 to 10 seconds
- Light trails (cars, traffic): 10 to 30 seconds
- Star trails: 15 minutes to several hours
- Milky Way: 15 to 25 seconds (before stars start trailing)
- Fireworks: 2 to 6 seconds
- Flash sync limit (most cameras): 1/200s to 1/250s
For an excellent secondary breakdown of these settings with real-world scenarios, the team at Photofixal’s shutter speed guide covers additional shooting situations worth bookmarking.
Selling products online? Sharp shots deserve a polished finish — our clipping path service gives every product image clean edges that convert browsers into buyers.
The Reciprocal Rule: How Slow Can You Handhold?
The single most useful rule for sharp handheld shots
The reciprocal rule is photography’s oldest survival trick. It states that your shutter speed should be at least 1 divided by your focal length to avoid blur from natural hand shake.
- 50mm lens → minimum 1/50s
- 100mm lens → minimum 1/100s
- 200mm lens → minimum 1/200s
- 400mm lens → minimum 1/400s
For crop-sensor cameras, multiply your focal length by 1.5x (Nikon, Sony, Fuji) or 1.6x (Canon) first. So a 50mm lens on an APS-C body acts like 75–80mm, meaning your minimum handheld shutter speed jumps to roughly 1/80s.
Modern caveat: Image stabilization (IS/VR/OIS) can buy you 3 to 5 stops of slower shutter speed, but it only counters camera shake — not subject motion. A still flower at 1/15s? Stabilization helps. A toddler running at 1/15s? Stabilization can’t save you. According to Digital Photography School, this rule helps you avoid the soft, slightly blurry images caused by tiny hand movements — and it’s worth personalizing based on your own posture and breathing.
Shutter Priority Mode: Letting the Camera Help
When automation actually makes sense
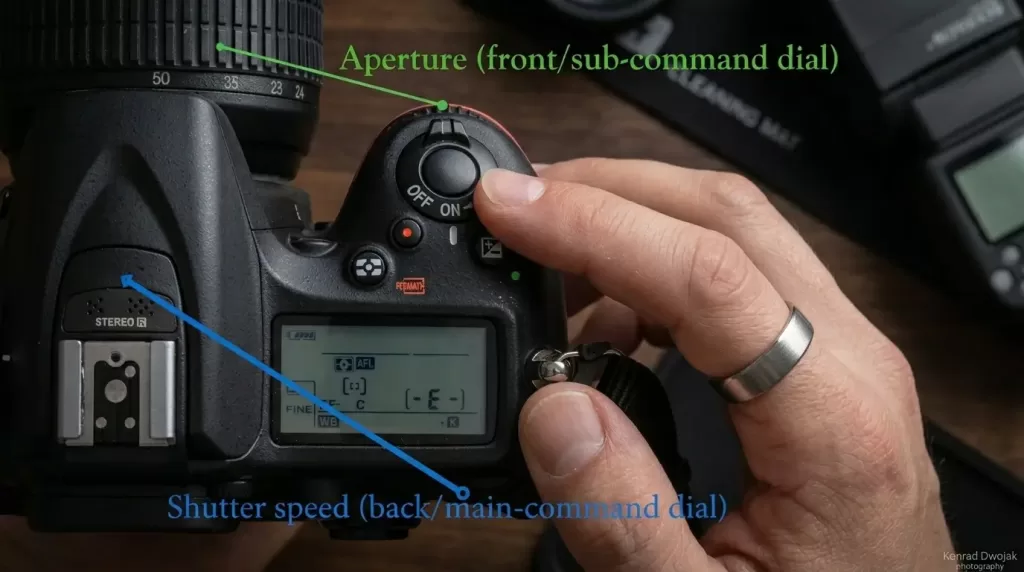
Shutter Priority mode (S on Nikon/Sony/Fuji, Tv on Canon) lets you pick the shutter speed while the camera automatically balances aperture for correct exposure. It’s the secret weapon for situations where motion control matters most.
When to use Shutter Priority:
- Sports and wildlife: Lock 1/1000s and trust the camera with aperture.
- Panning shots: Set 1/30s and concentrate on tracking.
- Light trails at night: Dial in 15 seconds and shoot.
- Quick handheld events: Set a safe 1/250s minimum and forget about shake.
Pros:
- Faster reaction times during fast-paced shoots.
- Less mental overhead in dynamic scenes.
Cons:
- The camera might choose a wider aperture than you’d prefer for depth of field.
- In low light, ISO may climb higher than ideal if Auto-ISO is enabled.
Most photographers eventually graduate to Manual mode with Auto-ISO — a hybrid that gives you both shutter and aperture control while letting ISO float to keep exposure correct.
Long Exposure Photography: A Mini Masterclass
Turning seconds into storytelling
Long exposures unlock photography’s most magical effects, but they demand precision. Anything longer than about 1/2 second handheld will produce blur from your own movement, so a sturdy tripod becomes non-negotiable.
Gear checklist for long exposures:
- A solid tripod with a weighted hook
- A remote shutter release or 2-second self-timer
- A neutral density (ND) filter for daytime long exposures
- Mirror lock-up enabled (on DSLRs) to reduce vibration
- Manual focus locked before the shot
- A lens hood to block flare near light sources
Common long exposure subjects:
- Waterfalls, rivers, and ocean waves
- Cloud movement across landscapes
- Light trails from vehicles, planes, or boats
- Star fields and the Milky Way
- Fireworks bursts
- Light painting with flashlights or sparklers
For daytime long exposures, an ND filter (typically 6 to 10 stops) reduces light hitting the sensor so you can use shutter speeds of 30 seconds or more even at noon. Think of it as sunglasses for your lens. Without one, you’d overexpose almost instantly. The B&H Photo Explora blog regularly publishes excellent gear-by-gear breakdowns if you want to deep-dive.
Running a fashion or apparel store? Showcase clothing with realistic dimension using our ghost mannequin service — perfect for e-commerce listings that need to convert.
Shutter Speed for Video: The 180-Degree Rule
Why your video looks weird at the wrong shutter speed
Photographers crossing into video often forget that shutter speed behaves differently in motion. Cinematographers follow the 180-degree shutter rule: your shutter speed should be roughly double your frame rate for natural-looking motion.
- 24 fps → 1/50s shutter
- 30 fps → 1/60s shutter
- 60 fps → 1/125s shutter
- 120 fps slow-mo → 1/250s shutter
Faster shutter speeds in video create a stuttery, hyper-real look (think Saving Private Ryan). Slower ones produce dreamy motion smear. Both are creative choices — but the 180-degree rule remains your safe default for cinematic results.
Panning: The Sweet Spot Between Sharp and Blurry
A creative technique that takes minutes to learn and years to master
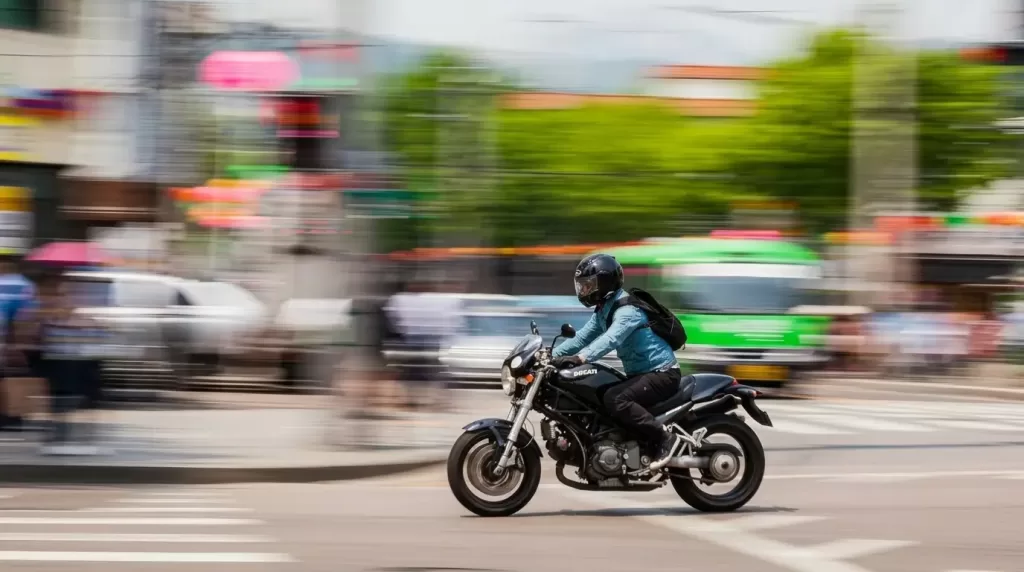
Panning is a slow-shutter technique where you follow a moving subject with your camera while the shutter is open. Done right, the subject stays sharp while the background streaks into beautiful motion blur — communicating speed in a single frozen frame.
How to nail a panning shot:
- Set your camera to Shutter Priority and dial in 1/30s to 1/60s.
- Plant your feet shoulder-width apart and pivot from the hips.
- Pre-focus on the path your subject will travel.
- Track the subject smoothly through the viewfinder.
- Press the shutter while continuing the motion (don’t stop panning at the click).
- Use continuous focus (AF-C / AI Servo) for better subject tracking.
Expect a low keeper rate at first — maybe 1 out of 20 frames. That’s normal. Panning rewards persistence and rhythm, not luck.
Common Shutter Speed Mistakes (And How to Fix Them)
The quiet errors that ruin otherwise great photos
Even experienced shooters fall into these traps. Catch them early, and your hit rate climbs dramatically.
- Mistake #1 — Shutter too slow for the subject: A 1/60s on a running child guarantees blur. Bump to 1/500s or faster.
- Mistake #2 — Ignoring the reciprocal rule: A 200mm telephoto at 1/100s handheld? Expect shake. Match shutter speed to focal length.
- Mistake #3 — Forgetting flash sync limits: Most cameras max out at 1/200s or 1/250s with flash — anything faster creates dark bands unless you use high-speed sync (HSS).
- Mistake #4 — Shooting long exposures without a tripod: Even a strong arm can’t hold still for 1 second.
- Mistake #5 — Maxing out ISO instead of slowing the shutter: In static scenes on a tripod, drop ISO and let the shutter do the work for cleaner files.
- Mistake #6 — Skipping the self-timer or remote: Even pressing the shutter button introduces vibration on long exposures. Use a 2-second timer for tack-sharp results.
- Mistake #7 — Using Auto mode in tricky light: Take manual control in concerts, stages, sunsets, and any scene with mixed lighting.
For a curated case study of these errors fixed in real shoots, PhotoFixal’s deep guide walks through troubleshooting with side-by-side examples.
Want your final shots to look magazine-ready? Our specialists deliver high-end photo retouching that preserves natural texture while removing every distraction.
Shutter Speed in Different Photography Genres
Tuning the dial for your shooting style
Each genre has its own shutter speed personality. Understanding them shortens your learning curve enormously.
Portrait Photography
- Studio portraits: 1/125s to 1/200s (sync with strobes)
- Outdoor portraits: 1/250s handheld minimum
- Environmental portraits with movement: 1/500s
Landscape Photography
- Golden hour with tripod: Any speed — typically 1/30s to several seconds
- Handheld scenic shots: 1/60s or faster
- Moving clouds or water: 30 seconds to 2 minutes with ND filter
Wedding Photography
- Ceremony shots: 1/250s to avoid blur in candid moments
- First dance: 1/100s with creative motion blur
- Reception details: 1/125s with off-camera flash
Wildlife Photography
- Stationary animals: 1/500s
- Walking wildlife: 1/1000s
- Birds in flight: 1/2000s to 1/4000s
Astrophotography
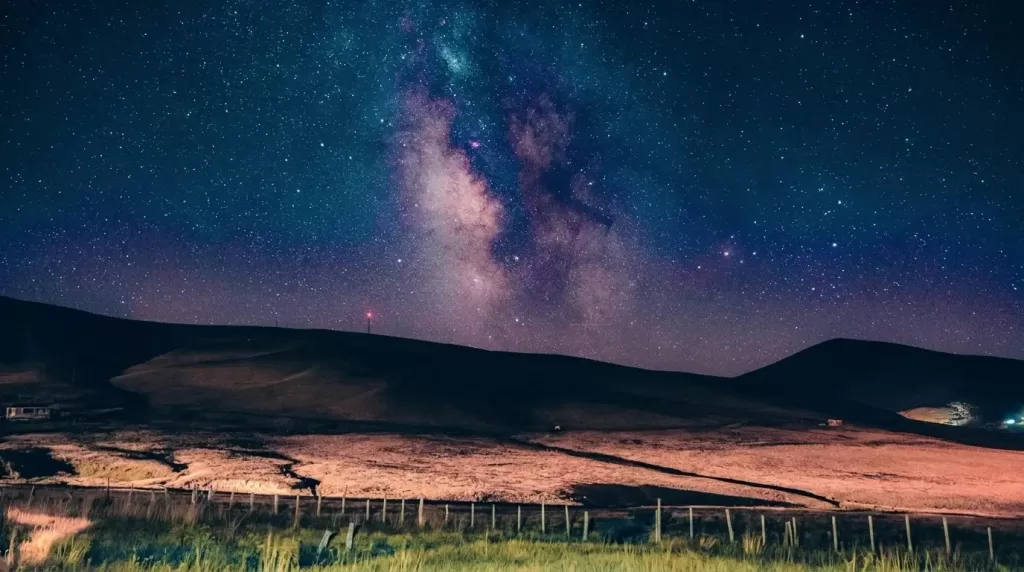
- Milky Way: 15 to 25 seconds (use the 500 rule: 500 ÷ focal length = max shutter time)
- Star trails: Stack multiple 30-second exposures over an hour
- Aurora: 5 to 15 seconds depending on intensity
E-commerce seller juggling 500+ product photos? Our multi-clipping path service lets you recolor and edit every element separately — saving hours per batch.
Shutter Speed Across Camera Types
From DSLRs to smartphones to action cams
DSLR and mirrorless cameras
Both offer full manual control with shutter speed ranges from 30s to 1/4000s or 1/8000s. Higher-end mirrorless bodies even reach 1/32000s using electronic shutters.
Smartphone cameras
Most smartphones automate shutter speed, but Pro Mode (available on Samsung, Google Pixel, and many Android devices) lets you manually adjust it. iPhones can simulate long exposures using Live Photos and the Long Exposure effect inside the Photos app.
Action cameras
GoPros and similar devices include shutter controls in ProTune or Pro Mode. They’re surprisingly capable for light trails and night shots when mounted to a tripod.
Mechanical vs. electronic shutters
- Mechanical shutters use physical curtains and produce the classic “click.” They avoid rolling shutter distortion.
- Electronic shutters scan the sensor digitally and operate silently — excellent for wildlife and events — but can produce skewed images of fast-moving subjects (the “jello effect”). Switch to mechanical mode for high-speed action work.
Shutter Speed, Flash, and Image Quality Considerations
The technical details that separate good from great
Sync speed with flash
Flash photography introduces a concept called sync speed — the fastest shutter speed at which your camera fires flash without dark banding. Most cameras sync at 1/200s or 1/250s. To use flash at faster speeds, you need high-speed sync (HSS) flashes, which pulse rapidly throughout the exposure. This matters most in outdoor portraits where you balance flash with bright ambient light using a wide aperture.
Noise on very long exposures
Very long exposures cause thermal noise as the sensor heats up. Most cameras include Long Exposure Noise Reduction (LENR), which takes a second “dark frame” and subtracts noise automatically. Enable it for exposures longer than 30 seconds.
Diffraction at narrow apertures
Long exposures often pair with narrow apertures (f/16 or f/22). These tiny openings introduce diffraction, slightly softening the image. Many landscape photographers stick with f/8 to f/11 plus an ND filter for the cleanest results.
For a deeper technical dive into camera mechanics and the physics of light, the Cambridge in Colour tutorial series explains why fast shutters look “clinical” while slow ones feel “alive.”
Selling jewelry, glassware, or anything reflective? Our image masking service preserves hair, fur, and transparent edges that standard clipping paths can’t handle.
Pro Tips That Separate Beginners From Masters
Small habits that produce dramatically better photos
- Tip 1: Always check your shutter speed before the moment, not after. Pre-set for the scene you expect.
- Tip 2: When shooting action, use burst mode plus a fast shutter — your keeper rate triples.
- Tip 3: For handheld low-light, brace against a wall, tree, or your own knee for an extra stop of stability.
- Tip 4: Watch your subject’s fastest-moving part (a swinging foot, a flapping wing) and set shutter speed based on that, not the whole body.
- Tip 5: Use the histogram, not the LCD, to confirm exposure — screens lie outdoors.
- Tip 6: Test exposure with a single shot before committing to a 30-second long exposure.
- Tip 7: Carry a small flashlight for nighttime composition and manual focusing.
Practical Exercises to Master Shutter Speed Fast
Five drills that compress months of learning into a weekend
Knowledge without practice is invisible. Try these exercises this week:
- The 60-second water test: Find a fountain or stream. Shoot it at 1/1000s, 1/60s, 1s, and 5s. Compare the four files side by side.
- The handheld limit drill: Set your camera to a 50mm equivalent. Shoot the same scene at 1/250s, 1/60s, 1/30s, 1/15s, and 1/8s. Find your personal handheld threshold.
- The panning challenge: Stand near a road. Shoot 50 cars at 1/30s while panning. Keep only the sharp ones — analyze why they worked.
- The exposure triangle exercise: Pick one scene. Shoot it five different ways, changing only shutter speed each time, and adjust aperture and ISO to compensate. Notice how each version feels different even though brightness stays equal.
- The light trail walk: After sunset, find a busy intersection. Tripod up, shoot a single 20-second exposure. Adjust until headlights look like rivers of gold.
These drills build muscle memory faster than any YouTube tutorial — and honestly, that’s the real secret to mastering shutter speed.
Shutter Speed in the Era of AI and Computational Photography
How modern cameras blend exposures behind the scenes
Modern smartphones and mirrorless cameras now blend multiple shutter speeds into a single image through computational photography. Night Mode on iPhones, Astro Mode on Pixels, and similar features take dozens of exposures and merge them seamlessly. The result mimics long exposures without requiring a tripod.
However, learning manual shutter speed remains essential. Computational tricks fail for fast subjects, unusual lighting, and complex motion. True creative control still comes from understanding the fundamentals — not relying on the camera’s guesswork.
Want products to look grounded and lifelike? Add depth with our natural shadow creation service and elevate your e-commerce visuals instantly.
Frequently Asked Questions About Shutter Speed
Q1: What is the best shutter speed for everyday photography?
For general handheld shooting in daylight, 1/250s is a safe default. It freezes most casual subjects, prevents handheld blur with normal lenses, and gives the camera room to adjust aperture and ISO as light changes.
Q2: Does a faster shutter speed always mean a sharper photo?
Not always. A fast shutter freezes subject motion and camera shake, but it doesn’t fix focus errors, lens softness, or diffraction at tiny apertures. Sharpness comes from a combination of shutter speed, focus accuracy, lens quality, and a stable shooting platform.
Q3: Why are my long exposure photos always overexposed?
You’re letting in too much light. In bright conditions, use a neutral density (ND) filter, close down your aperture (f/16 or smaller), and drop ISO to 100. These three combined let you use shutter speeds of 10 to 30+ seconds even in daylight.
Q4: What shutter speed should I use without a tripod?
Apply the reciprocal rule — at least 1 / focal length, faster if you can. With a 50mm lens, use 1/60s or quicker. Image stabilization can extend that range by 3 to 5 stops, but moving subjects still demand fast shutters.
Q5: What’s the difference between shutter speed and exposure time?
The two terms are interchangeable. “Shutter speed” is the photography-room term; “exposure time” appears more often in technical specifications and scientific contexts. Both describe how long the sensor is exposed to light.
Q6: How fast should my shutter speed be for sports photography?
Most sports require at least 1/1000s to freeze action cleanly. Faster sports like motorsports, tennis, or birds in flight often demand 1/2000s to 1/4000s.
Q7: What is bulb mode used for?
Bulb mode keeps the shutter open as long as you hold the button (or until you press it again). Photographers use it for exposures beyond 30 seconds — such as star trails, fireworks finales, and extreme long exposures.
Q8: Does shutter speed affect depth of field?
No. Shutter speed only affects exposure time and motion rendering. Aperture controls depth of field. However, when you change shutter speed, you often adjust aperture to maintain exposure, which indirectly changes depth of field.
Conclusion: Shutter Speed Is Your Creative Signature
Shutter speed isn’t just a technical setting — it’s how you tell time inside a photograph. Every choice between 1/4000s and 30 seconds writes a different story about the scene in front of you. Freeze a hummingbird’s wing, smooth a crashing wave, or paint city lights into rivers of gold — the decision is yours, frame by frame.
The best photographers don’t memorize numbers. They learn to feel shutter speed the way a musician feels rhythm. They ask themselves: What feeling do I want this image to convey? Should this moment feel still, or should it feel alive with motion? Practice the exercises above, study your favorite photographers’ EXIF data, and most importantly — shoot more. Mastery never arrives through reading alone; it arrives through reps.
Once your captures look exactly the way you envisioned them, the next step is making them shine in post-production — clean backgrounds, crisp edges, polished retouching, and beautiful shadows that bring depth to every product or portrait.
Ready to make every photograph publication-ready? Visit Clipping Expert Asia for fast, affordable, and expert post-production services that complete your creative workflow.