
Best Film Cameras 2026: Top 12 Picks for Every Budget
June 15, 2026
Best Point and Shoot Digital Camera in 2026: Top 9 Picks
June 16, 2026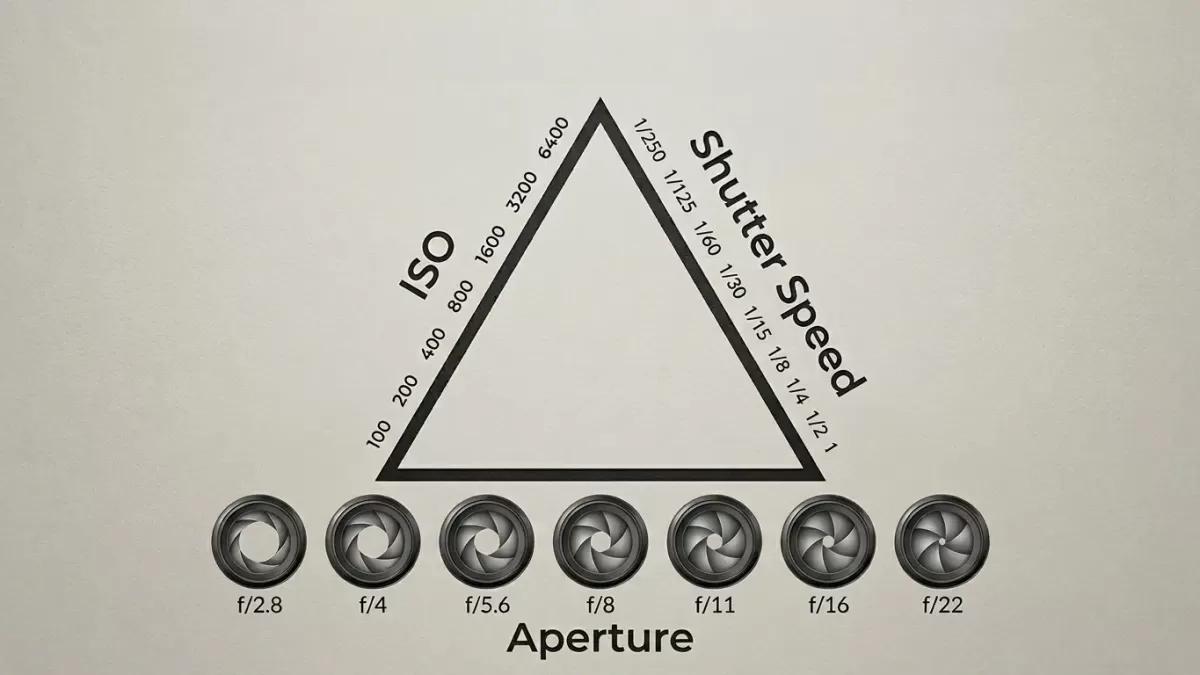
Every striking photograph you have ever admired — the velvety waterfall, the razor-sharp hummingbird, the dreamy portrait with a blurred background — relies on one foundational concept: the exposure triangle. Photographers call it a triangle because three settings sit at its corners, and each one influences the other two. Master the relationship, and you control light itself.
This guide breaks the exposure triangle into clear, plain-English pieces. You will learn how aperture, shutter speed, and ISO interact, when to push each setting, and how to balance them in real shooting situations. By the end, you will move beyond auto mode with confidence — and your images will show it.
Ready to make your photos look professional after the shoot? Our team can give your portraits and product shots a polished, magazine-ready finish — explore our professional photo retouching service to see the difference editing makes.
- What Is the Exposure Triangle in Photography?
- The First Side: Aperture Explained
- The Second Side: Shutter Speed Explained
- The Third Side: ISO Explained
- How the Three Sides Interact — Stops of Light
- Real-World Exposure Triangle Scenarios
- Common Exposure Mistakes — And How to Fix Them
- Camera Modes That Use the Exposure Triangle
- Advanced Tips to Master the Exposure Triangle Faster
- How Editing Complements the Exposure Triangle
- Quick Cheat Sheet: Exposure Triangle Summary
- Frequently Asked Questions (FAQs)
- Final Thoughts: Practice Beats Theory
What Is the Exposure Triangle in Photography?
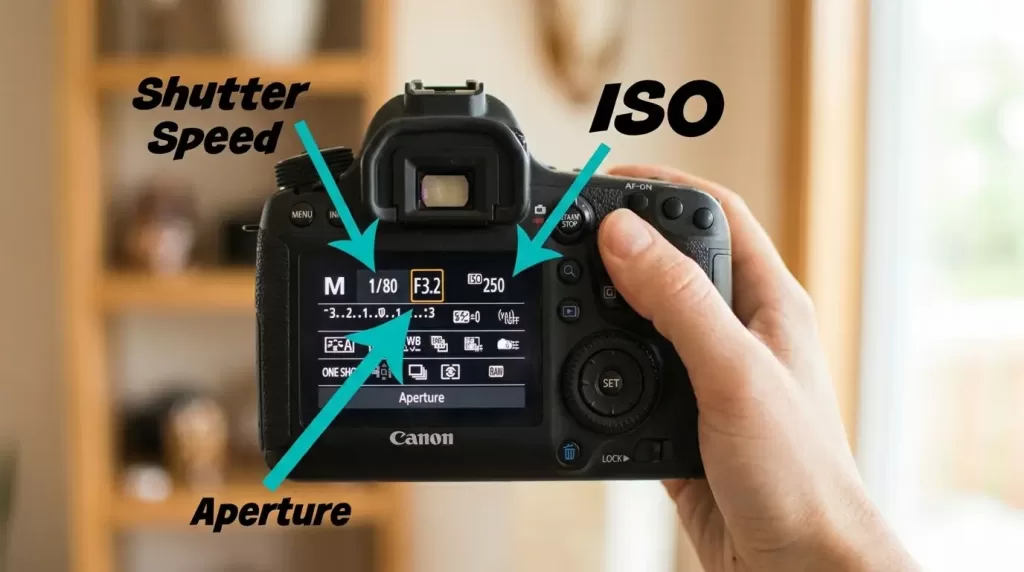
The exposure triangle is a model that describes how three camera settings — aperture, shutter speed, and ISO — work together to control the brightness of your image. Change one, and you must adjust another to keep the photo properly exposed.
Think of it like a recipe. If you add more sugar, you balance it with more flour or less butter. In photography, more light from one setting means you need less from another.
Here is the simplest way to see it:
- Aperture controls how wide the lens opens (how much light enters).
- Shutter speed controls how long the sensor sees that light.
- ISO controls how sensitive the sensor is to the light it receives.
Every correctly exposed image is a balanced trade-off between these three values. According to Photography Life, there is only one mathematically correct exposure for any scene — but hundreds of combinations can achieve it. Your creative choice decides which one.
Why the Exposure Triangle Matters
You shoot in auto mode, and the camera guesses. You shoot in manual, and you decide. The triangle gives you the framework to decide intelligently — to freeze a soccer ball mid-flight, to blur a river into silk, or to capture a candlelit dinner without a flash.
Photographers who skip this concept stay stuck on the auto setting forever. Those who learn it produce images that look intentional, polished, and creatively their own.
The First Side: Aperture Explained
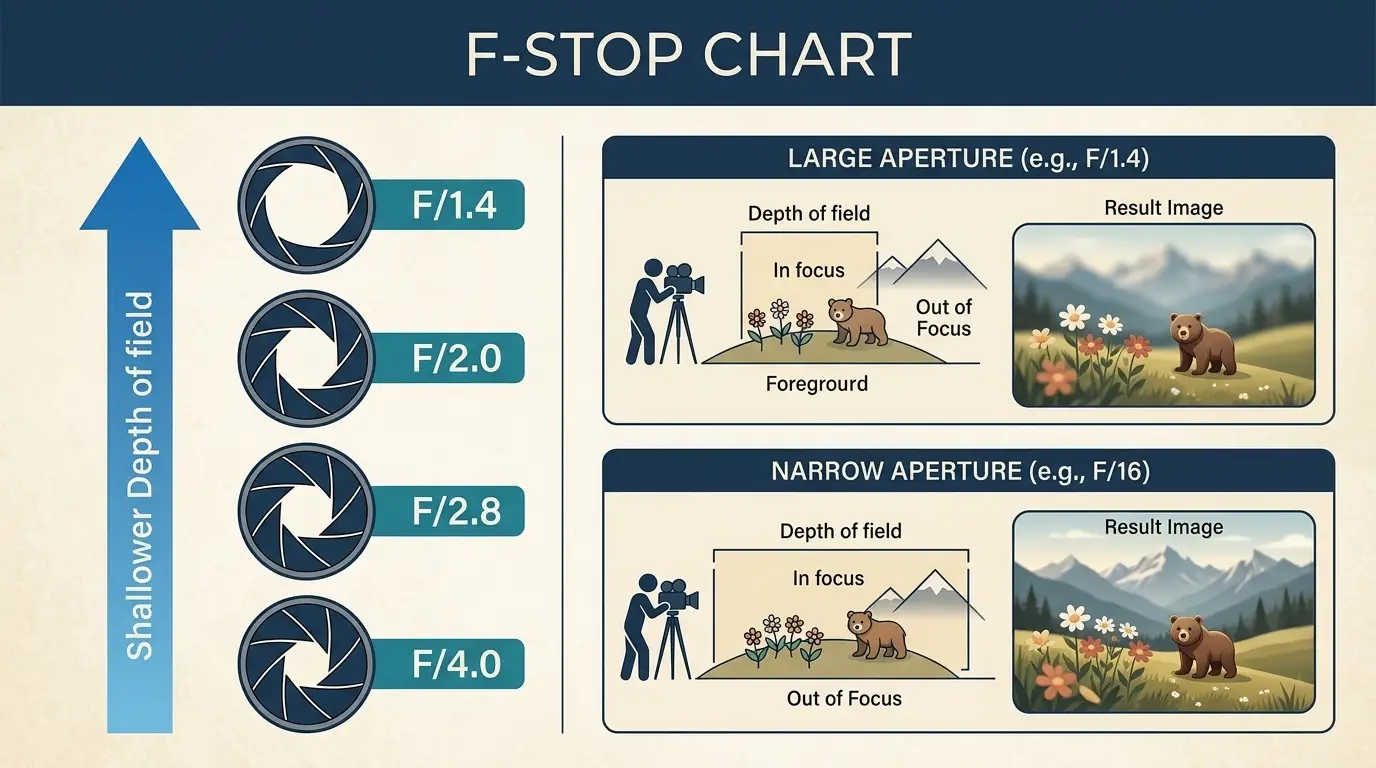
Aperture refers to the adjustable opening inside your lens. A wider opening lets in more light; a narrower opening lets in less. Photographers measure aperture in f-stops — written as f/1.4, f/2.8, f/5.6, f/11, and so on.
Here is the part that confuses most beginners: the smaller the f-number, the larger the opening. f/1.8 is a huge opening. f/22 is a tiny one. The relationship feels backward, but it follows simple optical math (the number is a ratio of focal length to diameter).
How Aperture Shapes Your Image
Aperture does two things at once:
- It controls exposure by letting in more or less light.
- It controls depth of field — the amount of the scene that appears sharp.
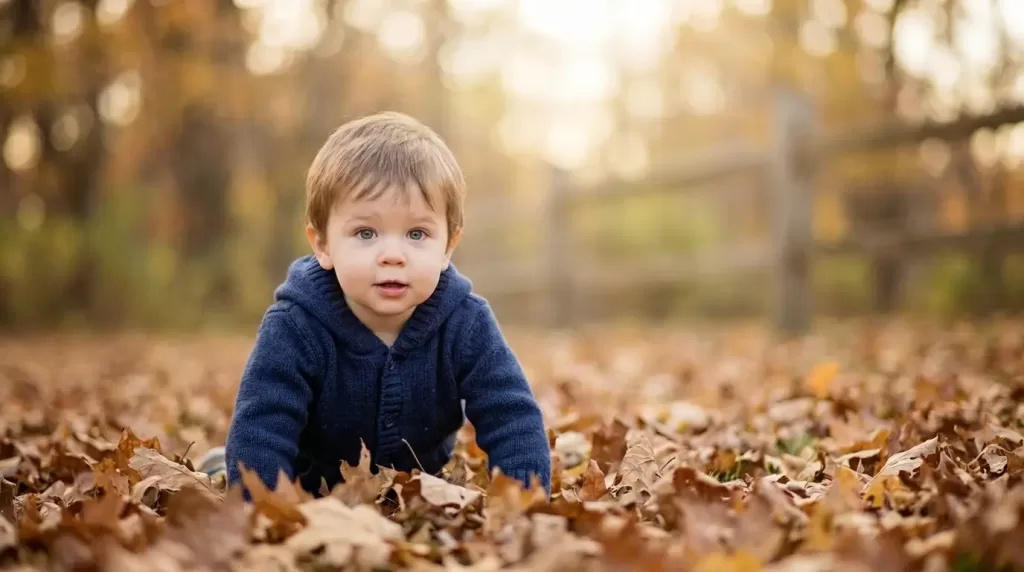
A wide aperture (like f/1.8) produces a shallow depth of field. Your subject pops, and the background melts into creamy blur. A narrow aperture (like f/11) keeps everything from foreground to horizon in focus — perfect for landscapes.
When to Use Each Aperture Range
- f/1.4 – f/2.8 (wide open): Portraits with creamy bokeh, low-light scenes, dim interiors. If you mostly shoot people, our guide on portrait photography tips pairs nicely with this aperture range.
- f/4 – f/5.6 (moderate): Everyday photos, group shots, street photography.
- f/8 – f/11 (sweet spot): Landscapes, architecture, group photos where every face needs sharpness.
- f/16 – f/22 (narrow): Bright sun, sunbursts, long-exposure water shots.
Pros also explore aperture for sharpness. Most lenses produce their sharpest results two or three stops down from their widest opening — often around f/5.6 to f/8. You can read more on this from Digital Camera World’s f-stop guide.
The Second Side: Shutter Speed Explained
Shutter speed measures the length of time the camera’s shutter stays open. Photographers express it in seconds or fractions of a second — for example, 1/1000s (very fast) or 5″ (five whole seconds).
A fast shutter freezes motion. A slow shutter records motion as blur. Both are creative tools, not problems to fix.
Shutter Speed Reference Points
Use these as starting points before you fine-tune:
- 1/2000s – 1/4000s: Birds in flight, professional sports, splashing water droplets.
- 1/500s – 1/1000s: Kids running, pets at play, cyclists.
- 1/125s – 1/250s: Walking subjects, handheld portraits, candid moments.
- 1/60s – 1/100s: Static subjects, indoor lighting, careful handheld work.
- 1/30s and slower: Tripod territory — long exposures, light trails, silky water.
The Reciprocal Rule for Handheld Shots
Camera shake ruins more photos than any other technical issue. To keep handheld shots sharp, use the reciprocal rule: your shutter speed should be at least 1 divided by your focal length.
- Shooting at 50mm? Use 1/50s or faster.
- Shooting at 200mm? Use 1/200s or faster.
- Shooting at 24mm? Use 1/30s or faster.
Modern lenses with image stabilization let you cheat this rule by two to four stops, but the math still gives you a safe baseline.
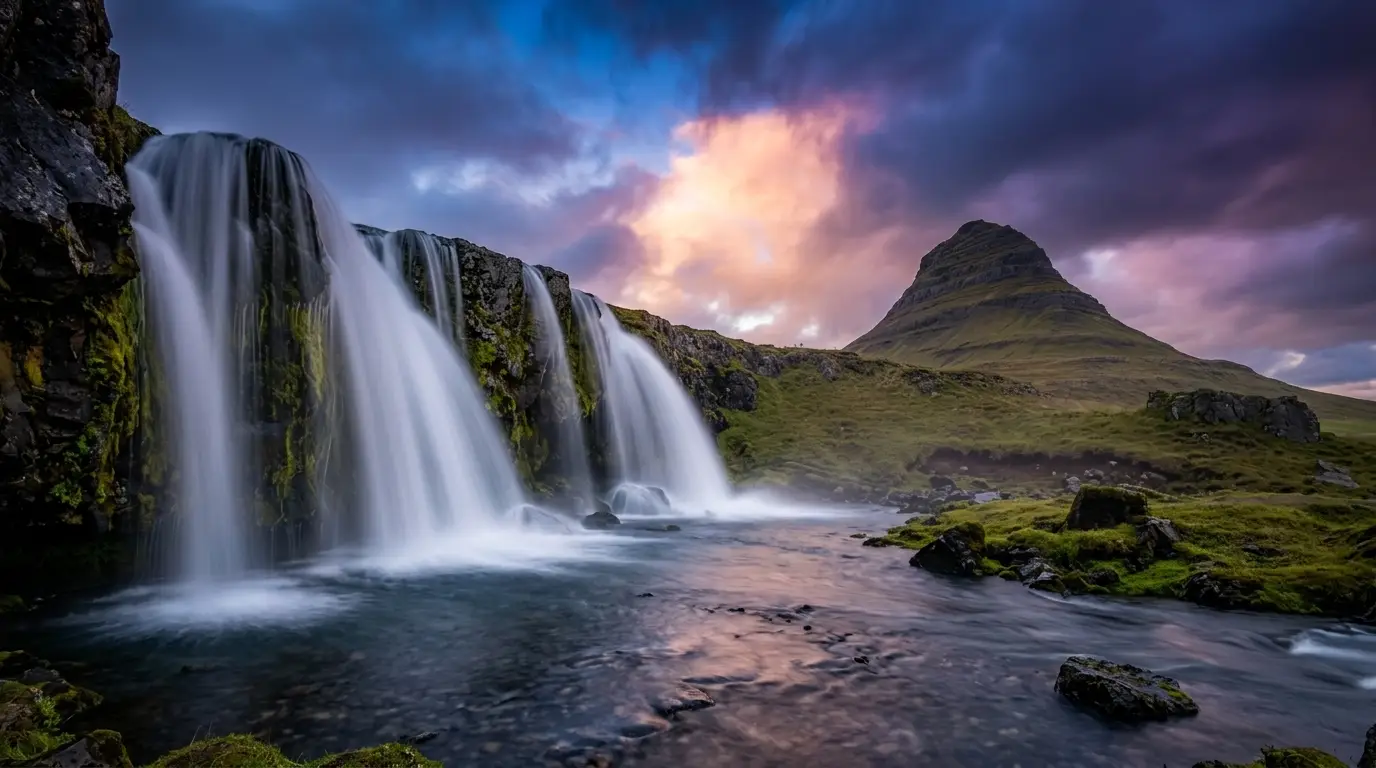
Creative Uses for Slow Shutter Speeds
Long exposures unlock dramatic effects you cannot fake in editing:
- Silky waterfalls (1 to 5 seconds)
- Light trails on highways (10 to 30 seconds)
- Star trails in night skies (several minutes to hours)
- Ghostly people in busy streets (15+ seconds)
- Cloud streaks across a sky (30 seconds to 2 minutes)
You will need a sturdy tripod and, often, a neutral density (ND) filter to block enough light during daylight shots.
Got a batch of shots that need clean, distraction-free backgrounds? Send them to our editors — we handle bulk background removal for e-commerce and portraits so you can focus on shooting more.
The Third Side: ISO Explained
ISO measures your camera sensor’s sensitivity to light. The name comes from the International Organization for Standardization, which set the scale years ago for film.
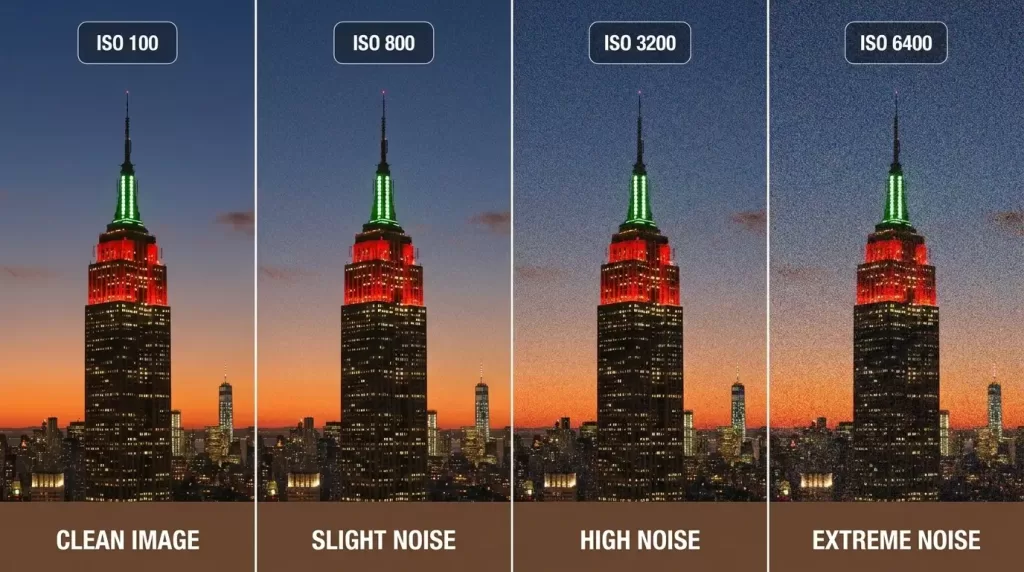
- Low ISO (100, 200): Less sensitive, cleanest image, best quality.
- Medium ISO (400, 800, 1600): Balanced for everyday situations.
- High ISO (3200, 6400, 12800+): Very sensitive, brightens dim scenes, adds grain or “noise.”
The Real Cost of High ISO
Raising ISO does not actually capture more light. It amplifies the signal the sensor recorded. That amplification also boosts noise — those grainy specks and color blotches you see in dark photos.
Modern full-frame cameras handle ISO 6400 beautifully. Older or smaller-sensor cameras start showing visible noise around ISO 1600. Test your own camera and learn its limit.
ISO Rules of Thumb
- Shoot the lowest ISO that gets you a clean exposure with the aperture and shutter speed you need.
- Bright sunlight: ISO 100 to 200.
- Cloudy day or open shade: ISO 400.
- Indoor with window light: ISO 800 to 1600.
- Dim indoor or evening: ISO 3200 to 6400.
- Concerts, night street photography, astrophotography: ISO 6400 and above.
Newer mirrorless cameras like the Sony a7 IV, Nikon Z6 III, and Canon R6 II push usable ISO ranges much further than older bodies. If you are still shooting with an older DSLR, you may find this guide on the Canon 80D as a beginner-friendly used DSLR helpful — it remains a strong, affordable platform to learn manual exposure.
How the Three Sides Interact — Stops of Light
The glue that holds the triangle together is the concept of a stop. One stop equals doubling or halving the amount of light. Increase any setting by one stop, and you must decrease another by one stop to keep the same exposure.
Here is what one stop looks like for each setting:
- Aperture stops: f/1.4, f/2, f/2.8, f/4, f/5.6, f/8, f/11, f/16, f/22.
- Shutter speed stops: 1/1000, 1/500, 1/250, 1/125, 1/60, 1/30, 1/15.
- ISO stops: 100, 200, 400, 800, 1600, 3200, 6400.
If you currently shoot at f/5.6, 1/250s, ISO 400, you have several equivalent exposures:
- f/4, 1/500s, ISO 400 (wider aperture, faster shutter)
- f/8, 1/125s, ISO 400 (narrower aperture, slower shutter)
- f/5.6, 1/500s, ISO 800 (faster shutter, higher ISO)
Each combination admits the same total light. Your creative goal decides which one to pick.
The Bucket Analogy That Makes It Click
Photography Life popularized a brilliant analogy. Imagine catching rainwater in a bucket:
- Shutter speed is how long you leave the bucket out.
- Aperture is the intensity of the rain (how heavy the downpour is).
- ISO is how wide the bucket is.
You can fill the bucket the same amount with a quick stint in a heavy downpour, a long stint in light drizzle, or a wider bucket exposed briefly. The exposure triangle works the same way.
Real-World Exposure Triangle Scenarios
Theory makes sense once you apply it. Here are common shooting situations and the triangle settings that work.
Sunny Outdoor Portrait
- Aperture: f/2.8 (creamy background blur)
- Shutter speed: 1/500s (no motion blur, freezes facial movement)
- ISO: 100 (bright daylight)
Why it works: Wide aperture isolates the subject. Fast shutter prevents shake. Low ISO keeps skin tones smooth.
Indoor Family Dinner, Available Light
- Aperture: f/2.8 to f/4
- Shutter speed: 1/125s
- ISO: 1600 to 3200
Why it works: Indoor light demands a wide aperture and a higher ISO. Keep shutter at 1/125s minimum so kids don’t blur.
Mountain Landscape at Golden Hour
- Aperture: f/11 (sharp from foreground to horizon)
- Shutter speed: 1/60s (tripod recommended)
- ISO: 100
Why it works: Narrow aperture maximizes depth of field. Low ISO captures the richest color and dynamic range.
Indoor Sports — Basketball Game
- Aperture: f/2.8
- Shutter speed: 1/1000s
- ISO: 3200 to 6400
Why it works: Indoor courts are darker than they look. You need the fast shutter to freeze players, so ISO does the heavy lifting. If you also shoot stills around the game, browse our roundup of the best sports photo background ideas for promo and team shots.
Milky Way / Astrophotography
- Aperture: f/2.8 (or as wide as your lens allows)
- Shutter speed: 15 to 25 seconds (use the 500 rule to avoid star trails)
- ISO: 3200 to 6400
Why it works: You need every photon you can grab. The triangle pushes to its limits, and noise reduction in post-processing cleans up the rest.
Selling products online? Sharp listings convert better. Try our precise clipping path service for clean cutouts that look great on every marketplace.
Common Exposure Mistakes — And How to Fix Them
Even experienced photographers fall into these traps. Watch for them.
Mistake 1: Overexposing Bright Scenes
Snow, beaches, and white walls trick the camera meter. The sensor sees too much white and overcompensates, creating washed-out highlights with no detail.
Fix: Use exposure compensation (+1 EV or +2 EV in tricky bright scenes) or shoot in manual and dial in slightly faster shutter speeds.
Mistake 2: Cranking ISO Too High Too Soon
Many beginners reach for ISO 3200 the moment the sun dips. The result is grainy, muddy photos.
Fix: Open the aperture first. Slow the shutter (if your subject is still). Only raise ISO when the other two settings have hit their limits.
Mistake 3: Slow Shutter Without a Tripod
Handheld at 1/15s on a 50mm lens almost always gives soft, shaky results.
Fix: Follow the reciprocal rule. Brace against a wall, lean on a railing, or use a tripod for shutter speeds under 1/60s.
Mistake 4: Forgetting White Balance
The triangle controls brightness, but white balance controls color. Mixing the two creates yellow skin tones or unnatural blue shadows.
Fix: Set white balance for your light source — daylight, cloudy, tungsten, or fluorescent. Or shoot RAW and adjust later. For a deeper dive, check our complete white balance photography guide on accurate color reproduction.
Mistake 5: Ignoring the Histogram
The LCD screen lies. Bright sun makes it look dark, and indoor light makes it look brilliant. The histogram tells the truth.
Fix: Glance at the histogram after every important shot. Keep highlights from clipping off the right edge, and shadows from crushing into the left.
Camera Modes That Use the Exposure Triangle
You do not have to shoot full manual to apply this knowledge. Semi-automatic modes let you control one side of the triangle while the camera handles the rest.
- Aperture Priority (A or Av): You choose aperture; the camera chooses shutter speed. Ideal for portraits and landscapes.
- Shutter Priority (S or Tv): You choose shutter speed; the camera chooses aperture. Best for sports and wildlife.
- Manual (M): You choose everything. Total control, total responsibility.
- Auto ISO with manual exposure: A modern hybrid — you set aperture and shutter, and the camera adjusts ISO on the fly.
Most working photographers use Aperture Priority for 60% of their shoots, Shutter Priority for action, and Manual for studio or tripod work. There is no badge of honor for shooting manual all the time — the right mode is the one that gets the shot.
The B&H Photo Explora blog offers excellent deeper tutorials on each mode if you want to specialize further.
Running an apparel store? Give your clothing photos a polished, lifelike form — our ghost mannequin editing creates a clean, 3D look that boosts conversions.
Advanced Tips to Master the Exposure Triangle Faster
These tips separate hobbyists from confident shooters.
Learn Your Camera’s ISO Sweet Spot
Every sensor has a point where image quality drops sharply. For most modern crop-sensor cameras, that point is around ISO 3200. For full-frame bodies, it is often ISO 6400 or 12800. Run a test: photograph the same scene at every ISO and zoom in at 100%. You will see where your camera breaks down.
Master Exposure Compensation
In any priority mode, exposure compensation lets you tell the camera “make this brighter” or “make this darker” without leaving auto. It is the single most underused tool on a modern camera.
Use the Histogram, Not the LCD
LCD screens deceive in bright sunlight and dark rooms. The histogram never lies. Aim for an exposure that fills the graph without clipping either end.
Practice the 30-Day Triangle Drill
Pick one variable per week and shoot the same scene with five settings. Week one — aperture. Week two — shutter. Week three — ISO. Week four — combine all three. You will internalize the triangle faster than any tutorial can teach you.
Shoot RAW
RAW files preserve all the data your sensor captures. If you nail exposure within one stop, you can recover the rest in Lightroom or Capture One. JPEGs throw away that flexibility before you even see the image. Our photography editing tips for professional results walks through how to squeeze the most from a RAW file in post.
How Editing Complements the Exposure Triangle
Even perfect exposures benefit from post-processing. The triangle gets the light into the camera; editing refines tone, color, and clarity.
Common adjustments include:
- Exposure tweaks: Recover blown highlights or lift shadows.
- White balance correction: Match the mood you wanted on location.
- Noise reduction: Smooth out high-ISO grain without losing detail.
- Sharpening: Bring out fine texture in eyes, hair, and details.
- Selective masking: Brighten faces while preserving sky tones.
Tools like Adobe Lightroom, Capture One, and DxO PhotoLab give you the controls. If you are weighing your options, our breakdown of the best photo retouching software in 2026 compares the leading apps for every budget. The triangle gives you the data to work with. Together, they create finished images that feel polished and professional.
Need stunning product cutouts at scale? Our image masking service handles soft edges, hair, and transparent objects — perfect when a simple clipping path is not enough.
Quick Cheat Sheet: Exposure Triangle Summary
Bookmark this for the field:
- Aperture controls light + depth of field. Lower f-number = wider opening = more blur.
- Shutter speed controls light + motion. Faster shutter = sharper action. Slower shutter = blur.
- ISO controls sensitivity + noise. Lower ISO = cleaner image. Higher ISO = grainier image.
- One stop = double or half the light. Adjust one setting, compensate with another.
- Shoot the lowest ISO that lets you get the shutter and aperture you need.
- Use Aperture Priority for portraits and landscapes; Shutter Priority for action; Manual for full control.
- Check the histogram, not the LCD.
- RAW files give you the most editing flexibility.
If you want to go further, our complete photo editing guide covers definitions, types, and techniques that complement everything you’ve learned about exposure.
Frequently Asked Questions (FAQs)
1. What is the easiest way to remember the exposure triangle?
Use the bucket analogy: shutter is time, aperture is intensity, and ISO is the bucket’s width. Any change to one means compensating with another to keep the total light the same.
2. Which setting should I adjust first when shooting in manual?
Start with the setting that matters most to your shot. For portraits, set aperture first. For sports, set shutter speed first. Then balance the other two around it.
3. Is a higher ISO always bad?
No. Modern cameras handle ISO 3200 to 6400 beautifully. A slightly grainy sharp photo always beats a blurry “clean” one. Use the ISO you need to get the shutter speed your subject demands.
4. What is the best aperture for sharp landscape photos?
Most lenses hit peak sharpness between f/8 and f/11. Beyond f/16, diffraction softens the image even though depth of field deepens. f/8 to f/11 is the sweet spot for most landscape work.
5. Can I use the exposure triangle on a smartphone?
Yes, if your phone has a Pro or Manual mode. Apps like Halide (iOS) and ProShot (Android) expose ISO and shutter controls. Smartphone apertures are usually fixed, but the other two sides still apply.
6. How does the exposure triangle work in video?
The same three settings apply, but shutter speed is locked to roughly twice your frame rate (1/50s for 24fps, 1/60s for 30fps) for natural motion blur. You then balance brightness with aperture, ISO, and ND filters.
7. Why does my photo look dark even though my settings look right?
The camera’s meter can be fooled by dark or bright surroundings. Check exposure compensation, switch metering modes (try spot metering on your subject), and read the histogram for the truth.
8. Do I really need to learn manual mode?
You don’t need it for every photo, but learning manual makes every other mode more powerful. Once you understand the triangle, semi-auto modes become precise tools rather than guesses.
Final Thoughts: Practice Beats Theory
The exposure triangle is not a rule to memorize — it is a relationship to feel. After a few hundred photos, you will stop calculating stops in your head. You will see a scene, sense the light, and reach for the right settings instinctively.
Start with one priority mode. Shoot the same subject in different light. Review your settings against the results. Within a month, the triangle stops being a diagram in a book and starts being a skill in your hands.
When you nail exposure in-camera, post-processing becomes a polish step instead of a rescue mission. That is the real reward of mastering this concept — better photos, faster workflow, and the creative confidence to chase any kind of light.
Ready to take your photography business to the next level? Pair sharp captures with flawless editing — visit Clipping Expert Asia for end-to-end image enhancement that helps your work stand out and sell better.