


Equine Photography: The Full Guide for Horse Photographers (Settings, Posing, Editing & Pricing)
October 31, 2026
Foreground, Middleground & Background: The 3-Layer Composition Guide That Makes Any Photo Look Deeper
November 3, 2026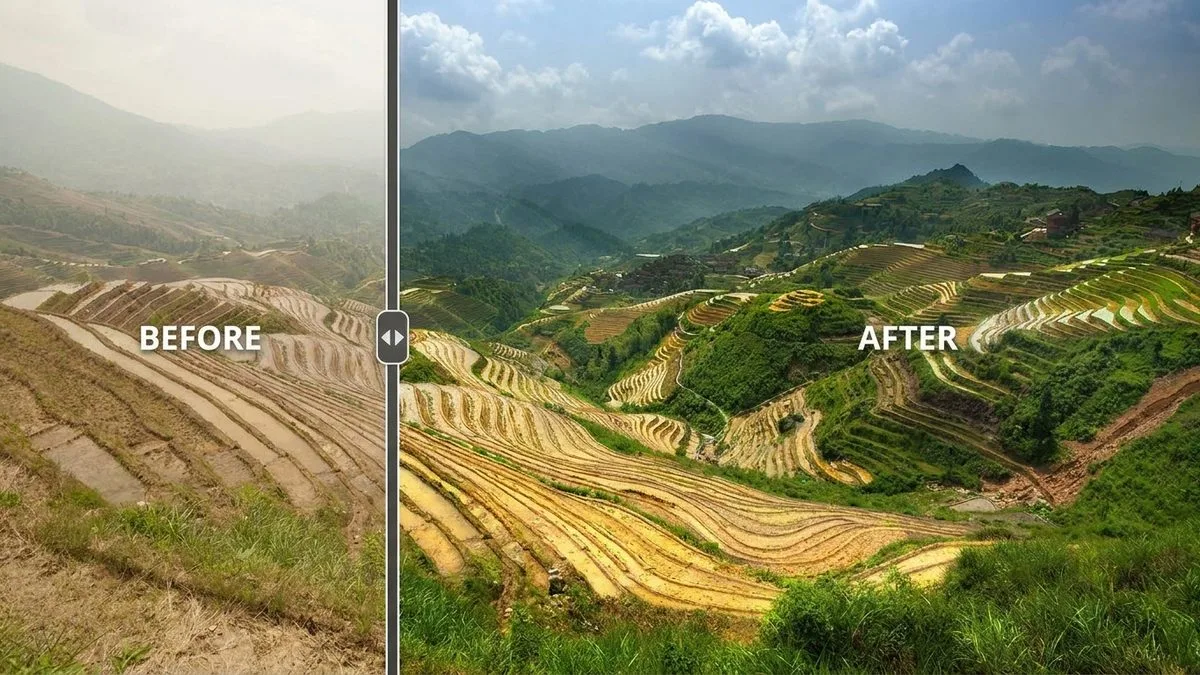
Photo editing is everything you do to a photo after you press the shutter. It ranges from a two-second crop on your phone to a three-hour pixel-level retouch in Photoshop. Some edits fix problems — a crooked horizon, bad lighting, a dust spot on the lens. Others add style — a warm color grade, a clean white background, a dramatic sky. If you have ever straightened a photo or bumped up the brightness before posting it, you have edited a photo.
The confusion starts because people use three different words — editing, retouching, and manipulation — like they mean the same thing. They don’t. And knowing the difference saves you a ton of time, money, and arguments with clients. This guide breaks it all down: what photo editing actually is, the basic techniques everyone should know, the advanced stuff that takes years to master, the exact workflow order pros use, and when doing it yourself costs more than hiring someone.
- A Quick History (So You Know It's Not Cheating)
- Editing vs Retouching vs Manipulation: The Three Words Everyone Confuses
- Why Every Photo Gets Edited (Even the Ones That Look "Unedited")
- The 10 Basic Edits Everyone Should Know
- Advanced Edits (The Stuff That Takes Real Skill)
- The 7-Step Editing Workflow (Order Matters More Than You Think)
- Editing by Genre: What Changes
- Destructive vs Non-Destructive Editing (Work on a Copy, Always)
- Tools: What to Actually Use
- Five Mistakes That Ruin an Edit
- DIY vs When to Outsource
- Pro Tips From Working Editors
- Frequently Asked Questions
- Final Thought
A Quick History (So You Know It’s Not Cheating)
People have been editing photos as long as photos have existed. In the 1860s, darkroom technicians were already combining negatives, removing people from portraits, and airbrushing skin. The famous portrait of Abraham Lincoln? His head was composited onto another man’s body. That was 1860.
The darkroom era lasted a century. Then in the 1990s, Photoshop arrived and editing moved to pixels. Today AI tools can remove an object or swap a sky in one click. The tools change, but the goal stays the same: make the photo look the way you saw it in your head when you pressed the shutter. Editing is not cheating — it is the second half of photography. Even Ansel Adams spent more time in the darkroom than he did behind the camera.
Editing vs Retouching vs Manipulation: The Three Words Everyone Confuses
This matters because clients will ask for one and mean another. Here is the plain-English breakdown.
| Photo Editing | Photo Retouching | Photo Manipulation | |
|---|---|---|---|
| What it does | Improves the whole image | Fixes details at pixel level | Changes what the photo shows |
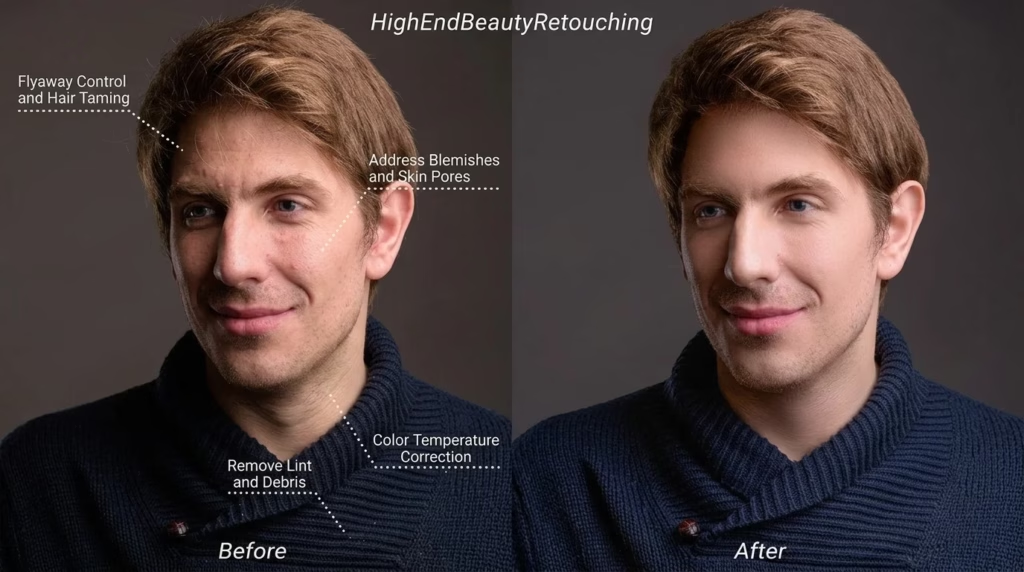
| Examples | Crop, exposure, color, resize | Skin smoothing, blemish removal, teeth whitening | Background swap, adding/removing objects, compositing |
| Time per image | Seconds to minutes | 5–30 minutes | 30 minutes to hours |
| Honesty line | Always acceptable | Acceptable when disclosed for commercial work | Requires disclosure for editorial/news |
| Who does it | Anyone | Trained editors | Advanced artists |
Editing is the umbrella term. Retouching is a subset of editing — the detailed cleanup work on skin, fabric, and products. Manipulation goes further: it changes the content of the photo, not just its appearance. A good portrait retouching guide will show you where the line between “enhancing” and “changing” actually sits.
Why Every Photo Gets Edited (Even the Ones That Look “Unedited”)
A camera does not see what your eyes see. It flattens contrast, misreads white balance, and adds noise in low light. Editing fixes that gap. Here is who edits, and why.
Photographers edit to bring the image back to what they actually saw — or to push it toward a signature style. A wedding photographer applies one consistent grade across 500 photos so the whole gallery feels like one story. A landscape photographer pulls detail out of a bright sky and a dark foreground in a way no single camera exposure can capture.
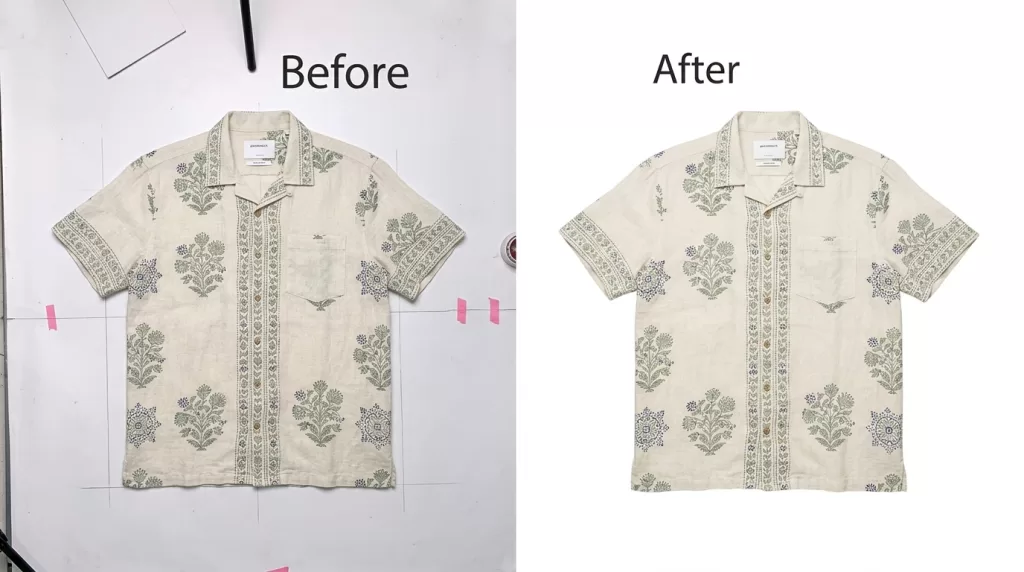
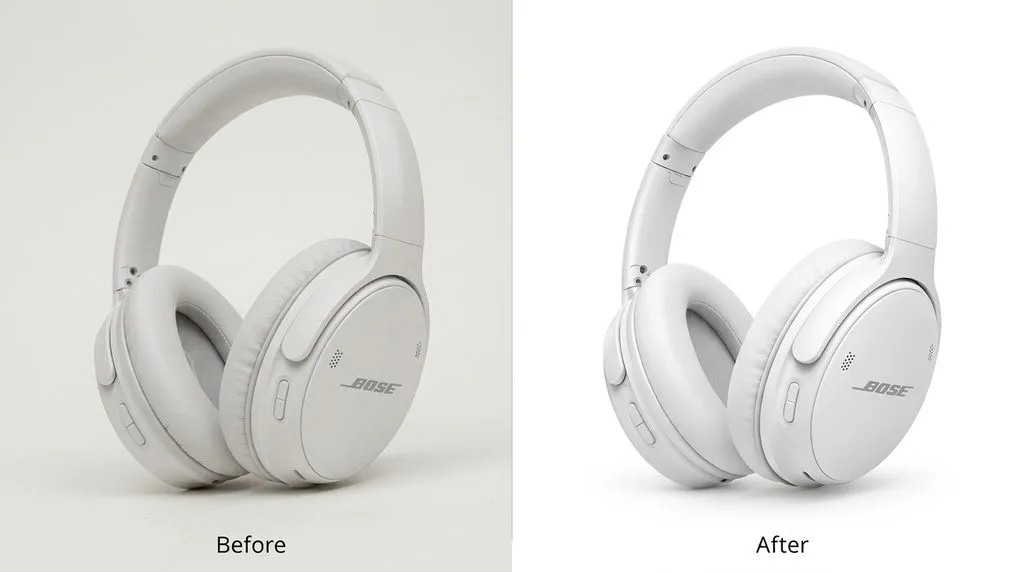
Ecommerce sellers edit because product photos directly drive sales. Amazon requires pure white backgrounds. Shoppers return products when the color in the photo does not match what arrives. Consistency across a catalog builds trust. This is why ecommerce product photo editing is its own specialized field — it is not the same skill set as editing portraits.
Want to replace messy backgrounds with pure white or custom colors?
Our expert Background Removal Service makes it quick and effortless.
Content creators and brands edit for consistency. When every thumbnail, every Instagram post, and every ad shares the same visual character, people start recognizing your content before they read your name. That is brand equity, and it is built in the editing room, not at the camera.
The 10 Basic Edits Everyone Should Know
You can learn all of these in an afternoon. Master them and 80% of your photos will look dramatically better.
- Cropping and straightening — Fix a tilted horizon and tighten the composition. Do this first, always.
- Exposure — Make the photo brighter or darker. Get this right before touching anything else.
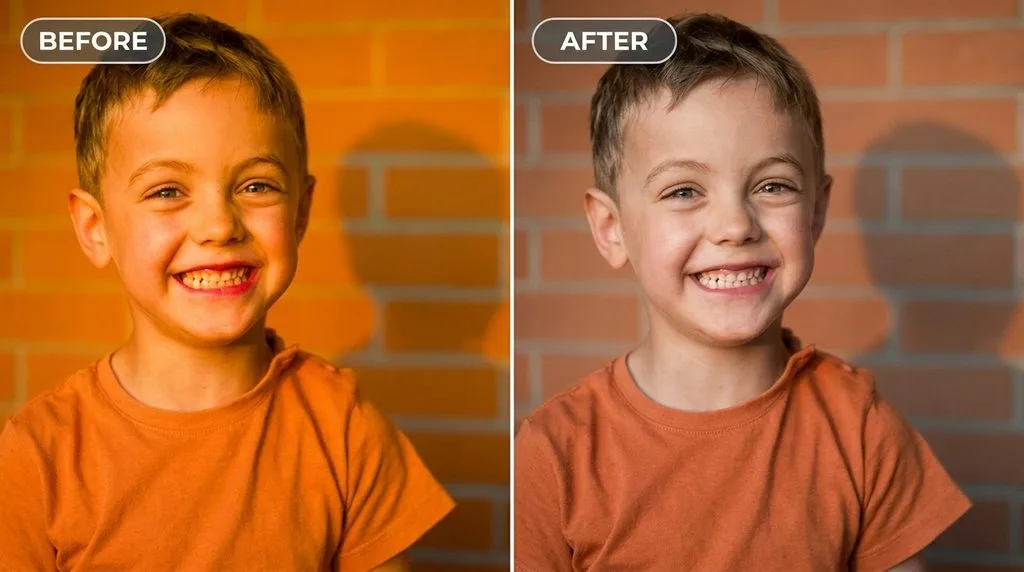
- White balance — Remove color casts so whites look white. Indoor light is too orange; shade is too blue. Fix it.
- Contrast — The difference between light and dark. A gentle S-curve adds punch without looking fake.
- Highlights and shadows — Pull detail back from bright skies and dark areas independently. This is where RAW files earn their keep.
- Vibrance and saturation — Make colors pop. Use vibrance first; it protects skin tones. Saturation is the nuclear option.
- Sharpening — Adds crispness to edges. It cannot fix a blurry photo, and too much creates ugly halos.
- Noise reduction — Smooths grain from low-light or high-ISO shots. Go easy — too much makes skin look plastic.
- Lens correction — Removes distortion, vignetting, and chromatic aberration. One click in most software. Do it automatically.
- Spot removal — Zap dust spots, blemishes, and stray hairs. Methodical, boring, and makes a huge difference.
Advanced Edits (The Stuff That Takes Real Skill)
Once the basics are second nature, these are the techniques that separate hobbyists from professionals.
- Background removal and clipping paths — Cut a product out cleanly so it sits on a white or transparent background. Essential for ecommerce.
- Image masking — For hair, fur, glass, and anything with soft edges where a hard clipping path fails.
- Color grading — The creative step where you set a mood with color in shadows, midtones, and highlights. Our color grading guide walks through the six signature looks.
- Ghost mannequin — Combine two photos of a garment so it appears to float in 3D without a model wearing it. Standard for apparel catalogs.
- Shadow creation — Add realistic drop shadows and reflections so products look grounded, not pasted on.
- Frequency separation — Separate texture from color so you can smooth skin without destroying pores. The pro retoucher’s secret weapon.
- Compositing — Blend multiple photos into one — a new sky, a cleaner background, a group shot where everyone has their eyes open.
- Photo restoration — Repair torn, faded, or water-damaged old photos. A specialized craft with its own techniques.
Struggling with complex hair or fur edges?
Let our experts deliver flawless, natural cutouts with our advanced Image Masking Service
The 7-Step Editing Workflow (Order Matters More Than You Think)
Do these out of order and you will re-do work, introduce artifacts, and waste hours. This is the sequence every professional editor follows.
- Cull first. Pick the photos worth editing. Do not edit 300 photos when 30 are keepers.
- Lens correction and straighten. One click. Fixes distortion and tilted horizons.
- Crop. Tighten composition before you spend time on pixels you will cut away.
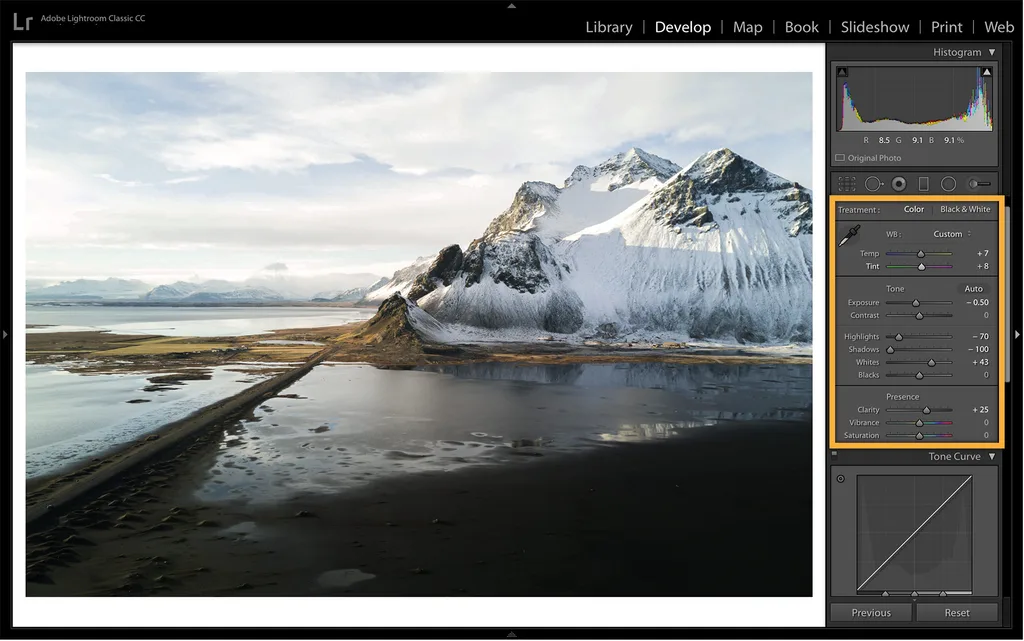
- Exposure and white balance. Get the global tone and color right. This is the foundation.
- Local adjustments. Darken a bright sky. Brighten a face. Use masks and gradients.
- Retouch and clean up. Spot removal, blemishes, stray hairs, dust. The tedious but important stuff.
- Sharpen, resize, export. Sharpen at the end, because resizing changes what sharpening looks like. Export in the right format for where the photo is going.
Save this as a preset or action. The next shoot starts 80% done.
Editing by Genre: What Changes
The techniques stay the same, but the priorities shift completely depending on what you are shooting.
| Genre | Top Priority | Common Edits | What to Avoid |
|---|---|---|---|
| Portraits | Natural skin tones | Skin retouching, teeth/eye brightening, flyaway removal | Over-smoothing skin to plastic |
| Product / Ecommerce | Accurate color, clean background | Background removal, color correction, shadow, resize for platform | Creative grading, shadows that look fake |
| Weddings | Consistency across the day | Batch color grading, culling, exposure matching | Trendy looks that date the photos |
| Real estate | Straight lines, bright rooms | Perspective correction, window pull, sky replacement | Making rooms look bigger than they are |
| Landscape | Dynamic range | Gradient filters, sky blending, local contrast | HDR halos, oversaturated greens |
| Street | Grit and character | Contrast, black-and-white conversion, crop | Removing real elements of the scene |
Need your images to be marketplace-ready (Amazon, Shopify, etc.)?
Ensure compliance and quality with our professional Photo Retouching
Destructive vs Non-Destructive Editing (Work on a Copy, Always)
There are two ways to edit a digital photo, and picking the wrong one can cost you the original forever.
Destructive editing changes the actual pixels. When you save, the old pixels are gone. If you edit the original file and close it, you cannot go back. This is how people lose photos.
Non-destructive editing records your edits as a list of instructions — crop here, brighten by +12, add this curve — and applies them on top of the original file. The original pixels never change. You can revisit any slider six months later. Lightroom, Capture One, and Photoshop layers are all non-destructive when used correctly.
The rule is simple: never edit the only copy of a photo. Work on a copy, or use software that protects the original. Your future self will thank you.
Tools: What to Actually Use
You do not need every app. Pick one and learn it deeply.
- Adobe Lightroom — Best for most photographers. Non-destructive, batch editing, built-in cataloging. Handles 90% of what anyone needs.
- Adobe Photoshop — Best for pixel-level retouching, compositing, and anything where you need to change pixels. Overkill for basic edits.
- Capture One — Favorite of studio and fashion photographers. Superior raw processing and color control, steeper learning curve.
- GIMP — Free, open-source, nearly as powerful as Photoshop. Great if you cannot justify a subscription.
- Mobile apps (Snapseed, Lightroom Mobile, VSCO) — Shockingly capable for phone-shot photos. Snapseed is free and does more than most desktop apps did ten years ago.
- AI tools — Great for one-click background removal, sky replacement, and object removal. Always check the edges — AI gets it right about 80% of the time, and the last 20% is what clients notice.
Struggling with inconsistent cutouts from automated software?
Switch to 100% manual, expert Clipping Path for guaranteed perfection.
A solid photo editing software comparison will help you pick based on your volume and budget. The honest advice: the tool matters less than using the same one consistently.
Five Mistakes That Ruin an Edit
Every beginner makes these. Learn them now and skip the embarrassment.
- Over-saturating. More color is not more emotion — it is more cartoon. Use vibrance. Check skin tones.
- Over-sharpening. Halos around edges scream “amateur.” Sharpen at the end, at low amounts, and zoom to 100% to check.
- Cropping too tight. Leave breathing room. You can always crop tighter later; you cannot add back what you cut.
- Ignoring the histogram. Your screen lies — it is too bright, too warm, or both. The histogram tells the truth about exposure.
- Editing on an uncalibrated monitor. If your screen is wrong, every edit you make is wrong. Calibrate, or at least check final images on your phone.
DIY vs When to Outsource
Here is the math nobody tells you. If you charge $150 an hour for your photography and you spend three hours editing a shoot, that editing cost you $450 of billable time. An editing service would have done it for a fraction of that — often with better consistency.
Outsource when the volume is high enough that editing time costs more than the service fee. That typically hits around 10+ paid shoots a month, or whenever you are turning down shooting work because you are too busy editing. A professional retouching partner matches your style exactly, delivers on schedule, and gives you back evenings you currently spend staring at sliders.
Ready to transform your raw photos into professional assets?
Get a custom, no-obligation quote tailored to your specific volume and needs. Explore Clipping Expert Asia
If you are weighing the options, look at the actual photo editing cost per image — for batch work, it is often pennies to a few dollars per photo, which is almost always cheaper than your own hourly rate. And if you want to build the process into your business, a guide on how to outsource photo editing will walk you through finding the right partner and setting up a workflow.
Pro Tips From Working Editors
A few hard-won lessons that save months of trial and error.
- Shoot RAW. Always. RAW files hold 2–4 stops more dynamic range than JPEGs. That is the difference between recovering a bright sky and losing it forever.
- Edit in batches with presets. Apply your base look to a whole shoot, then fine-tune individually. This is how wedding photographers edit 500 photos in a day.
- Step away. After 20 minutes, your eyes adapt and you lose perspective. Take a break, or flip between before and after. You will be shocked at how far you drifted.
- Zoom out often. Edits that look great at 100% often look terrible at full size. Check the whole image regularly.
- Consistency beats perfection. A slightly imperfect edit applied consistently across a portfolio looks more professional than perfect edits that all look different.
- Learn keyboard shortcuts. They cut editing time by half. Every professional editor uses them; almost no beginner does.
Frequently Asked Questions
What is photo editing in simple words?
Photo editing is changing a photo after it is taken — from a quick crop and brightness tweak to detailed retouching and background removal. It fixes problems and adds style. If you have ever adjusted a photo before posting it, you have edited it.
What is the difference between photo editing and photo retouching?
Photo editing is the broad term covering everything from cropping to color correction. Retouching is a specific type of editing — detailed, pixel-level cleanup like skin smoothing, blemish removal, and wrinkle reduction. All retouching is editing, but not all editing is retouching.
Do professional photographers edit their photos?
Almost all of them, every single one. Even photographers who claim to shoot “straight out of camera” do at least basic exposure and color correction. The question is never whether to edit — it is how much, and in what style.
What are the basic steps to edit a photo?
Cull your keepers, straighten and crop, fix exposure and white balance, adjust contrast and color, do local adjustments, clean up spots and blemishes, then sharpen and export. Do them in that order.
Can I edit photos for free?
Yes. Snapseed (mobile), GIMP (desktop), and the free version of Lightroom Mobile all handle basic and intermediate edits well. AI background removers are also widely available for free. The catch is time — free tools cost you hours that a paid service or subscription would save.
How long does it take to edit a photo?
A basic edit with a preset takes 1–2 minutes. A detailed portrait retouch takes 15–30 minutes. A complex composite or product photo with background removal and shadow work can take 30–90 minutes. Batch editing with presets is how pros keep per-photo time low.
Is photo editing the same as Photoshopping?
“Photoshopping” is slang for any photo manipulation, often implying heavy or deceptive changes. Photo editing is the neutral, professional term covering everything from basic corrections to advanced retouching. Most professional editors avoid the word “Photoshopping” because it carries a negative connotation.
When should I hire a photo editor instead of doing it myself?
Hire one when your shooting volume is high enough that editing time costs more than the service fee — typically 10+ paid shoots a month — or when you need specialized work like clipping paths, ghost mannequin, or jewelry retouching that would take you years to learn. If editing is keeping you from shooting, it is time to outsource.
Final Thought
Photo editing is not a separate skill from photography — it is the second half of the craft. The camera captures light; editing shapes it into something that communicates. Learn the basics, respect the workflow order, and know when the work is better handed to someone who does it all day, every day. The best photographers are not the ones who edit the most — they are the ones who edit exactly the right amount, and stop there.
Ready to elevate your brand’s visual presence?
Partner with Clipping Expert Asia for fast, secure, and premium image editing starting at just 25¢. Explore all our services