

How Big Are 4×4 Pictures: Your Complete Guide to Dimensions, Printing, and Creative Uses
March 17, 2026
Change the Color of an Object in Photoshop: Your Complete Step-by-Step Guide
March 19, 2026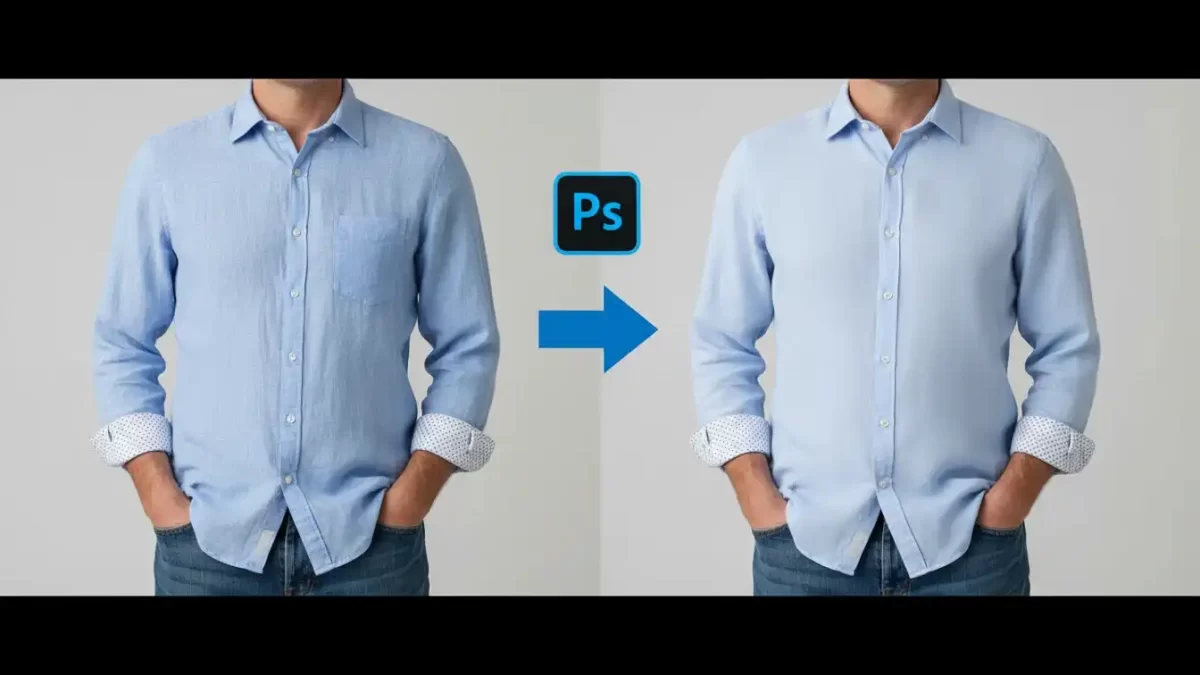
Ever stared at a great photo ruined by stubborn creases on a shirt or dress? You can fix that quickly when you remove clothing wrinkles in Photoshop. This powerful software turns messy fabrics into smooth, polished looks with just a few tools and techniques, similar to photo retouching used in commercial editing. Whether you edit portraits for clients or tweak personal shots, mastering wrinkle removal elevates your images. In this guide, I walk you through simple steps, from basic brushes to advanced methods, so you achieve pro-level results without hassle.
I remember the first time I tackled a wrinkled jacket in a family photo it looked like it came straight from the laundry basket. But after learning these tricks, the final image popped with clean lines. You start by opening your photo in the program and zooming in on the problem spots. Spot the wrinkles early, and you save time later. This approach works for casual snaps or high-end fashion edits, making fabrics appear freshly pressed.
Wrinkles ruining your apparel photos? Try our ghost mannequin service – we smooth and shape
- Understanding Wrinkles in Photos
- Essential Tools for Wrinkle Removal
- Step-by-Step Basic Wrinkle Removal
- Advanced Techniques for Stubborn Wrinkles
- Liquify Tool for Fabric Smoothing
- Layer Masks and Adjustments
- Non-Destructive Editing Practices
- Common Mistakes to Avoid
- Tips for Efficient Workflow
- Integrating Wrinkle Removal into Larger Edits
- Final Thoughts on Mastering Wrinkle Removal
- FAQs
Understanding Wrinkles in Photos
Wrinkles show up as shadows and highlights on fabric, created by light hitting uneven surfaces. You notice them more in tight clothing or materials like cotton and linen. Photographers often deal with this issue during shoots, but post-processing fixes what the camera captures. When you remove clothing wrinkles in Photoshop, you balance tones to create even textures. Think about how light plays on the material darker creases need lifting, while brighter folds require toning down.
Natural movements cause most wrinkles, like sitting or walking, which add realism but can distract in portraits. You assess the severity first: minor ones vanish with quick brushes, while deep ones demand layered adjustments. This knowledge helps you choose the right tool, ensuring edits look authentic. For instance, a silk blouse might need gentle handling to preserve its sheen, unlike a denim shirt that tolerates stronger corrections.
Essential Tools for Wrinkle Removal
Photoshop offers a toolkit perfect for smoothing fabrics. The Healing Brush stands out it samples nearby pixels to cover imperfections seamlessly. You select it from the toolbar, hold Alt to pick a clean area, and paint over the wrinkle. This method blends colors naturally, ideal for small creases. Pair it with the Spot Healing Brush for even faster fixes, as it automatically matches textures without manual sampling.
Another key player is the Clone Stamp, which copies exact pixels from one spot to another. You use it when healing tools over-blur details. Set opacity to 50% for subtle applications, building up layers gradually. These photo editing instruments work together, letting you tackle various wrinkle types. Remember, practice on duplicates to avoid ruining originals always create a new layer for safety.
For broader areas, the Patch Tool shines. You draw around the wrinkled section, then drag to a smooth part of the fabric. Photoshop fills in the selection intelligently, maintaining patterns. This technique speeds up work on larger garments like dresses or coats, especially useful in ghost mannequin editing for e-commerce clothing photography. Combine it with content-aware fill for stubborn spots, enhancing your clothing retouching efficiency.
Step-by-Step Basic Wrinkle Removal
Start by duplicating your background layer press Ctrl+J on Windows or Cmd+J on Mac. This protects the original image. Zoom in to 200% for precision, focusing on one wrinkle at a time. Select the Spot Healing Brush, adjust its size to match the crease width, and brush over it in short strokes. Watch as the software replaces the flaw with surrounding pixels.
If results look patchy, switch to the Healing Brush for more control. Sample a nearby smooth area, then paint carefully. You build confidence with each pass, seeing fabrics transform. For curved wrinkles, follow their shape to avoid straight lines that scream “edited.” This basic wrinkle removal technique handles most everyday photos, from vacation pics to social media shares.
Test on different fabrics wool requires softer brushes to keep fuzziness, while synthetics allow harder edges. You refine your skills through trial, ensuring edits blend invisibly. Once done, merge layers and check at full view. Small adjustments make big differences, turning good shots into great ones.
To incorporate professional software, explore Adobe Photoshop for these features it powers countless creatives worldwide.
Advanced Techniques for Stubborn Wrinkles
When basic tools fall short, frequency separation steps in. You duplicate the layer twice, naming one “Low Frequency” and the other “High Frequency.” Apply a Gaussian Blur to the low layer, around 5-10 pixels, to smooth colors. Then, on the high layer, use Image > Apply Image with settings to subtract the low from the original, creating texture details.
Now, you paint on the low layer with the Clone Stamp to even out tones, ignoring fine details. Switch to the high layer for texture fixes using healing tools. This method separates color from detail, letting you remove clothing wrinkles in Photoshop without losing fabric patterns — a process similar to multiple clipping path editing used for complex garments. It takes practice, but results stun with realism.
For deep shadows, dodge and burn tools help. Set Dodge to highlights at 10% exposure, lightening dark creases. Burn shadows to darken raised areas, balancing the surface. You apply these on a new layer filled with 50% gray in Overlay mode. This non-destructive approach preserves flexibility, allowing tweaks later.
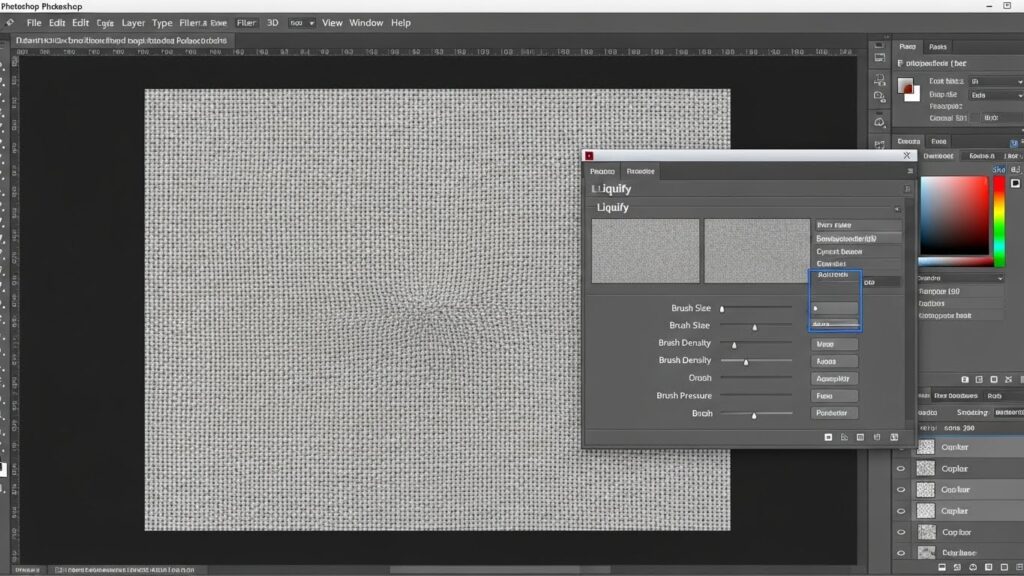
Liquify Tool for Fabric Smoothing
The Liquify filter reshapes fabrics gently. Access it via Filter > Liquify, then select the Forward Warp Tool. You nudge wrinkled areas slightly, pushing pixels to flatten curves. Keep movements small to avoid distortion aim for subtle shifts that mimic ironing. This works wonders on flowing garments like skirts, where wrinkles bunch unnaturally.
Combine with the Smooth Tool to blend edges after warping. You preview changes in real-time, undoing if needed. For precision, use a large brush on broad sections and shrink it for tight spots. This Photoshop tool enhances clothing retouching by addressing structural issues basic brushes miss.
Remember, overusing Liquify warps reality, so compare with the original often. You achieve natural looks by focusing on how fabric should fall, based on gravity and fit. This technique elevates edits, making models appear in perfectly tailored outfits.
One wrinkle or a hundred – we remove them all. View our retouching portfolio
Layer Masks and Adjustments
Masks let you hide or reveal edits selectively. Create a new adjustment layer, like Curves, to tweak contrast in wrinkled zones. You paint black on the mask to conceal effects elsewhere, white to apply them. This targets specific areas, boosting efficiency in photo editing workflows.
For color shifts from wrinkles, Hue/Saturation layers correct tones. You clip them to the base layer, adjusting sliders to match smooth fabric. Masks refine these changes, ensuring seamless integration. This layered approach builds complexity without overwhelming the file.
Experiment with blending modes. Overlay amplifies details, while Soft Light softens harsh lines. You fine-tune opacity for each layer, creating depth. These methods ensure wrinkles vanish while preserving the garment’s character, like embroidery or prints.
Non-Destructive Editing Practices
Always work non-destructively to revisit changes. Use Smart Objects for filters, they let you edit parameters anytime. Convert layers to Smart Objects before applying Liquify or blurs, maintaining quality. This habit saves time on revisions, especially in collaborative projects.
Organize layers with groups and names, like “Wrinkle Fixes” or “Color Adjustments.” You navigate complex files more easily, speeding up workflows. Backup often, and use the History panel for quick undos. These practices turn chaotic edits into structured processes.
In professional settings, outsource complex tasks to experts like those at Clipping Expert Asia for polished outcomes.
Common Mistakes to Avoid
One pitfall is over-smoothing, which makes fabric look plastic. You counter this by zooming out frequently and checking realism. Another error involves ignoring lighting consistency wrinkles cast shadows, so removing them requires adjusting highlights accordingly.
Mismatched textures happen when sampling from wrong areas. You pick sources close to the wrinkle for accurate matches. Rushing layers leads to visible seams; blend with feathered brushes. Avoid these, and your edits impress with subtlety.
Forgetting to calibrate your monitor skews color perception. You ensure accurate views by using calibrated displays. Over-relying on one tool limits results mix methods for best outcomes. Awareness of these issues sharpens your skills over time.
Tips for Efficient Workflow
Streamline your process with keyboard shortcuts. Learn Alt for sampling, Space for hand tool, and brackets for brush size. You save seconds that add up in long sessions. Customize workspaces to prioritize retouching panels, reducing clicks.
Batch process similar images using Actions. Record steps for wrinkle removal, then apply to multiple files. This boosts productivity for event photos or product shoots. Stay updated with software versions for new features that simplify tasks.
Take breaks to refresh eyes, fatigue leads to overlooked flaws. You return with fresh perspectives, catching subtle issues. Collaborate with peers for feedback, refining techniques. These habits make editing enjoyable and effective.

Integrating Wrinkle Removal into Larger Edits
Wrinkle fixes fit into broader retouching. After skin smoothing, address clothing to unify the image. You ensure fabrics complement subjects, not distract. In fashion photography, this step precedes color grading for cohesive looks.
For e-commerce, clean wrinkles boost sales by presenting products ideally. You apply techniques to mannequins or models, enhancing appeal. In portraits, smooth attire draws eyes to faces. This integration elevates overall quality.
Combine with background adjustments for complete transformations. You remove distractions, focusing on the main elements. These comprehensive edits tell stories through visuals, captivating viewers.
Final Thoughts on Mastering Wrinkle Removal
As you practice, removing clothing wrinkles in Photoshop becomes second nature. You transform flawed images into stunning visuals, impressing clients and audiences. Remember, patience and experimentation are key to success. With these tools and tips, tackle any fabric challenge confidently. Keep refining your approach, and watch your photo editing skills soar.
Stop clone‑stamping every wrinkle. Get a free quote for clothing photo editing (wrinkle removal + mannequin)
FAQs
- What is the best brush size for removing small wrinkles in Photoshop?
Use a brush slightly larger than the wrinkle (20–50 px) for smooth coverage without blurring details. - Can I remove clothing wrinkles from old or scanned photos?
Yes. Scan at 300 DPI+, then use Healing Brush and Clone Stamp. Preserve vintage tones carefully. - How do I fix wrinkles on patterned or printed fabrics?
Sample matching pattern areas with Clone Stamp at high zoom to keep color and texture perfect. - Is the Liquify Tool safe to use on clothing?
Yes, when used subtly. Keep low pressure and compare with original often. Ideal for dresses and jackets. - My edits look too perfect — how do I make them natural?
Add 1–3% noise or reduce layer opacity to 85–95% to restore realistic fabric texture. - How long does it take to remove wrinkles from one photo?
Simple portraits: 5–10 minutes. Complex fashion or group shots: 20–40 minutes. - Do I need advanced Photoshop skills for these techniques?
No. Basic methods are beginner-friendly. Learn Frequency Separation in one afternoon. - Can I use these methods in GIMP or Affinity Photo?
Yes. Similar tools exist. Workflow is almost identical, though Photoshop is most powerful. - What is the best way to save the final edited image?
Save as PSD to keep layers. Export JPEG (90–100%) for web or TIFF for print. Always backup originals.s.