
From Blurry to Brilliant: How To Make Your Camera Quality Better
April 13, 2026
How to Crop an Image in Illustrator 2026: 6 Easy Methods
April 16, 2026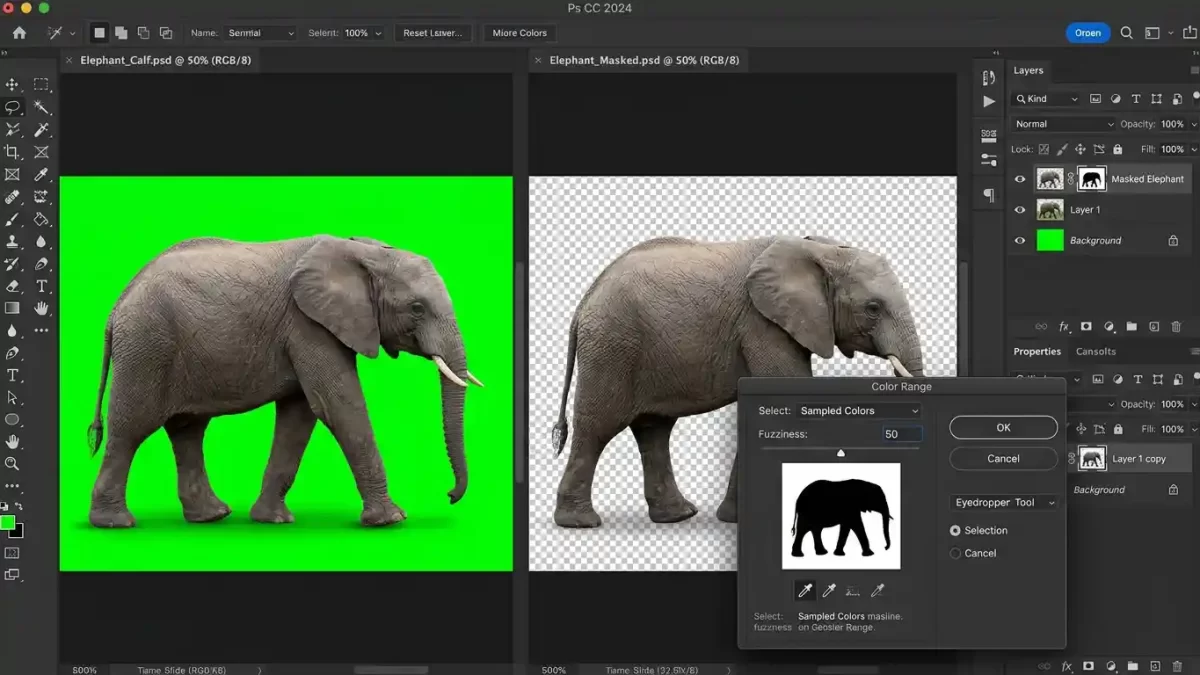
Whether you’re a graphic designer, photographer, or small business owner, you’ve likely faced a common challenge: an otherwise great image is ruined by one stubborn color. Perhaps a bright green logo bleeds into a white background, or a bold red object distracts from your main subject. Manually erasing pixel by pixel is tedious and often leaves rough edges. Fortunately, Photoshop provides several smart methods to remove a specific color quickly and cleanly.
In this guide, I’ll walk you through the best techniques to delete a color in Photoshop. You’ll learn step‑by‑step methods ranging from beginner‑friendly tools to professional‑grade, non‑destructive workflows. By the end, you’ll know exactly which approach to use for any image you encounter.
The Color Range tool is powerful – but complex edges still need a human touch. Get a free image masking demo for flawless results.
- Understanding How Photoshop “Sees” Color
- Method 1: Using the Color Range Tool (Best for Solid or Gradient Backgrounds)
- Method 2: The Magic Wand Tool (Fastest for Simple, Solid Backgrounds)
- Method 3: Hue/Saturation Adjustment Layer (Non‑Destructive and Precise)
- Method 4: Replace Color Command (Quick and Easy for Beginners)
- Method 5: Blend If (Advanced Technique for Gradient or Shadow Removal)
- Method 6: Working with Channels (Best for High‑Contrast Color Removal)
- Non‑Destructive Workflow: The Professional’s Approach
- Common Use Cases for Color Removal
- Pro Tips and Troubleshooting
- Final Thoughts
- Frequently Asked Questions
Understanding How Photoshop “Sees” Color
Before diving into the tools, it helps to understand how Photoshop interprets color. Every pixel in your image is a mix of red, green, and blue channels (in RGB mode). When you “remove a color,” you’re actually telling Photoshop to select all pixels that fall within a certain color range and then delete them or make them transparent.
Photoshop offers several ways to accomplish this. Each method suits different types of images. Your choice depends on whether you’re dealing with a solid background, a complex scene, or an object with fine details like hair or fur.
Method 1: Using the Color Range Tool (Best for Solid or Gradient Backgrounds)
The Color Range tool is my go‑to for removing a single color from a uniform background. You sample a color, and Photoshop creates a selection based on how closely other pixels match that sample. This method works beautifully for solid‑color backdrops, gradients, and even images with slight color variations.
For official guidance, Adobe’s help page on making color range selections provides additional troubleshooting tips.
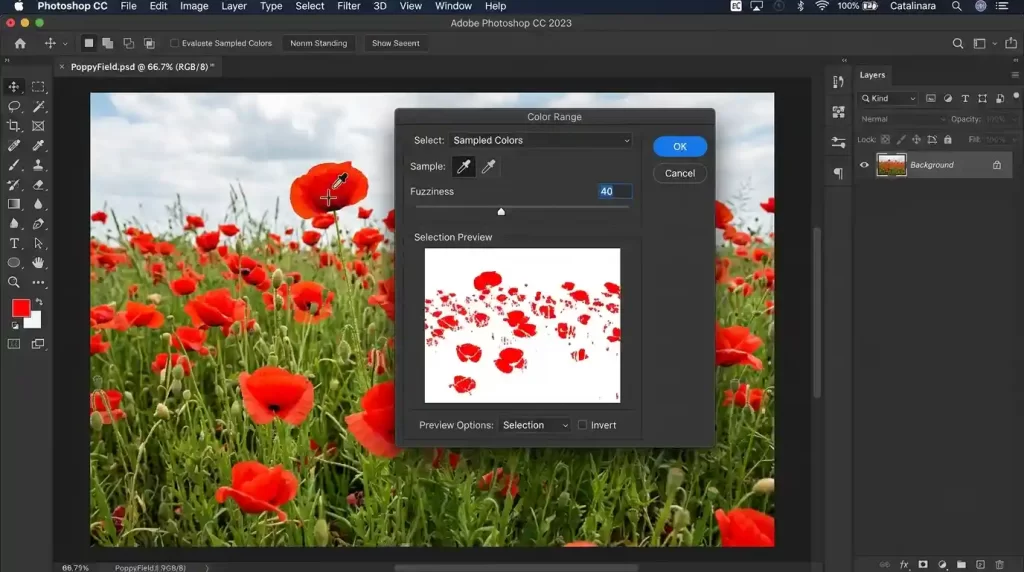
Step‑by‑Step: How to Delete a Color with Color Range
- Open your image in Photoshop and unlock the background layer. Click the lock icon in the Layers panel to turn it into a normal layer (Layer 0).
- Navigate to Select > Color Range. A dialog box appears with a preview window.
- Use the eyedropper tool (the one with no plus or minus) to click on the color you want to remove. The preview turns white where that color is selected and black where it’s not.
- To include similar shades, hold Shift and click additional areas with the plus eyedropper. To narrow the selection, hold Alt (Windows) / Option (Mac) and click with the minus eyedropper.
- Adjust the Fuzziness slider. This controls how many similar colors are included. Lower values (20‑40) target only the exact shade; higher values (60‑100) include more variations.
- Check the Localized Color Clusters box if your target color appears in multiple separate areas. Then use the Range slider to limit the selection to nearby pixels of that color.
- Click OK. You’ll see “marching ants” outlining the selected color.
- Press the Delete key to remove that color. The deleted area becomes transparent (assuming you’re on a regular layer, not the background layer).
- For a non‑destructive approach, skip the delete step. Instead, click the Add Layer Mask button at the bottom of the Layers panel. The selected color is now hidden by the mask, and you can paint with white or black on the mask to restore or remove more of that color later.
Pro Tips for Color Range
- Use the Selection Preview drop‑down in the Color Range dialog. Choose “Black Matte” to see selected areas in white against a black background, making it easier to spot missed pixels.
- Invert the selection if you want to keep the target color and remove everything else. Just check the “Invert” box before clicking OK.
- Save your settings by clicking the Save button in the Color Range dialog. This is handy if you frequently remove the same color from multiple images.
Removing one color is easy – but what if you need multiple color variants for your catalogue? Learn how our multi‑clipping path service handles colour changes at scale.
Method 2: The Magic Wand Tool (Fastest for Simple, Solid Backgrounds)
If your image has a perfectly uniform background (like a white product shot on a seamless backdrop), the Magic Wand tool is your fastest option. It selects all adjacent pixels that fall within a similar color range.
Adobe’s official guide to the Magic Wand tool explains its tolerance settings in more detail.
How to Use the Magic Wand to Erase a Color
- Select the Magic Wand from the toolbar (shortcut: W). If you see the Quick Selection tool instead, right‑click it and choose Magic Wand.
- In the options bar at the top, set the Tolerance value. This controls how wide a range of colors the wand selects. For a solid white background, a tolerance of 20‑30 often works perfectly. Increase it if the wand misses some areas; decrease it if it selects too much.
- Uncheck “Contiguous” if the color you want to remove appears in multiple disconnected areas (e.g., a white background with holes or gaps). Leave it checked if you only want to remove the color from one continuous area.
- Click on the color you want to remove. The Magic Wand selects all adjacent pixels within your tolerance range.
- To add more areas to the selection, hold Shift and click on another region. To subtract, hold Alt (Windows) / Option (Mac) and click.
- Press Delete to remove the selected color. The deleted area becomes transparent.
- If the edges look jagged, go to Select > Modify > Feather and enter 1‑2 pixels before deleting. This softens the transition.
When to Avoid the Magic Wand
The Magic Wand struggles with:
- Soft shadows or gradients (it will leave halos)
- Fine details like hair or fur
- Backgrounds that aren’t perfectly uniform
For those cases, stick with Color Range or the layer mask techniques described below.
Method 3: Hue/Saturation Adjustment Layer (Non‑Destructive and Precise)
For complete control without permanently deleting pixels, use a Hue/Saturation adjustment layer. This method targets a specific color range and desaturates it or shifts its lightness to effectively “remove” it from view.
Learn more about adjusting hue and saturation in Photoshop from Adobe’s reference library.
Removing a Color with Hue/Saturation
- In the Layers panel, click the Create New Fill or Adjustment Layer icon (the half‑filled circle) and choose Hue/Saturation.
- In the Properties panel, click the Master drop‑down and select the specific color you want to target (e.g., Reds, Yellows, Blues).
- Drag the Lightness slider all the way to the right (+100). This turns the selected color to white.
- If that doesn’t fully remove the color, also adjust the Saturation slider to -100. The targeted color becomes grayscale and blends into the background.
- To narrow the range of colors affected, use the two color‑range sliders at the bottom of the Properties panel. Drag the inner sliders to define the core color range, and drag the outer sliders to control the feathering.
Because this method uses an adjustment layer, you can turn the effect on or off at any time, adjust the opacity, or mask out parts where you want the original color to remain. This makes it perfect for professional workflows where you may need to revert or refine later.
Method 4: Replace Color Command (Quick and Easy for Beginners)
The Replace Color command combines color selection with direct adjustment, making it a good choice for beginners or when you need a fast result. It lets you pick a color and then replace it with another color or transparency.
Steps to Use Replace Color
- Go to Image > Adjustments > Replace Color.
- In the dialog, use the eyedropper to click on the color you want to remove.
- Adjust the Fuzziness slider to include more or fewer similar colors.
- Under “Replacement,” set Hue, Saturation, and Lightness to 0 if you want to make the color disappear (it will turn gray). To make it completely transparent, you’ll need to combine this with a mask or use one of the other methods.
- Click OK.
Keep in mind that Replace Color is a destructive adjustment—it permanently changes the pixel values of your original layer. For important projects, duplicate your layer first (Layer > Duplicate Layer) or use a Hue/Saturation adjustment layer instead.
Just like removing a color changes the entire look, adding realistic shadows transforms product photos. Check our shadow creation service for e‑commerce.
Method 5: Blend If (Advanced Technique for Gradient or Shadow Removal)
For images where the color you want to remove blends into shadows or gradients, the Blend If feature offers surgical precision. This advanced blending option hides pixels based on their brightness values.
Adobe’s blending modes and Blend If documentation provides a deeper technical background.
Using Blend If to Remove a Color
- Double‑click your image layer (not the thumbnail, but the blank area to the right of the layer name) to open the Layer Style dialog.
- At the bottom, find the Blend If section. You’ll see two gradient bars: “This Layer” and “Underlying Layer.”
- From the drop‑down menu, choose the color channel you want to affect (e.g., Red, Green, Blue) or stick with Gray to work with luminosity.
- On the “This Layer” bar, drag the left (black) triangle to the right to hide darker pixels, or drag the right (white) triangle to the left to hide lighter pixels.
- For a smooth transition, hold Alt (Windows) / Option (Mac) and click the triangle to split it. This feathers the transition and prevents harsh edges.
Blend If works especially well for removing a white or black background without affecting the subject. For example, to remove a pure white background, drag the right triangle of the “This Layer” bar inward until the white disappears, then split the triangle to soften the edge.
Method 6: Working with Channels (Best for High‑Contrast Color Removal)
For images with extreme color contrast (like a red object on a white background), the Channels panel provides a powerful, often overlooked method. You can read more about using channels in Photoshop for advanced selections.
How to Delete a Color Using Channels
- Open the Channels panel (Window > Channels). You’ll see Red, Green, and Blue channels.
- Click on each channel individually to see which one shows the highest contrast between the color you want to remove and the rest of the image. For a bright red object on a white background, the Red channel will make the object appear nearly white while the background stays dark.
- Duplicate the channel with the best contrast (right‑click the channel and choose Duplicate Channel).
- With the duplicate channel selected, press Ctrl+L (Windows) / Cmd+L (Mac) to open Levels. Drag the black and white input sliders to make the area you want to remove pure white and everything else pure black.
- Load the channel as a selection by Ctrl‑clicking (Windows) / Cmd‑clicking (Mac) on the duplicate channel thumbnail.
- Return to the RGB channel (click the top RGB channel), go back to the Layers panel, and press Delete. The targeted color disappears.
Channel‑based removal preserves fine details like hair or lace because it works with luminosity information rather than just color proximity.
Non‑Destructive Workflow: The Professional’s Approach
If you take away one concept from this article, let it be this: always work non‑destructively. Deleting pixels permanently limits your ability to adjust later. Instead, use layer masks.
How to Build a Non‑Destructive Color Removal Workflow
- After making a selection (using Color Range, Magic Wand, or any method), do not press Delete.
- Instead, click the Add Layer Mask button at the bottom of the Layers panel. The selected area becomes hidden, but no pixels are lost.
- To refine the mask, select the mask thumbnail (the white/black box next to your layer thumbnail) and paint with:
- White to reveal the image (remove the mask)
- Black to hide the image (apply the removal)
- Gray to create partial transparency
- Use the Brush Tool with soft edges to blend the removed area seamlessly into the background.
This approach gives you unlimited undo, the ability to fine‑tune edges at any time, and complete flexibility if your project requirements change.
Removing a color manually takes time. Get a free clipping path test for precise, one-click extractions.
Common Use Cases for Color Removal
Let’s look at specific scenarios and which method works best for each.
| Use Case | Recommended Method | Why It Works |
|---|---|---|
| Remove white background from a logo | Magic Wand + Delete | Fast, effective for solid uniform color |
| Delete green screen background | Color Range | Handles slight color variations and soft edges |
| Remove a color cast from a photo | Hue/Saturation adjustment layer | Non‑destructive, targets specific hues |
| Extract a subject from a complex background | Channels + Levels | Preserves fine details like hair |
| Hide a distracting color in a product photo | Blend If | Works with shadows and gradients |
| Batch process multiple images with same color | Color Range + Saved Settings | Load and apply same settings repeatedly |
Pro Tips and Troubleshooting
- Fuzziness vs. Tolerance: Color Range uses “Fuzziness” (graded selection), while the Magic Wand uses “Tolerance” (all‑or‑nothing selection). For soft edges or gradients, always choose Color Range.
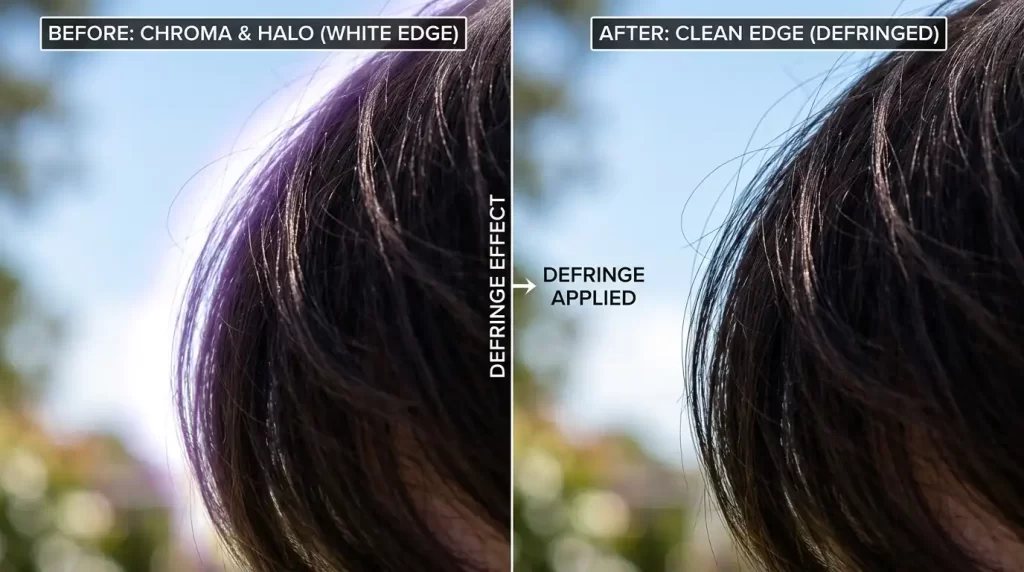
- Remove halos after deletion: If you see a faint outline of the deleted color, go to Layer > Matting > Defringe and enter 1‑2 pixels. This removes the leftover color fringe.
- Save transparency correctly: After removing a color, save your image as PNG to preserve the transparent areas. JPEG does not support transparency and will fill deleted areas with white.
- Use the Quick Mask mode: Press Q to enter Quick Mask mode. Paint with black to add to the selection, then press Q again to convert the mask to a selection. This gives you more control than the standard selection tools.
- Check your layer type: You cannot delete a color from a locked Background layer. Always unlock it first (double‑click the layer or click the lock icon).
Final Thoughts
Removing a specific color in Photoshop doesn’t have to be a headache. Whether you reach for the Color Range tool for precision, the Magic Wand for speed, or a Hue/Saturation adjustment layer for non‑destructive flexibility, Photoshop gives you multiple paths to a clean result.
The key is choosing the right method for your image. Solid background? Use the Magic Wand. Subtle gradients or shadows? Use Color Range or Blend If. Fine details like hair? Work with channels and masks. And always, always favor non‑destructive workflows with layer masks—your future self will thank you when you need to make changes later.
Now open Photoshop, pick an image with a distracting color, and give these techniques a try. With a little practice, you’ll remove unwanted colors in seconds, not minutes.
Stop spending hours tweaking the Color Range tool. Get a free quote for professional photo editing – from color removal to full retouching.
Frequently Asked Questions
Will removing a color reduce my image resolution?
No. Removing a color only deletes or hides pixels; it does not change the pixel dimensions or resolution. However, if you delete large contiguous areas, the remaining pixels may appear isolated, but the actual resolution stays the same.
How do I avoid removing shades that are similar to my target color?
Lower the Fuzziness setting when using Color Range, or reduce the Tolerance on the Magic Wand. For Hue/Saturation adjustments, narrow the color range by dragging the inner sliders in the Properties panel. You can also refine your selection using the Lasso tool or Quick Mask to manually exclude similar tones.
Can I remove a color from a JPEG without losing quality?
Yes, but JPEG is a lossy format. For the best results, convert your JPEG layer to a Smart Object (Layer > Smart Objects > Convert to Smart Object) before applying any adjustments. Better yet, work with lossless formats like TIFF or PSD whenever possible.
What’s the difference between removing a color and making it transparent?
When you delete a color, you permanently remove those pixels. Making a color transparent typically involves creating a layer mask or using blending modes to hide the color while preserving the underlying pixel data. Transparency is non‑destructive and reversible; deletion is permanent unless you have an undo history or a saved backup.
How do I remove a color from only part of an image?
Make a selection around the area you want to edit using the Lasso, Marquee, or Pen tool. Then apply any of the color removal methods described above. The effect will only apply inside your selection.
Why does my Magic Wand select too much (or too little) of the color?
Adjust the Tolerance value. A high tolerance (e.g., 100) selects a wide range of colors; a low tolerance (e.g., 10) selects only the exact pixel you click. Start with a tolerance of 30 and increase or decrease as needed. Also check whether “Contiguous” is selected—uncheck it to select non‑adjacent areas of the same color.
Can I batch‑remove the same color from many images at once?
Yes. Record an Action (Window > Actions) while you perform the color removal on one image. Then run that action on a folder of images using File > Automate > Batch. This works well for Color Range selections with saved settings.
Does the Magic Eraser tool remove color the same way as the Magic Wand?
The Magic Eraser tool combines the Magic Wand selection with an automatic delete. When you click on a color, it immediately erases all similar contiguous pixels. It’s fast but destructive and offers less control than using a mask. Use it only for quick, simple images where you don’t need fine adjustments.