

What’s the Difference Between SD and HD Video?
April 9, 2026
Removing Unwanted Colors in Photoshop: Step-by-Step Guide
April 15, 2026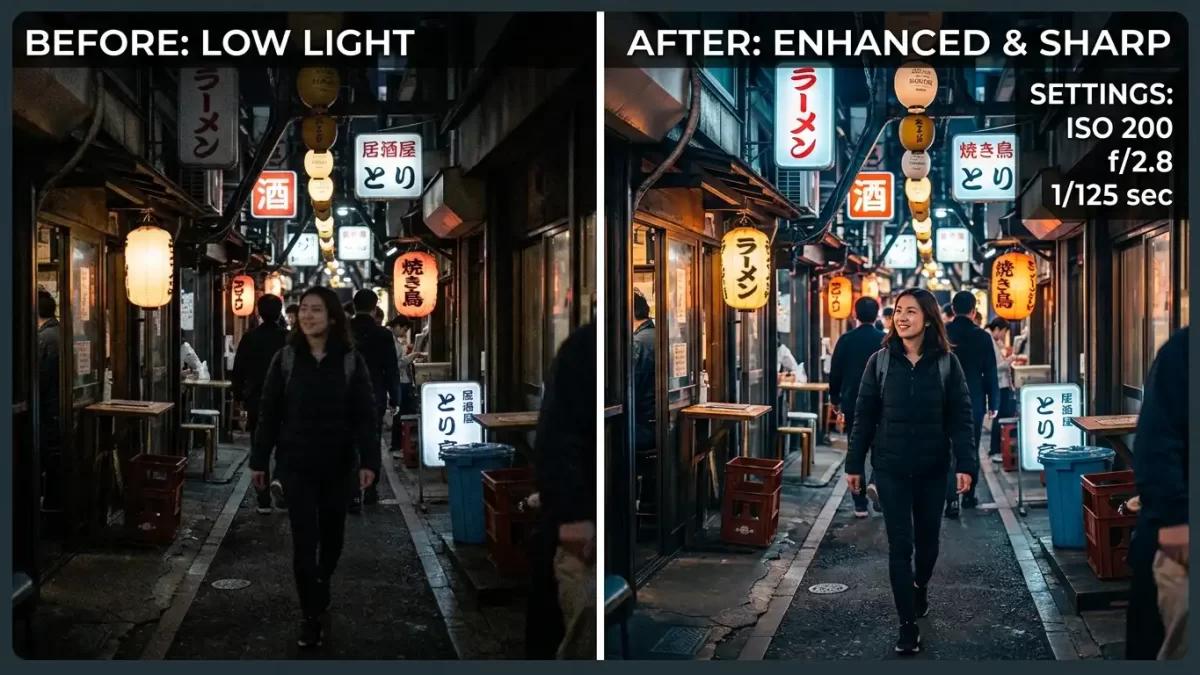
You finally pull out your phone or camera to capture a perfect sunset, a family gathering, or that once-in-a-lifetime moment. You press the shutter button, check the result, and feel a wave of disappointment. The image looks grainy, soft, or just dull. Sound familiar? You are not alone. Most photographers struggle with this exact problem. The good news? You do not need to spend thousands on new gear to fix it.
This guide walks you through practical, actionable steps to make your camera quality better right now. Whether you use a high-end DSLR, a compact mirrorless camera, or the device in your pocket, these techniques will help you capture sharper, clearer, and more professional-looking images.
Sharp photos are just the start. Get a free clipping path demo to add perfect cutouts and clean edges.
- Clean Your Lens: The Fastest Free Upgrade
- Master Manual Controls: Unlock Your Camera’s Hidden Potential
- Lighting: Your Secret Weapon for Stunning Photos
- Focus with Intention: Never Miss the Sharp Shot
- Composition: Frame Your Shots Like a Pro
- Avoid Digital Zoom: Stay Sharp at a Distance
- Shoot in RAW: Unlock Editing Superpowers
- Stabilize Your Camera: Kill the Blur
- Post-Processing: The Final Polish
- Beyond the Basics: Advanced Tips for Serious Shooters
- Practice With Purpose
- Frequently Asked Questions (FAQ)
Clean Your Lens: The Fastest Free Upgrade
A dirty lens ruins more photos than any other single factor. Even a tiny smudge scatters light and creates hazy, low-contrast images. Before you blame your gear, check the glass.
Follow this cleaning routine:
- Use a rocket air blower first. Blow away loose dust and dirt without touching the lens. (Learn more about proper lens cleaning techniques from Nikon.)
- Take a clean microfiber cloth. Wipe the lens gently in circular motions starting from the center.
- For stubborn fingerprints or grease, dampen the cloth with a few drops of lens cleaning solution. Never spray liquid directly onto the lens.
- Avoid paper towels, tissues, or rough fabrics. These materials scratch delicate coatings.
- Use a small brush with soft bristles for hard-to-reach areas.
Most modern smartphones also include a “dirty lens warning” feature. Enable this setting so your phone alerts you before a smudge ruins your shot. Make lens cleaning a habit, not an afterthought. A clean piece of glass produces instantly better results at zero cost.
Master Manual Controls: Unlock Your Camera’s Hidden Potential
Your camera’s auto mode makes convenient guesses, not creative decisions. To truly improve image quality, you need to take control. Modern smartphones and dedicated cameras both offer manual modes that transform how you shoot.
Understand the Exposure Triangle
Three settings control every photo: aperture, shutter speed, and ISO. (For a deeper dive, see this detailed explanation of the exposure triangle on Wikipedia.) Learning how they work together gives you complete creative control.
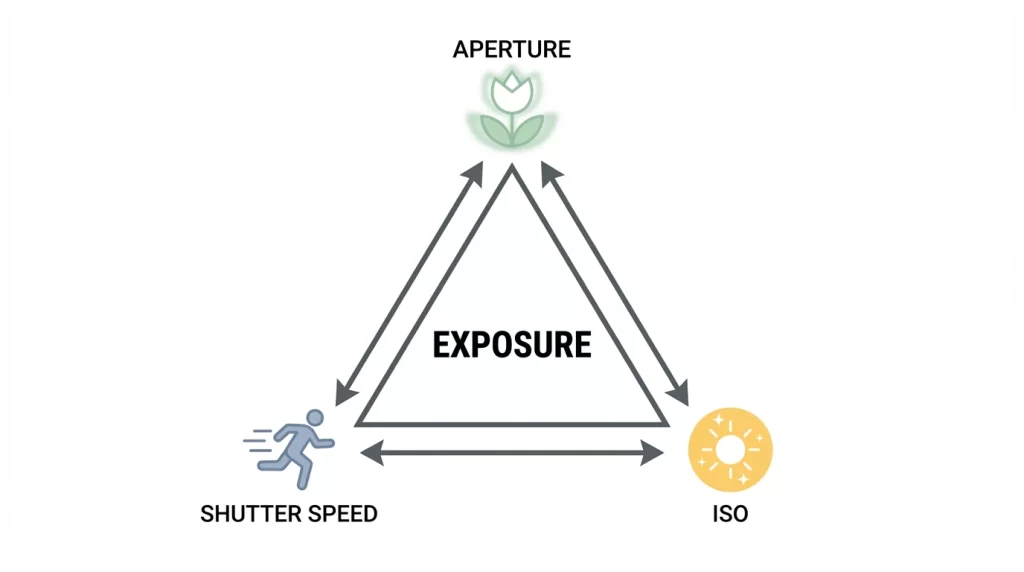
Aperture (f-stop) controls the size of the lens opening. A wider aperture (lower f-number like f/1.8) creates a blurry background and performs well in low light. A narrower aperture (higher f-number like f/11) keeps everything sharp from front to back.
Shutter speed determines how long light hits the sensor. Fast speeds like 1/1000th of a second freeze motion perfectly. Slow speeds like 1 second create intentional blur but require a tripod.
ISO measures your sensor’s light sensitivity. Always keep ISO as low as possible (100-400) for the cleanest, noise-free images. Increase ISO only when you absolutely need more brightness.
Pro tip: Start by learning one setting at a time. Set your camera to aperture priority mode and practice changing only the f-stop. Move to shutter priority next, then finally full manual mode.
Access Pro Mode on Your Smartphone
Most flagship Android phones include a built-in Pro mode. Swipe to find it in your camera app. Look for controls labeled ISO, shutter speed, white balance, and focus. iPhones do not offer a native manual mode, but third-party apps like Halide, ProCamera, or Manual provide full control.
Key settings to adjust in Pro mode:
- Set ISO between 100-400 in good light to minimize grain
- Use faster shutter speeds (1/500s or higher) to freeze action
- Lower shutter speed to 1/60s or slower for stationary subjects in dim light
- Adjust white balance manually using Kelvin values to match your light source
- Tap to focus, then lock it with a long press on your screen
These small adjustments instantly elevate your photos from casual snapshots to intentional, professional-looking images.
Lighting: Your Secret Weapon for Stunning Photos
Light makes photography possible. Bad lighting produces flat, noisy, or blown-out images. Good lighting reveals texture, depth, and emotion. Master light, and you master your camera.
Natural Light Strategies
Window light creates beautiful, soft illumination for portraits and still life. Position your subject near a large window, but avoid direct sunlight streaming in. A sheer curtain diffuses harsh rays perfectly.
Golden hour — the hour after sunrise and before sunset — delivers warm, directional light that flatters every subject. Shadows become longer and softer, colors look richer, and highlights rarely blow out.
Midday sun creates harsh shadows and unflattering contrast. Move into open shade or use a diffuser to soften the light. A simple white bedsheet held above your subject works surprisingly well.
Artificial Lighting Solutions
When natural light is not enough, bring your own. Desk lamps, video lights, or even a friend’s phone flashlight can transform a dark scene.
Tips for artificial lighting:
- Place lights at 45-degree angles to reduce flat, frontal illumination
- Use multiple light sources to fill harsh shadows
- Bounce light off white walls, ceilings, or foam boards for softer results
- Avoid mixing different color temperatures (warm tungsten with cool LED) unless intentional
A basic reflector costs very little but changes everything. You can also use white poster board, aluminum foil on cardboard, or even a white t-shirt stretched over a frame.
Great lighting in-camera + perfect retouching = stunning results. Check our photo retouching pricing for bulk images
Focus with Intention: Never Miss the Sharp Shot
Modern cameras focus quickly, but they do not always focus correctly. Blurry images almost always result from focus errors, not equipment limitations.
Manual Focus for Critical Sharpness
Autofocus works great in many situations, but it struggles with low contrast, low light, or complex backgrounds. Switch to manual focus when the camera hunts or picks the wrong subject.
For DSLR and mirrorless cameras:
- Locate the focus ring on your lens (usually near the front)
- Switch your lens or camera body to MF (Manual Focus)
- Turn the ring slowly while watching your viewfinder or LCD screen
- Use focus peaking if your camera offers it — this highlights sharp edges in red or white
For smartphones:
- Tap the screen where you want focus
- Press and hold to lock focus and exposure (AE/AF Lock)
- Swipe up or down on the sun icon next to the focus box to adjust brightness
Choose the Right Focus Mode
Single-point autofocus gives you the most control. Select one focus point and place it directly over your subject’s eye (for portraits) or your main point of interest. Avoid using all focus points at once — the camera cannot read your mind and often picks the wrong element.
For moving subjects like sports or wildlife, switch to continuous autofocus (AF-C on Nikon, AI Servo on Canon). This mode constantly adjusts focus as your subject moves through the frame.
Composition: Frame Your Shots Like a Pro
Even the sharpest, best-exposed photo falls flat with poor composition. How you arrange elements within your frame dramatically impacts visual quality.
The Rule of Thirds (Then Break It)
Turn on your camera’s grid overlay. Most devices show two horizontal and two vertical lines dividing the frame into nine equal rectangles. Position key elements along these lines or at their intersections rather than dead center.
This simple shift creates tension, guides the viewer’s eye, and immediately improves almost any photo. Once you understand why it works, you will know exactly when to break the rule for creative effect.
Fill the Frame and Eliminate Distractions
The most common composition mistake: standing too far away. Move closer. Fill your frame with your subject. Remove empty space around the edges.
Before pressing the shutter, scan the entire frame:
- Look for poles, tree branches, or bright objects behind your subject
- Check the corners for photobombers or clutter
- Ensure horizons stay level (use your camera’s electronic level)
- Remove distracting elements by changing your position or angle
A clean, intentional composition makes every photo look more professional, regardless of your camera’s technical specifications.
Avoid Digital Zoom: Stay Sharp at a Distance
Digital zoom seems convenient, but it destroys image quality. Unlike optical zoom (which uses glass to magnify), digital zoom simply crops and enlarges the existing pixels. The result looks pixelated, soft, and lacking detail.
Better alternatives to digital zoom:
- Move physically closer to your subject whenever possible
- Use optical zoom if your camera or phone has multiple lenses
- Take the photo at full resolution and crop later in editing software
- Accept the wider view and recompose your shot creatively
On smartphones, zoom beyond 2x or 3x (depending on your device) always triggers digital zoom. Stay within the optical range for maximum quality.
Shoot in RAW: Unlock Editing Superpowers
Your camera probably saves photos as JPEGs by default. JPEG files compress image data to save space, but this compression throws away valuable information. Once gone, you cannot recover it.
RAW files preserve everything your sensor captures. Highlights that look completely white in a JPEG? A RAW file lets you recover detail. White balance looks wrong? Change it without penalty. Shadows appear too dark? Lift them without introducing ugly noise. (Read this RAW vs JPEG comparison from Adobe for more details.)
How to enable RAW:
- On DSLR/mirrorless: Find “Image Quality” in your menu and select RAW or RAW+JPEG
- On iPhone: Go to Settings > Camera > Formats > Apple ProRAW (on Pro models)
- On Android: Look for Pro mode settings or install a third-party camera app
RAW files occupy more storage space and require editing software like Lightroom, Capture One, or even free options like Darktable. The extra effort pays off in image quality that rivals professional results.
Even the best RAW files need editing. Learn how our image masking service handles complex selections like hair and glass.
Stabilize Your Camera: Kill the Blur
Camera shake ruins more photos than you realize. Even your heartbeat creates micro-movements that soften images, especially in low light or at longer focal lengths.
The Reciprocal Rule
Your shutter speed should be at least 1 divided by your focal length. Shooting at 50mm? Use 1/50th of a second or faster. Zoomed to 200mm? You need 1/200th or faster.
When light forces you to use slower speeds, stabilize your camera:
- Use a tripod for landscapes, architecture, or any static subject
- Lean against a wall, tree, or lamppost for extra support when a tripod is unavailable
- Tuck your elbows into your chest and hold your breath while pressing the shutter
- Use your camera’s self-timer or remote release to avoid shake from pressing the button
Image stabilization (IBIS in camera bodies or OIS in lenses) helps, but it cannot work miracles. Good technique beats technology every time. (Learn how image stabilization works from Canon.)
Post-Processing: The Final Polish
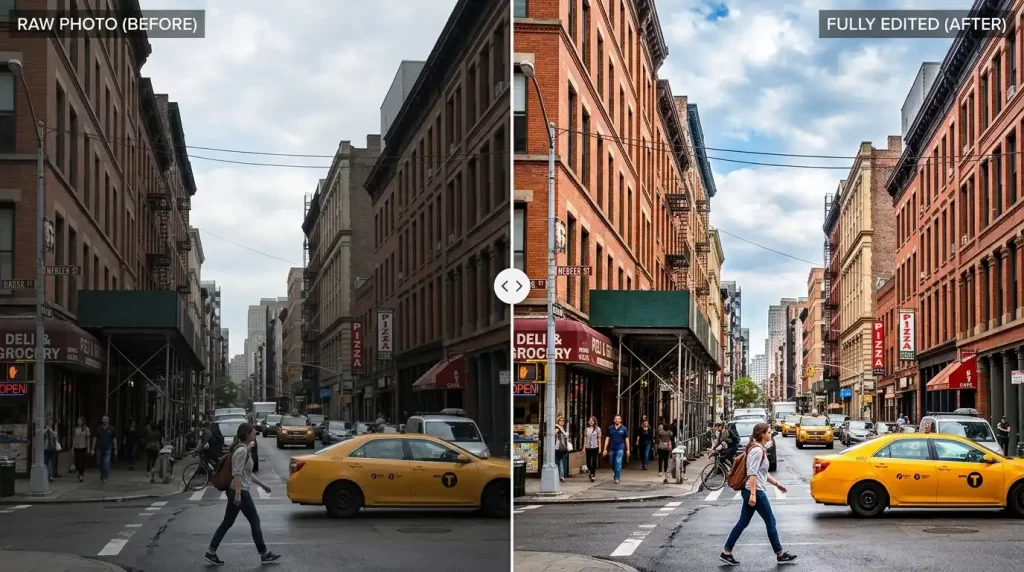
Taking the photo represents only half the work. Editing transforms good images into great ones. Every professional photo you admire has been edited.
Simple Edits That Make a Big Difference
Start with basic adjustments before attempting complex edits:
- Exposure: Brighten or darken the overall image
- Contrast: Add punch by increasing contrast slightly
- White balance: Correct color casts for natural-looking tones
- Highlights and shadows: Recover detail in bright and dark areas
- Clarity or texture: Add subtle mid-tone contrast for more definition
- Sharpening: Apply light sharpening (around 25-50) to enhance edges
Free and Paid Editing Tools
Mobile options:
- Adobe Lightroom Mobile (free version available)
- Snapseed (completely free from Google)
- VSCO (basic features free)
Desktop options:
- Adobe Lightroom Classic (subscription)
- Capture One (professional-grade, paid)
- Darktable (powerful and completely free)
- GIMP (free, Photoshop alternative)
Save your edits as a new file to preserve your original image. Over time, develop your own editing style that enhances your photos without making them look artificial.
Beyond the Basics: Advanced Tips for Serious Shooters
Once you master the fundamentals, these advanced techniques push your image quality even further.
Understand Your Lens’s Sweet Spot
Every lens performs best at a specific aperture, typically two to three stops down from its widest setting. For most lenses, this falls around f/5.6 to f/8. Shoot at these apertures for maximum sharpness across the frame.
Use a Polarizing Filter for Landscapes
A circular polarizer cuts glare from water, glass, and leaves. It deepens blue skies and increases color saturation. This simple filter screws onto your lens and produces effects impossible to replicate in editing. (Check out this guide on how to use a polarizing filter from B&H Explora.)
Bracket Your Exposures for High-Contrast Scenes
When a scene contains both bright highlights and dark shadows (like a sunset landscape), take multiple shots at different exposures. Merge them later in software to create a single image with full detail throughout.
Keep Your Sensor Clean (Interchangeable Lens Cameras)
Dust on your camera sensor appears as dark spots in every photo, especially at narrow apertures. Most cameras include a self-cleaning mode that vibrates the sensor to shake off dust. For stubborn particles, use a rocket blower with the camera facing downward. If dust remains, consider professional cleaning.
Practice With Purpose
Reading tips alone does not improve your photography. You need deliberate, focused practice. Set small goals for each shooting session:
- Spend one hour shooting only in manual mode
- Practice focusing manually on moving subjects
- Shoot the same scene at every aperture from wide open to f/16
- Edit the same RAW file five different ways to understand the possibilities
Review your images critically. Compare your results to photos you admire. Identify what works and what needs improvement. Photography is a skill, not a talent. Every great photographer started exactly where you are now.
Stop struggling with post-processing. Get a free quote for professional photo editing – from basic retouching to advanced masking.
Frequently Asked Questions (FAQ)
1. Why are my photos still blurry even with a high-megapixel camera?
Megapixels measure resolution, not sharpness. Blurry photos usually result from focus errors, camera shake, or slow shutter speeds. Check your focus point, stabilize your camera, and ensure your shutter speed meets the reciprocal rule.
2. Does a higher megapixel count mean better image quality?
Not necessarily. Sensor size, lens quality, and processing matter more than megapixels. A 12-megapixel full-frame camera produces cleaner, more detailed images than a 108-megapixel smartphone sensor in most conditions.
3. Can I improve camera quality with just software?
Software helps, but it cannot fix fundamentally bad captures. Prioritize getting the shot right in-camera through proper lighting, focus, and exposure. Use editing to enhance, not rescue.
4. What is the single fastest way to improve smartphone photos?
Clean your lens and learn to tap for focus. These two actions take five seconds but produce immediate, dramatic improvements.
5. How do I fix grainy, noisy photos?
Noise comes from high ISO settings. Lower your ISO as much as possible. Add more light to your scene, use a wider aperture, or slow your shutter speed (with stabilization). In editing, use noise reduction tools sparingly — too much smoothing destroys detail.
6. Why do my indoor photos always look yellow or blue?
Your camera’s auto white balance struggles with artificial lighting. Switch to manual white balance or use presets like Incandescent (for yellow bulbs) or Fluorescent (for office lights). Shoot in RAW to fix white balance perfectly in editing.
7. Is optical image stabilization (OIS) necessary?
OIS helps significantly, especially in low light or at longer focal lengths. However, good shooting technique and proper shutter speeds remain more important. OIS cannot fix subject motion or poor focus.
8. How often should I clean my camera lens?
Clean your lens only when you see visible smudges or dust affecting your images. Over-cleaning risks scratching delicate coatings. Use a blower for dust and a microfiber cloth for fingerprints as needed.