
Clipping Path vs. Background Removal: The Ultimate 2026 Guide for E-commerce & Photographers
October 20, 2025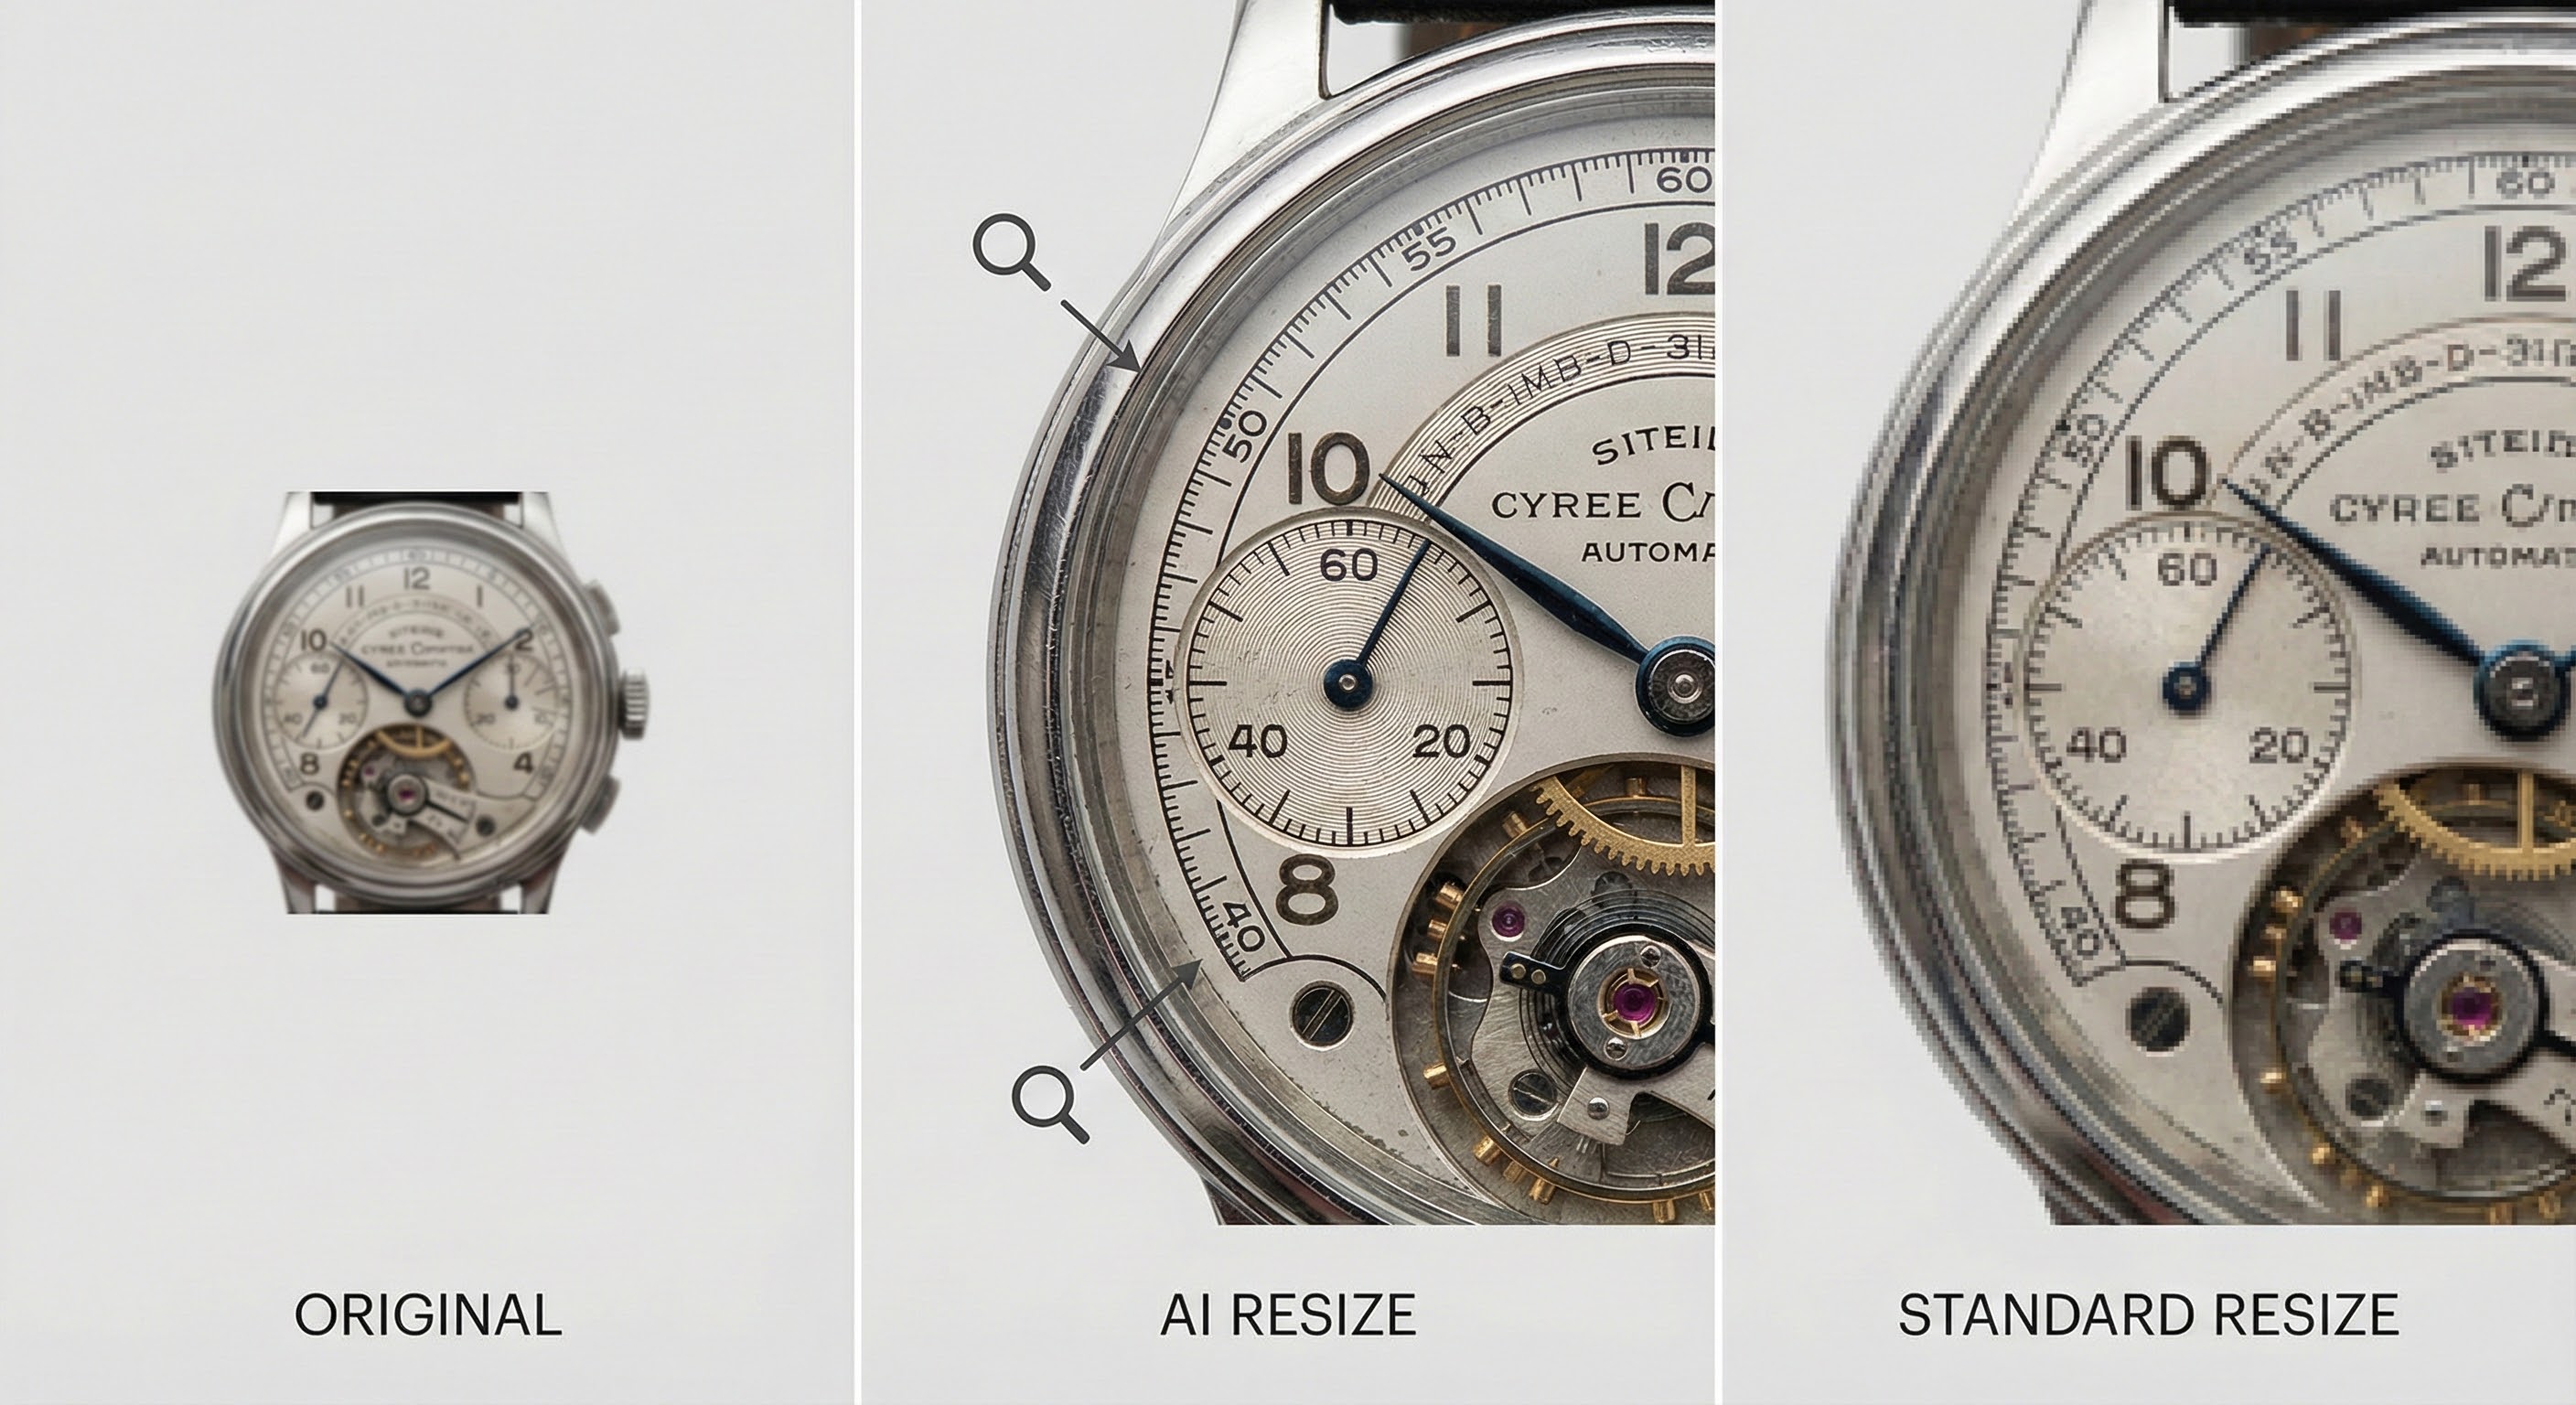
Resize Images Without Quality Loss ?
October 20, 2025
- Clipping Path in InDesign: Easy Steps for Beginners
- What is a Clipping Path in InDesign?
- Clipping Path vs. Clipping Mask: What's the Difference?
- Why Use Clipping Paths in InDesign?
- How to Create a Clipping Path in InDesign: Step by Step
- Clipping Path for E-commerce and Product Photography
- Advanced and Feature-Specific Clipping Path Techniques
- Troubleshooting Clipping Paths in InDesign
- Comparison: Clipping Path in InDesign vs. Other Methods
- Action-Oriented InDesign Clipping Path Tutorials
- Frequently Asked Questions (FAQ)
- Conclusion: Clipping Path Mastery for Modern Design
Clipping Path in InDesign: Easy Steps for Beginners
In the world of graphic design, digital publishing, and e-commerce, producing flawless visuals is essential for engaging your audience and creating a professional brand image. Whether you’re designing a catalog, magazine, product brochure, or digital ad, you want your pictures to stand out, blend seamlessly, and draw attention to the subject, not the background. This is precisely where the concept of a clipping path in InDesign becomes pivotal.
In this extensive, up-to-date guide, you’ll master how to make a clipping path in InDesign, discover the best clipping path techniques in InDesign, and compare the process with related tasks such as making a clipping mask in InDesign, performing photo retouching, and more.
You’ll find actionable steps whether you’re a beginner learning clipping path for product images in InDesign or a professional looking to refine your workflow with compound or multi clipping paths. Throughout, we’ll also share opportunities for internal linking, to services like background removal, image masking, ghost mannequins, color changes, and beauty retouching.
What is a Clipping Path in InDesign?
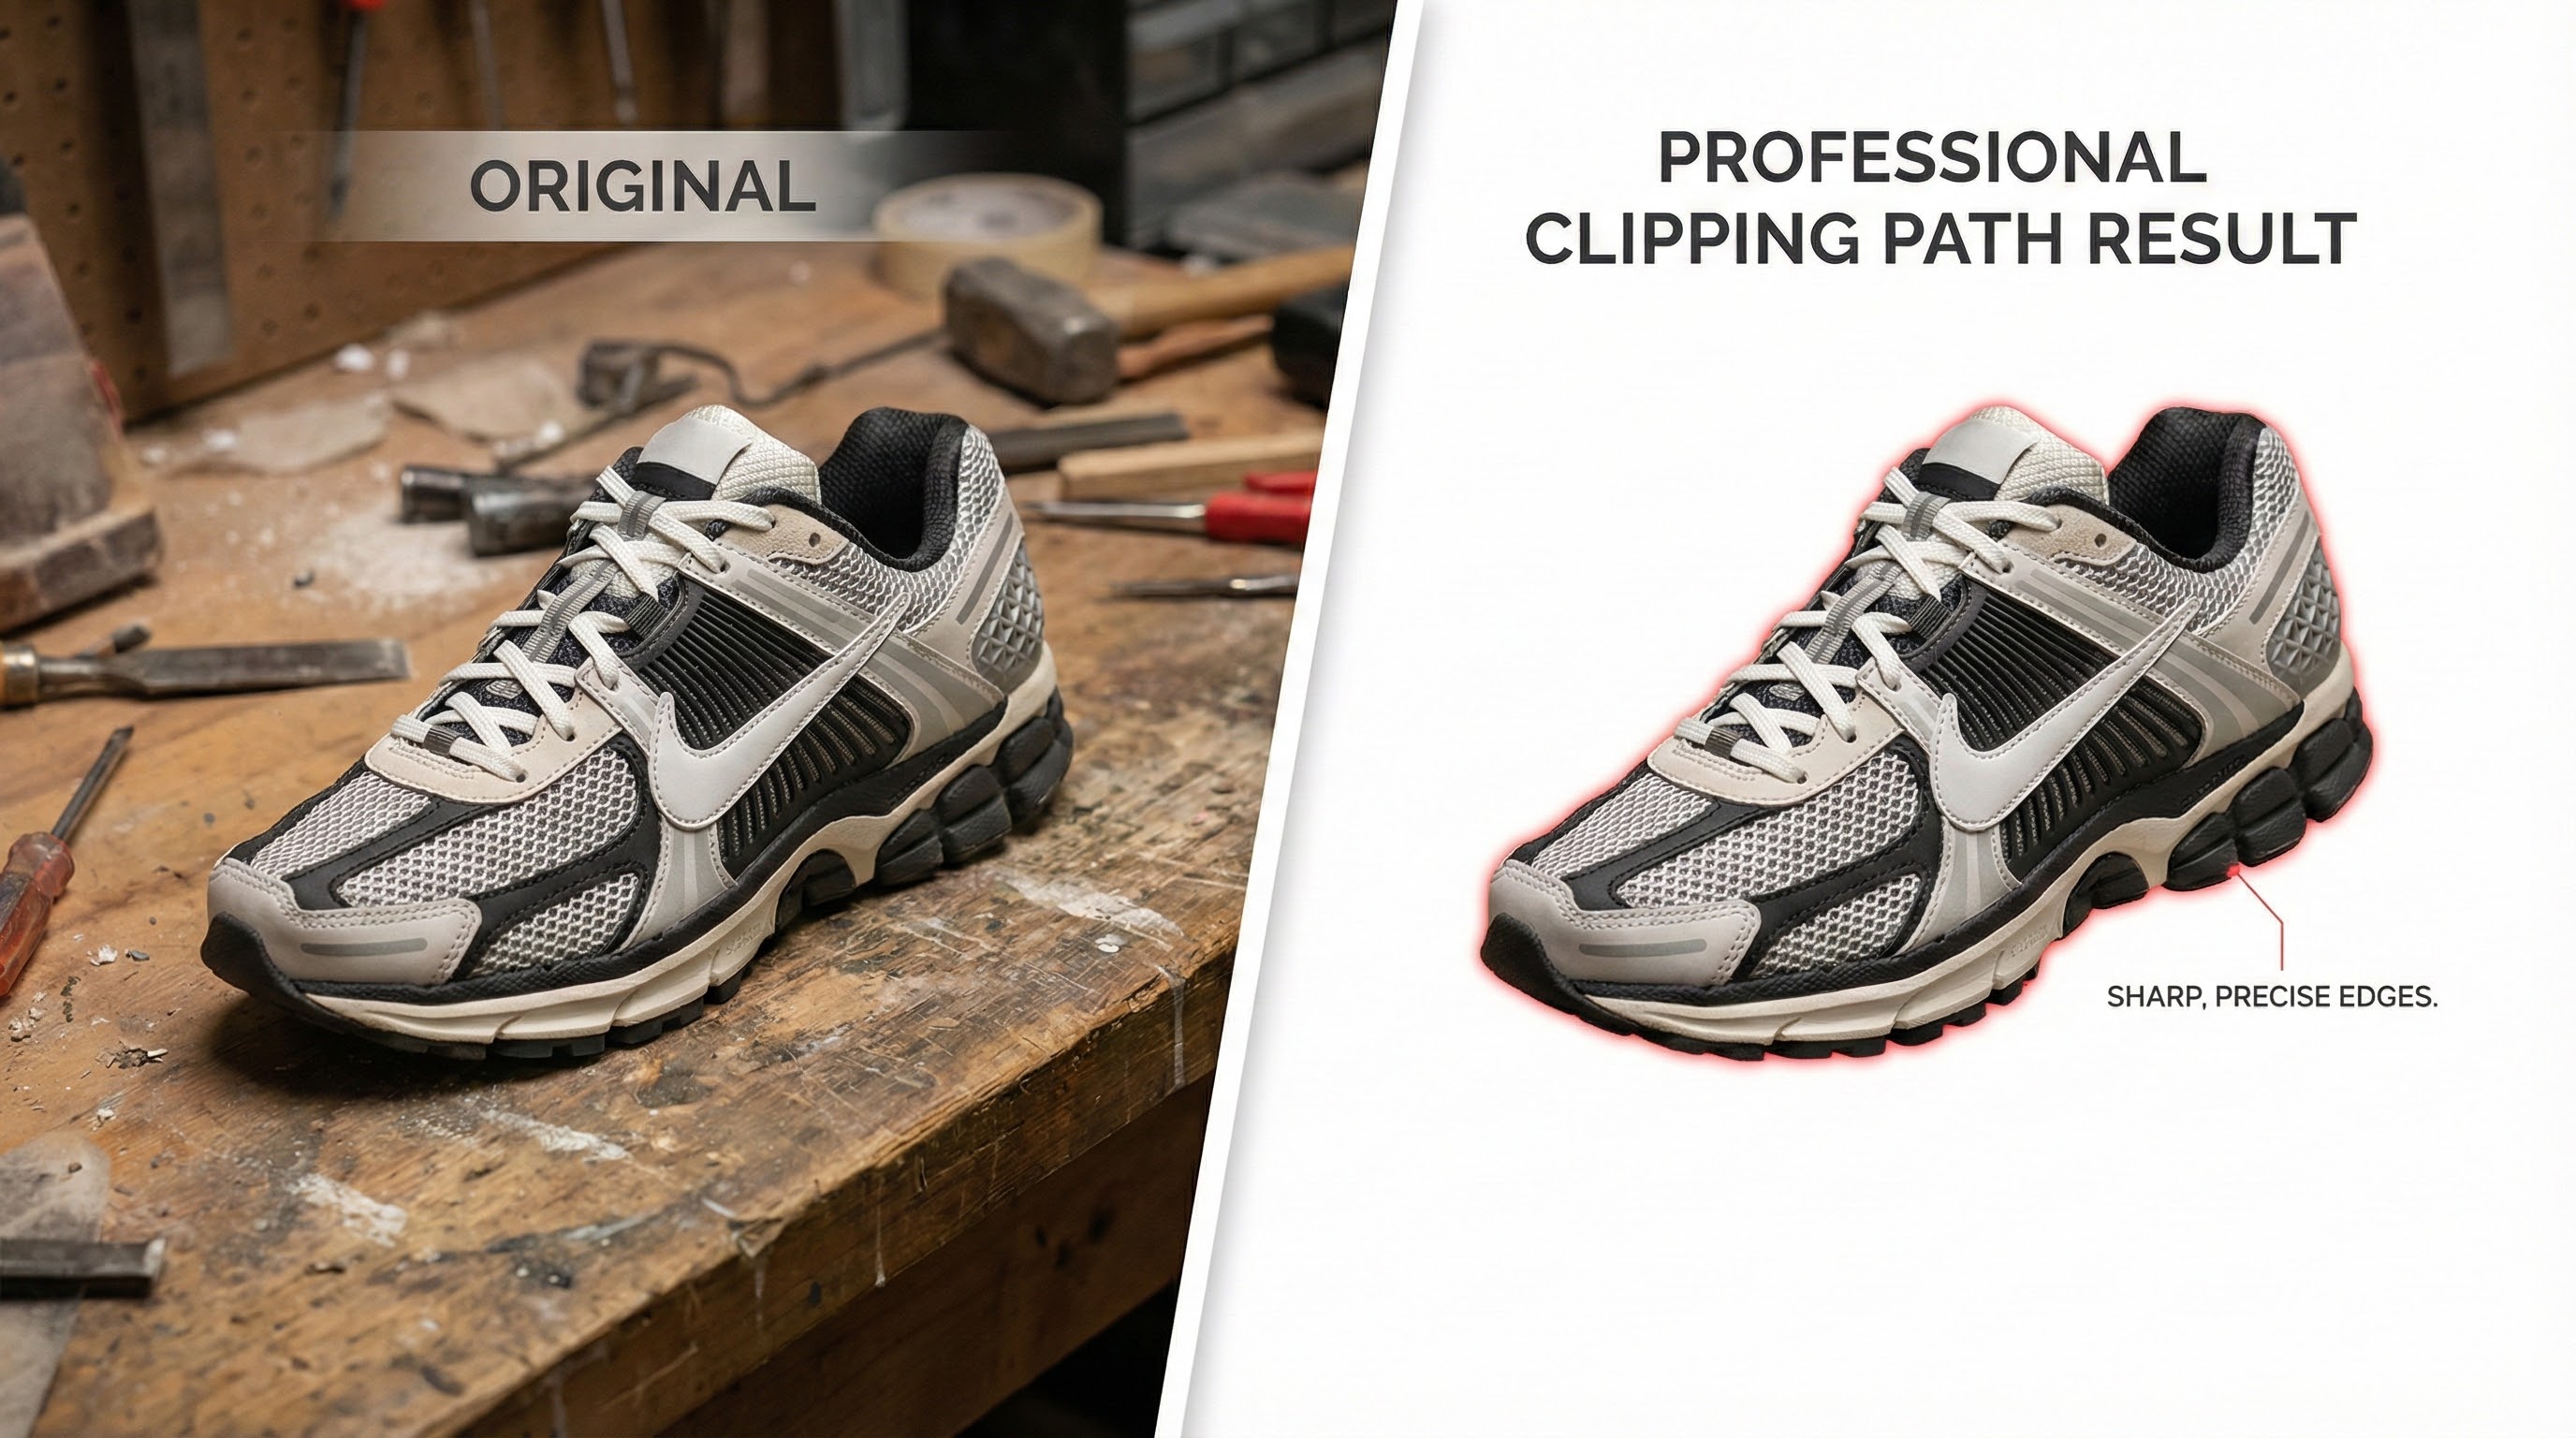
A clipping path is a vector outline that lets you “clip” or crop an image so that only the part inside the path is visible, essentially removing anything outside the line. Think of it as a digital pair of scissors for your photos! Mastering how to use a clipping path in InDesign enables you to place products on pure white backgrounds, wrap text around objects, and incorporate images with complex edges into your layouts.
Unlike a simple rectangular crop, a clipping path can trace any contour, making it ideal for e-commerce product shots, multi-figure portraits, or intricate decorative graphics. Understanding these tools and the difference between a clipping path and a vs mask in InDesign will shape your design approach.
Clipping Path vs. Clipping Mask: What’s the Difference?
Although these terms are used interchangeably, they’re distinct in Adobe InDesign, and in how they’re used for professional design:
- Clipping Path: Created either within InDesign or embedded in a supported image file (like a PSD, TIFF, or EPS), a clipping path removes the background of a single image. It’s often used for product images, Jewelry, or any photo requiring a non-rectangular crop. For clipping path vs Photoshop in InDesign workflows, Photoshop paths are the gold standard for precision.
- Clipping Mask: Instead, a clipping mask in InDesign uses a vector shape (like text or a custom-drawn form) as a “window” to show part of an image or artwork beneath. This is useful for creative photo layouts where images are shaped into letters, numbers, or icons.
For most business needs, especially background removal, e-commerce, or catalog projects, a clipping path offers the control and consistency you want.
Why Use Clipping Paths in InDesign?
Before we get hands-on, let’s run through some practical uses:
- E-commerce sellers use clipping paths to feature apparel, products, and accessories on crisp, distraction-free backgrounds.
- Publishers and marketers rely on this technique for seamless layouts, enabling visuals to flow smoothly with text and branding elements.
- Designers use them for color changes, shadow creation, beauty retouching, and creating multiple clipping paths for objects needing various cutouts.
Using a clipping path is also a key part of a full photo retouching workflow, right alongside exposure corrections, sharpness tweaks, and color enhancements.
How to Create a Clipping Path in InDesign: Step by Step
Ready to learn the process? Here’s the complete, step-by-step clipping path in the InDesign guide:
Step 1: Place Your Image
Start by adding your photo or product image.
- Go to File> Place (or use shortcut Ctrl+D/Cmd+D) and select your File.
- Supported formats for paths: PSD, TIFF, JPEG, EPS.
- Click to place the image in your document.
Tip: High-contrast images (e.g., white backgrounds) deliver the best results with InDesign’s automated options. For bulk tasks or intricate photos, our background removal service can do the prep for you.
Step 2: Access Clipping Path Options
With the image selected, go to Object > Clipping Path > Options…. Here you’ll find the settings to automatically or manually create your path.
Step 3: Generate an Automatic Clipping Path
For images with clear subject-background separation:
- Inside Clipping Path Options, select Detect Edges (for raster images) or Photoshop Path (if path embedded).
- Enable Preview.
- Adjust:
- Threshold: Controls what’s “kept” or “cut” based on light/dark pixels.
- Tolerance: How tightly the outline fits.
- Inset Frame: Moves the path inward (to avoid “halo” backgrounds).
- Invert: Switches focus from object to background.
- Include Inside Edges: Cuts out internal holes (e.g., mug handles).
- Check Restrict to Frame if you don’t want the path to extend beyond the image border.
Step 4: Using Embedded Photoshop Paths or Alpha Channels
If your image was edited in Photoshop and you used the Pen Tool or Magic Wand to create a path (or alpha channel):
- Select Photoshop Path or Alpha Channel under Type.
- Choose the correct path or alpha (if more than one exists).
- Your exported PSD or TIFF will contain those paths for the cleanest, sharpest cutout, essential for Jewelry, hair, or product images.
For best results, try InDesign Photoshop path clipping, especially for images prepared by a professional retoucher.
Step 5: Manual Clipping Path Adjustments
Sometimes, the automatic method leaves small bits of background, overly smooths complex edges, or fails with busy backdrops. Here’s how to fine-tune your path:
- After applying an automatic path, choose Convert Clipping Path to Frame.
- Use the Direct Selection Tool (white arrow, A) to click anchor points and handles, making manual adjustments.
- Add/delete points using the Pen Tool (P) as needed.
When handling images with soft or frizzy edges (hair, fur), consider our specialized image masking and beauty retouching services, which go beyond what InDesign can offer.
Clipping Path for E-commerce and Product Photography
- Clipping path for e-commerce: Remove distractions to highlight products so customers focus on what you’re selling.
- Clipping path for product images in InDesign: Make catalog design or marketing flyers pop by combining cutouts, drop shadows, or color-changing overlays.
- Multi clipping path: Edit multiple objects within a single image, think shoes, laces, and soles, all separately for custom correction or color changes.
You can even automate clipping path in InDesign for fast bulk edits. Ask about our workflow solutions!
Advanced and Feature-Specific Clipping Path Techniques
Using Compound Paths
Complex images (like a donut or interior windows on a car) will need compound paths:
- Draw each outer and inner shape as separate paths with the Pen Tool.
- Select all, then go to Object > Paths > Make Compound Path.
- File > Place to insert your image into this custom compound frame.
Color and Shadow Creations
- Create color changes by isolating parts of your cutout for different variants.
- Add shadow creations to bring depth and realism, vital for e-commerce and editorial work.
Combining Paths and Masks
For versatile layouts, mix clipping paths and masks:
- Use a clipping path for precise cutouts
- Layer a clipping mask for creative composition (such as filling text with images).
Troubleshooting Clipping Paths in InDesign
Even the pros face issues, here’s a quick AEO-friendly troubleshooting guide:
- Why is my clipping path not working in InDesign?
- Double-check your file type. Make sure your PSD/TIFF/EPS has an embedded path.
- For JPEG, rely on Detect Edges or convert to TIFF first.
- How to fix clipping path issues in InDesign?
- Use the “Convert Clipping Path to Frame” method for manual edits.
- Adjust threshold/tolerance and use the inset option to remove halos.
- Common clipping path mistakes in InDesign:
- Ignoring the “Inset Frame” leads to outlines of the background.
- Overusing Tolerance can overly smooth or roughen edges, find the right balance!
- How to edit a clipping path in InDesign: Switch to Direct Selection (A) and manually adjust the anchor points for perfect control.
Comparison: Clipping Path in InDesign vs. Other Methods
- Clipping path vs mask in InDesign: Paths are for precise cutouts, masks for creative frames.
- Clipping path vs Photoshop in InDesign: Photoshop’s Pen Tool remains the king for complex paths; InDesign offers speed for simple backgrounds.
- InDesign vs Illustrator clipping path: Illustrator gives advanced vector creation, but if your workflow is layout-focused, do as much as you can in InDesign for speed.
- Best clipping path techniques in InDesign: Use paths for products, compound paths for objects with holes, and masks for artistic cuts.
Action-Oriented InDesign Clipping Path Tutorials
- How to mask images in InDesign: Layer images under shapes, select both, then Object > Clipping Path > Make Clipping Mask.
- How to cut out objects in InDesign: Use the Detect Edges feature or manually draw a path, then refine as needed.
- How to crop images with clipping paths in InDesign: After path creation, crop further by adjusting the frame.
Frequently Asked Questions (FAQ)
1. What is a clipping path, and why should I use it in InDesign?
A clipping path lets you remove unwanted backgrounds so your images pop in any layout. Perfect for catalogs, e-commerce, or marketing creatives.
2. Can I make an automatic clipping path in InDesign?
Yes! Use the Detect Edges option for solid/contrasted backgrounds or import a Photoshop path for more complex needs.
3. What’s the difference between InDesign and Illustrator for clipping path creation?
Illustrator is better for highly-precise custom paths; InDesign excels at using existing paths quickly within layouts.
4. Can I perform advanced clipping path techniques in InDesign?
You can use compound paths, combine clipping paths with masks, and apply multiple color or shadow effects for professional polish.
5. Why is my clipping path not working in InDesign?
Check file type (PSD, TIFF, EPS support paths), ensure the correct path/channel is selected, and fine-tune with the dialog settings.
6. How do I troubleshoot clipping paths in InDesign?
Adjust thresholds, Tolerance, and inset values; convert to a frame and manually tweak with the Direct Selection tool for perfection.
7. Is a clipping path the same as background removal?
A clipping path is the technique; background removal is the result! See our Background Removal page for bulk solutions.
8. What’s the advantage of a multi-clipping path?
For catalogs with products that require different edits (such as color changes or shadows), a multi-clipping path enables advanced, selective adjustments within a single image.
9. How do I optimize for e-commerce and local results?
Use transparent backgrounds, optimized product sizing, and include your location keywords in alt text or captions (“Best clipping path in London”).
10. Can I link to other services within my content?
Absolutely, mention and link to complementary solutions like image masking, ghost mannequin, or beauty retouching when explaining advanced workflows.
Conclusion: Clipping Path Mastery for Modern Design
Learning how to make a clipping path in InDesign, and understanding the full spectrum of related keywords, comparisons, and troubleshooting steps, empowers you to craft polished, professional layouts fast. Whether you’re fixing an e-commerce product shot, prepping editorial images, or creating regional catalog layouts, these InDesign clipping path step-by-step instructions and tips for troubleshooting clipping paths in InDesign mean you’ll never be stuck.
Need help scaling for your growing business? Explore our Clipping Path, Background Removal, and Photo Retouching services for bulk, high-quality results every time.