

Photo Editing Explained: Definition, Types & Workflow
November 2, 2026
How to Add a Background to an Image: The 2026 Guide That Makes It Actually Look Real
November 4, 2026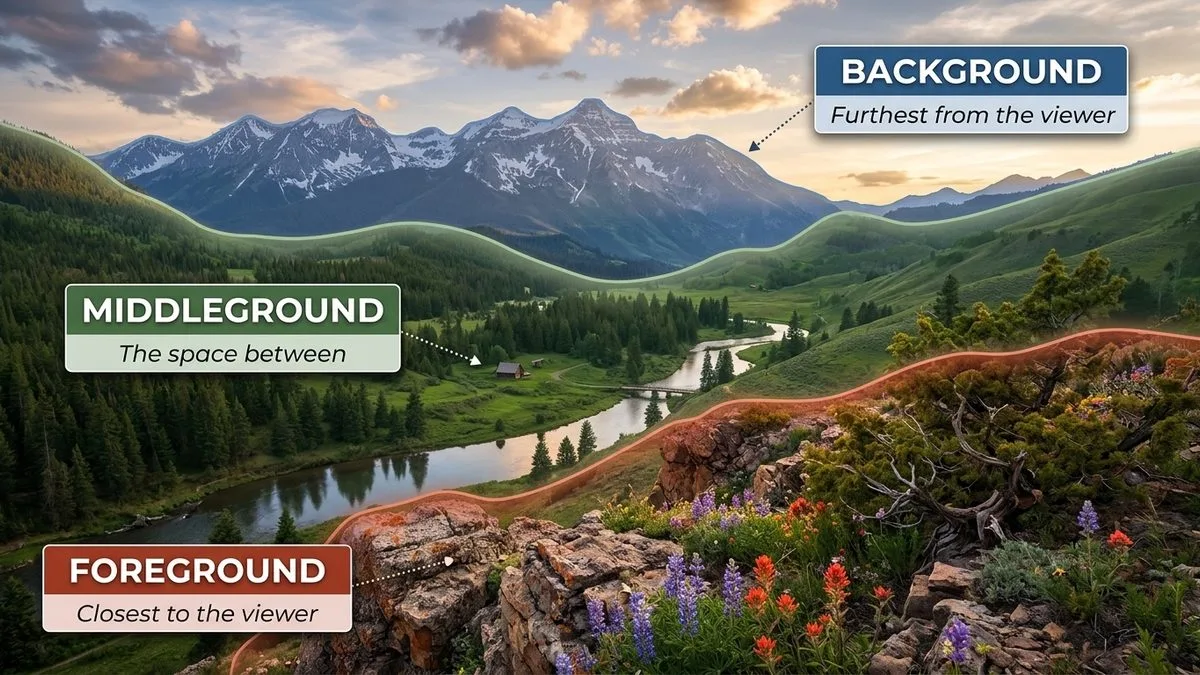
- Here's the Short Version
- So What Are These Three Layers, Exactly?
- Why Your Brain Cares About These Layers
- What Each Layer Actually Does for Your Photo
- Where to Put Your Subject (It's Not Always the Middleground)
- Pairing the Three Layers With Other Composition Rules
- Camera Settings That Actually Matter
- How It Works by Genre
- The Five Mistakes That Make Photos Look Flat
- Enhancing the Layers in Post-Processing
- When to Break the Rules
- Frequently Asked Questions
- One Last Thought
Here’s the Short Version
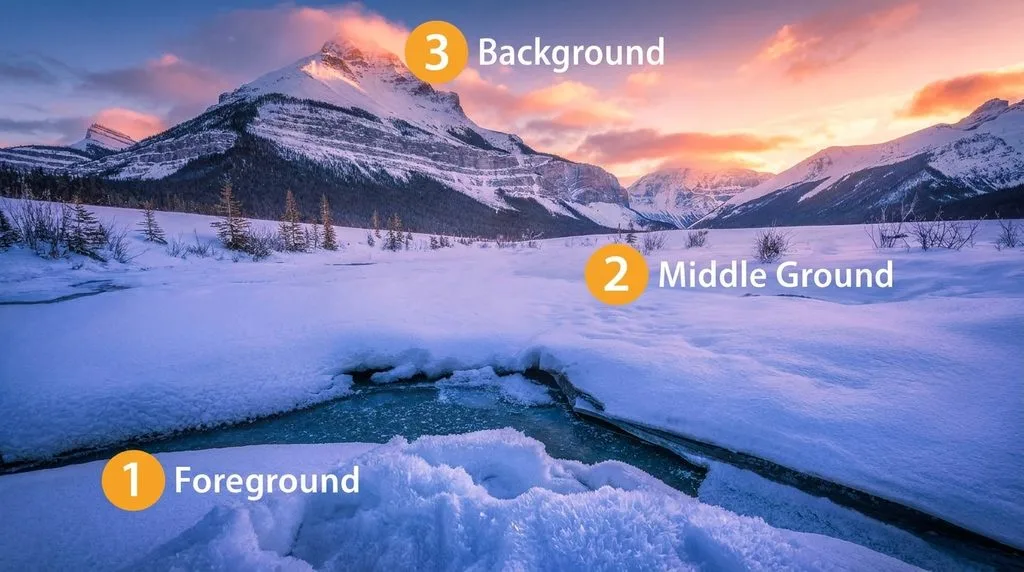
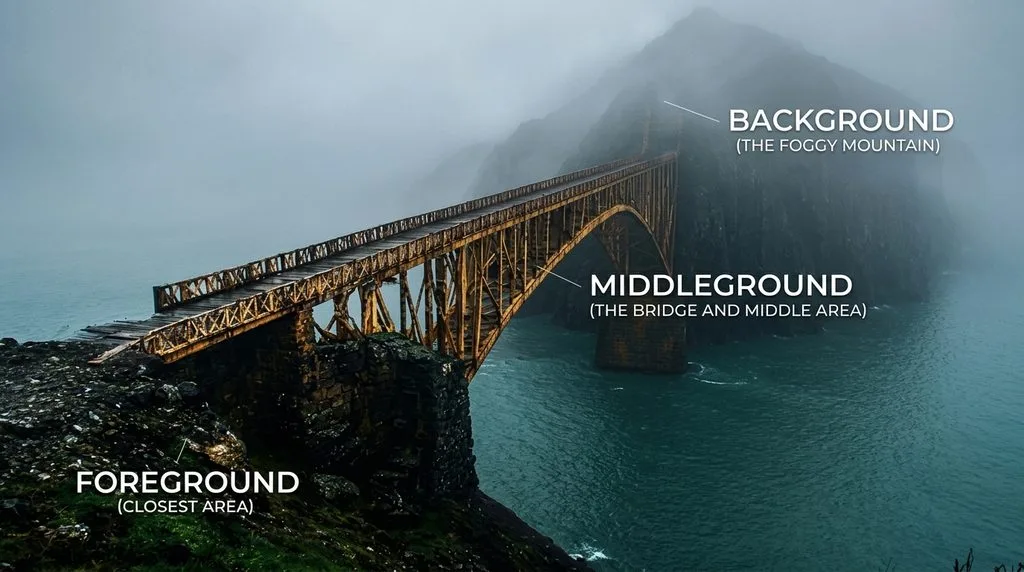
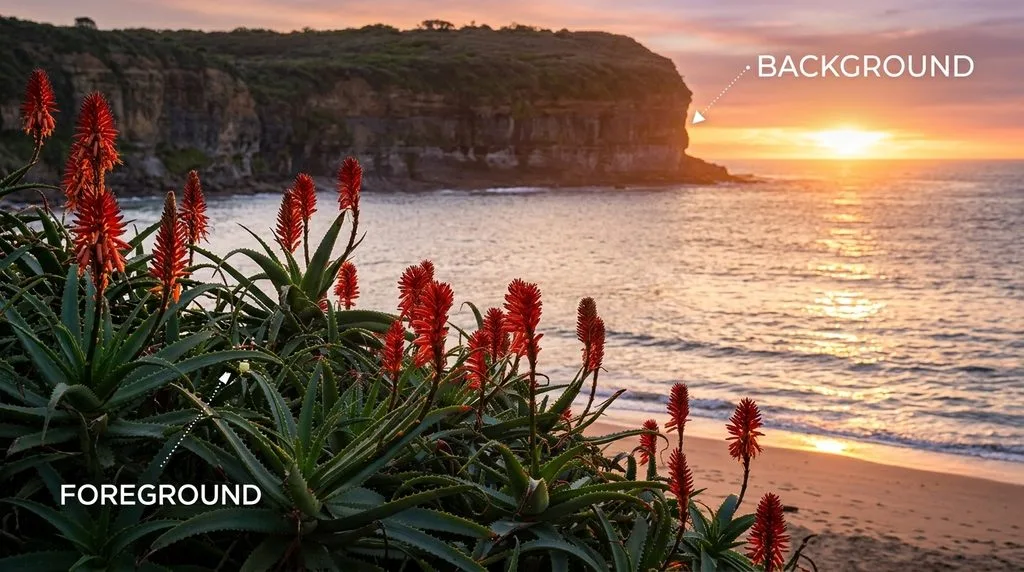
Every photo has layers — whether you notice them or not. The foreground is the stuff closest to your camera. The background is the stuff farthest away. The middleground is everything in between. When all three work together, a flat two-dimensional photo suddenly feels three-dimensional — like you could step into it. When they don’t, your shot looks boring and your eye doesn’t know where to land.
You don’t need a fancy camera to use this. You just need to start seeing the layers before you press the shutter. This guide walks through what each layer does, where to put your subject, which camera settings actually matter, and the five mistakes that make even a great scene look flat.
So What Are These Three Layers, Exactly?
Think of a stage. Upstage, at the back, is the background — it sets the scene. Center stage is the middleground — that’s where the action happens. Downstage, closest to the audience, is the foreground — it’s the most intimate part of the frame, and it’s what pulls the viewer in.
Here’s the plain-English breakdown:
| Layer | Where It Is | What It Does |
|---|---|---|
| Foreground | Closest to the camera | Hooks the viewer, adds texture, creates an entry point into the frame |
| Middleground | Between foreground and background | Usually holds your main subject; connects the other two layers |
| Background | Farthest from the camera | Provides context, mood, and a sense of place |
One important point: these aren’t fixed distances. They’re relative. A tiny still life on a tabletop can have all three layers just as easily as a sweeping mountain vista. It’s about the relationship between objects, not how many feet away they are.
And not every photo needs all three. Some great shots only have a foreground and background. Others are just a subject against a clean backdrop. But when you want depth and dimension, three layers is where the magic happens.
Why Your Brain Cares About These Layers
There’s actual science behind this. Your brain performs something called figure-ground segregation in about 13 milliseconds — it instantly decides what’s the main thing (the figure) and what’s just the setting (the ground). When a photo has clear layers, your brain sorts it effortlessly. When it doesn’t, the image feels confusing or flat, and you can’t quite say why.
A camera flattens a three-dimensional world into two dimensions. Your eyes see depth because you have two of them — a camera only has one lens. So you have to fake the depth. A strong foreground element is the single easiest way to do that. Put something interesting close to the lens — rocks, flowers, a fence, a person’s shoulder — and suddenly the viewer’s brain reads the whole scene as deep.
A solid composition guide will tell you the same thing: the difference between a snapshot and a photograph is often just a few steps forward to include something in the foreground.
What Each Layer Actually Does for Your Photo
The Foreground: Your Hook
The foreground is the first thing a viewer sees. It’s the welcome mat. If it’s empty — just a blank patch of grass or a blurry nothing — the viewer’s eye has nowhere to land and bounces right out of the frame.
A good foreground does one or more of these:
- Frames the subject. Overhanging branches, an archway, a window — these create a “frame within a frame” that isolates your subject.
- Leads the eye in. A path, a wall, a line of rocks — anything that points toward the subject acts as a leading line.
- Adds texture and scale. Close-up detail in the foreground makes the distant background feel bigger by comparison.
- Sets the mood. A dark, moody foreground tells a very different story than a bright, flowery one.
The trick? Get low. Most beginners shoot from eye level, which puts the foreground way down at the bottom of the frame and makes it feel like an afterthought. Drop your camera to your knees or even the ground, and suddenly that patch of wildflowers or that interesting rock fills a third of the frame and becomes a real element.
The Middleground: Your Subject Lives Here
Most of the time, your main subject sits in the middleground. That’s the sweet spot — close enough to feel present, far enough to have context around it. The middleground is also the bridge: it’s what connects the foreground to the background so the whole image reads as one scene instead of three disconnected chunks.
If your subject is in the middleground, make sure it’s the sharpest, most contrasty, or most colorful thing in that zone. The eye goes to what’s in focus and what pops. If something in the foreground is sharper or brighter than your subject, you’ll lose the viewer to it.
The Background: The Storyteller
The background sets the scene. It tells the viewer where they are — a mountain range, a city skyline, a studio wall, a stormy sky. It should support the subject, never compete with it.
A busy background is the number one portrait killer. If there’s a tree growing out of someone’s head or a bright sign pulling the eye away, the whole shot falls apart. That’s why photographers use wide apertures to blur the background into a soft wash — it’s called bokeh, and it’s a way of saying “ignore this, look at the subject.”
Where to Put Your Subject (It’s Not Always the Middleground)
Where you place your focal point changes how the photo feels. There’s no “right” answer — but each choice creates a different mood.
Subject in the foreground → feels intimate and close. You’re right there with it. Works for flowers, portraits, and detail shots. The background becomes soft context.
Subject in the middleground → feels balanced and natural. This is the default for most landscapes and environmental portraits. The foreground leads to it, the background supports it.
Subject in the background → feels vast and dramatic. Think a tiny person standing before a huge mountain or a sunset. The foreground and middleground pull the eye back to that small, distant subject. This is how you make a scene feel epic.
If you’re not sure, try all three. Move your feet. Take a few steps closer so the subject fills the foreground, then back up so it sits in the middleground. You’ll see instantly which one tells the story you want.
Pairing the Three Layers With Other Composition Rules
The three layers work best when you combine them with the other basics. Here’s how they play together.
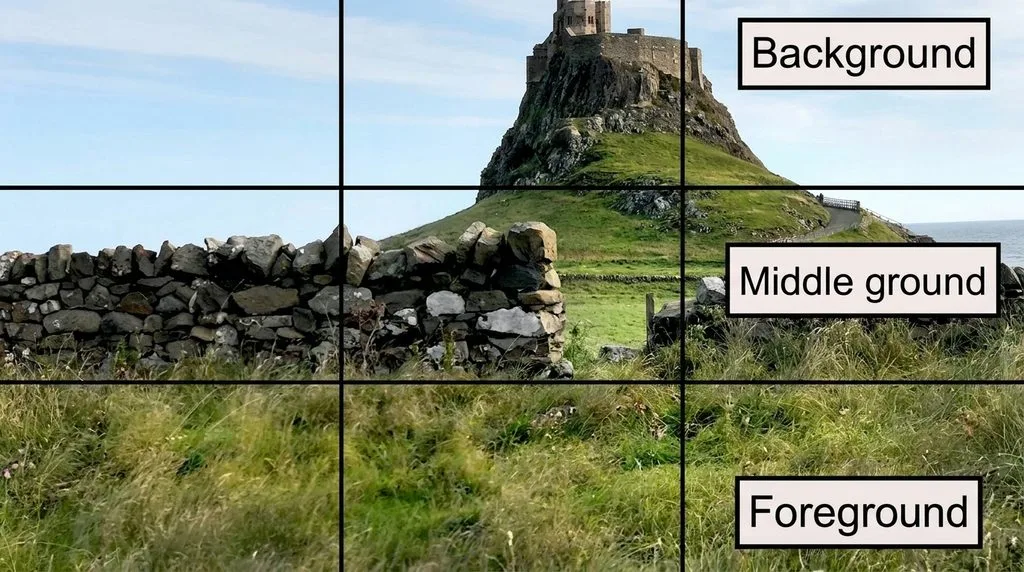
Rule of thirds. Drop your foreground interest in the bottom third, your subject in the middleground at a thirds intersection, and your horizon line on the top or bottom third line. Instant structure.
Leading lines. A road, a river, or a fence that starts in the foreground and winds back to the subject is the single most powerful depth tool you have. It literally pulls the viewer’s eye through all three layers.
Framing (frame within a frame). Use a foreground element — a doorway, tree branches, a window — to surround your middleground subject. It adds depth and focuses attention in one move.
Negative space. A big empty sky as background, a simple foreground, and one small subject in the middleground. That quiet, uncluttered feel is hard to beat.
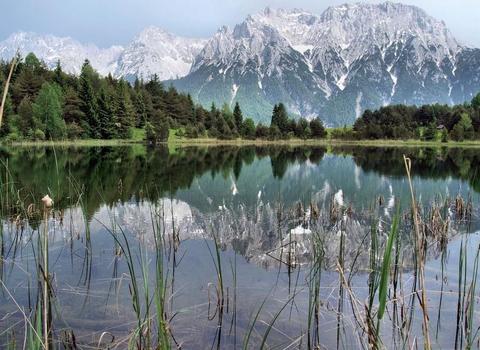
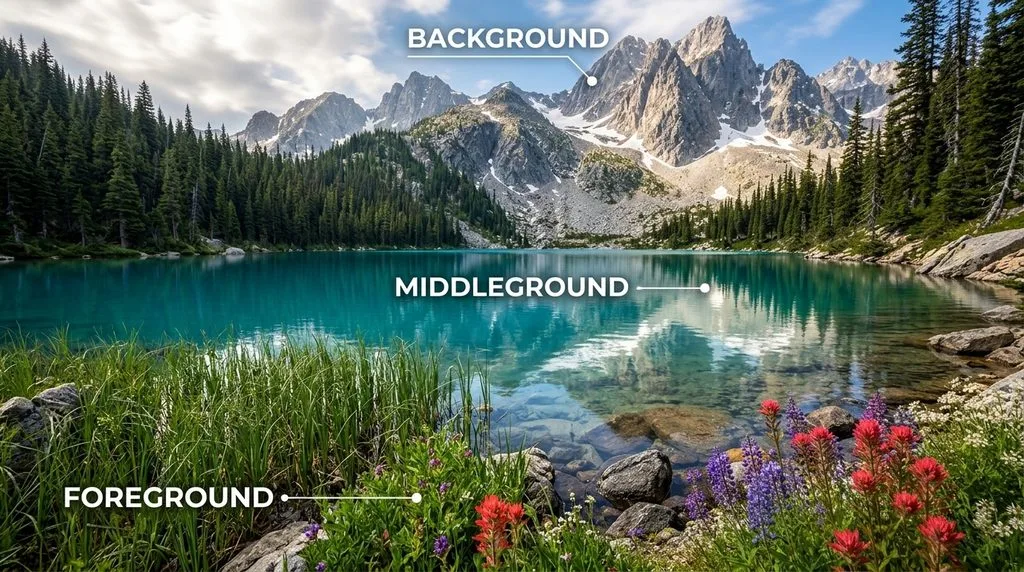
Symmetry and reflections. A lake in the middleground reflecting the background mountains, with rocks in the foreground? Symmetry ties all three layers together and feels instantly satisfying.
Camera Settings That Actually Matter
One setting controls all three layers more than any other: aperture.
Wide aperture (f/1.4 to f/4). Shallow depth of field. Your subject is sharp, and both the foreground and background blur into creamy bokeh. This is the portrait and wildlife look — you’re isolating the subject and throwing away the other layers.
Narrow aperture (f/8 to f/16). Deep depth of field. Everything from a few feet in front of you to the distant horizon is sharp. This is the landscape and architecture look — you want all three layers crisp so the viewer can explore every detail.
Here’s the catch with narrow apertures: even at f/16, if you focus on the background, your foreground will still be soft. That’s where hyperfocal distance comes in. It’s the exact focus distance that keeps everything from half that distance to infinity acceptably sharp. There are apps and charts for it, but the rule of thumb is: focus about a third of the way into the scene, not on the farthest object. That single trick keeps your foreground rocks and your distant mountains sharp at the same time.
If you’re shooting with a longer lens, a telephoto lens compresses the layers — foreground, middleground, and background feel closer together, which creates a different kind of drama. A wide-angle lens exaggerates the distance between layers, making the foreground feel huge and the background feel far away. Both are useful — it just depends on the feeling you’re after.
How It Works by Genre
Landscape. This is where the three-layer system was basically invented. Foreground interest (rocks, flowers, water), middleground subject (a lake, a tree, a cabin), background (mountains, sky). Get low, use a wide-angle lens, stop down to f/11, focus a third of the way in. That’s the whole landscape playbook.
Portraits. Most of the time you want a shallow depth of field — subject sharp in the middleground, background blurred. But you can also use a blurred foreground — shooting through flowers, a fence, or a crowd — to add depth and context to a portrait. It’s a pro move that instantly makes a shot look more editorial.
Street photography. Layers are everything. A person in the foreground, a sign in the middleground, a building in the background — all telling one story. Street photographers hunt for these moments where the layers line up.
Wildlife. The animal is almost always the middleground subject. Foreground grass or foliage adds habitat context; a blurred background keeps attention on the animal. A wide aperture keeps the animal sharp and everything else soft.
Product and ecommerce. Here, the “background” is usually a clean white or neutral wall, and the product is the foreground — sharp, detailed, isolated. The three-layer system still applies, but you’re intentionally simplifying it so nothing competes with the product. A photo editing guide will walk you through how to clean up and separate those layers in post.
The Five Mistakes That Make Photos Look Flat
Every beginner makes these. Learn them now and skip the frustration.
- Empty foreground. The most common mistake. You find a beautiful view, point the camera, and shoot — with nothing in the foreground. The result is a postcard, not a photograph. Take three steps forward, find a rock or a flower, and include it.
- Distracting foreground. The opposite problem. A bright piece of trash, a random person’s elbow, a sign — if the foreground is louder than the subject, it steals the show. Either recompose or blur it with a wide aperture.
- The even split. Horizon line dead center, foreground and background taking exactly half the frame each. It feels static and boring. Put the horizon on the top third or bottom third instead.
- Focusing on the wrong layer. You meant everything sharp but focused on the background, so your beautiful foreground flowers are soft. Remember: focus a third of the way in for maximum depth.
- Ignoring the background. You nail the subject and foreground, but there’s a tree growing out of someone’s head or a bright window pulling the eye. Check the corners and edges of your frame before you shoot — that’s where problems hide.
Enhancing the Layers in Post-Processing
You can strengthen the three-layer effect after the shoot. In Lightroom or Photoshop, use a graduated filter to darken the background sky, or a radial filter to brighten your middleground subject. Dodge and burn can push the foreground darker and the subject lighter, guiding the eye. A touch of extra sharpening on the foreground detail makes it feel closer and more tactile.
If you’re not comfortable doing this yourself, or you’re processing hundreds of product shots, the photo editing cost per image is often lower than the hours you’d spend learning it — and a retouching expert can enhance each layer precisely without making it look overdone.
When to Break the Rules
Not every great photo has all three layers. A clean product shot on white is just foreground. A minimalist sky photo is just background. A macro shot of a flower might only have foreground and a soft blur behind it. The rules are tools, not laws. If you’re intentionally going for simplicity or abstraction, drop a layer on purpose. The key is that it’s a choice, not an accident.
Frequently Asked Questions
What is the foreground in a photo?
The foreground is the part of the image closest to the camera. It’s the first thing a viewer sees, and it’s used to hook attention, add texture, create depth, or frame the main subject.
What’s the difference between foreground and background?
The foreground is closest to the camera; the background is farthest away. The foreground usually grabs attention and adds depth, while the background provides context and setting. The middleground sits between them and often holds the main subject.
Why is foreground important in photography?
A camera flattens a 3D world into 2D. A strong foreground element tricks the brain into reading the scene as deep and three-dimensional. Without it, photos look flat and snapshotsque.
What is the middleground?
The middleground is the area between the foreground and background. It’s where the main subject usually sits, and it acts as the bridge that connects the other two layers into one cohesive scene.
How do I make my photos look more three-dimensional?
Get low and include a strong foreground element. Use leading lines that start in the foreground and lead to your subject. Shoot at a narrow aperture (f/8–f/16) and focus about a third of the way into the scene to keep all layers sharp.
What aperture keeps foreground and background both sharp?
Use a narrow aperture like f/11 or f/16, and focus at the hyperfocal distance — roughly a third of the way into the scene. This keeps everything from a few feet in front of you to infinity acceptably sharp.
Should the subject be in the foreground, middleground, or background?
It depends on the mood. Foreground feels intimate, middleground feels balanced, and background feels vast and dramatic. Most photos place the subject in the middleground, but all three can work.
What is figure-ground perception?
It’s the brain’s ability to instantly separate a main subject (figure) from its surroundings (ground). It happens in about 13 milliseconds. Clear foreground/background separation makes this easy for the viewer; clutter makes it hard.
One Last Thought
The three-layer system isn’t a rule you follow — it’s a way of seeing. Once you start noticing foreground, middleground, and background everywhere you look, your compositions improve automatically. The next time you’re about to take a shot, pause. Look at what’s closest to you. Is it interesting? If not, move until it is. That single habit will do more for your photography than any gear upgrade.