

What Is Composition? A Photographer’s Guide
June 6, 2026Human Eye Resolution Explained: Megapixels, FPS & Vision
June 6, 2026
Depth of field is one of those photography concepts that quietly separates a snapshot from a story. You’ve probably scrolled past hundreds of images where a bride glows against a creamy, melting background, or where a mountain range stays tack-sharp from the wildflowers at your feet to the horizon. Both effects come from the same idea: controlling depth of field (DoF). Once you understand how it works, you stop guessing and start directing your viewer’s eye on purpose.
In this essential guide, we’ll unpack what depth of field really means, the three factors that control it, and the practical tips professionals use every day. You’ll also pick up tricks for portraits, landscapes, macro, and product photography — plus a few common mistakes to avoid. Let me walk you through it the same way I’d explain it to a friend over coffee.
Want product photos with picture-perfect focus and clean edges? Try our professional clipping path service to make every subject pop.
- What Is Depth of Field in Photography?
- Why Depth of Field Matters for Storytelling
- The 3 Main Factors That Control Depth of Field
- Shallow vs. Deep Depth of Field: A Side-by-Side Comparison
- How to Create a Shallow Depth of Field (Step-by-Step)
- How to Create a Deep Depth of Field (Step-by-Step)
- Depth of Field by Genre
- Common Depth of Field Mistakes (And How to Fix Them)
- Tools That Make Depth of Field Easier
- Quick Tips and Best Practices
- Depth of Field in Post-Production
- Advanced Technique: Focus Stacking
- How Sensor Size Quietly Changes Everything
- A Quick Workflow Example: Portrait Shoot in Real Life
- Bringing It All Together
- Frequently Asked Questions (FAQ)
What Is Depth of Field in Photography?
Depth of field is the distance between the nearest and farthest objects in your scene that appear acceptably sharp in the final image PhotoPills. Think of it as a zone of sharpness wrapped around your focal point. Anything inside that zone looks crisp; anything outside slowly melts into blur.
It’s worth pausing on the phrase “acceptably sharp.” In reality, only one perfectly flat plane is in true focus. Sharpness fades gradually in front of and behind that plane. The point at which sharpness becomes noticeably soft is governed by something called the circle of confusion — the smallest blur spot the human eye still perceives as a point PhotoPills.
In simple terms:
- Shallow depth of field = a tiny sharp zone, with everything else blurred
- Deep depth of field = a wide sharp zone, with most of the scene in focus
Both are creative choices, not technical “wins.” A wedding photographer might chase shallow DoF for emotion, while a real estate shooter wants deep DoF for clarity.
Why Depth of Field Matters for Storytelling
Depth of field is more than a technical setting — it’s how you guide attention. Filmmakers use shallow focus during intimate dialogue scenes because it feels personal. Landscape photographers favor deep focus because every detail contributes to the story of a place Photography Life.
When you adjust DoF, you decide:
- What the viewer sees first (the sharp subject)
- What context they receive (sharp or soft environment)
- The emotional weight of the shot (intimate vs. expansive)
Mastering this single concept will arguably improve your photos more than any new gear purchase.
The 3 Main Factors That Control Depth of Field
There are three primary controls behind every DoF decision: aperture, focal length, and focus distance Digital Photography School. Sensor size sneaks in as a fourth factor, but it works through the other three. Let’s break each down.
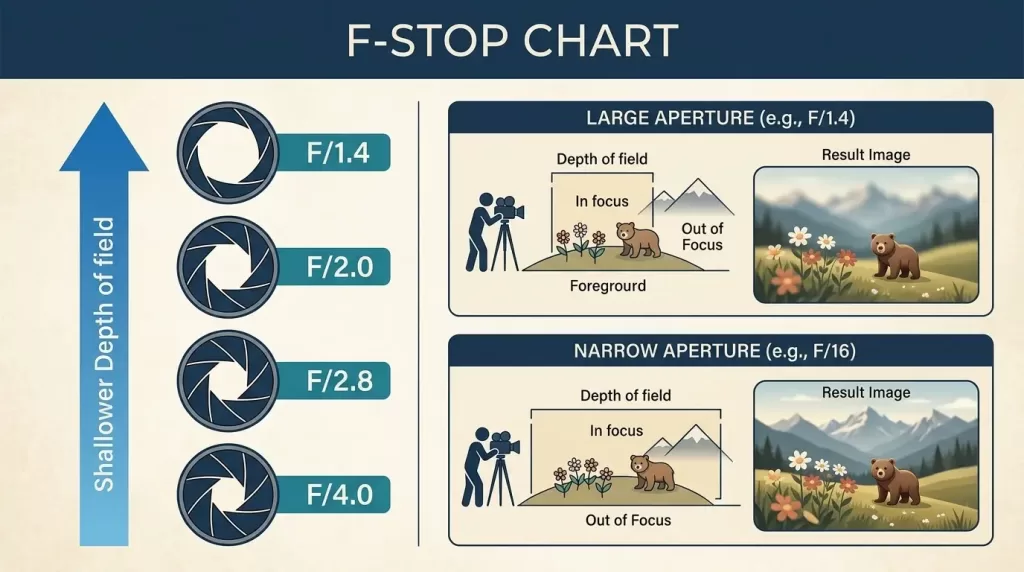
1. Aperture (f-stop)
Aperture is the adjustable opening inside your lens. It’s measured in f-stops like f/1.8, f/2.8, f/8, and f/16.
- Wide aperture (small f-number, e.g., f/1.4–f/2.8) = shallow depth of field
- Narrow aperture (large f-number, e.g., f/11–f/22) = deep depth of field
A wider opening lets light enter at steeper angles, which exaggerates blur outside the focal plane. A narrower opening forces light into a tighter cone, keeping more of the scene sharp.
2. Focal Length
Focal length describes how “zoomed in” your lens is, measured in millimeters.
- Longer focal lengths (85mm, 135mm, 200mm) compress space and produce shallower DoF
- Shorter focal lengths (14mm, 24mm, 35mm) widen the view and deliver deeper DoF
This is why a 200mm telephoto at f/2.8 melts backgrounds into watercolor smears, while a 16mm wide-angle at the same aperture keeps far more of the scene sharp.
3. Distance to Subject
The closer your camera sits to the subject, the shallower your DoF becomes. The farther away you stand, the deeper your DoF grows.
This is why macro photographers — who shoot inches away from a flower or insect — fight razor-thin DoF even at f/8 or f/11. Meanwhile, a landscape shooter standing 50 feet from the foreground rock can keep everything sharp at the same aperture MasterClass.
Bonus Factor: Sensor Size
Larger sensors (full-frame, medium format) tend to produce shallower DoF than smaller sensors (APS-C, Micro Four Thirds) when framing the same shot. That’s because you generally need a longer focal length or closer distance to match composition on a larger sensor.
Shallow vs. Deep Depth of Field: A Side-by-Side Comparison
Here’s a quick visual cheat sheet to keep handy:
| Factor | Shallow DoF | Deep DoF |
|---|---|---|
| Aperture | Wide (f/1.4 – f/4) | Narrow (f/8 – f/22) |
| Focal length | Long (85mm+) | Short (14–35mm) |
| Subject distance | Close | Far |
| Best for | Portraits, products, macro | Landscapes, architecture, group shots |
| Mood | Intimate, dreamy, isolated | Detailed, immersive, contextual |
How to Create a Shallow Depth of Field (Step-by-Step)
Want that gorgeous, melted-butter background? Combine these moves:
- Open up your aperture to the widest your lens allows — f/1.8, f/2, or f/2.8.
- Use a longer lens. An 85mm or 135mm prime works wonders for portraits.
- Move closer to your subject without ruining your composition.
- Push your subject farther from the background. A 10-foot gap between subject and backdrop dramatically improves bokeh.
- Focus precisely on the eye (for portraits) — at f/1.4, even a nose can fall out of focus.
A practical example: shoot a portrait at f/2.8 with an 85mm lens, with your subject standing 6 feet from you and 15 feet from the wall behind them. You’ll get the classic creamy background look almost automatically.
Already nailed the shot? Let our experts polish it. Our high-end photo retouching service keeps the bokeh dreamy while refining skin, color, and details.
How to Create a Deep Depth of Field (Step-by-Step)
Deep DoF is the bread and butter of landscape and architectural photographers. Here’s how to maximize it:
- Stop down your aperture to f/8, f/11, or f/16 — but rarely beyond, since diffraction softens images at very small apertures.
- Use a wide-angle lens (14mm to 35mm).
- Step back from your nearest foreground element.
- Focus about one-third into the scene — or even better, use the hyperfocal distance technique.
- Use a tripod. Narrow apertures often require slower shutter speeds.
What Is Hyperfocal Distance?
The hyperfocal distance is the closest focus distance at which everything from half that distance to infinity appears acceptably sharp PhotoPills. It’s the landscape shooter’s secret weapon for maximizing sharpness across an entire scene.
You can calculate it manually, but most photographers rely on apps and online calculators like PhotoPills or DOFMaster.
Depth of Field by Genre
Different photography styles demand different DoF strategies. Here’s a quick genre-by-genre breakdown.
Portrait Photography
For environmental portraits, work between f/4 and f/5.6 so your subject and a hint of context stay sharp. For tight headshots, drop to f/1.8–f/2.8 to dissolve the background. Always nail focus on the closest eye.
Landscape Photography
Stick to f/8–f/11 for a sweet spot of sharpness and depth. Use a wide-angle lens, place the camera on a tripod, and engage focus stacking when you need critical edge-to-edge sharpness TechRadar.
Macro Photography
Macro work shrinks your DoF dramatically. Even at f/11 or f/16, you may have only a few millimeters of sharpness. Consider focus stacking — combining several images focused at slightly different distances — to get a fully sharp subject.

Product and E-commerce Photography
This one’s nuanced. For Amazon-style catalog shots, you want the entire product sharp — so use f/8–f/11. For lifestyle product imagery on Instagram, a shallow f/2.8 shot tells a more emotional story. Pair sharp products with clean, distraction-free backgrounds for the best results.
Selling apparel? Our ghost mannequin service gives garments a clean, professional 3D look — perfect for online stores.
Street Photography
A medium aperture like f/5.6 or f/8 works beautifully. It gives you enough DoF to nail focus quickly while still subtly separating your subject from the chaos behind them.
Wildlife Photography
Long telephoto lenses already produce shallow DoF, so even at f/5.6 or f/6.3, the background dissolves naturally. Focus precisely on the animal’s eye.
Common Depth of Field Mistakes (And How to Fix Them)
Even seasoned photographers fall into a few of these traps:
- Shooting too wide for group portraits. At f/1.4, only one person’s face will be sharp. Stop down to at least f/4 for two-person shots and f/5.6+ for groups.
- Ignoring diffraction. Pushing past f/16 or f/22 on most lenses softens the entire image. Stay within your lens’s optimal range.
- Focusing on the wrong eye. For portraits, always focus on the eye closest to the camera.
- Forgetting to back up. When your DoF feels too shallow, just take two steps backward — distance fixes a lot.
- Mixing up shallow DoF with “blurry photos.” Camera shake produces overall blur. Shallow DoF produces intentional blur outside the focal plane.
Tools That Make Depth of Field Easier
A few apps and resources every photographer should bookmark:
- PhotoPills DoF Calculator — incredibly precise field tool
- DOFMaster — straightforward web calculator
- DOF Simulator — visual simulation of background blur
- Your camera’s depth-of-field preview button — often overlooked but extremely useful
Also worth a read: if you’re piling up tons of high-resolution photos, you’ll want a smart backup plan. Check out this practical guide on the best cloud storage for photos to safeguard your work.
Quick Tips and Best Practices
Here are field-tested tips you can apply on your very next shoot:
- Shoot in Aperture Priority (A or Av) mode while learning DoF. It lets you control aperture while the camera handles shutter speed.
- Use single-point autofocus for accurate focus placement.
- Check your shots at 100% zoom on the LCD to confirm sharpness.
- Combine focus stacking for landscapes or macro to expand DoF beyond a single frame’s limits.
- Watch your background. Even a beautiful blur can feel cluttered if bright lights or hot spots distract from the subject.
- Practice the “thirds rule” for focus in deep DoF landscapes — focus roughly one-third into the scene.
Got busy backgrounds ruining great shots? Our background removal service instantly cleans up your images for e-commerce, marketing, and portfolio use.
Depth of Field in Post-Production
You can also enhance — or simulate — depth of field in editing. Tools like Lightroom and Photoshop offer:
- Lens Blur filters that mimic shallow DoF
- Radial and graduated masks to soften specific areas
- AI-powered subject selection for clean foreground/background separation
That said, in-camera DoF will always look the most natural. Editing should refine, not replace, what you captured.
Need pixel-perfect subject isolation for editing? Try our image masking service — ideal for hair, fur, glass, and complex edges where clipping paths fall short.
Advanced Technique: Focus Stacking
When a single aperture can’t deliver enough DoF (think macro insects or sweeping landscapes with close foregrounds), focus stacking comes to the rescue. Here’s how it works:
- Mount your camera on a tripod.
- Take multiple images focused at slightly different distances — near foreground, middle, far background.
- Combine them in software like Photoshop or Helicon Focus.
The result: a single image with dramatically expanded DoF, sharp from front to back. It’s the technique pro landscape and macro photographers swear by.
How Sensor Size Quietly Changes Everything
Two cameras with identical settings can produce different-looking DoF if their sensors are different sizes. Here’s the practical takeaway:
- Full-frame sensors → shallower DoF at the same framing
- APS-C sensors → slightly deeper DoF
- Micro Four Thirds → noticeably deeper DoF
- Smartphones → deep DoF baked in (which is why phones use software to simulate portrait blur)
If you’ve ever wondered why your phone portraits look “fake,” it’s because the tiny sensor physically can’t produce true shallow DoF — so software fills the gap with computational blur.
A Quick Workflow Example: Portrait Shoot in Real Life
Let’s imagine a real-world scenario. You’re shooting a couple in a park, golden hour, leafy backdrop.
- Lens: 85mm f/1.8 prime
- Aperture: f/2.8 (sharp enough for both faces, shallow enough for great bokeh)
- Distance: 7–8 feet from couple
- Background: 20+ feet behind them
- Focus: Single-point AF on the closer eye
You squeeze the shutter. Their faces stand out, the foliage dissolves into golden orbs, and the entire image carries warmth and intimacy. That’s depth of field doing its job.
Bringing It All Together
Depth of field isn’t just a setting — it’s a creative tool that quietly shapes how every photo feels. Once you internalize the three controls (aperture, focal length, distance), you stop chasing happy accidents and start composing with intention. Whether you’re shooting portraits, products, or panoramas, the choice between shallow and deep focus is one of the most powerful storytelling decisions you can make.
Keep practicing. Shoot the same scene at f/2, f/5.6, and f/11. Move closer, then farther. Switch lenses. The more you experiment, the faster DoF will become second nature — and your images will improve dramatically because of it.
Captured beautiful depth of field, but multiple subjects need editing? Our multi-clipping path service helps you adjust each element individually — without touching your stunning blur. Or add lifelike dimension with our shadow creation service to make every product feel real.
Frequently Asked Questions (FAQ)
1. What is the simplest definition of depth of field?
Depth of field is the area in a photo that appears sharp, stretching from the closest sharp object to the farthest sharp object behind it.
2. Which aperture creates the shallowest depth of field?
The widest apertures your lens supports — usually f/1.2, f/1.4, or f/1.8 — produce the shallowest DoF, especially with longer lenses and closer subjects.
3. Does ISO affect depth of field?
No. ISO controls sensor sensitivity and brightness, not focus zones. Only aperture, focal length, distance, and sensor size impact DoF.
4. Is shallow depth of field always better for portraits?
Not always. While f/1.8–f/2.8 gives that classic creamy look, environmental portraits often benefit from f/4–f/5.6 so the background still contributes context to the story.
5. What is the best aperture for landscape photography?
Most lenses hit peak sharpness between f/8 and f/11. Pair this with hyperfocal focusing or focus stacking for maximum sharpness from foreground to horizon.
6. Can smartphones produce true shallow depth of field?
Not optically. Their tiny sensors create deep DoF by nature, so they simulate the shallow look using portrait mode and computational photography.
7. What’s the difference between bokeh and depth of field?
Depth of field is how much of the scene is in focus. Bokeh is the quality and look of the blur in the out-of-focus area — soft, harsh, swirly, or creamy.
8. How do I get sharp photos when using shallow depth of field?
Use single-point autofocus, focus precisely on your subject’s most important detail (usually the eye), keep your shutter speed high enough to avoid camera shake, and use a tripod for static subjects.