

Wedding Photography Editing Workflow: Complete Guide
April 7, 2026
What’s the Difference Between SD and HD Video?
April 9, 2026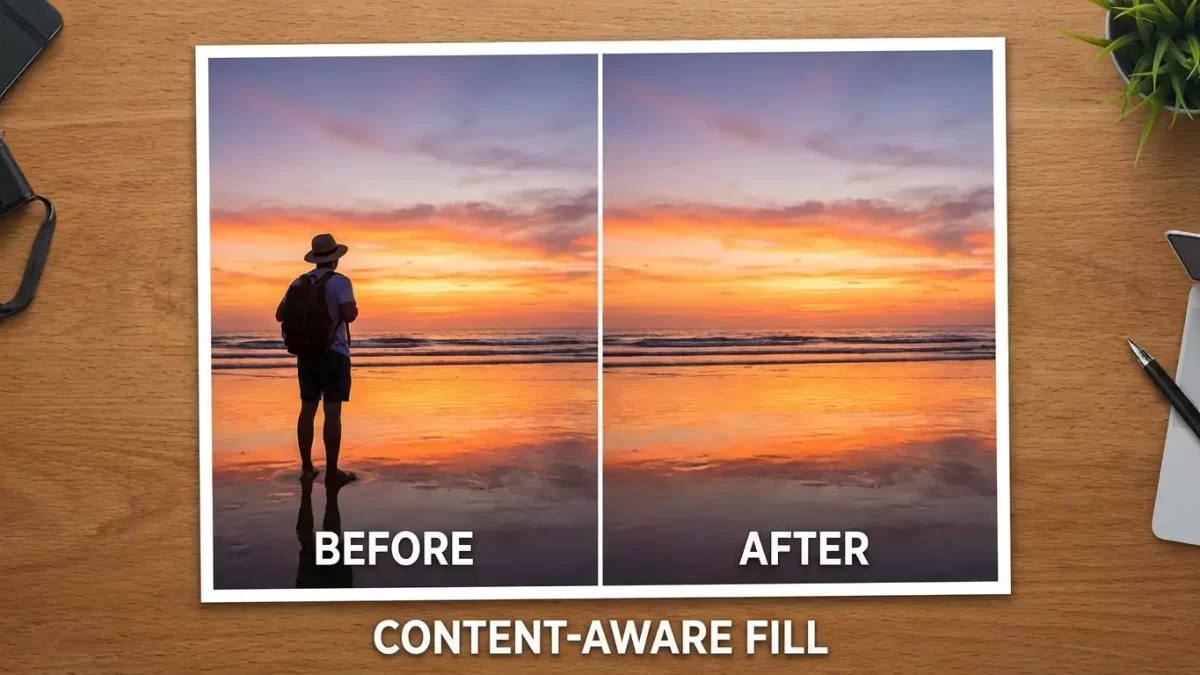
You finally captured that perfect sunset shot. The colors glow, the composition sings—and then you see it: a stray tourist’s elbow creeping into the frame or a power line cutting across the golden sky.
In the past, removing such distractions meant tedious clone-stamping for minutes or even hours. Fortunately, Adobe Photoshop’s Content-Aware Fill changes everything.
This intelligent tool analyzes the pixels around your selected area and generates new, matching content to fill the space. It often accomplishes in seconds what used to demand a steady hand and endless patience.
In this guide, you’ll learn:
- The difference between the Quick Fill method and the advanced workspace
- How to control the sampling area for tricky backgrounds
- Advanced techniques for complex textures
- How to fix common problems like blurring or repeating patterns
By the end, you’ll confidently integrate this feature into your regular editing workflow.
Removing a tourist is easy. Removing complex backgrounds from 500 product shots? That’s our job. See our bulk image editing pricing
- What Exactly Is Content-Aware Fill?
- Why Content‑Aware Fill Outperforms Traditional Methods
- Method 1: Quick Content-Aware Fill (30 Seconds or Less)
- Method 2: Advanced Workspace for Precise Control
- Advanced Techniques for Complex Backgrounds
- Common Problems and How to Fix Them
- Content-Aware Fill vs. Generative Fill: Which to Use?
- Ethical Use of Content-Aware Fill
- Content‑Aware Fill vs. Generative Fill: Which One Should You Use?
- Real-World Applications Across Industries
- Optimizing Your Workflow with Actions
- Putting It All Together
- Frequently Asked Questions
What Exactly Is Content-Aware Fill?
Content-Aware Fill is a retouching feature that automatically replaces a selected area with new pixel data. Unlike older tools that simply blur or copy a single patch, the algorithm performs a complex analysis of the surrounding visual information. It examines:
- Colors and brightness
- Textures and gradients
- Repeating patterns
The result blends seamlessly with the rest of the image. Think of it as a digital assistant whose sole job is to make the unwanted element look like it never existed.
Two Ways to Access Content-Aware Fill
| Method | Best For | Access Path |
|---|---|---|
| Quick Fill | Uniform backgrounds, fast edits | Edit > Fill |
| Advanced Workspace | Complex backgrounds, precise control | Edit > Content-Aware Fill |
For any edit that demands precision or involves a complex background, mastering the workspace is essential. (Introduced in Photoshop CC 2019, the core workflow remains unchanged in latest versions.)
Why Content‑Aware Fill Outperforms Traditional Methods
Before this technology, your main weapons were the Clone Stamp, Healing Brush, and Patch Tool. While those remain invaluable, Content-Aware Fill offers three major advantages.
1. Speed and Efficiency
- Clone Stamp: 2–3 minutes for a small trash can
- Content-Aware Fill: ~10 seconds (including selection time)
2. Reduction of Guesswork
Manual cloning demands a practiced eye to avoid “stamp” artifacts. Content-Aware Fill delivers an 80–90% perfect result on the first try, giving you a cleaner foundation for final touch-ups.
3. Ideal for Large, Simple Areas
For skies, blank walls, or fields of grass, this tool is dramatically faster than any manual method.
The Limit: In images with highly complex, non-repeating textures (dense crowds or piles of leaves), the algorithm may produce smudges. That’s when the dedicated workspace becomes your best ally.
Content‑Aware Fill works locally. We work globally on your entire catalogue. Get a free quote for multi‑clipping path service
Method 1: Quick Content-Aware Fill (30 Seconds or Less)
Use this method when the background has consistent texture and you need a fast, one-click solution.
Step 1: Unlock the Background Layer
Open your image and look at the Layers panel. Click the lock icon to unlock. This allows non-destructive edits later.
Step 2: Select the Unwanted Object
Pro tip: A tighter selection yields cleaner results
Use the Lasso Tool (L) for a loose selection around the object
For complex edges, try the Object Selection Tool (W)
Filling a power line is one thing. Filling missing hair or fur requires image masking. Check our image masking portfolio and pricing
Step 3: Apply Content-Aware Fill
Navigate to Edit > Fill. In the dialog:
- Contents: Select
Content-Aware - Blending: Normal with 100% Opacity
- Click OK
Step 4: Deselect and Inspect
Press Ctrl+D (Windows) or Cmd+D (Mac). Zoom in and examine the filled area.
Power user shortcut: Shift + F5 opens the Fill dialog instantly.
Method 2: Advanced Workspace for Precise Control
Sometimes the quick method produces artifacts—fragments of the object remain, or the fill pulls from the wrong areas. That’s when you need the dedicated workspace.
Step 1: Make Your Selection (with Feathering)
Use any selection tool, then add a small feather:
- Go to
Select > Modify > Feather - Enter 1–3 pixels (softens edges for seamless blending)
Step 2: Open the Workspace
Go to Edit > Content-Aware Fill. You’ll see a dedicated window with three areas:
- Left panel: Original image with green overlay (sampling area)
- Right panel: Live preview of the result
- Settings panel: Controls for sampling and output
Step 3: Adjust the Sampling Area
Use the Sampling Brush Tool (B) to control which pixels Photoshop uses as reference:
- Add mode (default): Paint green over regions you want to use
- Subtract mode: Hold
Alt(Windows) orOption(Mac) to exclude areas
Practical example: Removing a person from a beach photo? Paint out their shadow from the green overlay. The preview updates instantly.
Step 4: Fine-Tune Fill Settings
| Setting | When to Adjust |
|---|---|
| Color Adaptation | Set to High for sunset skies or scenes with lighting changes |
| Rotation Adaptation | Use High for curved patterns like fabric folds or wood grain |
| Scale | Try Low or Medium for filling large areas without repetition |
| Mirror | Turn on for symmetrical scenes (reflections in water) |
Step 5: Output to a New Layer (Critical!)
Under Output Settings, select New Layer – not Current Layer. This preserves your original image completely, allowing you to use a layer mask or delete the fill later.
Click OK. The filled area appears on its own layer.
Step 6: Final Cleanup
Even a perfect fill may leave minor imperfections. Use the Spot Healing Brush or Healing Brush at 100–200% zoom to paint over artifacts.
Advanced Techniques for Complex Backgrounds
Excluding Unwanted Pixels with the Sampling Brush
Scenario: Removing a person standing in front of a textured wall. To their left is a bright red fire extinguisher.
Fix: Use the Sampling Brush in subtract mode (Alt+paint) to remove the extinguisher from the green overlay. The red tint disappears from the preview.
Combining with Frequency Separation
High-end retouchers separate color and texture onto different layers:
- Duplicate your background layer twice
- On the top layer: Apply Gaussian Blur (10–20 pixels)
- On the middle layer:
Image > Apply Image, subtract the blurred layer, set blending to Linear Light - Apply Content-Aware Fill to the texture (high-frequency) layer
Breaking Large Removals into Smaller Sections
Resist the urge to select an entire large object in one pass. Instead:
Work from the outside toward the center
Divide the object into smaller overlapping sections
Apply Content-Aware Fill to each section separately
You removed the object – now remove the background forever. Try our background removal service free on 5 images (no AI halos, guaranteed)
Common Problems and How to Fix Them
| Problem | Cause | Solution |
|---|---|---|
| Blurry or soft fill | Photoshop averaged too many pixels | Output to new layer, apply Filter > Sharpen > Smart Sharpen (50–100% amount, 0.5–1.0px radius) |
| Repeating patterns | Sampling area too small | Reopen workspace, paint a larger, more diverse sampling area |
| Fill pulled from wrong areas | Default sampling included undesirable regions | Use subtract mode to aggressively exclude problematic areas |
| Color mismatch | Incorrect Color Adaptation setting | Increase to High or Very High, or add a Hue/Saturation adjustment layer |
| “Not enough source” error | Selection too large or too close to edge | Make a smaller selection, or expand the canvas with Crop Tool first |
| Content-Aware Fill grayed out | No active selection, Smart Object layer, or locked layer | Draw a selection, rasterize the layer, or unlock the background |
Content-Aware Fill vs. Generative Fill: Which to Use?
| Feature | Content-Aware Fill | Generative Fill (Firefly) |
|---|---|---|
| Source | Only pixels in your image | AI trained on billions of images |
| Internet required? | No (works offline) | Yes |
| Can invent new content? | No | Yes (via text prompts) |
| Best for | Simple backgrounds, repetitive textures | Complex scenes, creative additions, canvas extension |
| Control | Maximum local control over sampling | Less predictable, more creative |
Pro workflow: Use Content-Aware Fill for fast cleanup, then Generative Fill for tricky backgrounds or creative additions.
Ethical Use of Content-Aware Fill
While powerful, this tool raises ethical considerations:
- Photojournalism & documentary photography: Alterations are generally prohibited
- Legal evidence: Never alter
- Personal, e-commerce, real estate, creative work: Perfectly acceptable
Never use Content-Aware Fill to:
- Remove watermarks, copyright information, or identifying markers from images you don’t own
- Misrepresent factual content in news or documentary contexts
When in doubt, disclose any retouching.
Content‑Aware Fill vs. Generative Fill: Which One Should You Use?
With Adobe’s new Firefly‑powered Generative Fill, many users wonder if Content‑Aware Fill is still relevant. The short answer is yes, they serve different purposes.
Content‑Aware Fill is a local, analytical tool that works exclusively with the pixel information already present in your image. It identifies and blends existing textures, colors, and patterns, but it cannot invent anything new. Best of all, it processes entirely offline on your computer.
Generative Fill is a global, creative tool powered by AI trained on a vast dataset of images. It can generate entirely new content based on a text prompt or by analyzing the scene’s perspective and lighting. It requires an internet connection to communicate with Adobe’s cloud servers.
When to use Content‑Aware Fill
- Removing objects from simple or repetitive backgrounds (sky, grass, blank wall).
- You need the filled pixels to be 100% derived from the original image (important for photojournalism or forensic work).
- You want maximum local control over the sampling source.
- You are working offline or have a slow internet connection.
When to use Generative Fill
- Removing objects from highly complex, non‑repeating backgrounds (busy street, dense forest). The AI often generates more convincing results than rearranging existing pixels.
- Adding new elements to an image (e.g., “add a majestic lion”).
- Extending the canvas significantly beyond the original photo’s borders.
Many professionals use both tools in the same workflow: Content‑Aware Fill for fast, reliable cleanup, and Generative Fill for creative additions or exceptionally tricky backgrounds. For a detailed comparison, check out this practical guide from Photofocus.
Real-World Applications Across Industries
E-commerce Product Photography
Remove price tags, background clutter, and reflection spots. Fill missing areas on seamless backgrounds without reshoots.
Real Estate Photography
Take out cars from driveways, trash cans from curbs, and power lines crossing the sky. Cleaner photos help properties sell faster.
Portrait and Fashion Retouching
Remove skin blemishes, stray hairs, and jewelry reflections. Clean up background distractions.
Landscape and Travel Photography
Erase stray backpacks, construction signs, or tourists. Many photographers now shoot wider, knowing they can remove distractions later.
Optimizing Your Workflow with Actions
If you perform similar edits repeatedly, create a Photoshop Action:
- Open
Window > Actions - Click Create New Action, name it (e.g., “Content-Aware Cleanup”)
- Click Record
- Perform your standard Content-Aware Fill steps
- Click Stop
Combine with batch processing (File > Automate > Batch) to edit hundreds of photos automatically.
For a deeper dive into Photoshop’s selection tools and layer management, the offcial Adobe Photoshop User Guide provides comprehensive documentation from the software’s creators.
Putting It All Together
Content-Aware Fill has revolutionized photo retouching. Start simple, then explore the advanced workspace as you gain confidence.
Core principles to remember:
- Always work on a duplicate layer or output to New Layer
- Feather selections by 1–3 pixels
- Manually control the sampling area for complex scenes
- Break large removals into smaller sections
- Combine with Healing Brush or Clone Stamp for final cleanup
Now open Photoshop and try it yourself. Find an image with an unwanted element—a photobomber, stray branch, or random piece of trash. Run through the steps. You’ll be amazed at how quickly that distraction disappears.
You’ve mastered one smart fill – now let us handle the rest. Get a free clipping path demo and see how we save hours
Frequently Asked Questions
What is the keyboard shortcut for Content-Aware Fill?
Shift + F5 opens the Fill dialog. For the workspace, use Edit > Content-Aware Fill (you can assign a custom shortcut via Edit > Keyboard Shortcuts).
Can I use Content-Aware Fill on a blank layer?
Yes, but you must check Sample All Layers so Photoshop sees pixels on visible layers below.
Why does my fill have repeating patterns?
The algorithm reused a good match. Use the Sampling Brush in subtract mode to remove that area from the sampling overlay.
Is Content-Aware Fill available in older Photoshop versions?
The core technology exists since CS5 (2010). The advanced workspace with live preview came in CC 2019. Older versions only have the simple Fill dialog.
Does Content-Aware Fill require an internet connection?
No. It processes entirely offline on your local computer.
Is Content-Aware Fill safe for commercial work?
Absolutely. The tool only rearranges pixels from your own image—no copyright issues. (But check editorial guidelines for news work.)