

Is This Image Copyrighted? 8 Free Ways to Verify Online
June 23, 2026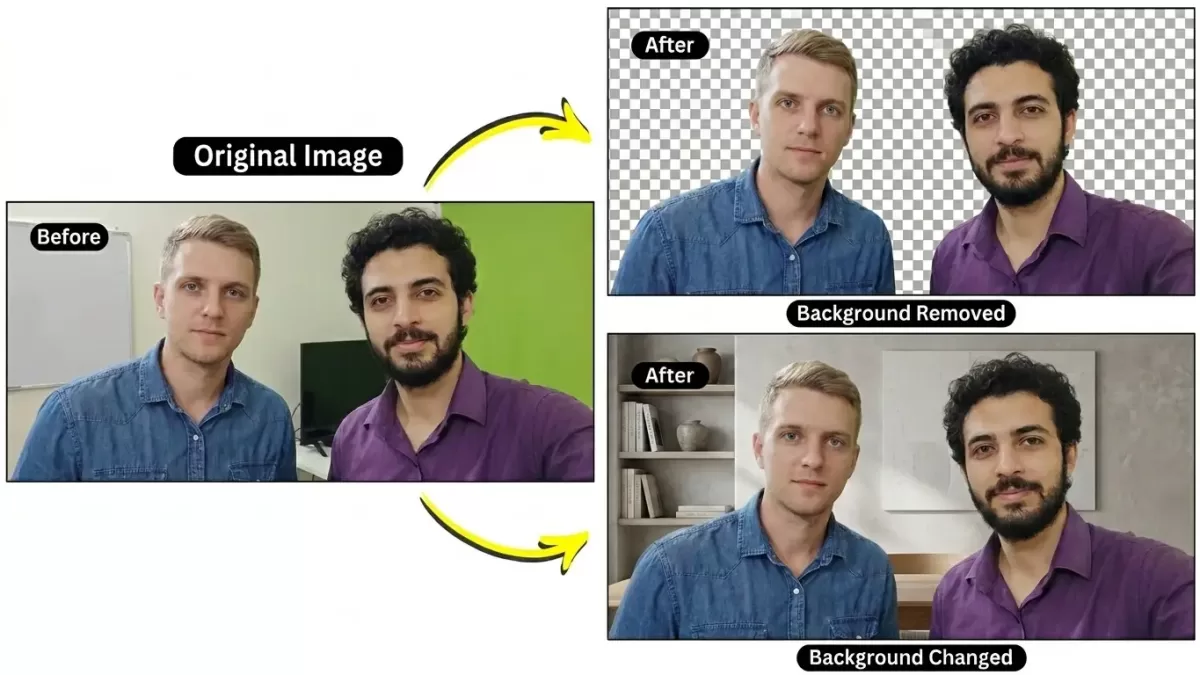
Five years ago, isolating a model’s flyaway hair from a busy studio backdrop demanded an experienced retoucher, a graphics tablet, and twenty patient minutes per image. Today, you drag a photo into a browser tab and the background dissolves in under three seconds. The shift looks like magic. It is not. Behind that one-click cutout sits a layered computer-vision pipeline that ingests pixels, predicts object boundaries, and stitches together a transparent PNG faster than most editors can pick up their stylus.
Yet anyone who has scaled an e-commerce catalog knows the catch. AI handles bulk effortlessly, but it still fumbles on glass, frizzy hair, fishing line, and any product where a single jagged edge can sink a sale. The smart question is no longer “AI or manual?” but rather “When should I trust the algorithm, and when should I bring in a human?” This guide unpacks the technology end-to-end, compares it against traditional clipping-path work, and shows you exactly how to choose the right tool for the job.
Want a flawless cutout without lifting a stylus? Try our professional background removal service and get bulk images returned in 24 hours.
- TL;DR — Quick Answer
- What Is an AI Background Remover?
- How AI Actually “Sees” a Photograph
- The 8-Step AI Background Removal Pipeline
- Why Hair, Fur, and Glass Still Break the Algorithm
- The Manual Clipping Path Method: Still the Gold Standard
- AI vs. Manual: The Side-by-Side Breakdown
- Real-World Scenarios: Which Method Wins?
- The Tiered Hybrid Workflow Most Pros Actually Use
- Foundational Models You Should Recognize
- How to Get Better Results — Whether You Use AI or a Human
- Costs and ROI: Doing the Math
- Privacy, Lock-In, and Hidden Trade-Offs
- Marketplace Compliance: What Amazon, Etsy & Shopify Actually Require
- Common Mistakes to Avoid
- Beyond Background Removal: What AI Is Quietly Getting Better At
- The Future: Where AI Background Removal Is Heading
- Frequently Asked Questions
- Final Verdict: Choose the Right Tool for Each Image
TL;DR — Quick Answer
Quick answer: An AI background remover uses deep-learning image segmentation to automatically detect the main subject, remove the background, and export a transparent image in seconds. It is the fastest solution for bulk e-commerce, marketplace, and social media images, while manual clipping paths still deliver the highest accuracy for hair, fur, glass, jewelry, reflective products, and other complex subjects.
Key Takeaways
- How it works: Image preprocessing → object detection → semantic segmentation → mask generation → alpha matting → edge refinement → color decontamination → final export.
- Best for AI: Bulk product catalogs, online marketplaces, social media content, and high-volume workflows where speed and cost matter most.
- Manual editing is better for: Hair, fur, glass, transparent objects, reflective metals, low-contrast edges, luxury products, print materials, and hero images.
- What professionals actually do: Most studios use a hybrid workflow—AI for straightforward images and experienced editors for complex or high-value photos.
- Bottom line: In 2026, the smartest background removal workflow combines AI for speed with manual editing for precision and brand-quality results.
What Is an AI Background Remover?
An AI background remover is software that automatically locates the main subject inside a photo and erases everything else. Instead of you tracing around a handbag with the Photoshop pen tool, a trained neural network looks at the image, decides which pixels belong to the bag and which belong to the studio sweep, and outputs a transparent PNG.
The “AI” part matters. These tools do not follow a rigid set of if-then rules — they learn from millions of labeled photos. Modern removers rely on deep-learning segmentation models (most often a U-Net variant or a transformer-based foundation model), trained until the network can predict a clean foreground mask for almost any everyday object. In short, an AI background remover combines three ideas:
- Computer vision — teaching machines to “see” pixel patterns.
- Deep learning — letting a neural network discover those patterns itself.
- Image segmentation — classifying every pixel as foreground or background.
Tools like the open-source rembg library, Adobe’s Remove Background quick action, Photoroom, and Canva’s one-click cutout all share this same DNA — even if their interfaces differ.
How AI Actually “Sees” a Photograph
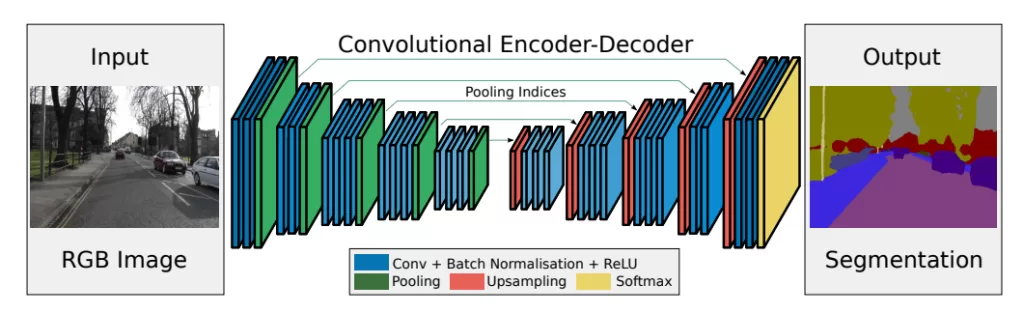
Humans see a coffee cup. A neural network sees a 1024×1024 grid of numbers, each cell holding red, green, and blue values between 0 and 255. From that raw tensor, the model has to reverse-engineer everything you take for granted — edges, surfaces, shadows, the difference between a handle and the sleeve behind it.
The model processes the image through convolutional layers, a core building block of computer vision. IBM’s primer on convolutional neural networks describes a CNN as a network that uses sliding filters to extract features such as edges, textures, and shapes from raw pixel data. Early layers detect simple cues like horizontal lines or color gradients. Deeper layers combine those cues into complex concepts — “fur,” “denim weave,” “the curve of a wine glass.” By the time the data reaches the final layer, the network has built an internal map of what is probably foreground and what is almost certainly backdrop. That map is the seed of the cutout you eventually download.
The 8-Step AI Background Removal Pipeline
Most modern removers — whether you use them through a free web app or a paid API — follow the same broad pipeline. Understanding each stage helps you spot why the algorithm sometimes nails a result and sometimes shaves off a corner of someone’s ear.
Step 1 — Image Preprocessing
Before any “smart” work happens, the image is conditioned for the model. The photo is resized to a fixed input resolution (often 320×320, 512×512, or 1024×1024), pixel values are normalized to a consistent numerical range, the color space is corrected (most networks expect RGB), and noise reduction and orientation fixes are applied. Skipping preprocessing is like feeding a chef ingredients without washing them — the model can still cook, but the result rarely matches the recipe.
Step 2 — Object Detection
Next, the network answers a deceptively hard question: what is the subject of this photo? The model scans the image for learned object signatures — human figures, common products, animals, vehicles, food, furniture — and ranks them by confidence. The most prominent object becomes the foreground candidate. Detection accuracy depends on how many examples of that object the network saw during training; a handbag against a white sweep is trivial, a vintage carburetor on a workbench is not.
Step 3 — Image Segmentation
Detection tells the AI that an object exists. Segmentation tells it which exact pixels the object occupies. IBM’s overview of instance segmentation explains that semantic segmentation classifies every pixel by category, while instance segmentation goes one step further and separates each individual object even when two objects share the same class. For background removal, the goal is binary: foreground or background. The model produces a probability map — values close to 1 for confident foreground, values close to 0 for confident background, and fractional values in the fuzzy in-between.
Step 4 — Mask Generation
The probability map gets thresholded into a usable alpha mask — a grayscale image where white pixels keep the subject, black pixels delete the backdrop, and gray pixels handle soft transitions like motion blur or hair wisps. This mask is the heart of the operation. Everything downstream — refinement, feathering, final compositing — is just polishing this mask.
Step 5 — Alpha Matting (Soft Edges)
Raw segmentation masks look blocky when zoomed in. For realistic edges, removers run a second pass called alpha matting, which estimates partial transparency for each boundary pixel. The MDPI survey on deep learning methods in image matting describes this as “extracting a fine foreground image by estimating the opacity values of each pixel” near the boundary. Refinement here typically includes edge smoothing to remove stair-step pixelation, feathering to blend the subject naturally onto a new backdrop, and trimap-free matting using lightweight networks like Hong Kong CityU’s MODNet for real-time portrait cutouts.
Step 6 — Edge Refinement
Even with alpha matting, edges often need a final pass — anti-aliasing, micro-contrast adjustment, and softening of jagged boundaries. This is where premium tools quietly separate themselves from free ones.
Step 7 — Color Decontamination
When you shoot against a green wall, traces of green spill onto the subject’s edges. Premium AI models detect that “color spill” and neutralize it — a step many free tools skip, which is why their cutouts can look slightly fringed against a new background. This is one of the most underrated quality differentiators in modern removers.
Step 8 — Output Rendering
Finally, the cutout is exported. Common options include PNG for full transparency support, WebP for smaller file sizes on the web, and JPG with a new solid background for marketplaces that reject transparent files. Layered PSD outputs are reserved for premium services where downstream editability matters.
Why Hair, Fur, and Glass Still Break the Algorithm
Even the best AI background remover has predictable weak spots. The common thread is ambiguity — situations where the line between subject and backdrop isn’t truly binary. Notable failure modes include:
- Flyaway hair and fur. Each strand contains partial transparency, so the model has to estimate an opacity value rather than draw a hard line. Microsoft’s own Azure background-removal documentation openly warns that “images with thin and detailed structures, like hair or fur, may show some artifacts when overlaid on backgrounds with strong contrast.”
- Glass, acrylic, and crystal. Transparent objects don’t have a single foreground color — they show whatever is behind them.
- Low-contrast edges. White cotton on a cream backdrop, black leather on a dark studio sweep, or a model whose hoodie matches the wall behind her.
- Reflective metals and jewelry. Mirrors and chrome confuse the network because the “subject” partially contains the room around it.
- Overlapping subjects. A handbag held by a model, a child hugging a dog, props touching a product — the segmentation network may merge them into one blob or, worse, slice off the wrong half.
- Heavy compression artifacts. Low-resolution stock photos and over-compressed JPGs starve the model of edge information.
Reviewers have documented striking cases where popular AI tools quietly removed a dog’s tail or shaved off part of a leg — clean output at first glance, but a brand-killer if you didn’t catch it before publishing. For curly hair, fuzzy sweaters, and animals, manual editing still wins on accuracy.
Have hair, fur, or transparent products? Our specialists deliver pixel-perfect cutouts using the advanced image masking service — a technique no AI can fully match.
The Manual Clipping Path Method: Still the Gold Standard
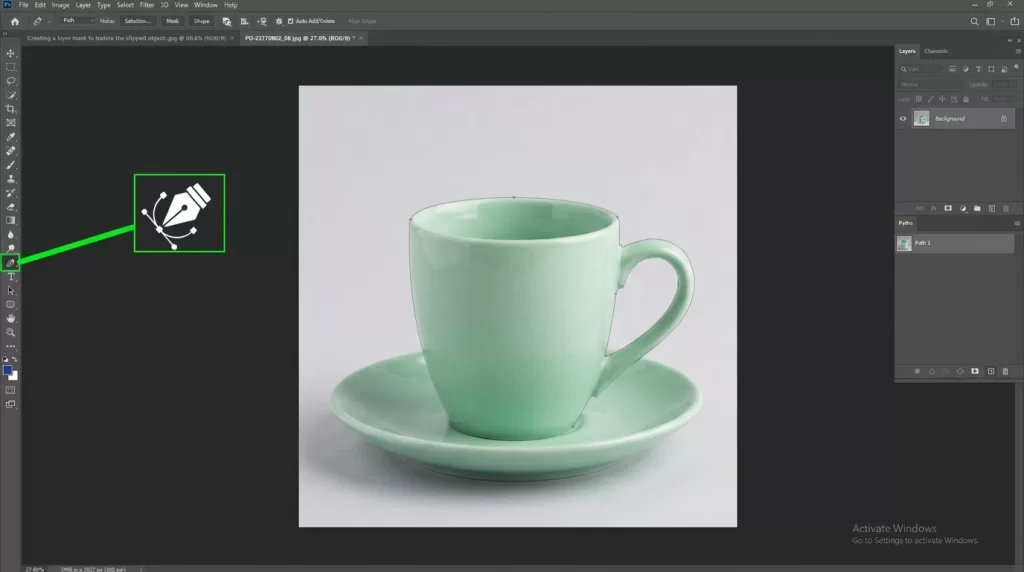
Manual background removal is, in essence, drawing. A trained editor opens the photo in Photoshop (or GIMP, or Affinity Photo), selects the Pen Tool, and traces a vector path around the subject one anchor point at a time. Adobe’s own Pen Tool documentation describes the workflow: place anchor points at each direction change, drag handles to shape the curve, then close the path and convert it to a selection. The output is a vector clipping path — infinitely scalable, perfectly crisp, and editable at any anchor. For curly hair or fur, editors switch to channel masking, frequency separation, and the Refine Edge brush to capture micro-detail.
Why Manual Still Beats AI on Premium Work
- Pixel-level precision. A human can zoom to 400% and decide, strand by strand, what stays.
- Vector paths. Output paths can be reused, scaled to billboards, and exported as Photoshop clipping paths for print.
- Multiple paths per image. A retoucher can create separate paths for the body, hardware, and shadow of a single product so each can be color-corrected independently — exactly what specialized multi clipping path work delivers.
- Bundled edits. While the path is open, the editor can also retouch dust, recolor a strap, or add a realistic drop shadow in one session.
- Brand consistency. A studio can lock down conventions (path width, anti-alias settings, shadow opacity) across thousands of SKUs.
The catch is unmistakable: manual work is slow. A single complex jewelry shot may take 15–30 minutes. AI completes it in seconds — at a quality that’s usually acceptable for catalog thumbnails but rarely good enough for hero banners or print campaigns.
AI vs. Manual: The Side-by-Side Breakdown
| Criterion | AI Background Remover | Manual Clipping Path |
|---|---|---|
| Speed per image | 2–10 seconds | 5–30+ minutes |
| Cost per image | $0.05 – $0.35 | $0.39 – $5+ |
| Edge precision (hard objects) | Excellent | Excellent |
| Hair & fur handling | Good to inconsistent | Reliable with masking |
| Glass & transparency | Often fails | Editable layer by layer |
| Low-contrast subjects | Weak | Strong |
| Scalability | Thousands per hour | Limited by team size |
| Skill required | Zero | Trained Photoshop editor |
| Output flexibility | PNG / WebP / JPG | Layered PSD with editable paths |
| Best for | Bulk catalog, social, drafts | Hero images, print, luxury |
| Worst for | Hair, glass, low contrast | One-off rush jobs |
Both ends of the industry converge on the same bottom line: AI prioritizes speed and scale; manual editing prioritizes fine control and quality.
Real-World Scenarios: Which Method Wins?
Generic advice is useless without context. Here is how the choice plays out across the campaigns most brands actually run.
Scenario 1 — A Fast-Moving D2C Apparel Brand
A small brand launches 60 SKUs a month on Shopify and Instagram. Each product is photographed on a clean white seamless. Subjects are mostly cotton tees, denim, and accessories with clear edges. Best fit: AI background remover. Contrast is high, shapes are simple, and the brand needs catalog turnaround in hours, not days. Reserve the human editor for the seasonal lookbook hero shots.
Scenario 2 — A Luxury Watch Retailer
Polished steel cases, sapphire crystal, mirror dials, and metal bracelets photographed against gradient backdrops. Best fit: manual clipping path with multi-path masking. AI almost always smudges reflections, drops the lume markers, or loses the bezel’s chamfer. A luxury price tag demands a luxury cutout.
Scenario 3 — A Fashion Editor Producing Lookbooks
Models with curly hair, layered fabrics, sheer scarves, and on-location backgrounds. Best fit: manual editing with integrated photo retouching. Hair detail is the deal-breaker, and the team usually wants color grading, skin retouch, and shadow work in the same pass.
Scenario 4 — A Marketplace Reseller Processing 5,000 Photos a Week
Furniture, toys, and home goods photographed by suppliers with inconsistent lighting and varied backdrops. Best fit: AI first, then human quality control. Hybrid workflows let AI handle ~80% of the volume while editors fix the 20% that fail. This combination delivers Amazon-ready images at sustainable cost.
Scenario 5 — A Jewelry Studio Launching an E-Commerce Site

Tennis bracelets, gemstone earrings, prongs catching light, internal facets visible through clear stones. Best fit: manual every time. Micro-reflections and translucency are precisely where AI hallucinates. The cost of one misshapen prong on a $4,000 ring is far higher than the cost of an editor.
Selling jewelry, watches, or premium accessories? Hand off the hard cuts to a trusted clipping path team and protect your brand from AI artifacts.
The Tiered Hybrid Workflow Most Pros Actually Use
Here’s the secret experienced e-commerce teams rarely advertise: they don’t pick a side. They build a tiered pipeline that routes each image to the cheapest method capable of handling it well.
Tier 1 — Easy SKUs (rigid products, clean white backdrops). AI auto-cutout, batch processed, no human review. Examples: electronics, books, hardgoods, packaging.
Tier 2 — Medium SKUs (lifestyle shots, multiple objects, mid-complexity). AI cutout followed by a 30-second human QA pass. Editors fix masks rather than starting from scratch. Examples: home goods, apparel on flat lays, food.
Tier 3 — Hero Shots (campaign images, jewelry, fashion, glass, fur). Full manual clipping path or layer masking from the start. Editors deliver layered PSDs with editable paths and shadows. Examples: magazine covers, hero banners, luxury catalogs.
A typical implementation looks like this:
- Bulk ingestion. Every photo runs through an AI remover (rembg, Photoroom API, Adobe Express, or a custom U²-Net model) for an instant first pass.
- Automated QA. Scripts or visual diffs flag images where the mask looks suspicious — too few foreground pixels, jagged edges, or low confidence scores.
- Manual triage. Flagged images and anything tagged “hero,” “hair,” “glass,” or “metal” go to human editors.
- Edge polish. Editors refine the AI mask rather than restart, saving 40–60% of typical editing time.
- Brand-specific finishing. Add natural shadow creation so cutouts don’t look like they were cut with scissors.
- Export and deliver. Publish PNGs and WebPs through your CMS or DAM.
If you’re building a hybrid pipeline at home, a few tools and skills pay outsized dividends: a fast image library like Pillow or ImageMagick, a working knowledge of the leading AI photo-editing software in 2026, and fluency with the Photoshop tools and toolbar workflow.
Foundational Models You Should Recognize
If you ever read about AI removers and want to know what’s running under the hood, the same handful of architectures come up again and again.
U-Net and U²-Net
The grandfather of modern segmentation. The original U-Net paper by Ronneberger, Fischer, and Brox (2015) introduced a contracting-expanding “U-shaped” encoder-decoder with skip connections, designed for biomedical image segmentation but later adopted across every imaging domain. The follow-up U²-Net (Pattern Recognition, 2020) stacks nested U-shaped blocks for sharper salient-object detection and powers many open-source removers, including rembg.
MODNet
A lightweight, trimap-free portrait-matting model from City University of Hong Kong that runs in real time, even on mobile hardware. The MODNet paper (AAAI 2022) is the reference: it produces broadcast-quality alpha mattes from a single image without any user input — no green screen, no manual trimap.
Segment Anything (SAM) and SAM 3
Meta AI’s Segment Anything Model is a foundation model trained to segment essentially anything in any image with a click, box, or text prompt. Its successors — most recently SAM 3, which adds concept-based prompts and video tracking — are reshaping the field by giving removers a general-purpose segmentation engine instead of a single-task model.
Mask R-CNN
A classic instance-segmentation network from Facebook AI Research that produces both a bounding box and a pixel mask for each detected object. Documented in the original Mask R-CNN paper, it remains the go-to architecture when you need to separate multiple distinct subjects in the same photo.
On-Device Portrait Matting
Phones now run matting locally. Google’s research team has documented how the Pixel pipeline chains a MobileNetV3 backbone with a shallow encoder-decoder, runs the whole thing inside TensorFlow Lite, and produces a high-resolution alpha matte without ever touching the cloud — detailed in their write-up on accurate alpha matting for portrait mode.
These models matter because the quality of your “free” background remover depends almost entirely on which of these architectures sits in the backend. Tools quietly upgrading from U-Net to SAM-based pipelines often produce dramatically better hair edges overnight.
How to Get Better Results — Whether You Use AI or a Human
Both approaches benefit from clean input. The cheaper your raw shoot, the more expensive your editing becomes. A few habits make an enormous difference:
- Shoot against contrasting backdrops. White products on white sweeps tank both AI accuracy and editor speed.
- Lock down lighting. Even, diffused light produces predictable edges.
- Use a tripod. Sharp focus gives the algorithm real edges to grip.
- Maintain high resolution. Masks degrade rapidly below ~512 px on the short edge.
- Pre-key when possible. A literal green screen or clean white cyc shaves minutes off any editor’s time.
- Keep RAW files. Editors can recover blown highlights and crushed shadows that AI throws away.
- Standardize crop and aspect ratio. Stick to a consistent format like the 4:3 aspect ratio so downstream automation behaves.
For long projects, build a style guide that covers acceptable mask softness, edge feathering, and shadow intensity. Consistency is what makes a catalog look professional — not any single perfect cutout.
Costs and ROI: Doing the Math
Pure AI is cheaper. Pure manual is safer. Here is roughly what a 50,000-image year looks like under each approach.
| Approach | Per-image cost | Annual cost (50K images) |
|---|---|---|
| AI only (subscriptions/API) | $0.05 – $0.25 | $2,500 – $12,500 |
| Manual only (outsourced) | $0.39 – $2.00 simple / $2–$5 complex | $20,000 – $100,000+ |
| Tiered hybrid (80% AI, 20% manual) | Blended ~$0.20 – $0.60 | $10,000 – $30,000 |
The hybrid model typically lands within 20–30% of AI-only cost while delivering quality close to all-manual — which is why it has become the e-commerce default.
Privacy, Lock-In, and Hidden Trade-Offs
The conversation usually stops at “speed vs. quality,” but there are three more variables worth weighing.
Privacy and data ownership. Most free online removers upload your photo to a remote server. For NDA-bound product launches, unreleased designs, or anything containing identifiable people, that’s a real concern. Self-hosted options like rembg or Adobe’s offline tools keep images on your machine, while professional editing studios sign NDAs as standard practice.
True cost at scale. Free AI tools look cheap until you hit volume caps. Most consumer APIs charge between $0.05 and $0.35 per HD image, and “credits” reset monthly. At 10,000+ images a month, outsourced manual editing becomes price-competitive while delivering noticeably higher quality on hard subjects.
Lock-in and format risk. A PNG from an AI tool is a flat, finished output. A PSD from a manual editor is an editable source file. The second one is dramatically more valuable five years from now when you need to restyle the catalog, change brand colors, or repurpose for print. If you care about long-term flexibility, demand layered deliverables.
Need an end-to-end catalog refresh? Combine retouching, masking, and shadows in one project with the full Clipping Expert Asia workflow.
Marketplace Compliance: What Amazon, Etsy & Shopify Actually Require
Clean cutouts aren’t just an aesthetic choice — they’re a marketplace gating requirement. Amazon’s own product-image guide spells it out:
- Pure white background at RGB 255, 255, 255 (not #FEFEFE).
- Product fills 85% or more of the frame.
- Minimum 1000–2000 px on the longest side for zoom functionality.
- No watermarks, borders, text, or graphics.
- JPG or PNG, sRGB color space.
AI tools occasionally drift on white levels, producing #FEFEFE instead of pure white — enough to trigger automated rejection on Amazon main images. The quick fix is a one-step Levels adjustment in Photoshop or a single-line ImageMagick command. Etsy and Shopify rules are looser, but both still penalize messy edges and inconsistent backgrounds in their search-ranking algorithms.
Common Mistakes to Avoid
Trusting the preview at low resolution. A cutout that looks clean at 600 px wide can fall apart at 2400 px. Always inspect at full size before publishing.
Ignoring color spill. Green-screen-style fringes ruin otherwise good cutouts. Pick a tool that performs explicit color decontamination, or fix the spill manually.
Treating shadows as optional. Floating products look fake. A soft, natural shadow effect underneath or behind the subject is the single fastest way to make an AI cutout look professional.
Letting the AI choose the subject. Some tools default to the largest object, which isn’t always the right object. Use tools that let you tap or click to confirm the subject.
Forgetting accessibility. Add descriptive alt text to every image. It helps screen readers and improves on-page SEO simultaneously.
Beyond Background Removal: What AI Is Quietly Getting Better At
The same underlying segmentation models that drive background removal now power object replacement (swap a sofa for a different sofa), generative fill (extend a canvas while keeping the subject perfect), one-click recoloring without re-shooting — see our service for precision color changes — automated retouching, and per-frame video matting at 30 fps. The cutout step still has to be near-perfect for any of these to look real, which is why demand for skilled clipping work has grown alongside AI adoption, not shrunk.
The Future: Where AI Background Removal Is Heading
Four trends will reshape the field over the next two to three years.
Foundation models everywhere. SAM-style universal segmenters are getting smaller, faster, and cheaper to deploy. Expect today’s “premium” removers to feel basic within a year as the baseline quality bar jumps.
Real-time matting on consumer devices. MODNet-class models already run on phones at 30+ FPS. Soon you’ll have broadcast-grade chroma keying without a green screen, directly in your camera app.
Generative background replacement. Instead of dropping a cutout onto a transparent layer, generative models like Adobe Firefly now invent a brand-new background that matches lighting, perspective, and shadows automatically. The cutout step still has to be near-perfect, which keeps demand for skilled clipping work strong.
Better fashion, hair, and transparency models. Research is increasingly targeted at the exact failure modes AI is known for — translucent fabrics, fur, hair, and reflective surfaces. Future removers will close the gap with human editors on these edge cases, but not eliminate it.
What will not change is the demand for premium, hand-finished imagery. As AI commoditizes the low end, the visual bar for hero campaigns rises. Brands that lean into both — automation for volume, craft for the marquee — will win.
Frequently Asked Questions
1. Is an AI background remover as accurate as Photoshop’s manual selection?
For simple subjects with high contrast — yes, and often faster. For hair, fur, glass, reflective metal, and overlapping subjects, manual editing in Photoshop still wins on detail and edge fidelity. The best AI tools today close the gap on portraits but rarely match a trained retoucher on premium product work.
2. Which AI background remover gives the best free results?
For lightweight one-offs, Adobe Express, Canva, and Photoroom produce respectable cutouts. For developers, Rembg is the leading open-source option and runs locally. Quality varies image by image, so always test on your actual product photos before committing.
3. Why does the AI cut off parts of my subject?
Three usual culprits: the model misidentified the subject, the foreground blends into the background (low contrast), or the image is too compressed for clean edge detection. Try a higher-resolution version, simplify the background, or crop closer before reprocessing.
4. Can AI handle hair and fur cleanly?
Specialized portrait-matting models (MODNet, MatteAnything, SAM 2) handle hair impressively well on portraits with even lighting. They still struggle on flyaways, curls against busy backdrops, and animal fur. For zero-defect results — especially on commercial fashion or pet products — hand masking remains the safer choice.
5. How much does professional manual background removal cost?
Simple silhouettes (a single sneaker on white) often start near $0.39 per image. Complex subjects (multi-path jewelry, fur, glass, layered apparel) range from $1.50 to $5+. Volume discounts and turnaround tiers usually apply above a few hundred images.
6. Can I use AI for the first pass and humans for the final polish?
Absolutely — that’s the tiered hybrid workflow most large brands run today. AI handles bulk, humans correct the edge cases. You get speed and quality without paying for either at full price.
7. Will AI replace manual clipping path services completely?
Unlikely in the foreseeable future. AI is getting closer every year, but premium e-commerce, print, and luxury marketing still depend on edits that algorithms can’t reliably produce. The market is shifting from “manual vs. AI” to “humans guiding AI” — a more durable role for skilled editors.
8. What file format should I export my background-removed image in?
For web with transparency, use PNG-24 or WebP. For print or marketplaces that reject transparent files, export JPG with a pure white background (RGB 255, 255, 255 for Amazon main images). Always keep a layered PSD or TIFF as a master copy so you can restyle later.
Final Verdict: Choose the Right Tool for Each Image
AI background removers are a genuine breakthrough. They turn a once-tedious task into a one-click action, unlock previously impossible scale, and make basic editing accessible to anyone with a browser. For social posts, marketplace catalogs, internal mockups, and most simple product shots, they are the obvious choice.
But algorithms still have blind spots. Hair, fur, glass, reflective metal, and overlapping subjects expose them. When your image will be magnified, printed, used in paid ads, or carry the weight of a premium brand, the predictable hands of an experienced editor remain the better investment.
The smartest workflow in 2026 isn’t AI or manual. It’s a deliberate, tiered blend — AI for bulk and speed, humans for craft and quality control. Build that pipeline once, and you’ll ship faster, look sharper, and protect your brand from the small but visible artifacts that quietly erode trust.
Ready to scale your visual catalog without sacrificing quality? Pair AI speed with our expert ghost mannequin and color-editing services for a flawless storefront finish.