

Top 10 Clipping Path Service Providers to Watch in 2026
May 1, 2026
How to Turn Your Pet’s Photo into a Custom T-Shirt (Dog, Cat & More): The Complete 2026 Guide
May 4, 2026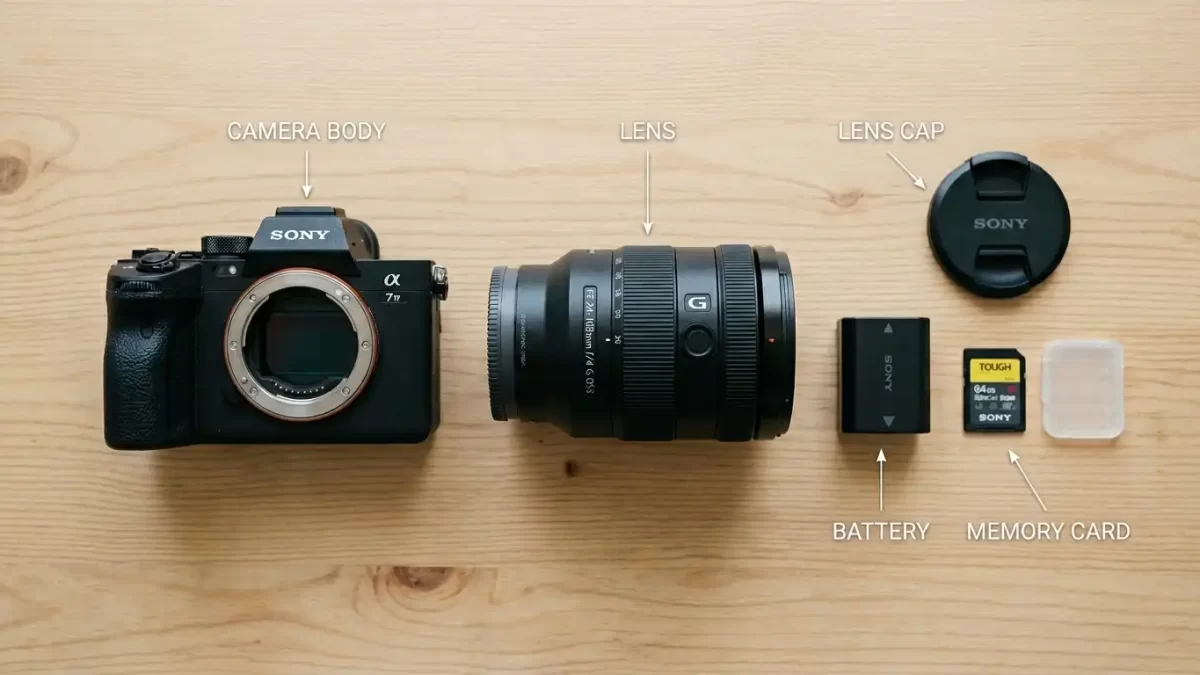
When you first hold a camera, all those buttons, dials, and terms like “aperture” or “ISO” can feel overwhelming. I remember my first DSLR I spent more time guessing than actually shooting. But here is the truth: understanding the parts of a camera transforms you from a casual snapper into someone who creates intentional, beautiful images. Each component works together like a team. The lens captures light, the sensor records it, and the processor turns that data into a photograph. You don’t need a degree in photography to master this. You just need a friendly guide that walks you through every piece of your camera’s anatomy.
Want your photos to look professionally edited without the hassle? Try our photo retouching services to bring out the best in every image you capture.
Today, we will explore every major part of a camera. I will explain what each piece does, why it matters, and how you can use it to take better pictures. Whether you own a DSLR, a mirrorless camera, or even a high-end compact, these principles apply across the board. Let us dive into the anatomy of your camera, piece by piece.
- 1. The Camera Body: The Heart of the System
- 2. The Lens: The Eye of Your Camera
- 3. The Image Sensor: Where Light Becomes Data
- 4. The Shutter: Controlling the Moment
- 5. The Aperture: The Pupil of the Lens
- 6. Viewfinder and LCD Screen: Framing Your World
- 7. Buttons, Dials, and Menus: Your Control Center
- 8. Memory Card Slot and Battery: Power and Storage
- 9. Flash and Hot Shoe: Adding Light
- 10. Image Stabilization and Focus Systems
- Frequently Asked Questions (FAQ)
- Conclusion
1. The Camera Body: The Heart of the System
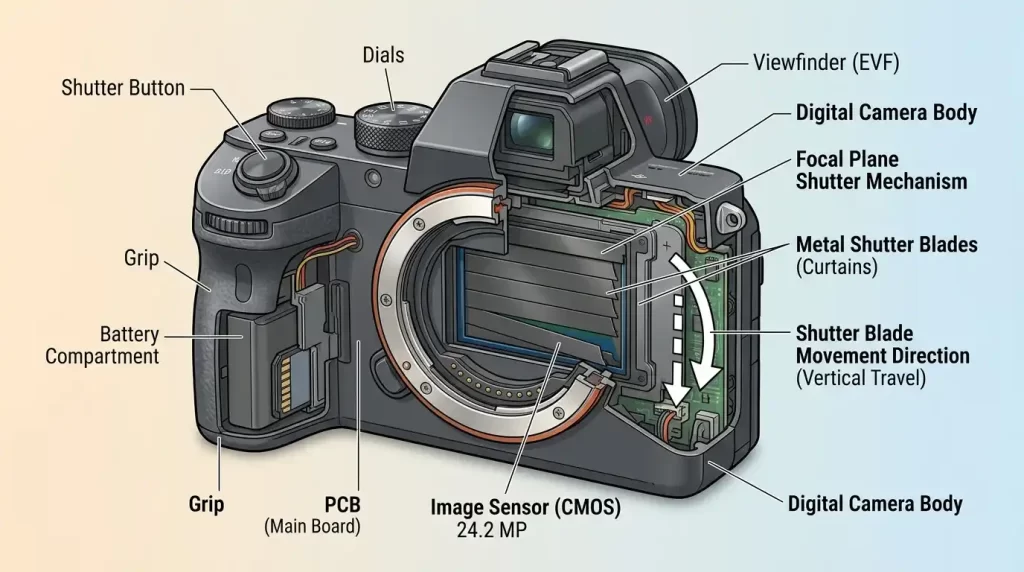
The camera body is the main housing that holds everything together. Think of it as the chassis of a car. It contains the sensor, the shutter, the processor, and all the internal electronics. It also provides the mount for attaching lenses, the grip for holding, and the external buttons you press to control settings.
Most modern camera bodies use durable materials like magnesium alloy or high-grade polycarbonate. Weather-sealed bodies resist dust and moisture, which matters when you shoot outdoors. Inside the body, a mirror mechanism (in DSLRs) directs light from the lens to the optical viewfinder. Mirrorless cameras remove that mirror, making the body smaller and lighter.
When you choose a camera, pay attention to the body’s ergonomics. Does the grip feel natural in your hand? Can you reach the main dials without stretching? A comfortable body encourages you to carry your camera everywhere. Also, look at the lens mount—it determines which lenses you can use. Every major brand (Canon, Nikon, Sony, Fujifilm) has its own mount system.
If you often photograph products or need clean cutouts for e-commerce, our clipping path service helps isolate subjects from backgrounds with pixel-perfect accuracy.
The camera body also houses the battery compartment and the memory card slot. These live behind a secure door, usually on the bottom or side. Some bodies include a built-in flash, while others rely on external flashes via the hot shoe. Later in this guide, we will cover those details separately.
2. The Lens: The Eye of Your Camera
Without a lens, your camera sees nothing but a blurry mess. The lens focuses light onto the sensor. It determines how much of a scene enters the frame (focal length) and how bright that light is (maximum aperture). Lenses come in two main types: prime lenses (fixed focal length) and zoom lenses (variable focal length).
Prime lenses often produce sharper images and allow wider apertures (like f/1.8), which creates that beautiful background blur called bokeh. Zoom lenses offer flexibility—you can frame a shot without moving your feet. A standard kit lens (18-55mm) gives you a useful range for everyday photography.
Inside every lens, multiple glass elements move back and forth. The focusing ring lets you adjust sharpness manually. Many lenses also include image stabilization (IS or VR) that reduces blur from shaky hands. Pay attention to the lens mount type—it must match your camera body. You can also buy adapter rings to use lenses from different systems, but autofocus may suffer.
Lenses with complex edges (like hair or fur) can be tricky to edit. Our image masking service handles those fine details perfectly.
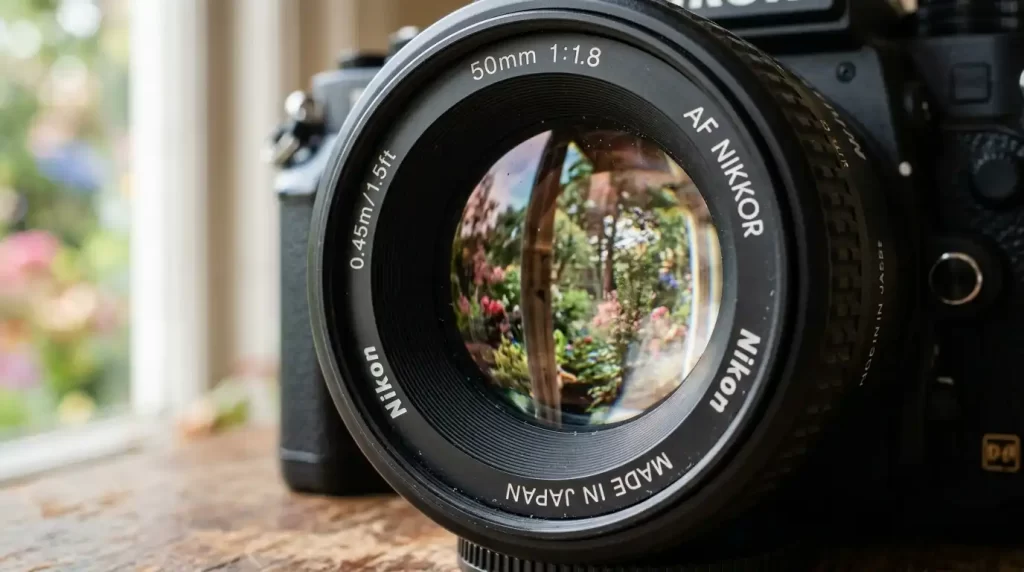
When you look through a lens, you will see numbers like “50mm f/1.8” or “70-200mm f/2.8”. The first number tells you the focal length; the second tells you the widest aperture. A lower f-number means better low-light performance. Clean your lenses with a microfiber cloth fingerprints and dust degrade image quality.
3. The Image Sensor: Where Light Becomes Data
The sensor is the electronic chip that converts light into an electrical signal. Your camera then processes that signal into a digital image. Sensors come in different sizes: full-frame (same as 35mm film), APS-C (cropped), Micro Four Thirds, and smaller ones in phones. Larger sensors capture more light, which means better low-light performance and shallower depth of field.
Megapixels (MP) measure how many tiny light-sensitive sites (photosites) sit on the sensor. More megapixels allow larger prints and more cropping flexibility. But do not chase megapixels alone. A 24MP full-frame sensor usually outperforms a 50MP phone sensor because of the physical size. Each photosite collects light, and the sensor’s analog-to-digital converter turns that into a number.
Two common sensor types exist: CMOS (complementary metal-oxide-semiconductor) and CCD (charge-coupled device). Most modern cameras use CMOS because it consumes less power and reads data faster. The sensor sits behind the shutter mechanism. When you press the shutter button, the mirror (in DSLRs) flips up, the shutter opens, and light hits the sensor for a precise duration.
Sometimes the colors your sensor captures need a little boost. Our color changes service gives you vibrant, natural-looking hues in post-production.
Keep your sensor clean. Dust particles appear as dark spots on every image, especially at narrow apertures like f/16. Many cameras include a self-cleaning mode that vibrates the sensor to shake off dust. For stubborn spots, use a sensor cleaning kit or take it to a professional.
4. The Shutter: Controlling the Moment
The shutter acts like a fast curtain that opens and closes to expose the sensor to light. Shutter speed measures how long that curtain stays open from 1/8000th of a second to 30 seconds or more (bulb mode). Fast shutter speeds freeze action, like a bird in flight or a splashing water droplet. Slow shutter speeds blur motion, creating silky waterfalls or light trails from cars.
Two main shutter types exist: mechanical and electronic. A mechanical shutter uses physical blades. It creates that satisfying “click” sound. An electronic shutter turns the sensor on and off without moving parts. Electronic shutters operate silently and allow extremely fast speeds, but they can cause rolling shutter distortion (wobbly video or skewed fast-moving subjects).
Your camera displays the shutter speed as a number: 1/500 means one five-hundredth of a second. When you shoot in Shutter Priority mode (Tv or S), you choose the speed, and the camera picks aperture and ISO. Use a tripod for slow speeds—anything slower than 1/60th of a second risks blur from hand shake.
Shadows play a huge role in photography. Our shadow creations service adds realistic drop shadows or natural shadows to make your products pop.
The shutter mechanism lives just in front of the sensor. In DSLRs, the mirror flips up before the shutter opens. In mirrorless cameras, the shutter stays open until you take a photo. Each shutter has a lifespan (e.g., 200,000 actuations). Do not worry you will likely upgrade your camera long before the shutter fails.
5. The Aperture: The Pupil of the Lens
While the shutter controls how long light enters, the aperture controls how much light enters through the lens. Aperture refers to the opening inside the lens formed by overlapping blades. You see it as an f-number: f/2.8, f/5.6, f/11, etc. A lower f-number (wide aperture) lets in more light and creates a blurry background. A higher f-number (narrow aperture) lets in less light but keeps everything sharp from foreground to background.
Think of your eye’s pupil. In dim light, your pupil expands to gather more light (wide aperture). In bright sun, your pupil shrinks (narrow aperture). Aperture also affects depth of field the zone of sharpness. Portrait photographers love f/1.4 to f/2.8 for soft, dreamy backgrounds. Landscape photographers use f/8 to f/16 to keep mountains and flowers both sharp.
Your camera’s aperture priority mode (Av or A) lets you set the f-number. The camera then chooses a matching shutter speed. Most lenses list their maximum aperture on the barrel. A 50mm f/1.8 lens has a very wide maximum aperture. A kit lens might say 18-55mm f/3.5-5.6, meaning the widest aperture changes as you zoom.
For fashion or clothing photography, a clean presentation matters. Our ghost mannequin service removes mannequins while keeping the garment’s natural shape.
Adjusting aperture also changes the look of point lights. Wide apertures turn lights into soft circles (bokeh). Narrow apertures turn them into starbursts. Practice shooting the same scene at f/2.8, f/8, and f/16 to see the difference.
6. Viewfinder and LCD Screen: Framing Your World
The viewfinder lets you compose your shot before pressing the shutter. Two types exist: optical viewfinders (OVF) in DSLRs and electronic viewfinders (EVF) in mirrorless cameras. An OVF shows you exactly what the lens sees through a mirror and prism—no lag, no battery drain. An EVF displays a tiny digital screen that shows the exposure, white balance, and even a histogram in real time.
Many photographers prefer EVFs because they show a “what you see is what you get” preview. If you change the aperture or shutter speed, the EVF darkens or brightens instantly. However, EVFs consume battery power and may lag in very low light.
The rear LCD screen offers another way to frame shots, especially for video or awkward angles. Tilting or articulating screens flip out and rotate, which helps when shooting from ground level or above a crowd. Touchscreens let you tap to focus or navigate menus quickly. Be careful with LCD screens in bright sunlight glare can make them hard to see.
After capturing your images, retouching brings them to life. Our beauty retouching service smooths skin, removes blemishes, and enhances eyes for stunning portraits.
Some cameras let you disable the LCD entirely to save battery. Others offer a hybrid system where the viewfinder activates when you raise the camera to your eye. Experiment with both to see which workflow suits you.
7. Buttons, Dials, and Menus: Your Control Center
Modern cameras pack dozens of buttons and dials. Do not let them intimidate you. Start with the essentials: shutter button (half-press to focus, full-press to shoot), mode dial (P, A, S, M, Auto), exposure compensation dial, ISO button, and the playback button (to review photos).
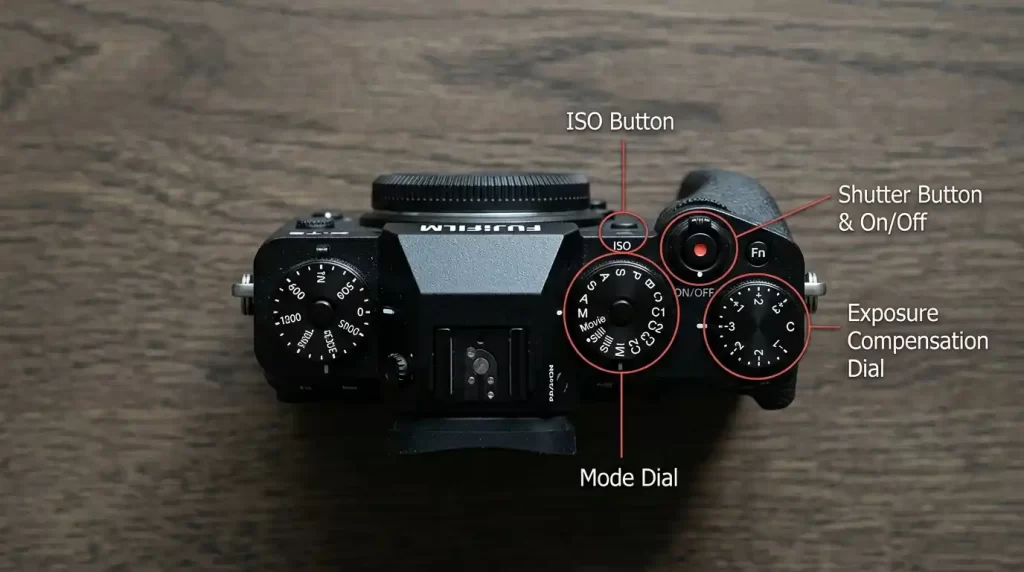
The mode dial gives you creative control. Auto mode lets the camera decide everything. Program (P) lets you adjust some settings while the camera handles exposure. Aperture Priority (A or Av) lets you set the f-number. Shutter Priority (S or Tv) lets you set the shutter speed. Manual (M) puts you in full control of aperture, shutter, and ISO.
Customizable function buttons (often labeled Fn or C1/C2) let you assign frequently used settings like white balance or focus mode. Learning these shortcuts speeds up your shooting dramatically. Spend an hour with your camera manual—yes, really. You will discover features you never knew existed.
Need to remove distracting backgrounds from hundreds of product photos? Use our background removal service for fast, clean results.
The menu system organizes all other settings: image quality (RAW vs JPEG), autofocus modes, metering patterns, and more. I recommend shooting in RAW format because it preserves all sensor data for flexible editing. JPEGs compress the image and discard information.
8. Memory Card Slot and Battery: Power and Storage
Without a memory card and a charged battery, your camera becomes a paperweight. The memory card slot (often on the right side or bottom) accepts SD, CFexpress, or XQD cards. SD cards are most common. Look for UHS-I or UHS-II ratings for fast write speeds. Faster cards clear the buffer quickly when shooting bursts or high-resolution video.
Always carry a spare memory card and battery. You never know when a shoot runs long. Format your card in the camera (not on a computer) to ensure proper file system compatibility. After transferring photos, do not delete images from the card using your computer format the card again in camera to avoid corruption.
The battery compartment usually sits under a small door on the bottom. Lithium-ion batteries provide hundreds of shots per charge. Mirrorless cameras drain batteries faster than DSLRs because the EVF and LCD consume power. Turn on airplane mode to disable Wi-Fi and Bluetooth if you do not need them. Carry a portable power bank and a USB charger for long trips.
For complex product images with multiple angles, our multi-clipping-path service gives you separate layers for each part of the object.
Check your battery’s health periodically. Swollen batteries become a fire hazard dispose of them properly. Use the manufacturer’s original charger for safety.
9. Flash and Hot Shoe: Adding Light
Sometimes natural light is not enough. The built-in flash (on many entry-level cameras) pops up when you need fill light indoors or in backlit situations. However, built-in flashes create harsh, flat light. They also cause red-eye and unnatural shadows.
The hot shoe sits on top of the camera. It allows you to attach an external flash (speedlite) or other accessories like a microphone or a wireless trigger. External flashes tilt and swivel, so you can bounce light off ceilings or walls for softer illumination. They recycle faster and provide more power.
Use flash creatively. In daylight, fill flash removes shadows from faces. At night, slow sync flash combines a long exposure with a burst of flash to capture both background and foreground. Off-camera flash (triggered wirelessly) opens up endless lighting setups for portraits and products.
Already placed a link above? Ensure each section has one. This section can link to the general services page for comprehensive editing.
Our all-in-one photo editing services handle everything from color correction to complex masking.
Avoid using flash through windows or mirrors you will see a bright reflection. Diffusers and softboxes soften the light further.
10. Image Stabilization and Focus Systems
Image stabilization (IS) reduces blur from shaky hands. You find it either in the lens (optical stabilization) or in the camera body (in-body stabilization or IBIS). Sony, Olympus, and Pentax use IBIS, which works with any lens. Canon and Nikon often put stabilization in the lens itself.
Stabilization gives you 2 to 5 extra stops of shutter speed. For example, you can shoot at 1/15th of a second instead of 1/125th and still get a sharp image. Turn off stabilization when using a tripod—it can actually introduce tiny vibrations.
Autofocus (AF) systems use phase detection or contrast detection. Phase detection is faster, which matters for sports or wildlife. Contrast detection is slower but more accurate for still subjects. Many modern cameras use hybrid systems. Focus points (from 9 to 1000+) let you select where the camera locks focus. Use single-point AF for precise control or zone AF for moving subjects.
Sharp images deserve perfect backgrounds. Our clipping path service provides clean, professional cutouts in minutes.
Continuous AF (AF-C) tracks a moving subject. Single AF (AF-S) locks focus once. Learn to back-button focus: assign AF activation to a button on the back, separate from the shutter button. This technique prevents refocusing when you recompose a shot.
Frequently Asked Questions (FAQ)
1. What is the most important part of a camera for image quality?
The lens and the sensor work together. A great lens on a mediocre sensor produces better images than a bad lens on a great sensor. Invest in quality glass first.
2. Do I need a full-frame sensor as a beginner?
No. APS-C or Micro Four Thirds sensors offer excellent quality at lower prices. They also allow smaller lenses. Upgrade to full-frame only when you need extreme low-light performance or shallower depth of field.
3. How do I clean my camera’s sensor safely?
Use a rocket blower first to remove loose dust. For stubborn spots, use a sensor swab designed for your sensor size. Never use compressed air or your breath.
4. What does “f-stop” mean?
F-stop measures the aperture size. A small f-number (f/1.8) means a large opening (more light, blurry background). A large f-number (f/16) means a small opening (less light, everything sharp).
5. Why do my photos look blurry even when I focus correctly?
Several reasons: slow shutter speed (hand shake), subject movement, or a dirty lens. Use a shutter speed faster than 1/(focal length). For a 50mm lens, use 1/50th or faster.
6. What is the difference between RAW and JPEG?
RAW files store all sensor data. You must edit them on a computer. JPEG files apply in-camera processing and compression. RAW gives you more editing flexibility; JPEGs are ready to share immediately.
7. How many megapixels do I really need?
24 megapixels suffice for most photographers. You can print sharp A3-sized prints and crop significantly. 50+ megapixels only benefit professional landscape or studio work.
8. Can I use old manual lenses on a new digital camera?
Yes, with an adapter. You lose autofocus and electronic communication, but manual focus works. This can be a fun, inexpensive way to explore vintage glass.
Conclusion
Understanding the parts of a camera transforms photography from guesswork into intentional artistry. You now know the lens focuses light, the sensor records it, the shutter and aperture control exposure, and the viewfinder helps you compose. Each component plays a specific role. When you learn to adjust them together, you gain complete creative control.