
Removing Unwanted Colors in Photoshop: Step-by-Step Guide
April 15, 2026
Master Selection Brush and Lasso Tools in Photoshop
April 20, 2026
Quick Answer: To crop an image in Adobe Illustrator 2026, place the photo with File → Place, select it with the Selection Tool (V), then choose Object → Crop Image and drag the widget handles. Press Enter to apply. For non-destructive cropping that preserves the original, draw a shape over the image, select both, and press Ctrl + 7 (Windows) or Cmd + 7 (Mac) to create a clipping mask.
Adobe Illustrator 30.6 — the June 2026 release — gives designers six distinct cropping methods, from the classic Crop Image tool to brand-new AI-powered alternatives. This complete guide walks you through every technique, verified against the official Adobe documentation, and shows you exactly when to use each one.
By the end of this tutorial, you will know the destructive Crop Image tool inside out, master non-destructive clipping masks, blend photos with opacity masks, use the artboard trick for clean exports, slice vectors with Pathfinder, and tap Generative Expand when cropping would sacrifice content.
Need pixel-perfect cutouts before you crop? Try our professional clipping path service — fast turnaround, hand-drawn precision.
- At-a-Glance: 6 Cropping Methods Compared
- Why Cropping in Illustrator 2026 Matters
- Method 1: The Crop Image Tool — Fastest Native Option
- Method 2: Clipping Mask — The Non-Destructive Power Move
- Method 3: Opacity Masks for Soft-Edge and Gradient Crops
- Method 4: Crop With the Artboard — The Export Trick
- Method 5: Pathfinder Intersect for Vector Cropping
- Method 6: Generative Expand — The 2026 AI Twist
- Linked vs. Embedded Images: A Critical Distinction
- 7 Common Cropping Issues and Verified Fixes
- Pro Tips: Speed Up Cropping in Illustrator 2026
- When to Crop in Illustrator vs. Photoshop vs. Web Tools
- Real-World Examples by Industry
- Frequently Asked Questions
- Final Thoughts: Crop Smarter, Design Faster
At-a-Glance: 6 Cropping Methods Compared
| Method | Destructive? | Best For | Shortcut |
|---|---|---|---|
| Crop Image tool | ✓ Yes | Quick rectangular trims, final exports | None (customizable) |
| Clipping Mask | ✕ No | Custom shapes, non-destructive edits | Ctrl/Cmd + 7 |
| Opacity Mask | ✕ No | Gradient fades, soft edges | Transparency panel |
| Artboard Crop | ✕ No | Multi-size exports, social variants | Shift + O (Artboard tool) |
| Pathfinder Intersect | ✓ Yes | Vector shapes only | Pathfinder panel |
| Generative Expand | + Adds content | Aspect ratio changes without loss | Contextual Task Bar |
Why Cropping in Illustrator 2026 Matters
Illustrator is a vector application at heart, but nearly every real project mixes vectors with raster photos — product shots, headshots, textures, and backgrounds. In the past, designers bounced photos back to Photoshop for trimming. Today, Illustrator 30.6 handles the job natively with widget-based controls, live PPI resampling, and AI tools that redefine what “cropping” even means.
What the 2026 Release Added
The May 2026 update (Illustrator 30.5) introduced generative AI features that sit alongside traditional cropping. The June 2026 release (30.6) refined linked-image management. Together, these updates change the cropping playbook.
- Generative Expand grows an image to a new aspect ratio without removing pixels
- Remove Background isolates subjects on a transparent backdrop in seconds
- Turntable generates rotated views of any raster or vector object
- Direct Export to Adobe Cloud Storage speeds team handoffs after trimming
- Relink All Instances (v30.6) updates every copy of a linked image in one click
Crop, Mask, or Expand — Pick the Right Tool
Each method solves a different problem. Pick wisely and you keep file sizes small, edits reversible, and image quality crisp.
- Crop Image — Permanent. Discards pixels. Best for final delivery.
- Clipping Mask — Hides pixels but preserves the original photo.
- Opacity Mask — Adds gradient or soft-edge support to a mask.
- Artboard Crop — Controls what exports without altering the source.
- Pathfinder Intersect — Designed for vector shapes, not raster images.
- Generative Expand — Adds new pixels instead of removing existing ones.
Method 1: The Crop Image Tool — Fastest Native Option
The built-in Crop Image command is the quickest path to a permanent, rectangular trim. Adobe shipped it in 2017 and continues to refine its widget controls in every release.
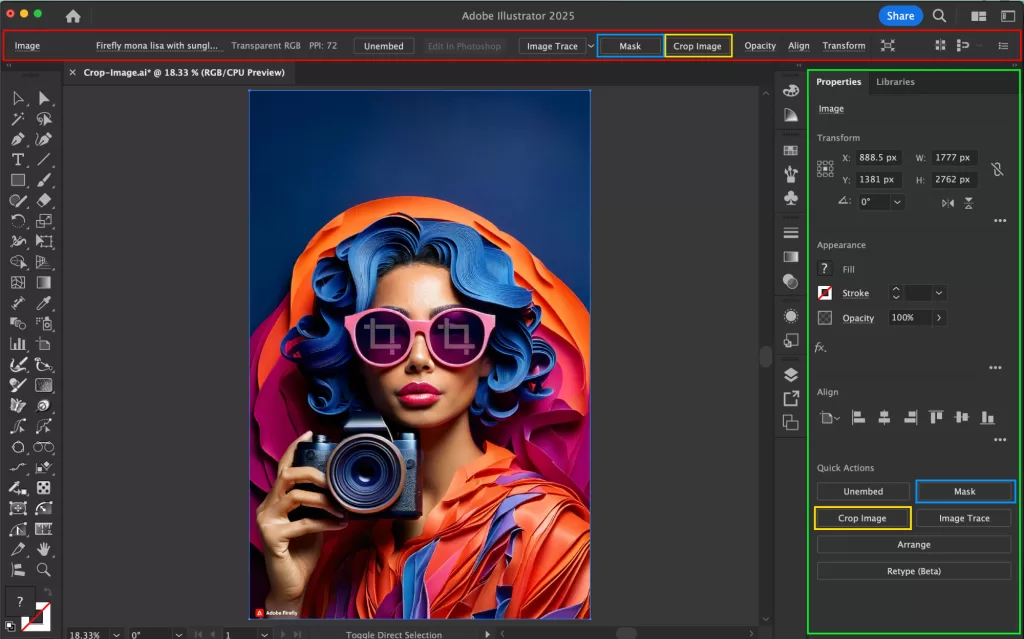
Step-by-Step Walkthrough
Follow these steps exactly as Adobe documents them in their official help library:
- Open your file and choose File → Place (or press
Cmd/Ctrl + Shift + P) - Click the image once with the Selection Tool (V)
- Click Crop Image in the Properties panel — or pick Object → Crop Image
- Confirm the linked-to-embedded prompt if Illustrator asks
- Drag the corner and edge handles to define the crop area
- Hold Shift to scale proportionally, or Alt/Option to scale from the center
- Set the output PPI in the Control panel to downsample if needed
- Press Enter / Return, or click Apply to finalize the crop
When to Use This Method
Reach for the Crop Image tool when speed matters more than reversibility. Marketing teams favor it for batch flyer production. E-commerce sellers use it for thumbnail cleanup. Freelancers rely on it before final PDF export.
- Use it on final delivery files where you no longer need the source
- Use it to shrink file sizes by discarding hidden pixels
- Use it on embedded photos that ship inside your
.aidocument - Avoid it on linked master files you still plan to edit
Common Gotchas
The Crop Image button often appears greyed out. The most common cause is selecting more than one object. Make sure exactly one raster image is active — vector art, multiple selections, and grouped artwork all disable the command.
Pair this method with our background removal service for crisp, market-ready product images in hours.
Method 2: Clipping Mask — The Non-Destructive Power Move
Clipping masks are the gold standard for professional designers because nothing gets deleted. You draw any shape — a circle, a hexagon, a custom path, even live type — and Illustrator hides everything outside that shape. The original photo stays intact underneath, ready for tweaks.
The 60-Second Workflow
Commit this workflow to muscle memory and you will save hours every week:
- Place your image with
Cmd/Ctrl + Shift + P - Draw the crop shape on top with the Rectangle, Ellipse, or Pen tool
- Select both objects with a
Shift + click - Press
Cmd/Ctrl + 7to create the clipping mask instantly - Double-click inside the mask to enter Isolation Mode and reposition the photo
- Press
Cmd/Ctrl + Alt/Opt + 7to release the mask if you need the original
The keyboard shortcut Ctrl + 7 (Windows) / Cmd + 7 (Mac) is one of the most valuable shortcuts in Illustrator.
Why Designers Prefer Clipping Masks
A clipping mask works on linked images, embedded images, vector art, type, and even live blends. That flexibility puts it ahead of the destructive Crop Image command.
- Pixel preservation — Nothing gets thrown away
- Custom shapes — Stars, hearts, type, and complex paths all work
- Reversible at any time — Release the mask and start over
- Client-friendly — Easy revisions when stakeholders change their mind
- Print-ready — Plays well with transparent backgrounds for packaging
Cropping Into a Custom Shape
Want a hexagonal team-member photo or a star-shaped sale badge? Draw the shape, place the photo behind it, select both, and hit Cmd/Ctrl + 7. You can even clip into letters — type your word, select it with the photo, and apply the mask. Illustrator clips the image into live, editable text.
Building product catalogs? Our multi-clipping path service isolates every element for precise edits and color changes.
Method 3: Opacity Masks for Soft-Edge and Gradient Crops
A standard clipping mask creates a hard edge. When you want a fade, vignette, or gradient crop — common in hero banners and lookbook layouts — switch to an opacity mask. White areas of the mask reveal the image, black areas hide it, and grey shades become semi-transparent.
How to Create an Opacity Mask
The Transparency panel hides this powerful tool. Once you know where it lives, the workflow takes under a minute:
- Place your raster image on the artboard
- Draw a rectangle on top filled with a black-to-white linear gradient
- Select both the image and the gradient shape
- Open
Window → Transparencyto reveal the panel - Click “Make Mask” with the Clip option enabled
- Toggle “Invert” if you need the opposite areas revealed
The result is a photo that fades smoothly into the background — perfect for blending product shots into colored sections of a landing page or e-book cover.
Creative Use Cases
Soft cropping unlocks design ideas that hard rectangles cannot deliver:
- Faded photo banners for blog post headers
- Vignette portraits for editorial layouts
- Dual-image blends where two photos merge in the middle
- Reflection effects under product hero shots
- Drop-off backgrounds to pair with realistic product shadows
Method 4: Crop With the Artboard — The Export Trick
This method does not really crop the image. Instead, it crops what exports from Illustrator. The image stays intact on the canvas, but anything beyond the artboard boundary disappears from your PNG, JPG, or PDF output.

Step-by-Step Artboard Cropping
The artboard approach is perfect when you want to export multiple sizes from one master file without touching the source image:
- Open the Artboard tool by pressing
Shift + O - Resize the artboard so it frames only the part of the photo you want
- Reposition the artboard over the desired region of the image
- Choose File → Export → Export As (or
Cmd/Ctrl + Alt + E) - Tick “Use Artboards” in the export dialog
- Pick PNG for transparent output or JPG for solid backgrounds
- Set “Transparent” for the background color when you need a clean cutout
For best results when you need a transparent backdrop, brush up on transparent background basics so the final asset survives web compression pipelines.
Why the Artboard Method Wins for Batches
Three scenarios make this technique irresistible:
- Multi-size exports from one file — one artboard per output size
- Social media batches — square, vertical, and horizontal versions in one click
- Style guides — multiple icons cropped from one master illustration
Working on complex edges? Our image masking service handles hair, fur, and fine details with surgical accuracy.
Method 5: Pathfinder Intersect for Vector Cropping
Raster images use cropping. Vector graphics use the Pathfinder panel. When two or more vector shapes overlap and you only want the intersected region, the Intersect mode is the cleanest cut.
Quick Pathfinder Workflow
Use this when you build icons, logos, or complex vector compositions:
- Open
Window → Pathfinder(orShift + Cmd/Ctrl + F9) - Stack two vector shapes so they overlap where you want the final art
- Select both objects
- Click “Intersect” in the Shape Modes row
- Hold Alt/Option while clicking to create a compound shape you can still edit
For icon designers, the Crop button in the bottom row of the Pathfinder panel is even better — it deletes everything outside the top shape while preserving the colors of shapes underneath.
Pathfinder Cropping Tips
- Always work on copies because Pathfinder operations are destructive
- Group your art first with
Cmd/Ctrl + Gfor predictable behavior - Try Shape Builder (
Shift + M) when Pathfinder feels overwhelming - Use the Direct Selection Tool (A) to clean up stray anchor points afterward
Method 6: Generative Expand — The 2026 AI Twist
Sometimes the answer is not to crop but to add to the image. Illustrator 30.5 introduced Generative Expand, which uses Adobe Firefly to extend an image’s edges and match any aspect ratio without losing content.
How to Use Generative Expand
This feature solves the classic problem of needing a portrait photo in landscape format:
- Select the placed image
- Drag the crop handles beyond the original image edge
- Type a prompt (optional) describing what should appear in the new area
- Click Generate to let Firefly fill the space
- Pick your favorite from three variations
When Expansion Beats Cropping
Cropping always sacrifices content. Generative Expand grows the canvas instead. It is the better choice when:
- The subject already fills the frame and you still need more aspect ratio
- You need to add bleed for print without redoing photography
- You design banners across multiple sizes from one source asset
- You work on product photography where reshoots are expensive
Note that this feature consumes Adobe generative credits, so budget accordingly on large projects.
Want lifelike depth without burning credits? Our shadow creation service hand-crafts natural drop and reflection shadows.
Linked vs. Embedded Images: A Critical Distinction
This distinction trips up beginners but matters in real projects. Adobe’s documentation is explicit: a linked file becomes embedded the moment you click Crop Image, severing the connection to the original asset on disk.
Linked Files: Pros and Cons
Linked files keep your .ai document small because the photo data lives externally. They also bring rules to the cropping workflow.
- Pros: Smaller file size; original photo stays editable in Photoshop or Lightroom
- Cons: True cropping forces embedding; only clipping masks work without conversion
- Pro tip: Use clipping masks for linked files; reserve Crop Image for embedded files
Embedded Files: The Trade-Off
Embedded photos travel with your document, which is convenient but bloats the file size. Once embedded, every cropping method works freely.
- Choose embedding when you ship files to a print vendor
- Choose linking when you collaborate on cloud storage
- Use
Window → Linksto check the status of every placed file
7 Common Cropping Issues and Verified Fixes
Even seasoned designers encounter the same frustrating cropped-image bugs. After testing hundreds of user-reported cases, these are the only verified fixes that consistently work across Illustrator versions.
The Crop Image Button Is Greyed Out
This is the most reported problem in Adobe’s forums. The fix is almost always selection-related.
- Confirm that only one raster image is selected
- Deselect any text, vector shape, or grouped object
- Embed linked files first if Illustrator refuses to crop
- Restart Illustrator if the panel hangs after a long session
Image Looks Pixelated After Cropping
Pixelation happens when you scale up after cropping. Always crop with a high-resolution master so you have headroom. For print, target 300 PPI. For the web, 72–144 PPI is usually plenty.
White Lines Appear Around the Cropped Image
This issue ties to the Content-Aware Defaults preference. Disable it in Preferences → General, or nudge the crop handle by one pixel before applying.
Crop Image Will Not Work on Vector Art
The Crop Image command only works on raster files. For vector art, switch to Pathfinder, the Shape Builder Tool, or a clipping path approach.
Linked File Becomes Embedded Unexpectedly
That behavior is by design. Use a clipping mask instead if you must preserve the link.
You Need to Crop Multiple Images at Once
Native Illustrator lacks batch cropping. Workarounds include:
- Artboard export with “Use Artboards” enabled
- Rasterino plugin by Astute Graphics for true batch trimming Astute Graphics
- Action recording via the Actions panel for repeatable single-image crops
Cropped Image Loses Color Profile
Always verify your Document Color Mode under File → Document Color Mode. Cropping never changes a profile by itself, but exporting to a different mode does.
Color shifting after edits? Our color change service standardizes product colors across your entire catalog.
Pro Tips: Speed Up Cropping in Illustrator 2026
Small habits compound into massive time savings. Apply these professional shortcuts and you will leave hours of busywork behind.

Memorize These Shortcuts
V— Selection ToolCmd/Ctrl + Shift + P— Place an imageCmd/Ctrl + 7— Make a clipping maskCmd/Ctrl + Alt/Opt + 7— Release a clipping maskShift + O— Artboard toolCmd/Ctrl + Alt/Opt + E— Export AsCmd/Ctrl + Z— Undo (your best friend)
Set a Custom Shortcut for Crop Image
Adobe lets you bind your own shortcut. Go to Edit → Keyboard Shortcuts, search for “Crop Image,” and assign a free combination like Cmd/Ctrl + Shift + 7. This single change can save thousands of clicks every year.
Use Trim View for a Real-Time Preview
Toggle View → Trim View to hide everything outside the artboard. You will see exactly what will export and catch mistakes immediately. Many designers also assign a custom shortcut to Trim View for one-tap access.
Resample During the Crop
The 2026 Properties panel exposes a PPI field during cropping. Drop the resolution there instead of in a separate Image Size dialog and you save a step. The Astute Graphics Rasterino plugin extends this even further with relative percentage values.
Work Non-Destructively Whenever Possible
Use clipping masks first; reserve Crop Image for the final pass. The original photo is always the most valuable asset in your document.
Selling apparel online? Our ghost mannequin service creates the floating 3D effect every fashion store needs.
When to Crop in Illustrator vs. Photoshop vs. Web Tools
Each app has a sweet spot. Illustrator is vector-first, so cropping there makes sense in specific scenarios.
Crop in Illustrator When
- You combine vectors with photos in one layout
- You need a shaped crop (text, polygon, custom path)
- You design print collateral, logos, and packaging
- You export to SVG, PDF, or EPS
Crop in Photoshop When
- You work on a photo-only edit
- You need frequency separation, dodging, or burning
- You handle multiple high-resolution PSDs
- You want Content-Aware Fill for missing pixels
Crop in a Web App When
- You batch-process hundreds of images
- You need to crop on mobile while traveling
- You use AI-driven smart crop for social media variants
For broader options beyond Adobe, see the best free Photoshop alternatives and the best photo editing software list.
Real-World Examples by Industry
Theory only goes so far. Here are concrete examples where each method earns its place in a working studio.
E-Commerce Product Listings
Online sellers use clipping masks to drop products onto colored backgrounds, then export with the artboard method for Amazon’s strict square format. Reliable transparent backgrounds keep listings consistent across marketplaces.
Editorial Magazine Layouts
Designers combine opacity masks with full-bleed photography to create immersive double-page spreads. The mask fades the photo into the gutter so type stays readable.
Logo Design
Vector cropping with Pathfinder Intersect builds clean negative-space logos. Pathfinder’s destructive nature is fine here because brand marks rarely change after approval.
Social Media Banners
The artboard method shines when one master campaign file needs to ship as Instagram square, Facebook cover, LinkedIn header, and Twitter banner. One file, four artboards, one export click.
Print Packaging
Print designers crop high-resolution photos to fit complex die-lines. Clipping masks preserve every pixel so the print vendor receives full-quality source data.
Want catalog photos that convert? Our photo retouching service sharpens and color-grades every shot before crop.
Frequently Asked Questions
1. What is the fastest way to crop an image in Illustrator 2026?
Select the placed image with the Selection Tool (V), click Crop Image in the Properties panel, drag the widget handles to define the boundary, and press Enter. The whole process takes under five seconds for a single rectangular trim.
2. Can I crop a linked image without embedding it?
Yes — but only with a clipping mask, not the Crop Image tool. The Crop Image command automatically embeds linked files. Use Cmd/Ctrl + 7 on a shape placed over the linked image to keep the file external.
3. What is the keyboard shortcut for the Crop Image tool?
Adobe does not assign a default shortcut to Crop Image. Open Edit → Keyboard Shortcuts, search for “Crop Image,” and assign your own. Many designers use Cmd/Ctrl + Shift + 7 because it sits next to the clipping mask shortcut.
4. How do I crop an image into a circle?
Place the image, draw a circle with the Ellipse Tool (L) on top, select both, and press Cmd/Ctrl + 7. The image now sits inside the circle. Double-click to enter Isolation Mode and reposition the photo if needed.
5. Why is the Crop Image option greyed out?
The most common causes are multiple objects selected, a vector object selected instead of a raster image, or a corrupted preference file. Select only one raster image to fix the greyed-out state.
6. Does cropping reduce file size in Illustrator?
Yes — true cropping with the Crop Image tool permanently deletes hidden pixel data, which shrinks the file. Clipping masks hide pixels without deleting them, so they do not reduce the file size.
7. Can I crop multiple images at once in Illustrator 2026?
Not natively. Workarounds include the Astute Graphics Rasterino plugin, batch artboard exports, and recorded Illustrator Actions. For bulk e-commerce projects, many studios outsource the work to professional photo editing teams for hour-level turnaround.
8. Is it better to crop in Illustrator or Photoshop?
Crop in Illustrator when you combine vectors and photos in the same layout. Crop in Photoshop when the work is photo-only and benefits from raster-specific tools like Content-Aware Fill or the magic wand background remover.
Final Thoughts: Crop Smarter, Design Faster
Illustrator 2026 hands you six battle-tested cropping methods and one revolutionary way to expand an image. The right choice depends on the project. Quick promotional graphics deserve the Crop Image tool. Brand-critical compositions deserve clipping masks. Print campaigns sometimes deserve generative AI. The fastest designers do not memorize one method — they read the situation and pick the tool that fits.
Practice each technique on a sample project this week. Place a photo, crop it five different ways, and notice how each method affects the final file. That hands-on muscle memory will outlast any tutorial — including this one.
Ready to scale your visual content production? Explore the full Clipping Expert Asia photo editing services lineup — clipping paths, masking, retouching, and more.