
How to Make a Clipping Path in Illustrator
February 4, 2026
Best Adobe Illustrator Alternatives in 2026 (Free, Paid & AI Tools Compared)
February 5, 2026
You dive into photo editing and quickly realize that removing backgrounds transforms ordinary images into professional masterpieces. Whether you edit product photos for an online shop or create custom graphics for social media, mastering this skill opens up endless possibilities. GIMP, a powerful free image editor, stands out as an accessible tool for anyone eager to learn. This guide walks you through every step, from basic setups to advanced techniques, so you achieve flawless results without spending a dime on premium software.
Professionals and hobbyists alike turn to GIMP for its robust features that rival paid alternatives. You install it easily on Windows, Mac, or Linux, and it handles complex tasks like layer management and precise selections. As you explore background removal, you discover how it enhances image quality, focuses attention on key subjects, and boosts visual appeal in various projects.
- Understanding GIMP and Its Core Features
- Why You Should Remove Backgrounds from Images
- Preparing Your Image and Workspace in GIMP
- Using the Fuzzy Select Tool for Simple Backgrounds
- Mastering the Foreground Select Tool for Complex Subjects
- Leveraging Paths for Precision Background Removal
- Applying Layer Masks for Non-Destructive Edits
- Refining Edges and Handling Tricky Areas
- Adding New Backgrounds and Final Touches
- Tips and Tricks for Efficient Workflow
- Avoiding Common Mistakes in Background Removal
- Advanced Techniques for Professional Results
- Exploring Alternatives to GIMP
- Integrating Background Removal into Your Projects
- Frequently Asked Questions
Understanding GIMP and Its Core Features
GIMP, short for GNU Image Manipulation Program, serves as a versatile open-source raster graphics editor. Developers built it to handle tasks like photo retouching, image composition, and authoring. You download it from the official website and start using it immediately, no subscription required.
The interface might seem intimidating at first, but you customize it to fit your workflow. Dockable dialogs let you arrange tools, layers, and brushes exactly how you prefer. Key features include support for multiple file formats, advanced color management, and a wide array of plugins that extend its capabilities. For background removal, you rely on selection tools, paths, and masks, which allow pixel-perfect edits.
Users appreciate GIMP’s community-driven development, which ensures regular updates and bug fixes. You join forums or watch tutorials to deepen your knowledge. This software empowers beginners to produce high-quality work while offering depth for experienced editors.
Why You Should Remove Backgrounds from Images
You remove backgrounds to isolate subjects, making them stand out against new backdrops or transparent layers. This technique proves essential in e-commerce, where clean product images drive sales by eliminating distractions. Designers use it to create collages, logos, or marketing materials that look polished and professional.
In photography, you eliminate cluttered scenes to emphasize portraits or objects. Social media creators leverage background removal to craft engaging thumbnails and memes. Even in personal projects, like family albums, you swap dull backgrounds for vibrant ones, adding creativity to your photos.
The process saves time in the long run by allowing reusable elements. You prepare assets once and apply them across multiple designs. Plus, transparent backgrounds integrate seamlessly into websites or presentations, maintaining a consistent aesthetic.
Preparing Your Image and Workspace in GIMP
You launch GIMP and open your image by navigating to File > Open. Choose a high-resolution photo for best results, as low-quality files lead to jagged edges. Adjust the zoom level to 100% or higher for detailed work.
Set up your workspace by enabling the Layers dialog if it’s not visible—go to Windows > Dockable Dialogs > Layers. You duplicate the original layer (Layer > Duplicate Layer) to preserve the source image. This safety net lets you revert changes easily.
Check the image mode under Image > Mode; ensure it’s in RGB for color editing. You calibrate your monitor for accurate colors, though GIMP handles most adjustments internally. Gather reference images or color palettes if you plan to add new backgrounds later.
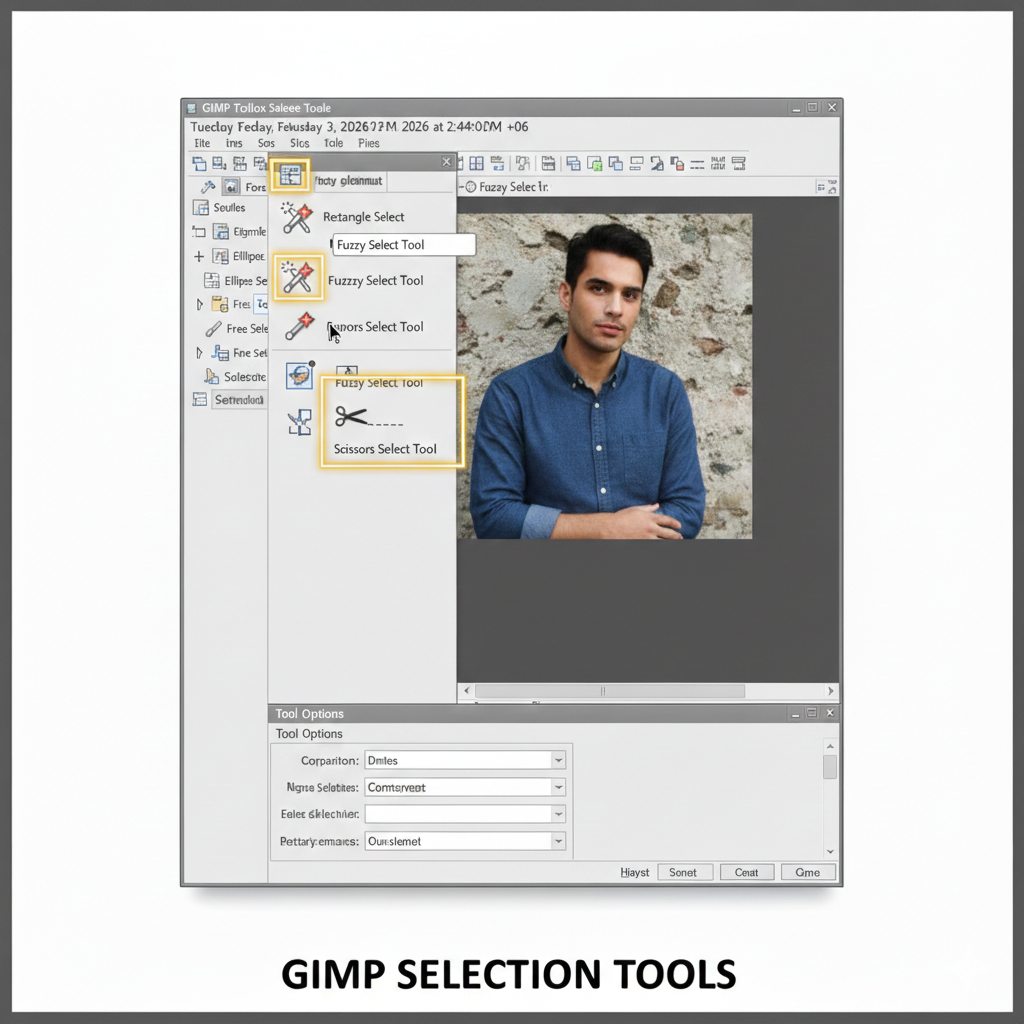
Using the Fuzzy Select Tool for Simple Backgrounds
You select the Fuzzy Select Tool (magic wand icon) from the toolbox for uniform backgrounds like solid colors. Click on the area you want to remove, and GIMP automatically selects similar pixels based on color threshold.
Adjust the threshold in the tool options—start low (around 15-30) and increase if needed to capture more area. Hold Shift to add to the selection or Ctrl to subtract. Once selected, press Delete to remove the background, revealing transparency if your layer supports it.
This method works best for high-contrast images where the subject edges differ sharply from the backdrop. You refine the selection with the Grow or Shrink options under Select > Grow/Shrink. Practice on simple photos first to build confidence.
Mastering the Foreground Select Tool for Complex Subjects
You activate the Foreground Select Tool for images with intricate edges, like hair or fur. First, draw a rough outline around your subject using the lasso-like mode, leaving a small buffer zone.
Switch to the paintbrush mode and brush over the foreground area. GIMP analyzes the strokes to differentiate subject from background. Preview the mask and refine by adding more strokes where needed. Click Enter to finalize, then invert the selection (Select > Invert) and delete the background.
This tool excels in handling semi-transparent areas, producing natural-looking results. You tweak the engine settings, like SIOX or Matting Levin, for better accuracy. Save your work frequently to avoid losing progress.
Leveraging Paths for Precision Background Removal
You choose the Paths Tool for ultimate control over curved or irregular shapes. Click to create anchor points around your subject, dragging handles to curve segments smoothly. Close the path by connecting the last point to the first.
Convert the path to a selection via the Paths dialog (right-click > Path to Selection). Feather the edges (Select > Feather) for softer transitions, typically 1-2 pixels. Delete the selected background or use a layer mask for non-destructive edits.
Paths demand patience but yield professional outcomes. You edit points individually for fine-tuning. This approach suits graphic designers creating vector-like selections in a raster environment.
Distinguish this from other techniques by understanding clipping path vs background removal, which clarifies when to apply each for optimal results.
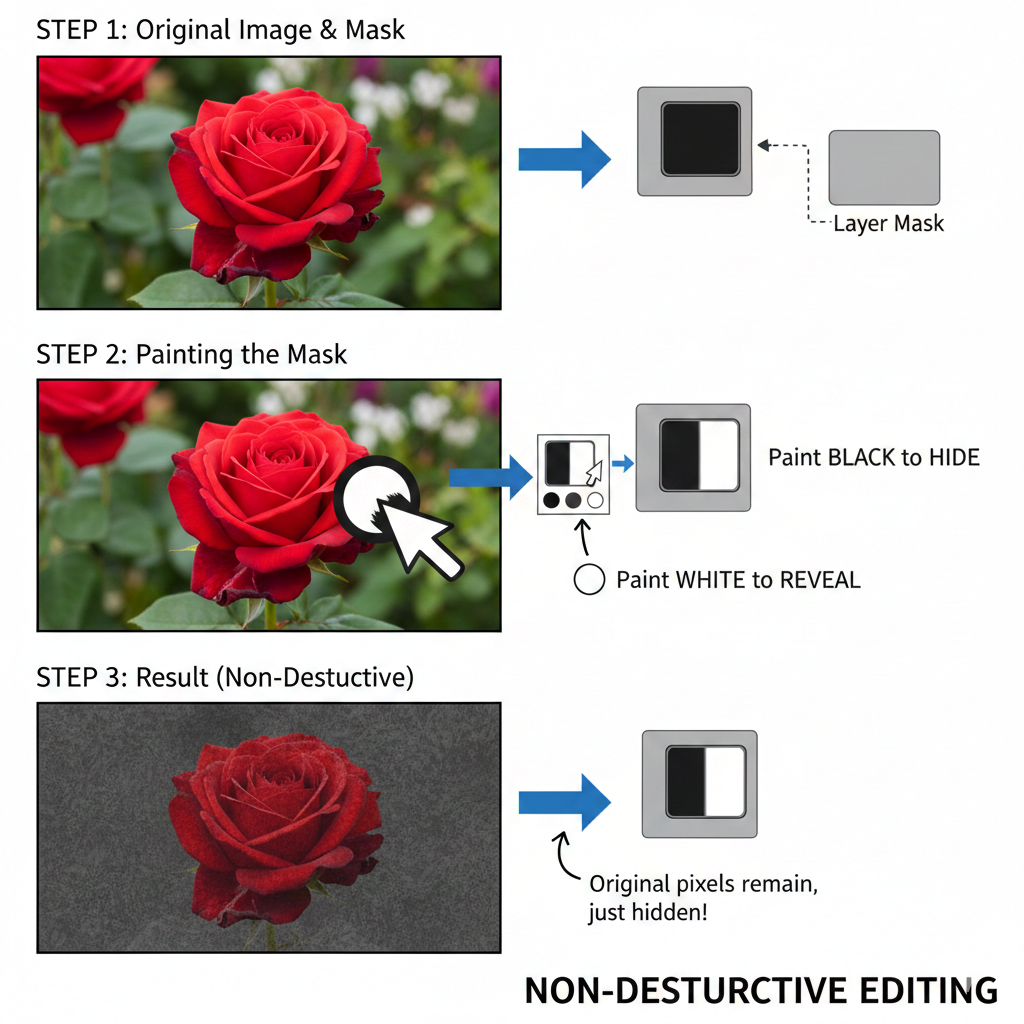
Applying Layer Masks for Non-Destructive Edits
You add a layer mask (Layer > Mask > Add Layer Mask) and choose white (full opacity) to start. Paint with black on the mask to hide parts of the layer, revealing the background below. Use gray shades for partial transparency.
This method preserves your original image, allowing easy adjustments. Switch to the Paintbrush Tool and select a soft brush for smooth blends. You erase mistakes by painting white to restore visibility.
Layer masks integrate well with other tools—combine them with selections for targeted masking. Professionals favor this for its flexibility in complex compositions. Experiment with brush sizes and opacities to achieve desired effects.
Refining Edges and Handling Tricky Areas
You zoom in closely to inspect edges after initial removal. Use the Eraser Tool with a soft brush to clean up remnants. For halos or color fringes, apply the Color > Desaturate or Levels adjustment on a duplicate layer.
Handle transparent subjects like glass by manually masking with low opacity brushes. You employ the Heal Tool to blend seams seamlessly. Test different blending modes if compositing onto new backgrounds.
Common challenges include low-light photos; boost contrast first via Colors > Brightness-Contrast. Patience pays off here—rush the process, and results suffer.
Adding New Backgrounds and Final Touches
You create a new layer below your subject (Layer > New Layer) and fill it with a color, gradient, or imported image. Position and scale as needed using the Move and Scale Tools.
Adjust the subject’s lighting to match the new background with Colors > Curves or Hue-Saturation. Add shadows or reflections for realism—use the Drop Shadow filter under Filters > Light and Shadow.
Export your final image via File > Export As, choosing PNG for transparency. Optimize file size without losing quality.
Tips and Tricks for Efficient Workflow
You can use keyboard shortcuts like Ctrl+Z for undo to speed up editing. Organize layers with descriptive names and groups for complex files. Install plugins like Resynthesizer for content-aware fills.
Batch process multiple images using Scripts > Batch, saving hours on repetitive tasks. Back up your work to external drives. Join GIMP communities for feedback on your edits.
Experiment with third-party brushes and textures to enhance creativity. Track your progress by comparing versions side by side.
Avoiding Common Mistakes in Background Removal
You steer clear of over-selecting by fine-tuning thresholds gradually. Ignore anti-aliasing, and edges appear jagged always enable it in tool options.
Rely solely on one tool, and you limit options; combine methods for best results. Forget to save in editable formats like XCF, and you lose layer data. Test on copies to prevent irreversible changes.
Rush through refinements, and imperfections show; take time to polish.
Advanced Techniques for Professional Results
You incorporate scripts and automation for repetitive removals. Use the GEGL operations for non-destructive filters. Explore color channels for selections in tricky images—duplicate the blue channel for high contrast.
Integrate GIMP with other software like Inkscape for vector elements. Master perspective corrections post-removal for composited scenes.
Exploring Alternatives to GIMP
You consider other editors if GIMP doesn’t suit your needs. Paid options offer additional features for power users.
Adobe Photoshop, for instance, provides AI-powered tools that automate complex removals. You access it through a subscription model, gaining cloud storage and regular updates. Learn more about Adobe Photoshop for advanced editing capabilities.
Free alternatives like Paint.NET or Krita handle basic tasks but lack GIMP’s depth in some areas. Choose based on your project’s demands.

Integrating Background Removal into Your Projects
You apply these skills to web design by creating transparent icons. In marketing, isolated products pop in ads. Photographers enhance portfolios with clean composites.
Track trends in digital editing to stay ahead. Share your work online for inspiration.
This comprehensive approach ensures your images captivate audiences. With practice, you handle any background removal challenge effortlessly.
Frequently Asked Questions
- What file formats support transparent backgrounds in GIMP?
You save images with transparency in formats like PNG or TIFF. JPEG does not support it, so avoid that for removed backgrounds. - How do I fix jagged edges after removing a background?
You apply feathering to your selection or use the Smooth option in tools. A soft eraser also helps blend edges smoothly. - Can I remove backgrounds from multiple images at once in GIMP?
Yes, you use the Batch Process script under Filters > Batch to automate removals on several files efficiently. - Is GIMP suitable for beginners in background removal?
Absolutely, you start with simple tools like Fuzzy Select and progress to advanced ones as you gain experience. - What if the Foreground Select Tool doesn’t work well on my image?
You try increasing contrast first or fall back to manual paths for more control over tricky subjects. - How does background removal benefit e-commerce?
You create clean, focused product images that attract buyers and improve site aesthetics, leading to higher conversions. - Are there plugins to enhance background removal in GIMP?
Yes, you install ones like G’MIC or Resynthesizer to add features like content-aware healing for better results.