
Elevate Your Visuals: The Comprehensive Guide to Beauty Retouching Agencies
January 31, 2026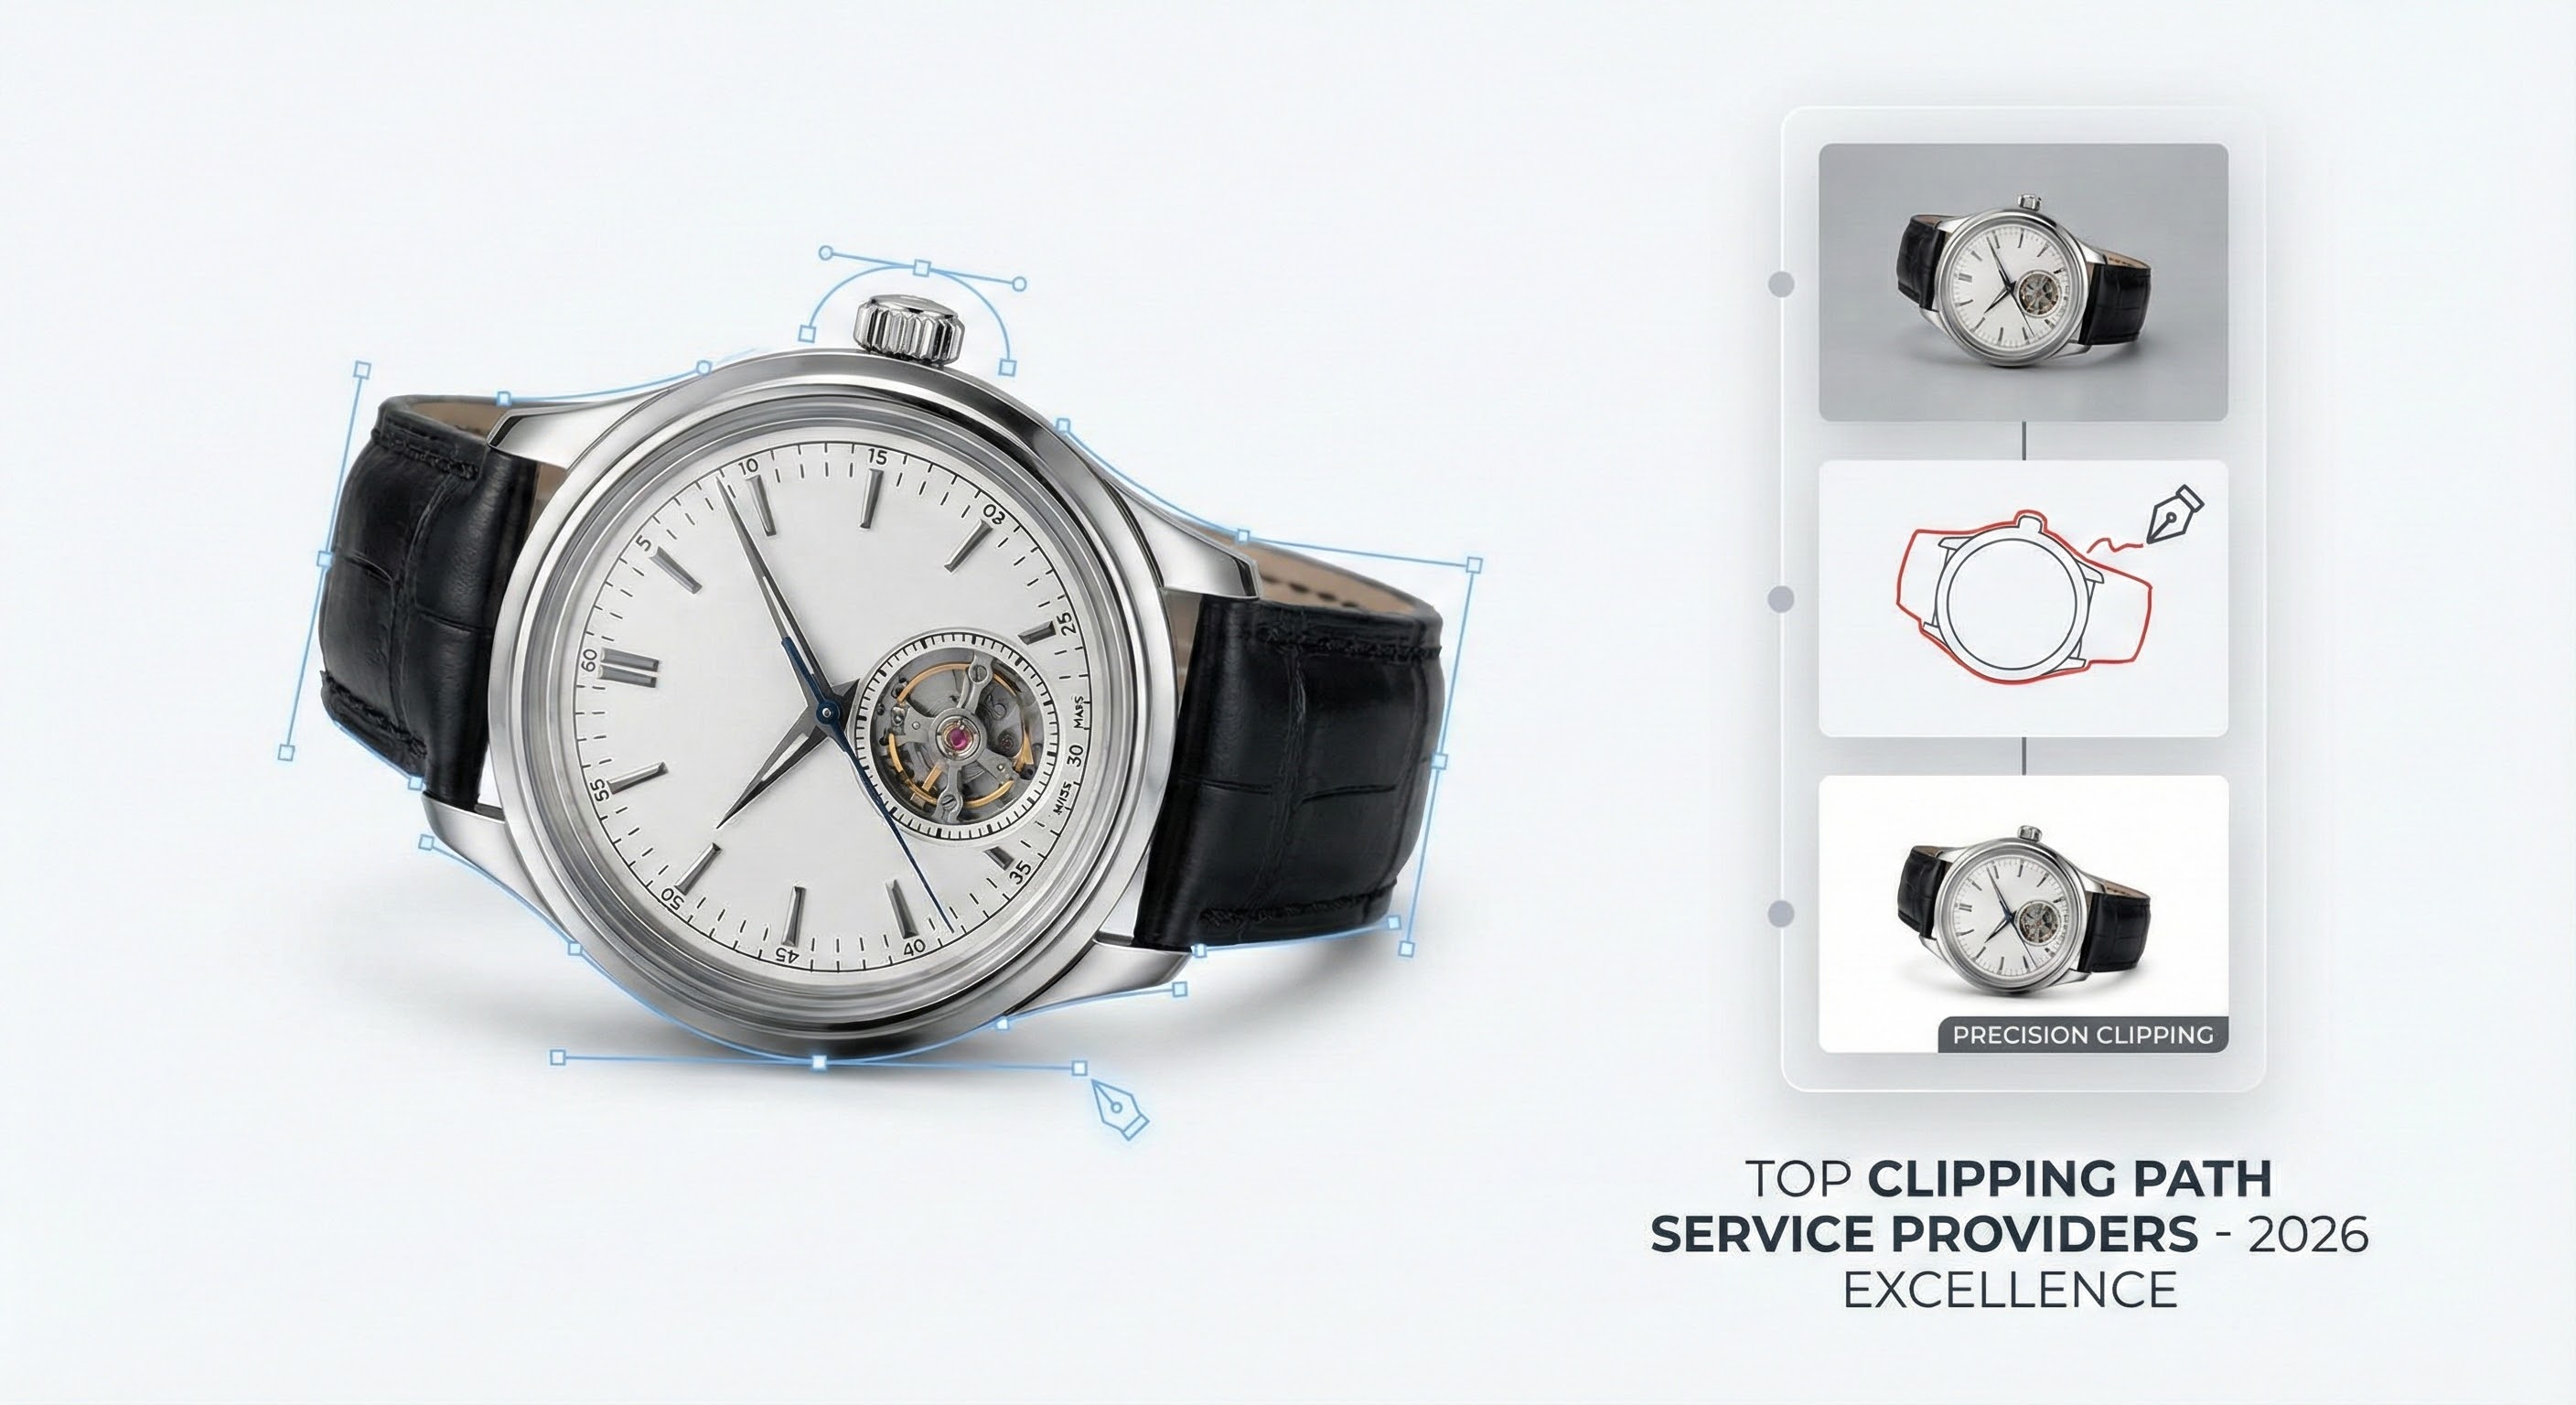
Top 10 Clipping Path Service Providers to Watch in 2026
February 1, 2026
If you’re just starting out with photo editing, learning how to use Photoshop to edit photos for beginners can feel overwhelming at first. But don’t worry, Photoshop offers powerful tools that make transforming your images straightforward and fun. This guide walks you through the essentials, from setting up your workspace to applying basic adjustments. By the end, you’ll confidently edit your photos like a pro. Whether you captured a family portrait or a scenic landscape, these steps help you enhance colors, fix imperfections, and create stunning results.
Photoshop, developed by Adobe, stands as the industry standard for image manipulation. Beginners often start with free trials to explore its features. Download it from the official Adobe site and install it on your computer. Once set up, launch the program and create a new project or open an existing photo. Familiarize yourself with the menu bar at the top, which includes options like File, Edit, and Image.
Getting Started: Installing and Opening Photoshop
Begin your journey by heading to Adobe’s website to grab the software. They offer a seven-day free trial, perfect for testing the waters without commitment. After installation, open Photoshop and select “Create New” to start a blank canvas, or use “Open” to import your photo from your device’s folders. Choose high-resolution images for better editing quality, aim for at least 300 DPI if you plan to print.
The welcome screen greets you with tutorials and recent files. Click on “Learn” for quick video guides that demonstrate core functions. This built-in resource saves time and builds your skills right away. Remember, practice on duplicate files to avoid overwriting originals.
Understanding the Photoshop Interface
Photoshop’s layout might seem complex, but it breaks down into key areas. On the left, the toolbar houses tools like the Move Tool, Crop Tool, and Brush Tool. Hover over each icon for a tooltip that explains its purpose. The right side features panels such as Layers, Properties, and History, which you can customize by dragging them around.
At the top, the options bar changes based on the selected tool, allowing you to tweak settings like brush size or opacity. The central workspace displays your image, where all the magic happens. Use the zoom tool (shortcut: Z) to magnify areas for precise edits. Beginners benefit from enabling the “New Document” preset for photos, which optimizes settings for image editing.
To make navigation easier, go to Window > Workspace > Essentials. This resets the interface to a beginner-friendly setup. Experiment with these elements by opening a sample photo and clicking around, no harm in trial and error here.
Essential Tools for Beginner Photo Editing
Master a few core tools to kickstart your edits. The Crop Tool lets you trim unwanted edges and straighten horizons. Select it, drag over your image, and hit Enter to apply. For spot fixes, the Spot Healing Brush Tool removes blemishes effortlessly, just paint over the area, and Photoshop samples nearby pixels to blend seamlessly.
The Lasso Tool helps isolate sections for targeted adjustments. Draw around an object, then copy or move it. Pair it with the Quick Selection Tool for smarter, edge-detecting selections. These tools form the foundation of how to use Photoshop to edit photos for beginners, enabling quick enhancements without advanced knowledge.
Don’t overlook the Move Tool for repositioning elements within layers. Hold Alt while dragging to duplicate selections. Practice on simple images, like portraits, to see immediate improvements.
- Crop Tool: Removes distractions and improves composition.
- Healing Brush: Fixes skin imperfections or dust spots.
- Selection Tools: Isolate subjects for color corrections or effects.
Step-by-Step Guide to Basic Photo Edits
Start with opening your photo: Go to File > Open and select your image. Adjust the overall exposure using Image > Adjustments > Brightness/Contrast. Slide the brightness up to lighten shadows or down to reduce highlights. Aim for a balanced look where details pop without washing out.
Next, enhance colors with Image > Adjustments > Hue/Saturation. Increase saturation slightly for vibrant tones, but avoid overdoing it to prevent unnatural results. For specific areas, use the Adjustment Brush in the Camera Raw filter, accessible via Filter > Camera Raw Filter, to paint corrections selectively.
Crop and straighten: Activate the Crop Tool, rotate if needed, and confirm. This step alone transforms amateur shots into professional ones. Save your progress frequently with File > Save As to preserve layers.
For more inspiration on simple edits, check out this 5 easy Photoshop editing steps for beginners from Adorama, which outlines quick workflows.
Working with Layers: The Key to Non-Destructive Editing
Layers act like transparent sheets stacked on your image, allowing changes without altering the original. Create a new layer via Layer > New > Layer, then apply edits there. This method keeps your work flexible, delete or hide layers anytime.
Duplicate your background layer first (Layer > Duplicate Layer) for safety. Add adjustment layers like Levels or Curves from the Layers panel bottom icon. These affect everything below them, perfect for global tweaks. Mask parts by adding a layer mask and painting with black to hide, white to reveal.
Beginners often skip layers, leading to irreversible mistakes. Embrace them early to build good habits. For instance, place text or graphics on separate layers for easy repositioning.
Adjusting Colors and Tones for Stunning Results
Color correction elevates your photos. Use the Color Balance adjustment (Image > Adjustments > Color Balance) to shift tones, add blue for cooler vibes or red for warmth. Target shadows, midtones, or highlights separately for nuanced control.
For black-and-white conversions, try Image > Adjustments > Black & White. Customize by adjusting individual color sliders to emphasize certain elements, like making greens darker for dramatic landscapes. Always preview changes with the eye icon on adjustment layers.
White balance fixes color casts from lighting. In Camera Raw, drag the Temperature slider left for blue tones or right for yellow. This tool mimics professional camera settings, giving your edits a polished edge.
Explore vibrant enhancements with Vibrance under Image > Adjustments > Vibrance. It boosts muted colors without oversaturating skin tones, ideal for portraits.
Removing Unwanted Elements and Blemishes
Spot imperfections? The Clone Stamp Tool copies pixels from one area to another. Hold Alt to sample, then paint over the flaw. For smoother results, use a soft brush with low opacity.
The Content-Aware Fill removes larger objects intelligently. Select the area with Lasso, then Edit > Fill > Content-Aware. Photoshop analyzes surroundings to fill seamlessly, great for erasing backgrounds or distractions.
Heal skin in portraits using the Healing Brush. Sample clean areas and brush over acne or wrinkles. Keep samples close for natural blending. These techniques ensure your subjects look their best without obvious edits.
For step-by-step basics, this guide on how to use Photoshop in 5 easy steps from ZDNet provides a solid foundation.
Resizing, Cropping, and Composition Tips
Resizing maintains quality for web or print. Go to Image > Image Size, uncheck Resample if preserving pixels, or check it for scaling. Set resolution to 72 DPI for online use, 300 for prints.
Crop to improve framing: Use the Rule of Thirds grid in the Crop Tool options for balanced compositions. Straighten tilted horizons by rotating within the crop boundary.
Experiment with aspect ratios, square for social media, wide for landscapes. These adjustments focus viewer attention and enhance storytelling in your photos.
Adding Text and Graphics to Your Photos
Overlay text for memes, watermarks, or captions. Select the Type Tool, click on your image, and type away. Customize font, size, and color in the options bar. Warp text via Layer > Type > Warp Text for curved effects.
Import graphics: Open another image, select with tools, copy, and paste into your project as a new layer. Blend modes like Overlay or Multiply integrate them naturally.
Use shapes from the Custom Shape Tool for borders or icons. Fill with color or patterns to add flair. This personalization turns ordinary photos into shareable art.
To learn more about creative overlays, visit Adobe’s official Photoshop tutorials for hands-on examples.
Sharpening and Noise Reduction for Crisp Images
Sharpen details with Filter > Sharpen > Unsharp Mask. Adjust Amount, Radius, and Threshold carefully, over-sharpening creates artifacts. Preview at 100% zoom for accuracy.
Reduce noise from low-light shots using Filter > Noise > Reduce Noise. Balance Strength and Preserve Details to smooth grain without blurring edges. This step refines high-ISO photos effectively.
Combine with Smart Sharpen for advanced control, targeting shadows or highlights. These filters ensure your final output looks professional and clear.
Exporting and Saving Your Edited Photos
Once satisfied, save your work. Use File > Save As for PSD format to retain layers. For sharing, go to File > Export > Export As, choosing JPEG for photos or PNG for transparency.
Optimize for web with Export > Save for Web (Legacy), compressing files without quality loss. Set quality to 60-80% for balanced size and sharpness.
Always export copies, keep the master PSD for future tweaks. This workflow protects your efforts and allows revisions.
For additional saving tips, refer to this Photoshop basics guide from Photoshop Essentials.
Common Mistakes Beginners Make and How to Avoid Them
New users often over-edit, making images look artificial. Stick to subtle changes and compare with the original frequently. Another pitfall: ignoring resolution, leading to pixelated prints. Always check Image Size before finalizing.
Forgetting to work in layers causes frustration when undoing becomes impossible. Duplicate everything initially. Also, avoid saving over originals, use Save As religiously.
Rushing selections results in jagged edges. Feather them (Select > Modify > Feather) for smooth blends. Patience here pays off in polished outcomes.
Advanced Beginner Techniques: Filters and Effects
Once basics click, try filters. Apply Gaussian Blur (Filter > Blur > Gaussian Blur) for soft focus effects. Or use Liquify (Filter > Liquify) to reshape elements subtly, like slimming figures.
Dodge and Burn tools lighten or darken areas manually. Set to midtones with low exposure for natural highlights and shadows. These add depth without complexity.
Explore Actions (Window > Actions) to record repetitive tasks, speeding up workflows. Download free ones online for instant effects like vintage looks.
Tips for Practicing and Improving Your Skills
Practice daily with free stock photos from sites like Unsplash. Edit one image multiple ways to experiment. Join online communities, like Reddit’s r/photoshop, to share work and get feedback.
Watch YouTube channels dedicated to tutorials, Phlearn offers beginner series that break down techniques. Set small goals, like mastering one tool per session, to build confidence gradually.
Track progress by keeping a folder of before-and-after edits. Over time, you’ll notice improvements in speed and creativity.
For community insights, check out Photoshop forums on Adobe’s site.
Conclusion: Start Editing Today
Diving into how to use Photoshop to edit photos for beginners opens a world of creative possibilities. From basic adjustments to layering techniques, these steps equip you to turn ordinary snapshots into captivating visuals. Grab your photos, fire up Photoshop, and apply what you’ve learned. With consistent practice, you’ll master the software and elevate your photography game.
FAQs
What do I need to start editing photos in Photoshop as a beginner?
You’ll need a computer meeting Adobe’s system requirements, the Photoshop software (start with the free trial), and some basic photos to practice on. Familiarize yourself with the interface through built-in tutorials.
How do I fix overexposed photos in Photoshop?
Use the Brightness/Contrast adjustment or Levels tool to darken highlights. Drag the sliders until details reappear, and preview changes to avoid losing shadows.
Can I edit photos on a mobile device with Photoshop?
Yes, Adobe offers Photoshop Express for mobile, which includes basic tools like crop, heal, and filters. It’s free and great for on-the-go edits.
What’s the difference between JPEG and PSD files in Photoshop?
JPEG compresses images for sharing but loses layers, while PSD preserves all edits and layers for future modifications. Use PSD for working files.
How can I remove the background from a photo in Photoshop?
Use the Quick Selection Tool to outline the subject, then refine edges and add a layer mask. For complex cases, try the Pen Tool for precise paths.
Is there a way to batch edit multiple photos in Photoshop?
Yes, record an Action for your edits, then use File > Automate > Batch to apply it to a folder of images. This saves time on repetitive tasks.
What keyboard shortcuts should beginners learn first in Photoshop?
Start with Ctrl+Z for undo, Ctrl+S for save, Z for zoom, and B for brush. These speed up your workflow significantly.
How do I add filters to make my photos look vintage?
Apply a Photo Filter adjustment layer, choose Sepia or Cooling, and adjust density. Combine with noise or vignette for authentic retro effects.