

Is This Image Copyrighted? 8 Free Ways to Verify Online
June 23, 2026
AI Background Remover Explained: Object Detection vs Manual
June 26, 2026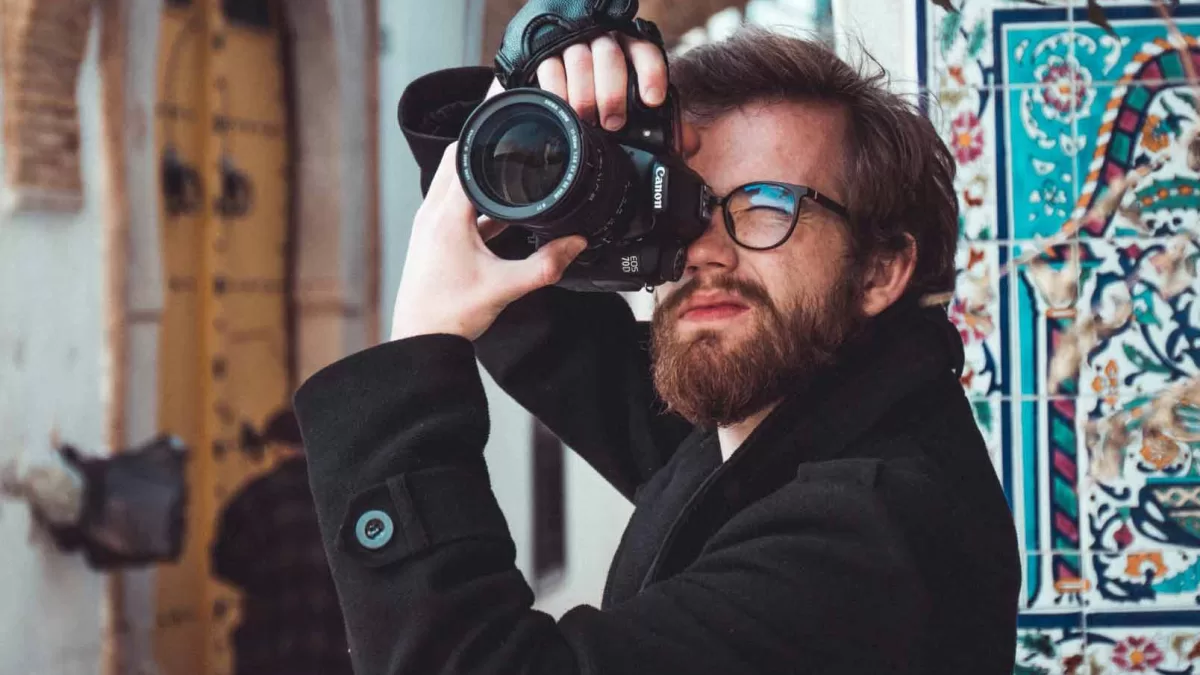
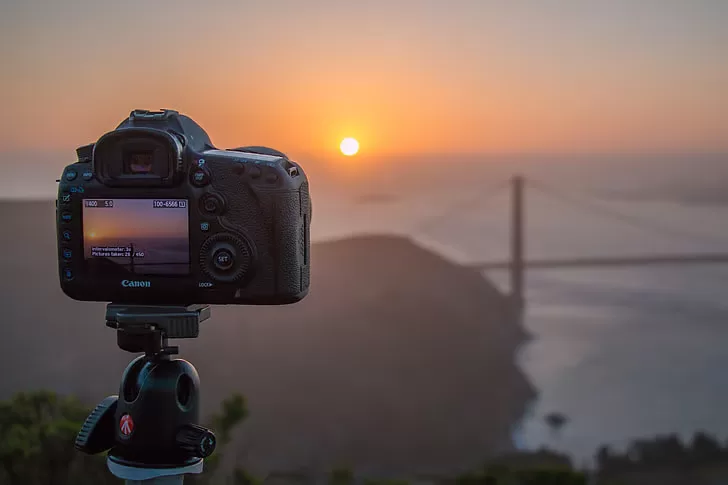
You hear the term “DSLR” everywhere — on camera store shelves, in YouTube reviews, across photography forums — yet many beginners still ask the same straightforward question: What does DSLR stand for? The short answer is Digital Single-Lens Reflex. The longer answer involves a clever mirror, a glass prism, and decades of engineering that quietly powered most professional photography until mirrorless cameras began stealing the spotlight.
This guide breaks down the DSLR meaning in plain English. You will learn how a DSLR captures light, why photographers still love it in 2026, how it compares with mirrorless rivals, which models remain worth buying, and how to keep your gear shooting for years. Whether you shoot weddings, sell products online, or simply love taking sharper family photos, understanding the DSLR will help you choose smarter gear and edit better images.
Already shooting with a DSLR? Polish every product shot with our pro-grade clipping path service and ship cleaner images today.
- What Does DSLR Stand For? The Quick Definition
- A Short History: From Film SLRs to the First DSLR
- How Does a DSLR Camera Work? The Mirror, Pentaprism, and Sensor
- Key Components Inside Every DSLR
- DSLR Sensor Sizes Explained
- DSLR vs Mirrorless: The Real-World Differences
- Advantages of Using a DSLR Camera in 2026
- Disadvantages and Limitations to Consider
- DSLR Lens Mounts: Canon EF, Nikon F, Pentax K, and More
- DSLR Camera Types: Entry-Level, Mid-Range, and Professional
- Best DSLR Cameras Still Worth Buying
- What Is a DSLR Best Used For?
- DSLR Photography Workflow: From Click to Final Image
- DSLR Camera Maintenance: Keep Your Gear Shooting for Years
- DSLR Buying Tips for Beginners
- DSLR Photography Tips to Get Better Results Fast
- DSLR vs Smartphone: Why DSLRs Still Matter
- The Future of DSLR Cameras: Are They Going Extinct?
- Frequently Asked Questions (FAQ)
- Final Thoughts
What Does DSLR Stand For? The Quick Definition
DSLR stands for Digital Single-Lens Reflex. Each part of the acronym describes a specific aspect of how the camera works, according to Photography Life:
- Digital – The camera records images on an electronic image sensor instead of film.
- Single-Lens – One lens handles both the live viewing and the actual exposure (unlike older twin-lens reflex cameras, which used two separate lenses and suffered from parallax errors).
- Reflex – A movable mirror reflects light upward into a viewfinder so you can preview the scene through the lens.
Put simply, a DSLR is a digital camera that uses an internal mirror system to send the lens’s view straight into your eye. When you press the shutter, the mirror flips up, the shutter opens, and the sensor records the image. That hybrid of old mechanical engineering and modern digital capture is what defines the DSLR meaning.
A Short History: From Film SLRs to the First DSLR
The “reflex” mirror design predates digital photography by more than half a century. The reflex mirror concept dates back to the 1860s, while the first practical 35mm Single-Lens Reflex (SLR) appeared in 1933 with the Ihagee Exakta. For most of the 20th century, SLRs ruled the professional world, loaded with rolls of film, as Nikon, Canon, Pentax, and Olympus built loyal followings around interchangeable lens systems.
The Digital Breakthrough
The shift to digital began in 1975, when Kodak engineer Steven Sasson built the first digital camera prototype. Almost fifteen years later, in 1989, Sasson and colleague Robert Hills filed the patent for what many consider the first true DSLR design.
The Nikon D1 Moment
Everything changed on June 15, 1999, when Nikon launched the Nikon D1, widely considered the first true DSLR built from the ground up rather than adapted from a film body, according to Wikipedia and Nikon Imaging. The D1 featured a 2.74-megapixel sensor and retailed near $5,500 — still a fraction of competing pro digital backs at the time — and convinced press and sports photographers that digital workflows could replace film.
The 2000s Consumer Boom
By the mid-2000s, models like the Canon EOS 300D (Digital Rebel) and Nikon D70 made DSLRs affordable for hobbyists. Sensor sizes grew, megapixels climbed, and DSLRs became the default tool for serious photography for nearly two decades. The shift toward digital also accelerated the evolution of photography as a whole, turning instant results, in-camera previews, and unlimited shooting into everyday expectations.
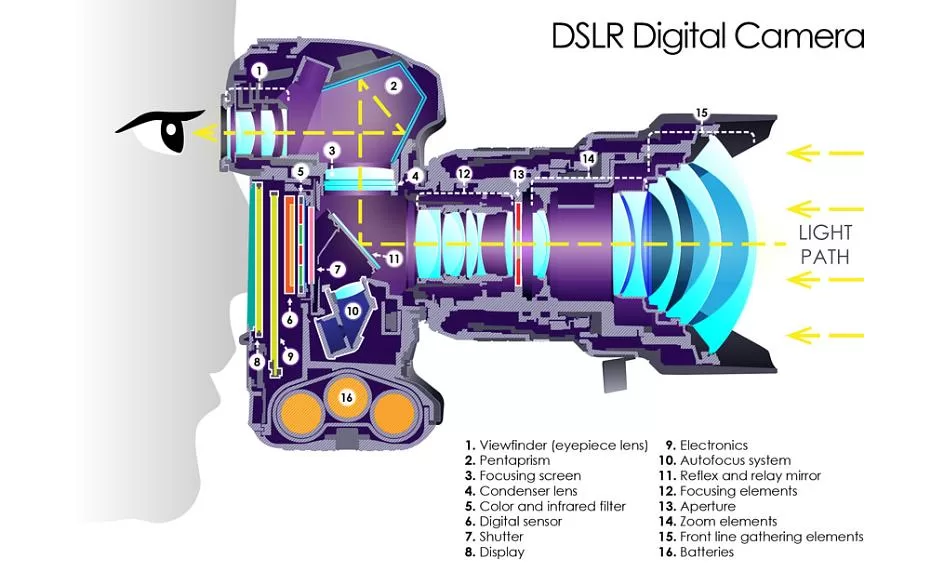
How Does a DSLR Camera Work? The Mirror, Pentaprism, and Sensor
The magic of a DSLR happens in milliseconds, inside a clever optical relay that lets you see exactly what the lens sees. Here is the step-by-step journey of light from the front of the lens to your memory card.
Step-by-step light journey
- Light enters the lens. The interchangeable lens focuses light from your scene into the camera body. The aperture inside controls how much light gets through.
- The reflex mirror redirects it. A mirror sitting at a 45-degree angle bounces the light straight up into the camera’s roof.
- The pentaprism flips the image. A five-sided glass prism corrects the orientation so the scene looks upright and natural.
- You see the scene in the optical viewfinder. This is a true-to-life optical preview with zero electronic lag and zero battery drain on the viewfinder itself.
- You press the shutter button. The mirror flips up with a satisfying mechanical “clack,” clearing the path.
- The shutter opens. Light strikes the digital image sensor for the chosen exposure time.
- The processor saves the image. The sensor data becomes a JPEG or RAW file written to the memory card. Curious how much that card can hold? Check our guide on photo storage capacity.
- The mirror drops back down. In a fraction of a second, the shutter closes, the mirror returns to its 45-degree resting position, and the viewfinder image returns. You are ready for the next shot.
The pentaprism matters because the mirror flips the image left-to-right and upside-down. The prism’s reflective surfaces re-orient everything so the viewfinder image matches reality, a function explained well by Hyperion Optics and the Encyclopedia Britannica. Cheaper DSLRs sometimes use a pentamirror instead, which is lighter and less expensive but slightly dimmer.
That single mechanical movement of the mirror is also the source of the satisfying click-clack that DSLR fans love. If you’ve ever wondered about the audible “ka-chunk,” you have just heard the reflex mirror in action.

Key Components Inside Every DSLR
A modern DSLR packs dozens of moving parts into one compact body. Knowing them helps you troubleshoot, shop smarter, and unlock more creative control.
- Camera body: The chassis houses the sensor, processor, mirror, shutter, controls, and battery. Pro-level bodies use magnesium alloy; entry-level models use reinforced polycarbonate.
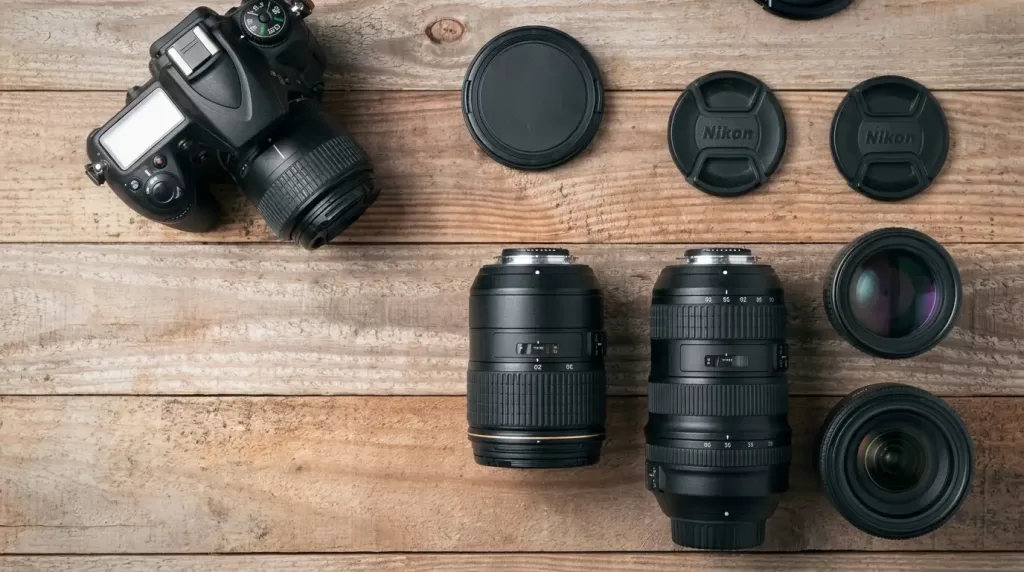
- Interchangeable lens and lens mount: Determines focal length, aperture, and overall image character. Lets you swap a wide-angle for a portrait prime, a macro, or a long telephoto in seconds.
- Reflex mirror: The hinged 45-degree mirror that defines the “R” in DSLR.
- Pentaprism (or pentamirror): Re-orients the optical image for the viewfinder. Pentaprisms are brighter; pentamirrors are lighter and cheaper.
- Optical viewfinder (OVF): Shows the scene through real glass with no electronic conversion or delay.
- Shutter: A mechanical curtain that controls exposure time.
- Digital image sensor: A full-frame, APS-C, or other digital sensor that records light into electrical signals.
- Image processor: Converts sensor data into a final photo and powers features like noise reduction, white balance, and burst shooting.
- Memory card slot: Stores RAW or JPEG files on SD, CFexpress, or XQD cards.
- Hot shoe: Mounts external flashes and accessories.
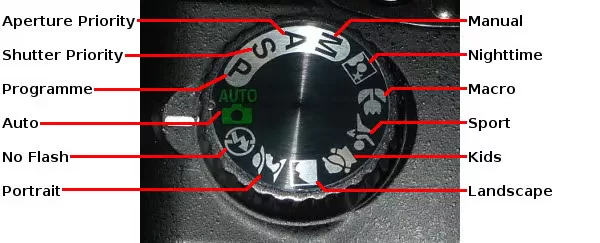
- Mode dial and controls: Manual (M), Aperture Priority (A/Av), Shutter Priority (S/Tv), Program (P), and Auto, plus dedicated buttons for ISO, white balance, drive mode, and metering.
- Battery and rear LCD: Most DSLRs use large lithium-ion batteries good for 800–3,000 shots per charge, and rear LCDs for menu navigation and Live View shooting.
DSLR Sensor Sizes Explained
The image sensor is the digital “film” of a DSLR, and its size shapes nearly every photo you take. Two sizes dominate the DSLR world.

APS-C sensors (crop sensors)
- Measure around 23.5 × 15.6 mm (Nikon DX, Pentax) or 22.3 × 14.9 mm (Canon).
- Apply a 1.5x or 1.6x crop factor, effectively turning a 50mm lens into a 75–80mm equivalent, according to B&H Photo.
- Power most beginner and mid-range DSLRs because they are smaller, cheaper, and lighter.
Full-frame sensors
- Measure roughly 36 × 24 mm, matching the size of a frame of 35mm film.
- Capture more light, which translates into better low-light performance and shallower depth of field.
- Live inside flagship DSLRs like the Nikon D850 and Canon EOS 5D Mark IV.
If you plan to print, standard photo sizes and the megapixels needed for sharp results will depend heavily on which sensor your DSLR carries.
DSLR vs Mirrorless: The Real-World Differences
The conversation around the DSLR meaning is incomplete without comparing it to mirrorless cameras. Mirrorless bodies remove the mirror entirely and feed the sensor’s live data straight to an electronic viewfinder (EVF) or rear screen.
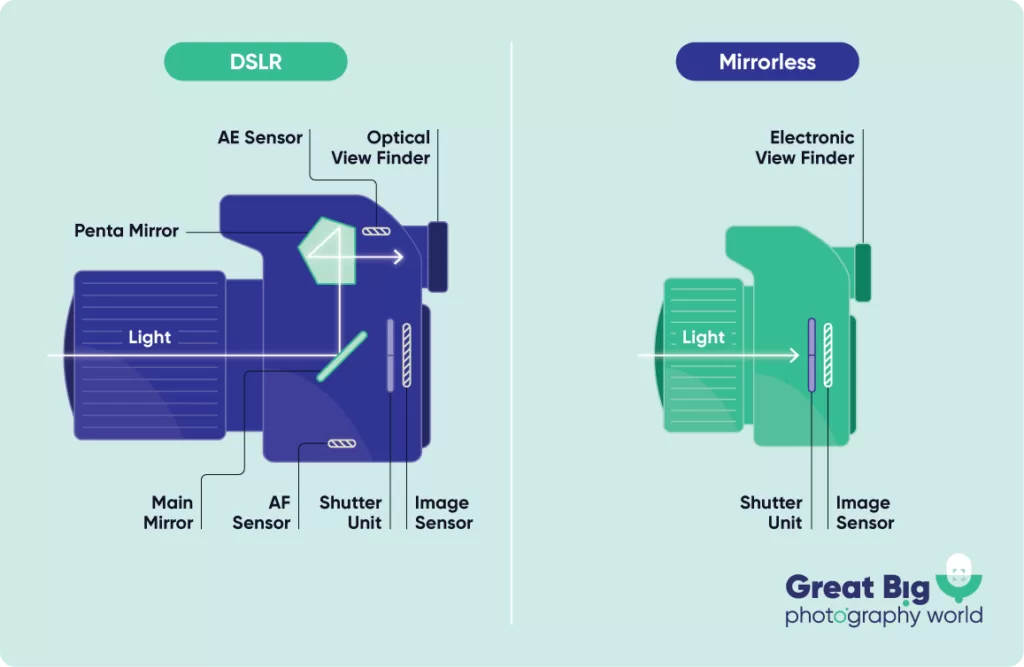
Quick comparison table
| Feature | DSLR | Mirrorless |
|---|---|---|
| Viewfinder | Optical (OVF), real glass, zero lag | Electronic (EVF), shows live exposure |
| Body size & weight | Larger and heavier | Smaller and lighter |
| Battery life | Longer (often 800–3,000 shots) | Shorter (300–700 shots typical) |
| Autofocus | Excellent phase-detect through OVF | Faster hybrid AF with eye/animal detection |
| Video | Capable, but mirror limits live AF | More advanced 4K/8K, better continuous AF |
| Lens selection | Massive legacy catalog | Growing fast, fewer legacy options |
| Price (used market) | Excellent value | Premium pricing for new bodies |
For a deeper look at the future of compact systems, our guide to the best mirrorless cameras covers current top picks and lens ecosystems.
Why some pros still pick DSLRs
- Optical clarity: Many photographers prefer a real optical view rather than a processed electronic preview, a point Fstoppers echoed in a recent article about returning to DSLR.
- Battery endurance: Sports, wildlife, and event photographers love that a single battery often lasts a full day.
- Lens legacy: Canon EF and Nikon F mount lenses span decades, and used prices are extremely friendly.
- Tactile feel: A reassuring grip, a satisfying mirror slap, and a “commit to the shot” rhythm.
Showcase your DSLR portfolio with crisp cutouts — order our affordable background removal service and watch your shots pop.
Advantages of Using a DSLR Camera in 2026
DSLR cameras are far from dead. Many photographers — especially budget-conscious enthusiasts and committed pros — still pick them as their daily drivers.
- Superior battery life: DSLRs routinely outlast mirrorless cameras by 2–3x per charge, thanks to the passive optical viewfinder.
- Optical viewfinder with no lag: What you see is exactly what the lens sees in real time.
- Robust build quality: Magnesium-alloy bodies and weather sealing handle rough conditions, as DPReview has documented in field reviews.
- Massive used market: Premium full-frame DSLRs cost a fraction of their original price.
- Outstanding ergonomics: Larger grips, dedicated buttons, and deep muscle-memory layouts feel natural during long shoots.
- Compatibility with legacy glass: Decades of high-quality lenses remain available.
- Better tactile feedback: The mirror slap and deeper shutter sound suit deliberate shooting.
- Strong autofocus tracking via dedicated phase-detection modules when used through the optical viewfinder — still trusted by sports and wildlife shooters.
If you also use a Nikon DSLR for product work, pairing it with the right macro or 70-200mm lens makes a measurable difference in client-ready output. For a deeper look at how older DSLRs hold up, our Nikon D4S review shows that pro bodies age gracefully.
Disadvantages and Limitations to Consider
A DSLR is not always the right choice. Several drawbacks have nudged many shooters toward mirrorless or hybrid systems.
- Bulky and heavy compared to modern mirrorless rivals — a full-frame DSLR with a 24-70mm lens weighs noticeably more than a comparable mirrorless setup.
- Slower live-view autofocus when the mirror is up for video, since older DSLRs rely on contrast detection on the rear LCD.
- Limited video capabilities, especially for 4K continuous AF and high-frame-rate codecs.
- No “What You See Is What You Get” preview, since the OVF cannot show your final exposure, white balance, or filter effects.
- Most manufacturers are phasing them out, which means fewer new bodies and accessories.
- Mechanical shutter wear over many years of heavy use.
- Louder operation because of the mirror slap and shutter mechanism — bad for weddings, ceremonies, and wildlife.
DSLR Lens Mounts: Canon EF, Nikon F, Pentax K, and More
Each DSLR brand uses its own proprietary lens mount, which determines which lenses you can attach without an adapter.
- Canon EF / EF-S: Used on all Canon DSLRs since 1987; one of the most widely supported mounts in history.
- Nikon F: Introduced in 1959 and still used on Nikon DSLRs; legendary backward compatibility with film-era lenses.
- Pentax K: Originally launched in 1975 and still supported by current Pentax DSLR bodies like the K-3 III and K-1 II.
- Sony A / Minolta A: Now largely dormant after Sony shifted focus to mirrorless E-mount.
This long history means a serious investment in glass usually outlives any single camera body, which is one of the strongest practical arguments for DSLR ownership.
DSLR Camera Types: Entry-Level, Mid-Range, and Professional
Manufacturers tier their DSLR lineups so different shooters can match price to feature set.
Entry-level DSLRs
- Light bodies, polycarbonate builds, friendly interfaces, beginner-friendly auto modes.
- APS-C sensors around 24 megapixels.
- Examples: Canon EOS Rebel SL3 / T8i, Nikon D3500.
- Best for beginners learning composition and manual modes.
Mid-range enthusiast DSLRs
- Higher resolution, faster burst rates (6–10 fps), dual control dials, weather sealing on some models.
- APS-C or entry-level full-frame sensors.
- Examples: Nikon D7500, Canon EOS 90D, Pentax K-70.
- Best for hobbyists and serious enthusiasts.
Professional full-frame DSLRs
- Full-frame sensors (20–50 MP), magnesium-alloy chassis, deep weather sealing, high burst speeds (10–14 fps), massive buffers.
- Examples: Nikon D850, Canon EOS-1D X Mark III, Pentax K-1 Mark II.
- Best for working photographers and demanding hybrid shooters.
If you are just starting out, our list of the best beginner cameras compares DSLRs and mirrorless options side by side.
Best DSLR Cameras Still Worth Buying
Despite the mirrorless wave, several DSLRs remain top performers in 2026. These models continue to deliver pro-level results at prices that often beat new mirrorless gear.
- Nikon D850 – A 45.7 MP full-frame workhorse loved by landscape, portrait, and wedding photographers.
- Canon EOS 5D Mark IV – A 30.4 MP all-rounder with reliable 4K video and Dual Pixel AF.
- Canon EOS-1D X Mark III – A flagship sports DSLR with blazing 16 fps and rugged build — widely considered the last great flagship DSLR.
- Nikon D780 – A hybrid DSLR with mirrorless-style live-view AF and superb battery life.
- Pentax K-1 Mark II – A full-frame DSLR with in-body stabilization and serious weather sealing.
- Canon EOS 90D – A 32.5 MP APS-C body with 4K and a great enthusiast feature set.
- Nikon D500 – A speed-focused APS-C DSLR favored by wildlife shooters.
- Pentax K-3 Mark III – A weather-sealed APS-C DSLR with an exceptionally large viewfinder.
If you’re starting out, our budget digital cameras roundup can help narrow the search before you commit to a system.
Iconic DSLRs That Defined the Format
A short list of cameras that shaped digital photography over the past 25 years:
- Nikon D1 (1999): First fully integrated pro DSLR.
- Canon EOS 300D / Digital Rebel (2003): First sub-$1,000 DSLR for consumers.
- Nikon D700 (2008): Beloved full-frame workhorse.
- Canon EOS 5D Mark II (2008): Brought full HD video to DSLRs and reshaped indie filmmaking.
- Nikon D850 (2017): 45-megapixel powerhouse for landscape and studio.
- Canon EOS-1D X Mark III (2020): The last great flagship DSLR.
Selling clothes online? Hide every mannequin seam with our flawless ghost mannequin service and double your conversion potential.
What Is a DSLR Best Used For?
DSLR cameras excel in many scenarios, even after years of mirrorless innovation.
- Portrait photography – Beautiful background blur with fast prime lenses and large, ergonomic viewfinders that speed up posing sessions.
- Wedding and event photography – Long battery life carries you through full-day shoots without changing batteries every hour.
- Landscape photography – High-resolution full-frame sensors capture rich detail.
- Sports and wildlife – Excellent phase-detect tracking through the OVF and long telephoto lens compatibility.
- Product photography – Tethered shooting with high-resolution full-frame sensors produces clean images ready for background removal and editing.
- Astrophotography – Long exposures, minimal sensor heat, and clean high ISO performance suit night-sky work.
- Photojournalism and documentary – Robust, weather-sealed bodies and instant optical previews handle dust, sand, and rain.
After capture, professional post-processing is what often separates good photos from great ones. Many e-commerce sellers rely on a clean transparent background and pixel-perfect masking before publishing.
DSLR Photography Workflow: From Click to Final Image
A great DSLR shot is only half the work. The post-capture workflow does the heavy lifting that turns a raw frame into a finished image.
- Capture in RAW. Keep maximum data for editing — RAW files preserve highlight, shadow, and color detail that JPEG discards.
- Cull and select. Sort the best frames using software like Lightroom or Capture One.
- Edit for tone, color, and exposure. Apply white balance, contrast, and color grading.
- Retouch portraits and products. Smooth skin, remove blemishes, or clean backgrounds.
- Mask hair and complex edges. Use professional image masking for hair, fur, and translucent objects.
- Export for the platform. Match resolution and color profile to the final use — web, print, or marketplace listing.
If e-commerce is your end goal, the Shopify product photography guide confirms that consistent, well-edited DSLR images directly improve conversion rates.
Need natural skin tones and flawless edits? Our expert photo retouching service makes every portrait magazine-ready.
DSLR Camera Maintenance: Keep Your Gear Shooting for Years
A well-maintained DSLR easily lasts a decade or more. A few simple habits protect your investment.
- Clean the sensor regularly. Use a manual blower first, then a wet sensor swab if dust persists.
- Wipe lenses with microfiber cloths. Avoid paper towels, which scratch coatings.
- Store in a dry, dust-free bag. Silica gel packets prevent fungal growth on lens elements.
- Update firmware. Manufacturers regularly patch autofocus, metering, and connectivity bugs.
- Recharge batteries before long storage. Lithium-ion cells lose health when fully drained.
- Use lens caps and body caps. Tiny grit damages mounts and rear elements over time.
- Track your shutter count. Pro shutters are rated for 150,000–400,000 actuations — knowing your count helps when buying or selling used.
DSLR Buying Tips for Beginners
Choosing your first DSLR can feel intimidating because the specs sheet is long. These tips simplify the decision.
- Pick the system, not just the body. Lenses outlive cameras, so commit to a mount with a strong lens lineup.
- Match the sensor to your goals. Choose APS-C for portability and price; pick full-frame for shallow depth of field and low-light dominance.
- Test the ergonomics in person. Hold the camera, feel the grip, and try the button layout.
- Plan for storage. Knowing how many photos a 32GB card holds helps you budget for cards and cloud backup.
- Buy used confidently. Shutter-count tools and certified-refurbished programs make second-hand pro bodies a smart deal.
- Invest in good glass first. A budget DSLR with a sharp 50mm prime beats a top body with a cheap kit zoom.
- Don’t forget editing software. Even the best DSLR file benefits from skilled retouching.
DSLR Photography Tips to Get Better Results Fast
You bought the camera — now squeeze more out of it.
- Shoot in RAW to preserve maximum detail and editing flexibility.
- Master the exposure triangle of aperture, shutter speed, and ISO.
- Shoot in aperture priority (A/Av) as a great middle ground while you learn manual mode.
- Use back-button focus for finer autofocus control.
- Use the rule of thirds. Place subjects on intersecting grid lines.
- Review the histogram, not the LCD. Highlights and shadows tell the truth; the rear-screen preview lies in bright sun.
- Master one focal length first. A 50mm prime teaches composition faster than a zoom.
- Calibrate your white balance for accurate color in the editing room.
- Clean your sensor regularly to avoid dust spots in skies.
- Practice deliberately. Pick one skill per shoot — focus, light, or composition.
- Try different lenses to discover what focal lengths fit your eye.
- Back up files immediately to cloud storage and an external drive.
For a deeper checklist, our photography tips for beginners guide covers gear, composition, and post-processing fundamentals.
Want every product image to pop on screen? Our team adds depth and realism with custom shadow creation services tailored to e-commerce listings.
DSLR vs Smartphone: Why DSLRs Still Matter
Smartphones have improved dramatically, but DSLRs still pull ahead where image quality, control, and creative depth count.
- Sensor size: Even an APS-C DSLR sensor is 10–30x larger than a phone sensor.
- Optical zoom: Real glass lenses beat digital zoom every time.
- Manual control: Full aperture, shutter, ISO, and focus control are native.
- RAW workflow: Cameras output uncompressed files for editing.
- Depth of field: Wide apertures create natural background blur, not algorithmic blur.
- Lighting performance: Larger sensors handle low light with less noise.
- Lens flexibility: Macro, telephoto, fisheye, and tilt-shift lenses open creative doors.
If you compare your DSLR output to phone shots, you may also want to read our quick study on how the human eye compares to camera resolution.
The Future of DSLR Cameras: Are They Going Extinct?
Canon and Nikon have both publicly shifted their flagship R&D toward mirrorless lines, and production of new DSLR bodies has slowed dramatically. Yet the format is far from dead.
- Used bodies will dominate budget photography for years. Millions of working DSLRs remain in service.
- Pentax actively develops new DSLRs. Ricoh’s Pentax brand still releases fresh DSLR models for traditionalists, according to PetaPixel.
- Used pro lenses remain plentiful. Decades of Canon EF and Nikon F glass will outlive most cameras — and many adapt cleanly to mirrorless bodies.
- Niche pros still prefer DSLRs. Wedding shooters, wildlife specialists, and budget-conscious students value the battery life, OVF reliability, and used-market prices.
- Service and repair networks remain active for at least the next decade.
DSLR cameras are not extinct — they are simply maturing into a stable, value-rich segment that will stay relevant deep into this decade.
Selling apparel shot on a DSLR? Give every photo a clean, hollow-body finish with our ghost mannequin service — built for fashion e-commerce success.
Frequently Asked Questions (FAQ)
1. What does DSLR stand for in photography?
DSLR stands for Digital Single-Lens Reflex. It is a digital camera that uses a single lens and a movable mirror to send the scene to an optical viewfinder before exposing the digital image sensor when you take the shot.
2. Is a DSLR better than a mirrorless camera?
Neither category is universally better. DSLRs win on battery life, optical viewfinders, and used-market value. Mirrorless wins on autofocus tracking, video features, and smaller body size. Your subject and shooting style decide which is right for you.
3. Do DSLR cameras still exist in 2026?
Yes. Pentax continues to make new DSLRs, and Canon and Nikon still sell existing DSLR models. The used market is also strong, offering excellent value on top-tier bodies for budget buyers, wildlife photographers, and event pros.
4. What is the difference between SLR and DSLR?
An SLR uses 35mm film to capture images, while a DSLR uses a digital sensor. Both share the same mirror-and-prism viewing system; the only real difference is the recording medium — the “D” simply means digital.
5. Can I use old film SLR lenses on a DSLR?
Often, yes. Many Canon EF, Nikon F, and Pentax K lenses from the film era mount directly onto modern DSLRs from the same brand. Autofocus and metering compatibility vary, so check the manufacturer’s compatibility chart first.
6. What does the “reflex” in DSLR mean?
“Reflex” refers to the moveable mirror that sits at a 45-degree angle behind the lens and reflects light upward into the pentaprism and viewfinder, then flips out of the way during exposure so light can hit the sensor.
7. Can I shoot video with a DSLR?
Yes — many films and YouTube channels were built on DSLRs. Most modern DSLRs record Full HD or 4K video. However, mirrorless cameras generally outperform DSLRs for continuous autofocus during video, so dedicated video shooters often prefer mirrorless or cinema cameras.
8. How long does a DSLR camera last?
A well-maintained DSLR easily lasts 8–15 years. Professional shutter mechanisms are rated for 150,000–400,000 actuations, and many photographers still shoot pro bodies from a decade ago without issue.
Final Thoughts
The DSLR meaning is straightforward — Digital Single-Lens Reflex — but the technology behind those words is a marvel of optical engineering. By bouncing light through a mirror and pentaprism into your viewfinder, the DSLR delivers a real-time optical preview that feels direct, honest, and immediate. The mirror-and-prism design gives DSLRs their famous bright viewfinders, fast phase-detect autofocus, and outstanding battery life. The interchangeable lens system unlocks creative range from wide vistas to tight portraits. And the digital sensor turns light into the high-resolution files that fill galleries, websites, and printed pages around the world.
While mirrorless cameras have taken center stage, DSLRs still earn their place in modern kits thanks to long battery life, rugged build, massive lens ecosystems, and unbeatable value on the used market. Whether you choose a professional Nikon D850, a balanced Canon 5D Mark IV, or a weather-sealed Pentax K-1 Mark II, you now understand exactly what those four letters mean — and why the design has stood the test of time. Pair your DSLR with consistent practice, sharp glass, and professional post-processing, and your photography will reach a new level.
Ready to turn your DSLR photos into scroll-stopping visuals? Partner with Clipping Expert Asia for expert editing, masking, retouching, and shadow work that brings every image to life — request a free trial today.