

Why White Background Product Photography is Still the Gold Standard for Driving E-commerce Sales in 2026
April 23, 2026
Clipping Path for Amazon Product Listings: Boost Sales with Clean Images
April 25, 2026
The foundation of every stunning graphic, marketing banner, or polished product photo rests on how you handle the initial digital file. Whether you are a seasoned photographer or an entrepreneur building an e-commerce brand, understanding the technical nuances of how to create, open, and import images determines the final quality of your work. Most people assume these three actions are identical, yet they serve distinct purposes in a professional design workflow. By mastering these basics, you ensure that your visuals remain crisp, professional, and ready for any platform.
Efficiency in digital design starts with a clean setup. When you understand the architecture of a file, you reduce the risk of pixelation and color shifts. This guide explores the depths of image management, ensuring you have the tools to handle high-stakes projects for clients in the United States, the United Kingdom, and beyond.
- Defining the Core Workflow: Create, Open, and Import
- How to Create a New Image Project from Scratch
- Opening Existing Images the Right Way
- The Art of Importing and Placing Assets
- Advanced Techniques for File Management
- File Formats and Why They Matter
- Maintaining Image Integrity During Import
- Optimizing Your Workflow for Speed
- Common Mistakes to Avoid
- Conclusion: Building a Professional Foundation
- Frequently Asked Questions (FAQ)
Defining the Core Workflow: Create, Open, and Import
Before diving into specific software, we must distinguish between the three primary ways to bring an image into your workspace. “Creating” involves starting from a blank slate with custom dimensions. “Opening” accesses an existing file to edit its original layers or data. “Importing” brings an external element into a project you already have active.
Each method affects how the software handles memory and resolution. If you choose the wrong path, you might find yourself stuck with a low-resolution file that looks blurry on high-definition screens. Professionals prioritize the “Create” phase to establish a “Safe Zone” for their design elements. For those looking to streamline these technical hurdles, exploring professional photo editing services can provide a significant advantage in maintaining consistency across large catalogs.
How to Create a New Image Project from Scratch
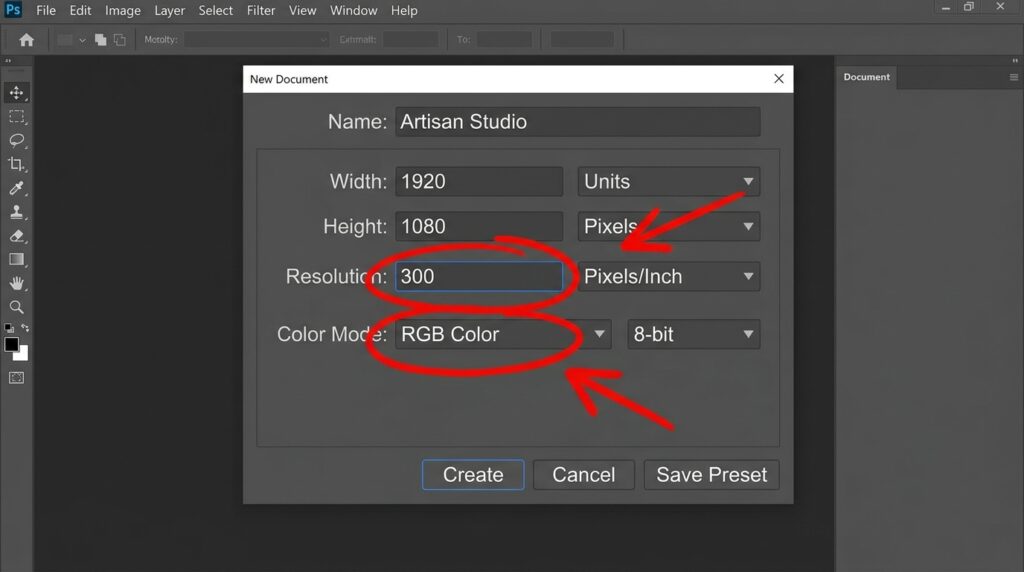
Creating a new document is the most critical step for any graphic designer. This process allows you to define the physical and digital constraints of your work. When you open your software and select “New Project,” you face several critical decisions: resolution, color mode, and bit depth.
Choosing the Right Resolution and DPI
Resolution refers to the density of pixels in your image. For web-based content, 72 DPI (Dots Per Inch) or PPI (Pixels Per Inch) served as the standard for years. However, with the rise of Retina displays and 4K monitors, many designers now opt for higher densities. If you intend to print your work, you must set your resolution to 300 DPI. Anything less results in a “muddy” or pixelated print that looks unprofessional.
Selecting Color Modes: RGB vs. CMYK
The color mode dictates how the screen or printer interprets your data. Use RGB (Red, Green, Blue) for anything that stays on a screen, such as social media posts or website headers. If you are designing for physical media like brochures or business cards, select CMYK (Cyan, Magenta, Yellow, Key/Black). Switching between these later can cause colors to look dull or neon, so setting them correctly at the start saves hours of correction.
Opening Existing Images the Right Way
Opening a file seems simple, but the “File > Open” command behaves differently depending on the file format. When you open a JPEG, you are working on a compressed, single-layer file. When you open a PSD or TIFF, you are often accessing a rich history of layers, masks, and adjustment settings.
Handling RAW Files
Photographers primarily work with RAW files. These are not technically “images” yet; they are data files containing everything the camera sensor captured. When you open a RAW file, most software triggers a secondary interface like Camera Raw. This allows you to adjust exposure, white balance, and shadows before the file officially enters your workspace. Always preserve your original RAW files and save your edits as a separate version to ensure you never lose the original data.
Opening Layered vs. Flattened Files
If you receive a file from a collaborator, check if it is “flattened.” A flattened image merges all elements into one layer, making it nearly impossible to change specific parts. Professionals prefer layered files (like PSD or AI) during the editing phase. This flexibility allows for precise adjustments to backgrounds or text without affecting the entire composition.
The Art of Importing and Placing Assets
Importing is the process of bringing secondary images, icons, or textures into an existing project. Unlike opening, which creates a new tab, importing adds a new layer to your current file. This is essential for compositing, where you combine multiple photos into a single masterpiece.
Linked vs. Embedded Files
When you import an image, some software gives you the choice to “Link” or “Embed” the file.
- Linking keeps the file size small because the software just “remembers” where the original image lives on your computer. If you move the original image, the link breaks.
- Embedding saves the full data of the imported image inside your project. This increases the project’s file size but ensures the image stays there even if you delete the original source file.
Smart Objects and Non-Destructive Editing
One of the best ways to import is by using “Smart Objects.” When you import an image as a Smart Object, the software protects the original pixels. You can shrink the image and then enlarge it again without losing quality. If you do this with a standard layer, the software throws away pixel data when you shrink it, leading to a blurry mess if you try to resize it back.

Advanced Techniques for File Management
Once you know the basics of creating, opening, and importing, you can move into advanced workflows that save time. For instance, “Place Linked” is a favorite among web designers who use the same logo across fifty different layouts. If the logo changes, they only update one file, and all fifty layouts update automatically.
Drag and Drop Workflow
Most modern operating systems allow you to drag an image directly from your desktop into your design software. This usually defaults to an “Import” command. It is the fastest way to build a mood board or a quick composite. Just remember to check your layer settings immediately after dragging to ensure the software hasn’t automatically flattened your asset.
Batch Processing and Importing
If you have 500 product photos that need the same basic color correction, you don’t open them one by one. Professional editors use “Automated Actions” or “Batch Import” scripts. These tools open each file, apply a specific set of edits, and save them in a new folder. This is how high-volume studios maintain quality while meeting tight deadlines. To understand how these workflows integrate with professional retouching, you can research industry-standard post-production techniques used by major studios.
File Formats and Why They Matter
The file format you choose during the “Create” or “Save” phase determines where your image can go. Not all formats are created equal, and using the wrong one can ruin your SEO or your print quality.
- JPEG: Great for photos on the web. It offers a balance between quality and file size but loses data every time you save it.
- PNG: The king of transparency. Use this when you need a logo without a white box around it.
- SVG: A vector format. These are “created” using mathematical paths rather than pixels. They never get blurry, no matter how much you zoom in.
- TIFF: The gold standard for high-quality printing and archiving.
Understanding these formats is vital when you are preparing images for international markets. For instance, e-commerce platforms in the US and Canada have strict requirements regarding file types and background colors to ensure a seamless shopping experience for their customers.
Maintaining Image Integrity During Import
A common mistake involves importing a low-resolution image into a high-resolution project. While the software allows this, the imported image will look grainy compared to your sharp background. Always check the “Image Size” of your assets before importing them. If your main project is 3000 pixels wide, importing a 300-pixel icon will not yield professional results.
To maintain the highest quality, always start with the largest version of an image available. It is easy to make a large image small, but it is mathematically difficult to make a small image large without significant quality loss. Professional graphic designers often use “Upscaling” techniques, but these are no substitute for a high-quality original file.
Optimizing Your Workflow for Speed
Time is money in the creative industry. To speed up your process, memorize the keyboard shortcuts for “New,” “Open,” and “Place.” In most programs, Ctrl+N (or Cmd+N) creates a new file, while Ctrl+O opens one.
Another tip is to use “Templates.” Instead of creating a new file every time you need a social media post, create a template with your brand colors, resolution, and guides already set. This ensures that every image you export has the same professional look and feel. Consistent branding is a key driver for sales in competitive e-commerce markets.
Common Mistakes to Avoid
Even experts occasionally slip up. Here are the most common errors people make when creating, opening, or importing images:
- Ignoring the Aspect Ratio: When importing and resizing, always hold the “Shift” key (in most programs) to keep the proportions. Stretching an image makes it look amateurish.
- Working on the Original File: Never edit your only copy of a photo. Always “Save As” a new version or work on a duplicate layer.
- Mixing Color Profiles: If you import a CMYK image into an RGB project, the colors might “clip” or shift. Always convert your assets to match your project’s color profile before finalizing the import.
- Forgetting to Save: Digital programs can crash. Set your software to auto-save every 5 or 10 minutes.
Conclusion: Building a Professional Foundation
Mastering the ability to create, open, and import images is the first step toward digital excellence. It allows you to control the quality of your visual narrative from the very first pixel. By choosing the right resolutions, understanding the difference between linking and embedding, and respecting color profiles, you set yourself apart from the competition.
Whether you are designing for a local audience or targeting the global markets of the UK and Canada, your technical precision reflects your brand’s authority. If the technical side of image management feels overwhelming, remember that professional support is always available to help you refine your visuals and ensure they meet the highest global standards.
Frequently Asked Questions (FAQ)
1. What is the main difference between opening and importing an image?
Opening an image creates a brand-new workspace or tab based on that specific file’s data. Importing brings an image into a workspace that you have already created or opened, adding it as a new layer.
2. Should I always use 300 DPI for my images?
Only if you plan to print the image. For digital use on websites or social media, 72 to 150 DPI is usually sufficient and helps keep your website loading quickly.
3. Why does my image look blurry after I import it?
This usually happens if the imported image has a much lower resolution than the project you are working in. Always try to import assets that match or exceed your project’s dimensions.
4. What is a “Smart Object” and why should I use it?
A Smart Object is a container that protects the original pixels of an image. It allows you to scale and transform the image non-destructively, meaning you won’t lose quality if you resize it multiple times.
5. Can I open a PDF as an image?
Yes, most professional design software allows you to open PDFs. You will usually be asked to choose a resolution and which page you want to “rasterize” into an image.
6. Is RGB or CMYK better for my website images?
Always use RGB for websites. CMYK is specifically designed for ink-on-paper printing and will not display correctly in most web browsers.
7. How do I import an image without a background?
You should use a PNG or TIFF file that already has a transparent background. When you import these formats, the transparency is preserved, allowing the image to sit cleanly over your other layers.
8. What happens if I move a “Linked” file on my computer?
The design software will show a “Missing File” error because it can no longer find the data at the original location. You will need to “re-link” the file by pointing the software to its new home.
9. Can I open RAW photos directly in my design software?
Most professional tools require a “plugin” or a specific “RAW converter” interface to open these files because they contain unprocessed data rather than standard pixels.