

Mastering the Color Replacement Tool in Adobe Photoshop for Precise Photo Editing
February 21, 2026
How to Find Recently Deleted Photos on Any Device (2026 Quick Guide)
February 25, 2026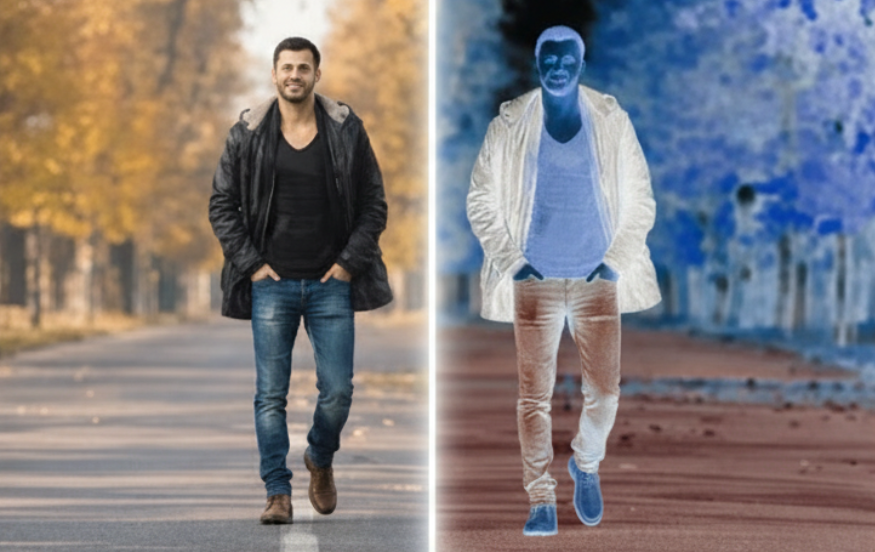
Ever wondered how a simple flip can turn an ordinary photo into something surreal? Learning how to invert colors in Photoshop opens up a world of creative possibilities. This technique swaps every hue to its opposite, like turning blues into oranges or greens into magentas. It’s perfect for artists, photographers, and designers who want to add a twist to their work. Whether you’re editing portraits for a dramatic vibe or enhancing graphics for eye-catching designs, inverting colors brings fresh energy to your projects. In this guide, we’ll walk through easy methods, tips, and real-world applications to help you master it quickly.
Inverting colors isn’t just a trick, it’s a powerful tool rooted in photography’s past. Back in the days of film, negatives showed inverted tones that developers flipped to create positives. Today, digital tools make this process instant and versatile. You can use it to highlight hidden details in shadows or craft moody atmospheres for social media posts. Many professionals rely on this for quick enhancements, saving time while boosting visual impact. If you’re new to image editing, start with basic steps, and you’ll see results in minutes.
- Understanding Color Inversion Basics
- Why Invert Colors? Real-World Benefits
- Preparing Your Image for Inversion
- Method 1: The Fastest Way with Keyboard Shortcuts
- Method 2: Using Adjustment Layers for Control
- Method 3: Fine-Tuning with Hue/Saturation
- Method 4: Advanced Inversion with Curves
- Selective Inversion Techniques
- Combining Inversion with Other Effects
- Tips for Stunning Inversion Results
- Common Mistakes to Avoid
- Applications in Photography and Design
- Inversion in Different Photoshop Versions
- Troubleshooting Inversion Issues
- Beyond Basics: Creative Experiments
- Ethical Considerations in Editing
- Wrapping Up Your Inversion Journey
- Frequently Asked Questions
Understanding Color Inversion Basics
Color inversion flips the spectrum, making light areas dark and vice versa. In color images, it follows the color wheel: reds become cyans, and yellows turn blues. This creates a negative-like effect that’s both artistic and practical. Photographers often use it to check compositions or reveal overexposed spots. Designers apply it for bold contrasts in logos or posters. Grasping this foundation helps you experiment confidently.
Think about a sunny beach photo. Normally, the sky is blue and sand is golden. After inversion, the sky shifts to orange, and sand to deep purple. This transformation can make everyday scenes look otherworldly. It’s not random—Photoshop calculates opposites based on RGB values. Each pixel’s red, green, and blue channels get subtracted from 255, the maximum intensity. This math ensures precise changes every time.
Why Invert Colors? Real-World Benefits
Inverting colors enhances creativity across fields. For photographers, it deepens shadows and highlights textures, making portraits pop. Graphic designers use it to test color schemes or create vintage effects for album covers. In web design, inverted palettes improve accessibility by increasing contrast for text overlays. Even marketers flip hues to make ads stand out on crowded feeds.
- Boosts contrast for clearer details in low-light shots.
- Creates artistic effects like dreamlike landscapes.
- Helps in proofreading designs by revealing imbalances.
- Adds retro vibes to modern graphics.
- Simplifies color correction in batch editing.
One photographer I know inverted a forest scene to mimic alien worlds, turning greens to pinks. The result? A viral post that drew clients. These benefits show how a quick inversion can elevate your work from standard to standout.
For more on basic photo effects, check this in-depth tutorial on color flips. It dives into preserving elements while inverting backgrounds.
Preparing Your Image for Inversion
Before diving in, set up your file properly. Open Photoshop and load your photo via File > Open. Choose high-resolution images for best results—aim for at least 300 DPI if printing. Duplicate the background layer by right-clicking and selecting Duplicate Layer. This keeps your original safe. Name layers clearly, like “Original” and “Inverted,” to stay organized.
Adjust brightness and contrast first if needed. Go to Image > Adjustments > Brightness/Contrast. Slide the bars until details shine. This prep step prevents flat results after inversion. If working with RAW files, process them in Camera Raw for finer control over exposure. A solid setup makes the inversion process smoother and more effective.
Method 1: The Fastest Way with Keyboard Shortcuts
Shortcuts offer the quickest path to inversion. They save clicks for busy editors. Start with your image open and the layer selected. Press Ctrl + I on Windows or Command + I on Mac. Boom—colors flip instantly. This method works on entire layers or selections. It’s ideal for testing ideas without commitment.
- Ensure the correct layer is active in the Layers panel.
- Use the Marquee or Lasso tool for partial inversions.
- Hit Ctrl + Z to undo if it doesn’t look right.
- Save a copy before applying to avoid overwriting originals.
This approach shines in fast-paced workflows, like prepping social media graphics. One designer flipped a logo’s colors in seconds for a client pitch. However, it lacks finesse for complex edits. For non-destructive options, layer masks pair well here. Practice on sample images to build speed.
Method 2: Using Adjustment Layers for Control
Adjustment layers provide flexibility without altering pixels permanently. Click the half-filled circle icon at the Layers panel’s bottom. Choose Invert from the menu. Your image transforms, but you can tweak or delete the layer anytime. Adjust opacity by sliding the bar in the Layers panel for subtle effects.
- Double-click the adjustment layer to revisit settings.
- Add a layer mask by clicking the mask icon—paint black to hide inversion in spots.
- Combine with blending modes like Screen for glowing highlights.
- Group layers (Ctrl + G) to organize multiple adjustments.
Professionals love this for its editability. Imagine editing a product shot: Invert the background while keeping the item natural. Lower opacity to 50% blends the effect softly. This method encourages experimentation, leading to unique outcomes. If you’re into layered workflows, explore Adobe’s official inversion resource for more layer tips.
Method 3: Fine-Tuning with Hue/Saturation
For custom control, Hue/Saturation excels. Navigate to Image > Adjustments > Hue/Saturation. Drag the Hue slider to -180 or 180 degrees for a full flip. Adjust Saturation to amp up vibrancy or Lightness for brightness tweaks. Select specific color ranges from the dropdown to invert only reds or blues.
- Preview changes in real-time by checking the box.
- Use the eyedropper to sample and target hues precisely.
- Apply to adjustment layers for non-destructive edits.
- Experiment with presets for quick starts.
This technique suits selective edits, like flipping sky colors in landscapes. A landscape artist once inverted just the foliage for a surreal twist, leaving the horizon intact. It adds depth to your toolkit. Pair it with vibrance adjustments for punchy results. If hues feel off, calibrate your monitor for accuracy.
Method 4: Advanced Inversion with Curves
Curves offer precise tonal flips. Go to Image > Adjustments > Curves. Drag the line from bottom-left to top-right for inversion. This inverts tones while allowing curve bends for custom contrasts. Add points on the curve to boost mids or shadows selectively.
- Click the diagonal line to add anchor points.
- Pull up for brighter areas, down for darker ones.
- Use the eyedropper for sampling specific tones.
- Apply as an adjustment layer for reversibility.
Curves shine in professional retouching. Editors use it to invert and then refine for high-end prints. One retoucher inverted a portrait’s skin tones subtly, enhancing features without overdoing it. This method demands practice but yields pro-level control. For deeper curves insights, visit this helpful guide on Photoshop techniques.
Selective Inversion Techniques
Not everything needs a full flip. Use masks for targeted areas. Select your region with the Quick Selection tool. Add an Invert adjustment layer, it applies only to the mask. Paint white on the mask to reveal inversion, black to conceal. This keeps key elements original.
- Feather selections (Select > Modify > Feather) for soft edges.
- Refine masks with the Brush tool at low opacity.
- Group masked layers for easy toggling.
- Use channels for complex selections like hair.
In fashion editing, invert backgrounds to make models stand out. An editor I spoke with masked clothing for color pops against inverted scenes. This precision elevates ordinary shots. Combine with clone stamps for seamless blends. Selective methods add versatility to your skills.
To learn more about masking, refer to this detailed post on inversion methods.
Combining Inversion with Other Effects
Layer inversion with blurs or overlays for magic. After inverting, apply Gaussian Blur via Filter > Blur > Gaussian Blur. Set radius to 5-10 pixels for a soft glow. Change the blurred layer’s blend mode to Overlay, it boosts contrast dramatically.
- Duplicate inverted layers before blurring.
- Adjust opacity to dial in intensity.
- Add vibrance (Image > Adjustments > Vibrance) post-blur.
- Experiment with sharpen filters for crisp edges.
Artists create mystical forests by inverting and blurring foliage. One digital creator blended inverted layers with textures for album art. These combos spark innovation. Try double exposures: Merge two inverted images on Soft Light mode. The results? Endless creative fuel.
Tips for Stunning Inversion Results
Achieve pro looks with these pointers. Always work on copies, duplicate your file first. Calibrate colors using the Info panel to check RGB values before and after. Use histograms (Window > Histogram) to ensure balanced tones. Lower saturation if inversions feel too vibrant.
- Test on grayscale copies for tonal focus.
- Batch process multiple files via Actions (Window > Actions).
- Save presets for frequent workflows.
- Preview on different devices for consistency.
- Undo history (Window > History) saves steps if needed.
Editors swear by these for efficiency. One tip: Invert twice to revert, handy for comparisons. Keep layers organized with color labels. These habits streamline your process, letting creativity flow.
Common Mistakes to Avoid
Steer clear of pitfalls for better outcomes. Don’t invert without pre-adjusting exposure, flat images worsen. Avoid overusing full inversions; they can look unnatural. Forgetting to mask leads to unwanted flips on subjects. Ignoring blend modes misses contrast opportunities.
- Check layer order, adjustments affect below only.
- Don’t skip saving versions; overwrites erase originals.
- Balance saturation to prevent garish hues.
- Test prints, screens differ from paper.
Many beginners invert and stop, missing refinements. Refine with levels (Image > Adjustments > Levels) for depth. Learning from errors builds expertise. One common fix: Use healing brushes post-inversion for artifacts.
Applications in Photography and Design
Photographers invert to uncover details in underexposed shots. It reveals textures in architecture or nature. For portraits, subtle inversions enhance skin tones creatively. Designers flip colors in branding to test palettes quickly. Web creators use it for hover effects on buttons.
In advertising, inverted graphics grab attention. Event posters with flipped hues stand out. Fine artists blend inversions with paints for mixed media. A designer inverted a city’s skyline for a night vibe without shooting at dusk. These uses show inversion’s broad appeal.
Inversion in Different Photoshop Versions
Most methods work across versions like CS6 to 2023. Shortcuts remain consistent. Adjustment layers appeared in earlier editions but improved over time. In newer releases, smart objects enhance non-destructive workflows. Update your software for the latest features.
If using older versions, some menus differ slightly. For example, Hue/Saturation is under Image > Adjustments in all. Cloud-based Photoshop offers auto-save perks. Adapt steps based on your setup, core inversion stays the same.
Troubleshooting Inversion Issues
Colors not flipping? Check if the layer is locked, unlock via the lock icon. Flat results? Add contrast layers. Selections inverting wrong? Ensure they’re active. Plugin conflicts can interfere; disable extras in Preferences > Plugins.
- Restart Photoshop for glitches.
- Update graphics drivers for display accuracy.
- Clear cache if performance lags.
- Consult forums for version-specific fixes.
These steps resolve most problems. One user fixed washed-out inversions by recalibrating their screen. Patience pays off in troubleshooting.
Beyond Basics: Creative Experiments
Push boundaries by inverting vectors or text. Use Type tool for words, then invert for standout effects. Apply patterns, create seamless tiles with inverted duplicates. Mix with gradients for abstract art.
Artists invert scanned sketches for negative space studies. Digital painters layer inverted brushes for unique textures. Try animating inversions in timelines for GIFs. A creator inverted stop-motion frames for eerie videos. These ideas expand your repertoire.
Ethical Considerations in Editing
Respect originals when inverting client work. Disclose heavy edits in professional portfolios. Avoid misleading inversions in journalism, stick to enhancements. Credit sources if using stock images.
In education, teach inversion ethically to students. It fosters creativity without deception. One ethical tip: Use watermarks on inverted previews. This maintains integrity in your practice.
Wrapping Up Your Inversion Journey
Mastering how to invert colors in Photoshop transforms your editing game. From quick shortcuts to layered finesse, these techniques offer endless ways to innovate. Apply them in photos, designs, or art for standout results. Remember, practice unlocks the best outcomes. Start simple and build complexity. Dive in today and watch your creations evolve.
Frequently Asked Questions
- What does inverting colors do exactly?
It flips each hue to its opposite on the color wheel, creating a negative effect that can make images look dramatic or abstract. - Can I invert only part of an image?
Yes, use selections or layer masks to target specific areas, keeping the rest unchanged for selective edits. - Why do my inverted colors look flat?
This happens due to lost contrast; add brightness/contrast or levels adjustments afterward to restore depth. - Is there a way to revert an inversion quickly?
Simply invert again using the same method, or undo with Ctrl + Z—it brings back the original hues. - Does inversion work on all file types?
It works best on raster images like JPEG or PNG; for vectors, convert to smart objects first. - How can I use inversion for black-and-white photos?
It swaps lights and darks, turning positives into negatives—great for simulating film effects. - What’s the difference between invert and desaturate?
Invert flips colors fully, while desaturate removes them, creating grayscale—use invert for colorful negatives. - Can beginners learn inversion easily?
Absolutely; start with shortcuts, then move to layers—practice on free stock photos for quick mastery.