

AI vs. Professional Real Estate Photo Editing: What’s Best for Your Business in 2026?
January 28, 2026
How to Take a Screenshot on Windows 11 and Windows 10: Shortcuts and Tools
January 30, 2026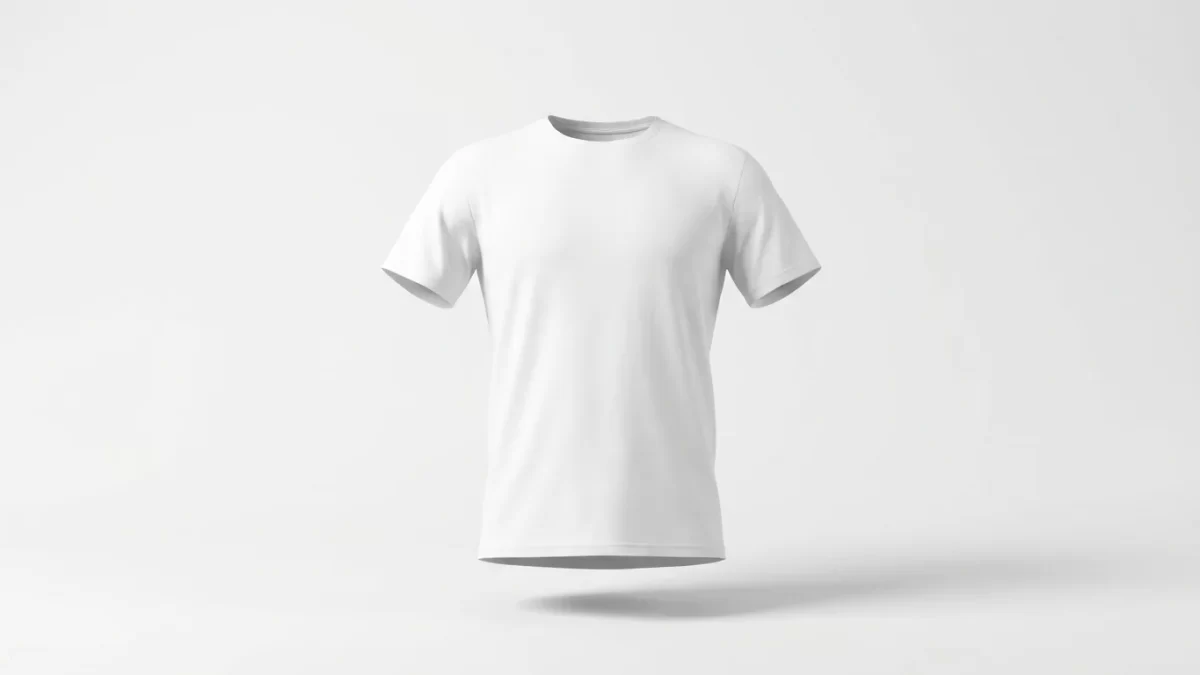
Have you ever landed on an online clothing store and seen a shirt that seems to float in mid-air, perfectly shaped as if someone is wearing it, but with no model in sight? That is ghost mannequin photography in action. This technique removes the mannequin from the final image, leaving only the garment behind. The result shows the product’s true fit, fabric drape, and structure without any distractions.
For e‑commerce sellers, ghost mannequin photography solves a major problem. Customers cannot touch or try on clothes before buying. Flat‑lay shots often hide how a shirt really falls on the body, while live models introduce variables like pose, hair, and personal style that shift focus away from the product itself.
In this guide, you will learn everything you need to create professional ghost mannequin images. We cover the essential equipment, lighting setups, a complete step‑by‑step shooting and editing process, common mistakes to avoid, and even AI‑powered alternatives that speed up the workflow. By the end, you will be ready to produce stunning 3D product photos that increase customer confidence and reduce returns.
Ghost mannequin photography looks simple – but editing is a beast. Start with a free trial of our ghost mannequin service and see the difference
- What Is Ghost Mannequin Photography (The Invisible Mannequin Technique)?
- Why It Stands Out From Flat Lay and Live Model Photography
- Key Benefits of Using Ghost Mannequin Photography for E‑Commerce
- Essential Equipment for Ghost Mannequin Photography
- Step‑by‑Step Guide to Ghost Mannequin Photography
- Common Ghost Mannequin Photography Mistakes (And How to Avoid Them)
- Ghost Mannequin Photography for Amazon, Shopify, and Other Platforms
- DIY Ghost Mannequin on a Budget
- Final Thoughts
- Frequently Asked Questions (FAQ)
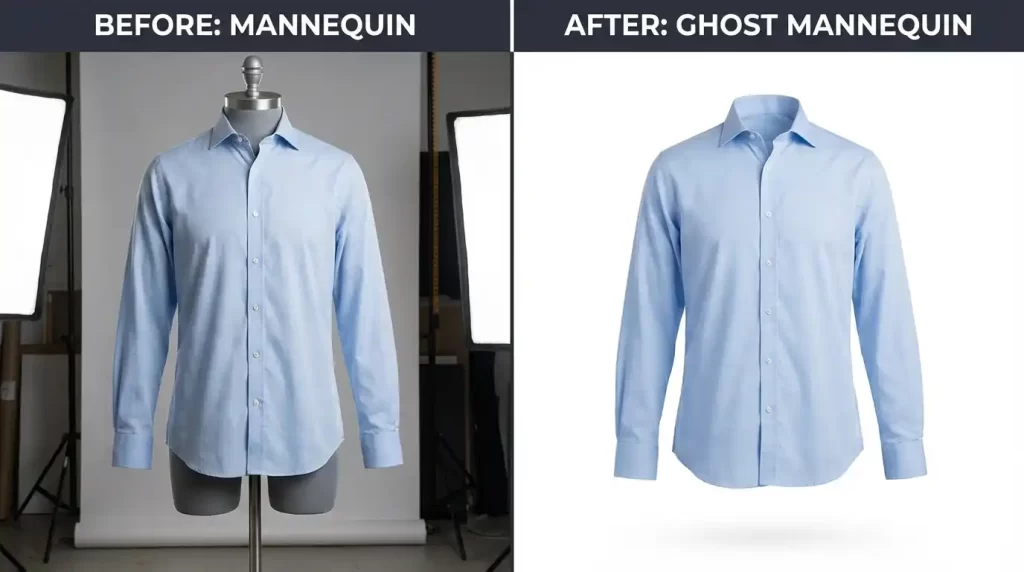
What Is Ghost Mannequin Photography (The Invisible Mannequin Technique)?
Ghost mannequin photography, also called invisible mannequin or floating garment photography, is a specialized method for shooting apparel. You dress a mannequin in the clothing, photograph it from multiple angles, and then digitally erase the mannequin during post‑production. What remains looks like a ghost wearing the garment. The technique creates a realistic 3D effect that reveals how the item drapes, fits, and moves on a human body.
Many online retailers prefer this approach because it provides a clean, consistent look across hundreds of products. Instead of hiring models for every shoot, you simply use one well‑fitted mannequin and replicate the same lighting and camera settings for each item.
Why It Stands Out From Flat Lay and Live Model Photography
Flat lay photography lays the garment on a table or floor. While easy to set up, flat shots cannot show how the clothes naturally fall around the shoulders, chest, or waist. Live model photography looks more natural but brings many variables: model fees, scheduling, posing differences, and the risk of the model’s face or hair competing with the product.
Ghost mannequin photography offers a perfect middle ground. It highlights the garment’s true shape, eliminates distractions, and keeps your product catalog visually uniform. Studies show that high‑quality product images can increase conversion rates by up to 30%, and ghost mannequin shots specifically outperform flat lay photos for structured garments like jackets and dresses.
Key Benefits of Using Ghost Mannequin Photography for E‑Commerce
Higher customer trust. Shoppers can inspect every detail: the collar, the cuffs, the seams, and even the inner lining. This transparency builds confidence and encourages purchases.
Fewer returns. When customers see exactly how a garment fits and falls, they receive fewer surprises at delivery. Accurate visual representation directly lowers return rates.
Cost‑effective at scale. One mannequin can display dozens of different sizes and styles. You pay no model fees, no location rentals, and no hair‑and‑makeup costs. The process becomes more affordable as your product catalog grows.
Brand consistency. All your product images share the same angle, lighting, and background. This unified look strengthens your brand identity and makes your online store look professional and trustworthy.
Better platform compliance. Marketplaces like Amazon allow ghost mannequin images for apparel main photos, whereas traditional visible mannequins are not permitted. Using this technique helps you meet marketplace guidelines while keeping your listings attractive.
Essential Equipment for Ghost Mannequin Photography
You do not need a million‑dollar studio to start. With the right basic gear, you can produce professional results.
Camera. A DSLR or mirrorless camera with a 50mm or 85mm prime lens works best. These lenses avoid wide‑angle distortion and produce sharp, natural‑looking images.
Tripod. Stability is non‑negotiable. A sturdy tripod keeps your camera perfectly aligned between shots, which is critical when combining multiple images in editing.
Mannequin. Choose a torso mannequin (without head and arms) for shirts, jackets, and sweaters. For pants and skirts, a lower‑body or full‑size mannequin works better. Many professionals prefer mannequins with detachable arms and neck sections because they make editing much easier. A neutral white or light gray mannequin reflects less unwanted color onto the garment.
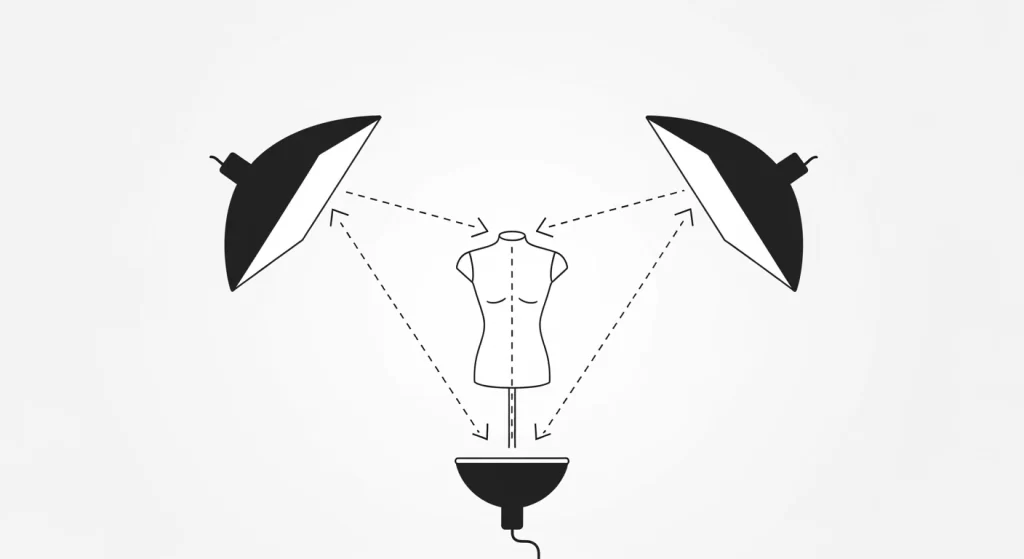
Lighting. Soft, diffused lighting eliminates harsh shadows and highlights. Two softbox lights positioned at 45‑degree angles on either side of the mannequin provide even illumination across the garment. Continuous LED panels are also a good choice for beginners because you see exactly how the light falls before you shoot.
Background. A white or light gray seamless backdrop simplifies the editing process. Many photographers use a white infinity cove or a large white sweep of paper or fabric.
Editing software. Adobe Photoshop is the industry standard for ghost mannequin editing. Alternatively, GIMP offers a free option, and newer AI tools like Photoroom or Snappyit can automate much of the work.
Even the best ghost mannequin can’t hide wrinkles. Combine with our photo retouching service for flawless fabric
Step‑by‑Step Guide to Ghost Mannequin Photography
Follow this process to create clean, professional ghost mannequin images from start to finish.
Step 1: Prepare the Garment and Mannequin
Start with a wrinkle‑free garment. Steam or iron the item thoroughly before placing it on the mannequin. Wrinkles look unprofessional and distract customers from the product.
Dress the mannequin carefully. Adjust the garment so it sits naturally, just as it would on a real person. Align the seams, straighten the collar, and smooth the shoulders. Use pins, clips, or double‑sided tape to tighten loose areas and create a flattering fit. Make sure no pins or clips show from the front view.
For the neck area, prepare to photograph the inside of the collar separately. You will use this shot later to fill in the hollow space after removing the mannequin.
Step 2: Set Up Your Lighting and Background
Place the mannequin in front of a white seamless background. Position two softbox lights at roughly 45‑degree angles to the left and right of the mannequin. Adjust the height so the light falls evenly across the whole garment, from the collar down to the hem.
Check for unwanted shadows, especially under the chin or arms. Add a fill light or a reflector from below if needed. The goal is soft, even light that reveals the fabric texture without creating harsh dark spots.
Step 3: Capture the Front, Back, and Inner Shots
Set your camera on a tripod at the same height as the mannequin’s chest. Use a remote shutter release or a timer to avoid camera shake.
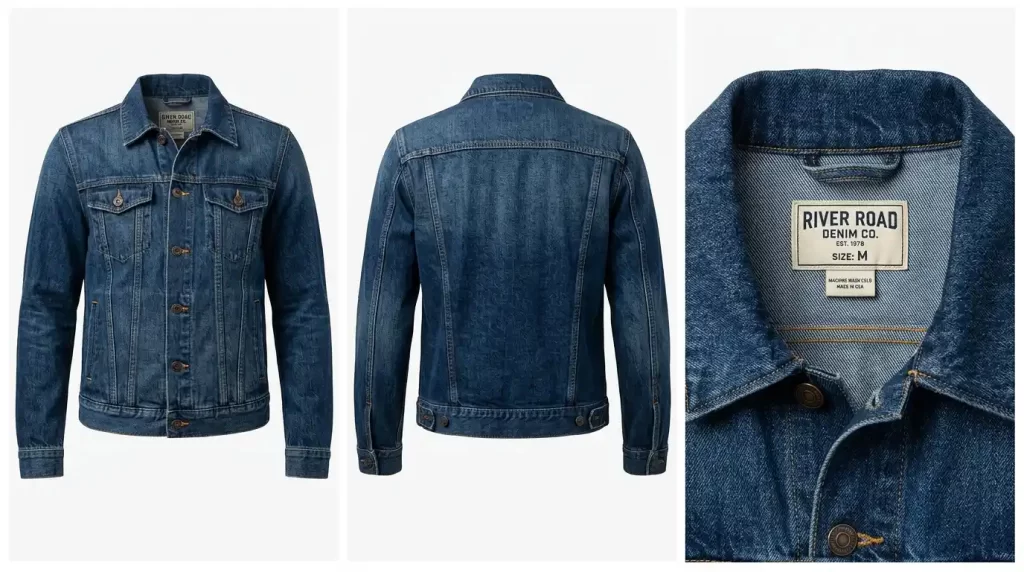
Front shot. Photograph the garment straight on. Include a small amount of space around the product so you have room to crop later.
Back shot. Rotate the mannequin 180 degrees and capture the back of the garment using the same lighting and camera settings.
Inner neck shot. Remove the garment from the mannequin and turn it inside out. Lay it flat on a foam board or mannequin torso, or hold it open, and photograph the inside of the collar, neckband, and lining. Use the same lighting setup to maintain color and brightness consistency.
Sleeve or accessory shots (optional). For long sleeves, consider capturing a separate photo of the sleeve interior to create a seamless hollow effect when the arm is cut away.
Step 4: Edit the Images in Photoshop (Traditional Method)
Open your front‑view image in Photoshop. Use the Pen Tool to draw a precise path around the garment, excluding the mannequin. Convert the path to a selection and create a layer mask that hides the mannequin.
Open the inner neck shot as a new layer. Scale and position it so the neck opening aligns perfectly with the hole left by the mannequin. Apply a layer mask and blend the edges smoothly using a soft brush.
Repeat the same process for the back view and any sleeve openings. Pay special attention to transitions where the inner fabric meets the outer fabric; the junction should look seamless.
Finally, clean up any remaining mannequin parts, smooth out wrinkles using the Clone Stamp or Healing Brush tools, and adjust brightness and contrast to make the product pop.
Step 5: Use AI Tools for a Faster Workflow (Optional)
If you want to skip manual masking and layering, AI‑powered tools can generate ghost mannequin effects automatically. Services like Photoroom and Snappyit let you upload a flat lay or mannequin shot and receive a clean ghost mannequin image in seconds.
These tools work well for high‑volume catalogs where speed matters more than absolute perfection. However, for premium products or complex garments with unusual cuts, the traditional Photoshop method still gives you maximum control.
AI tools are fast but imperfect. For premium results, see why 500+ clothing brands trust our manual ghost mannequin service
Common Ghost Mannequin Photography Mistakes (And How to Avoid Them)
Even experienced photographers make mistakes. Here are the most frequent issues and simple fixes.
Wrinkled or poorly fitted garments. This is the number one problem. Always steam the garment before shooting, and use pins or clips to create a smooth, natural fit.
Inconsistent lighting between shots. The front, back, and inner neck photos must share identical lighting and white balance. Use manual camera settings and do not move your lights once you start shooting.
Visible cut marks or harsh edges. When you remove the mannequin, the edge between the garment and the background should be invisible. Use a soft brush on your layer mask and zoom in to ensure a smooth transition.
Wrong mannequin size. A mannequin that is too large stretches the garment and creates unnatural folds. One that is too small leaves slack fabric that looks baggy. Choose a mannequin that matches the intended fit of the product.
Forgetting the inner details. Shoppers want to see the inside of the collar and the hem of the sleeves. Always capture separate inner shots and composite them properly. A hollow neck with no lining looks cheap and unfinished.
Ghost Mannequin Photography for Amazon, Shopify, and Other Platforms
Each platform has slightly different requirements for product images. Understanding these rules saves you from rejected listings.
Amazon. For apparel main images, Amazon allows ghost mannequin photography but does not permit traditional visible mannequins. Your image must have a pure white background (RGB 255,255,255) and measure at least 1000 pixels on the longest side to enable zoom.
Shopify. Shopify does not enforce strict image rules like Amazon, but a consistent white‑background ghost mannequin look improves your store’s professionalism and customer trust.
Your own website. You have full creative freedom. Many brands combine ghost mannequin front/back shots with detail close‑ups and a few lifestyle images to give shoppers a complete view of the product.
DIY Ghost Mannequin on a Budget
You do not need a professional studio to get started. Here is a low‑budget setup that works surprisingly well.
- Camera. Your smartphone’s main camera, used in manual mode if possible.
- Tripod. A cheap phone tripod or even a stack of books to keep the phone steady.
- Lighting. Two desk lamps with white LED bulbs, diffused with white paper or thin cloth.
- Background. A large white poster board or a white bedsheet hung on the wall.
- Mannequin. A foam torso mannequin from a craft store or online marketplace (often under $50).
- Editing. GIMP (free) or a free trial of Photoshop.
Follow the same steps described above. With careful preparation and patience, you can produce solid results that look professional enough for a small online store.
Final Thoughts
Ghost mannequin photography transforms the way customers see your products. It removes distractions, highlights true fit and fabric, and builds the trust that leads to more sales and fewer returns. Whether you set up a DIY studio in your living room or use AI tools to speed up the workflow, the technique is accessible to any determined e‑commerce seller.
Start small. Master the basics of lighting and garment prep first. Then experiment with editing, or outsource to a professional service if volume becomes too high. As your images improve, so will your conversion rates. The floating garment effect is not just a visual trick; it is a proven sales tool that today’s online shoppers expect and appreciate.
Ready to stop editing and start selling? Request a no‑obligation quote for your catalog
Frequently Asked Questions (FAQ)
1. What is ghost mannequin photography used for?
Online clothing retailers use ghost mannequin photography to show how garments fit and drape without distracting mannequins or models. It works well for shirts, dresses, jackets, pants, and even accessories like scarves and hats.
2. How much does ghost mannequin photography cost?
If you do it yourself, the main cost is the mannequin (around $50–$150 for a basic torso) and basic lighting gear. Outsourcing to a professional service typically ranges from $1 to $20 per image, depending on volume and complexity. Full‑service studio shoots can cost $50–$150 per product.
3. Do I need expensive equipment to start?
No. A smartphone, two desk lamps, a white poster board, and a foam mannequin can produce acceptable results for a small catalog. As your business grows, you can upgrade to a DSLR and softbox lights.
4. Is ghost mannequin photography allowed on Amazon?
Yes. Amazon permits ghost mannequin images for apparel main photos. In fact, traditional visible mannequins are not allowed, but the ghost mannequin technique is explicitly approved.
5. How long does it take to edit one ghost mannequin image?
A skilled editor can finish one image in 10–20 minutes using Photoshop. Beginners may take 30–60 minutes per image. AI tools can generate a ghost mannequin photo in under a minute.
6. Can I use ghost mannequin photography for all types of clothing?
Yes. The technique works for tops, bottoms, dresses, outerwear, and even underwear. For very sheer or extremely delicate fabrics, you may need additional care in lighting and editing to avoid showing the mannequin through the material.
7. What is the difference between ghost mannequin and invisible mannequin?
There is no difference. These terms describe the same technique. Some photographers also call it “hollow man” or “floating garment” photography.
8. Does ghost mannequin photography really increase sales?
Data suggests it does. One study showed a 20–30% lift in conversion rates when switching from flat lay to ghost mannequin images for structured garments. Another case study reported a 30% sales increase after adopting ghost mannequin photography.